Page 119 of 540

1193-2. Opening, closing and locking the doors
3
Operation of each component
HILUX_OM_OM0K219E_(EE)
■Operation signals
The emergency flashers flash to indicate that the doors have been locked/
unlocked. (Locked: once; Unlocked: twice)
■ Door lock buzzer (some models of type B)
If an attempt to lock the doors is made when a door is not fully closed, a
buzzer sounds for 1 second.
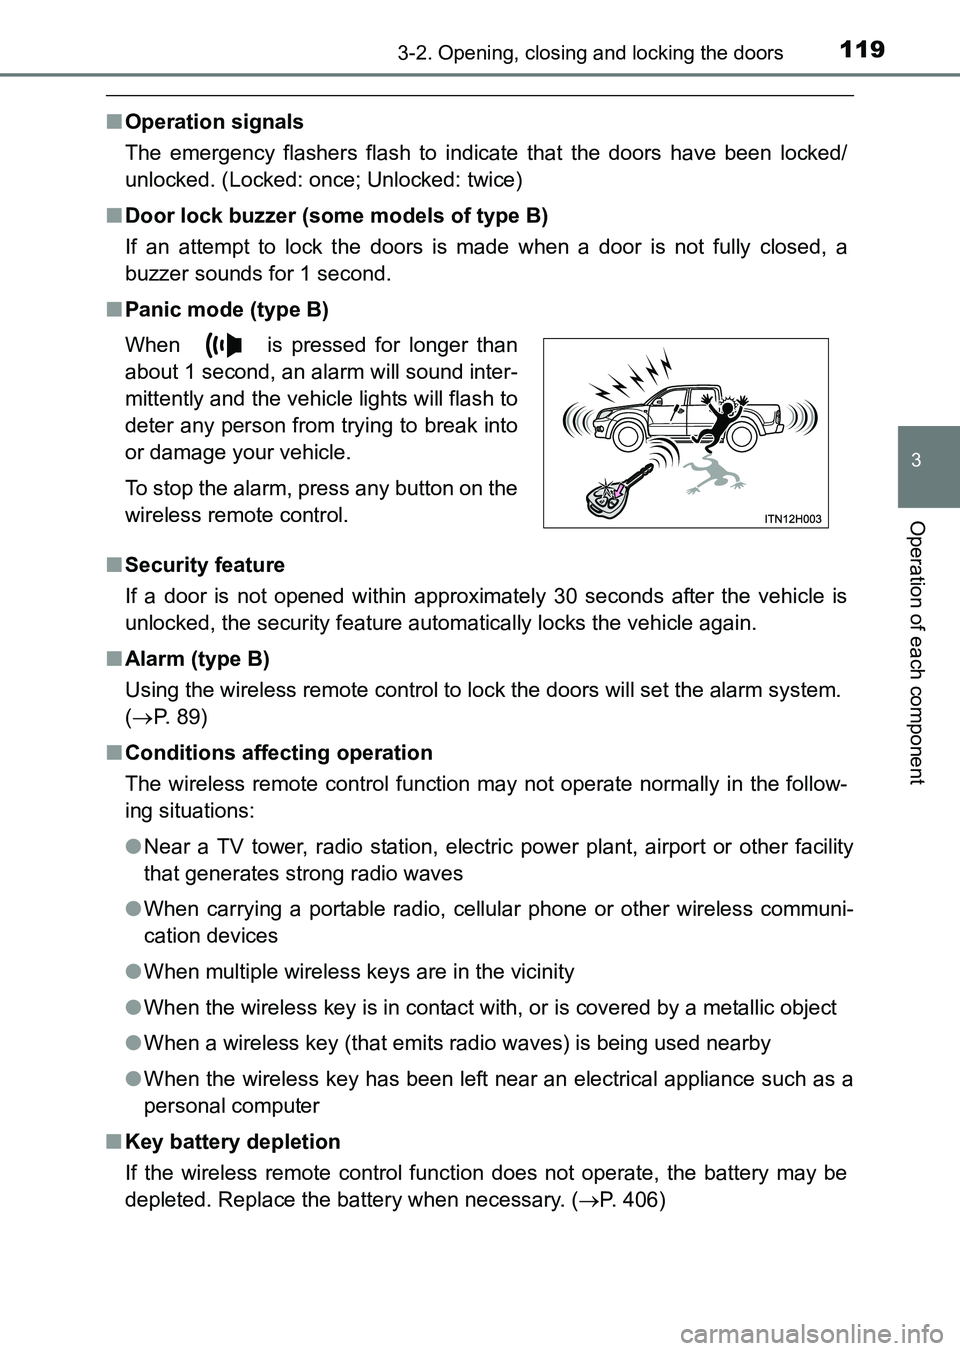
■ Panic mode (type B)
■ Security feature
If a door is not opened within approximately 30 seconds after the vehicle is
unlocked, the security feature automatically locks the vehicle again.
■ Alarm (type B)
Using the wireless remote control to lock the doors will set the alarm system.
(→ P. 89)
■ Conditions affecting operation
The wireless remote control function may not operate normally in the follow-
ing situations:
●Near a TV tower, radio station, electr ic power plant, airport or other facility
that generates strong radio waves
● When carrying a portable radio, cellular phone or other wireless communi-
cation devices
● When multiple wireless keys are in the vicinity
● When the wireless key is in contact with, or is covered by a metallic object
● When a wireless key (that emits radio waves) is being used nearby
● When the wireless key has been left near an electrical appliance such as a
personal computer
■ Key battery depletion
If the wireless remote control function does not operate, the battery may be
depleted. Replace the battery when necessary. ( →P. 406)
When is pressed for longer than
about 1 second, an alarm will sound inter-
mittently and the vehicle lights will flash to
deter any person from trying to break into
or damage your vehicle.
To stop the alarm, press any button on the
wireless remote control.
HILUX_OM_OM0K219E_(EE).book Page 119 Wednesday, May 14, 2014
3:06 PM
Page 145 of 540
145
3
3-4. Adjusting the steering wheel and mirrors
Operation of each component
HILUX_OM_OM0K219E_(EE)
Inside rear view mirror
The height of the rear view mirror can be adjusted to suit your driving
posture.
Adjust the height of the rear view
mirror by moving it up and down.
Reflected light from the headlights of vehicles behind can be reduced
by operating the lever.Normal position
Anti-glare position
The rear view mirror’s position can be adjusted to enable suffi-
cient confirmation of the rear view.
Adjusting the height of rear view mirror
Anti-glare function
1
2
CAUTION
Do not adjust the position of the mirror while driving.
Doing so may lead to mishandling of the vehicle and cause an accident,
resulting in death or serious injury.
HILUX_OM_OM0K219E_(EE).book Page 145 Wednesday, May 14, 2014 3:06 PM
Page 155 of 540

155
4Driving
HILUX_OM_OM0K219E_(EE)4-1. Before driving
Driving the vehicle ............. 156
Cargo and luggage ............ 170
Trailer towing ..................... 172
4-2. Driving procedures Engine (ignition) switch...... 183
Automatic transmission ..... 187
Manual transmission.......... 191
Turn signal lever ................ 194
Parking brake .................... 195
Horn ................................... 196 4-3. Operating the lights
and wipers
Headlight switch.................197
Fog light switch .................. 201
Windshield wipers and washer ............................. 204
Headlight cleaner switch .... 208
4-4. Refueling Opening the fuel tank cap ................................... 209
4-5. Using the driving support systems
Cruise control..................... 214
Rear view monitor system ............................. 219
Four-wheel drive system.... 226
Rear differential lock system ...................... 230
Driving assist systems ....... 233
DPF (Diesel Particulate Filter) system ................... 238
4-6. Driving tips Winter driving tips .............. 243
HILUX_OM_OM0K219E_(EE).book Page 155 Wednesday, May 14, 2014 3:06 PM
Page 177 of 540

1774-1. Before driving
4
Driving
HILUX_OM_OM0K219E_(EE)
■Tire information
●Increase the tire inflation pressure to 20.0 kPa (0.2 kgf/cm
2 or bar, 3 psi)
greater than the recommended value when towing. ( →P. 513)
● Increase the air pressure of the trailer tires in accordance with the total
trailer weight and according to the values recommended by the manufac-
turer of your trailer.
■ Trailer lights
Check that the turn signal lights and stoplights are operating correctly every
time you hitch up the trailer. Direct ly wiring up to your vehicle may damage
the electrical system and stop the lights from functioning correctly.
■ Break-in schedule
Toyota recommends that vehicles fitted with new power train components
should not be used for towing trailers for the first 800 km (500 miles).
■ Safety checks before towing
●Check that the maximum load limit for the towing hitch/bracket and hitch ball
is not exceeded. Bear in mind that the coupling weight of the trailer will add
to the load exerted on the vehicle. Also make sure that the total load exerted
on the vehicle is within the range of the weight limits. ( →P. 173)
● Ensure that the trailer load is secure.
● Supplementary outside rear view mirrors should be added to the vehicle if
the traffic behind cannot be clearly seen with standard mirrors. Adjust the
extending arms of these mirrors on both sides of the vehicle so that they
always provide maximum visibility of the road behind.
● The trailer ball is set up at the proper height for the coupler on the trailer. (for
KUN25L-PRMDH model
*)
*: The model code is indicated on the manufacturer’s label or plate.
(→ P. 494)
HILUX_OM_OM0K219E_(EE).book Page 177 Wednesday, May 14, 2014 3:06 PM
Page 179 of 540

1794-1. Before driving
4
Driving
HILUX_OM_OM0K219E_(EE)
Your vehicle will handle differently when towing a trailer. In order to
avoid accident death or serious injury, keep the following in mind
when towing:
■Checking connections between trailer and lights
Stop the vehicle and check the operation of the connection between
the trailer and lights after driving for a brief period as well as before
starting off.
■Practicing driving with a coupled trailer
●Get the feel for turning, stopping and reversing with the trailer
coupled by practicing in an area with no or light traffic.
● When reversing with a coupled trailer, hold the section of the
steering wheel nearest to you and rotate clockwise to turn the
trailer left or counterclockwise to turn it right. Always rotate a little
at a time to prevent steering error. Have someone guide you
when reversing to lessen the risk of accident.
■Increasing vehicle-to-vehicle distance
At a speed of 10 km/h (6 mph), the distance to the vehicle running
ahead of you should be equivalent to or greater than the combined
length of your vehicle and trailer. Avoid sudden braking that may
cause skidding. Otherwise, the vehicle may spin out of control. This
is especially true when driving on wet or slippery road surfaces.
Guidance
HILUX_OM_OM0K219E_(EE).book Page 179 Wednesday, May 14, 2014 3:06 PM
Page 194 of 540
1944-2. Driving procedures
HILUX_OM_OM0K219E_(EE)
Tur n signal lever
Right turn
Left turn
Lane change to the right (push
and hold the lever partway)
The right hand signals will flash
until you release the lever.
Lane change to the left (push
and hold the lever partway)
The left hand signals will flash until
you release the lever.
■Turn signals can be operated when
The engine switch is in the “ON” position.
■ If the indicator flashes faster than usual
Check that a light bulb in the front or rear turn signal lights has not burned
out.
Operating instructions
1
2
3
4
HILUX_OM_OM0K219E_(EE).book Page 194 Wednesday, May 14, 2014 3:06 PM
Page 197 of 540
197
4
4-3. Operating the lights and wipers
Driving
HILUX_OM_OM0K219E_(EE)
Headlight switch
Turning the end of the lever turns on the lights as follows:
The headlights can be operated manually or automatically.
Operating instructions
*
Off
The headlights, front
position, tail, license
plate and instrument
panel lights turn on and
off automatically (when
the engine switch is in
the “ON” position).
The front position, tail,
license plate and instru-
ment panel lights turn
on.
The headlights and all
lights listed above turn
on.
*: Vehicles with optitron type metersonly
1
2
3
4
(if equipped)
HILUX_OM_OM0K219E_(EE).book Page 197 Wednesday, May 14, 2014 3:06 PM
Page 198 of 540
1984-3. Operating the lights and wipers
HILUX_OM_OM0K219E_(EE)
With the headlights on, push
the lever away from you to turn
on the high beams.
Pull the lever toward you to the
center position to turn the high
beams off.
Pull the lever toward you and
release it to flash the high
beams once.
You can flash the high beams with the headlights on or off.
The level of the headlights can be adjusted according to the number
of passengers and the loading condition of the vehicle.Raises the level of the head-
lights
Lowers the level of the head-
lights
Turning on the high beam headlights
1
2
Manual headlight leveling dial (if equipped)
1
2
HILUX_OM_OM0K219E_(EE).book Page 198 Wednesday, May 14, 2014 3:06 PM