2015 TOYOTA AYGO change time
[x] Cancel search: change timePage 6 of 440
6
AYGO_EE_OM99J92E
For your infor mation
Please note that this manual applies to all models and all equipment, includ-
ing options. Therefore, you may find some explanations for equipment not
installed on your vehicle.
All specifications provided in this manual are current at the time of printing.
However, because of the Toyota policy of continual product improvement, we
reserve the right to make changes at any time without notice.
Depending on specifications, the vehicle shown in the illustrations may differ
from your vehicle in terms of equipment.
Both genuine Toyota and a wide variety of other spare parts and accessories
for Toyota vehicles are currently available in the market. Should it be deter-
mined that any of the genuine Toyota parts or accessories supplied with the
vehicle need to be replaced, Toyota recommends that genuine Toyota parts
or accessories, be used to replace them. Other parts or accessories of
matching quality can also be used. Toyota cannot accept any liability or guar-
antee spare parts and accessories which are not genuine Toyota products,
nor for replacement or installation in volving such parts. In addition, damage
or performance problems resulting from the use of non-genuine Toyota spare
parts or accessories may not be covered under warranty.
The installation of an RF-transmitter system in your vehicle could affect elec-
tronic systems such as:
● Multiport fuel injection system/sequential multiport fuel injection system
● Anti-lock brake system
● SRS airbag system
● Seat belt pretensioner system
Be sure to check with any authorized Toyota dealer or repairer, or another
duly qualified and equipped professional fo r precautionary measures or spe-
cial instructions regarding installa tion of an RF-transmitter system.
Further information regarding frequency bands, power levels, antenna posi-
tions and installation provisions for the installation of RF-transmitters, is avail-
able on request at any authorized Toyota dealer or repairer, or another duly
qualified and equipped professional.
Main Owner’s Manual
Accessories, spare parts and modification of your Toyota
Installation of an RF-transmitter system
Page 87 of 440

872. Instrument cluster
2
Instrument cluster
AYGO_EE_OM99J92E
■Driving range
Displays the estimated approximate distance that can be driven
with the quantity of fuel remaining.
• This distance is computed based on your average fuel consumption. As
a result, the actual distance that can be driven may differ from that dis-
played.
• When only a small amount of fuel is added to the tank, the display may
not be updated.
When refueling, turn the engine switch off. If the vehicle is refueled with-
out turning the engine switch off, the display may not be updated.
• The display shows “Lo FUEL” when the remaining is very low.
■Average vehicle speed
Displays the average vehicle speed since the function was reset.
The function can be reset by pushing one of the “DISP” button for longer
than 1 second when the average vehicle speed is displayed.
■Instrument cluster light control
Displays the instrument cluster light control display.
• This screen is only displayed when the tail lights are on.
• The brightness of the instrument cluster light can be adjusted. ( →P. 88)
The automatically displayed function of the Stop & Start system oper-
ation time can be activated or deactivated.
Push one of the “DISP” buttons and the Stop & Start system opera-
tion time is displayed, while the vehicle is stopped.
Push and hold the “DISP” buttons for 5 seconds.
Push the “DISP” buttons to
switch activate or deactivate.
Activated
Deactivated
The screen will change back to the
previous screen after 6 seconds or
by push and holding one of the
“DISP” buttons for 2 seconds.
Stop & Start system operation time customization (if equipped)
1
2
3
1
2
Page 156 of 440
1564-2. Driving procedures
AYGO_EE_OM99J92E
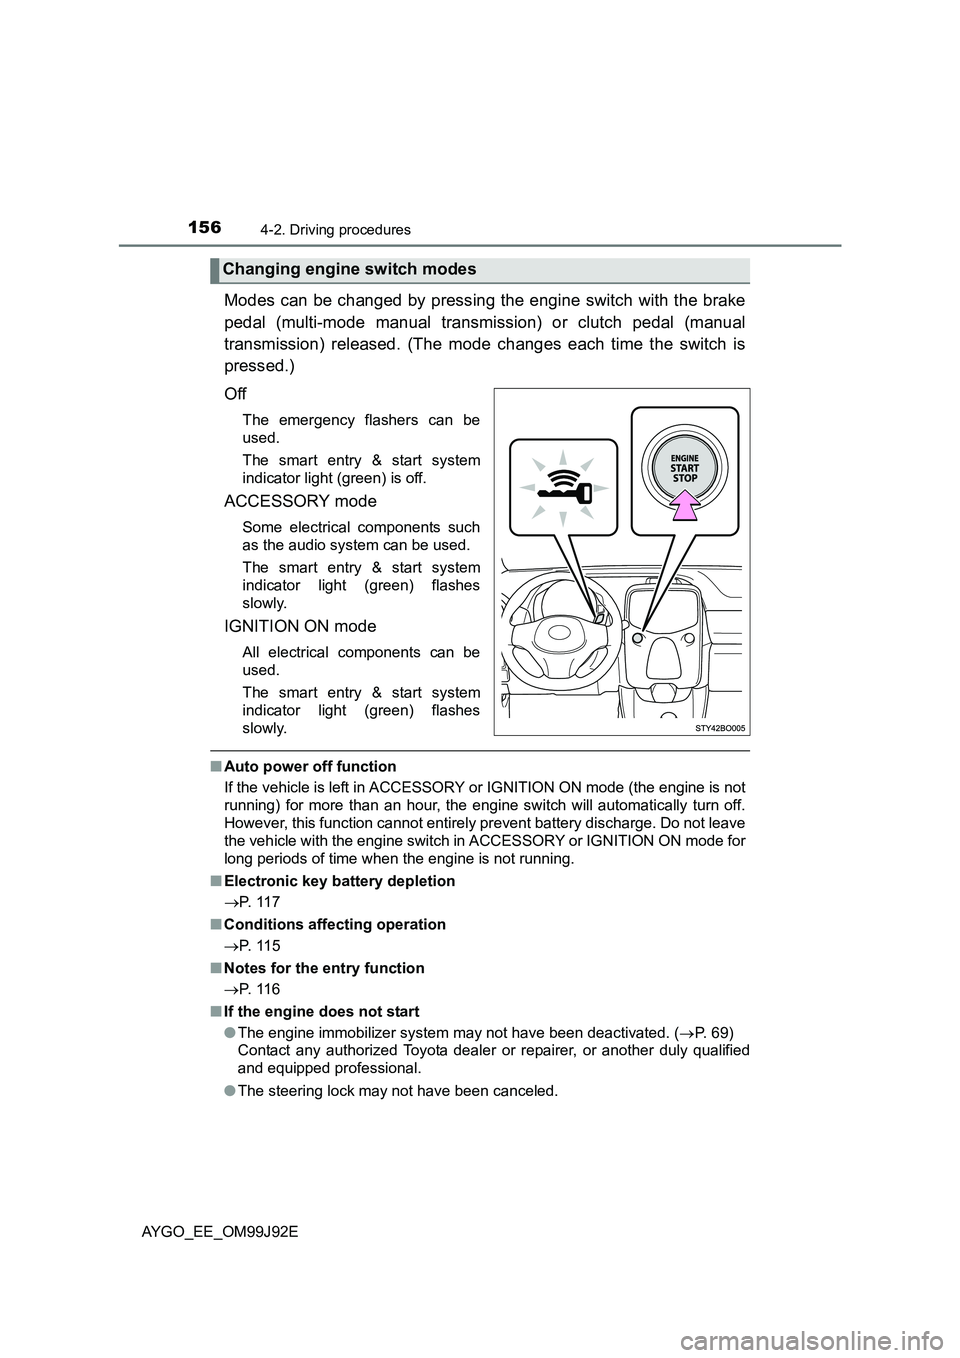
Modes can be changed by pressing the engine switch with the brake
pedal (multi-mode manual transmission) or clutch pedal (manual
transmission) released. (The mode changes each time the switch is
pressed.)
Off
The emergency flashers can be
used.
The smart entry & start system
indicator light (green) is off.
ACCESSORY mode
Some electrical components such
as the audio system can be used.
The smart entry & start system
indicator light (green) flashes
slowly.
IGNITION ON mode
All electrical components can be
used.
The smart entry & start system
indicator light (green) flashes
slowly.
■ Auto power off function
If the vehicle is left in ACCESSORY or IGNITION ON mode (the engine is not
running) for more than an hour, the engine switch will automatically turn off.
However, this function cannot entirely prevent battery discharge. Do not leave
the vehicle with the engine switch in ACCESSORY or IGNITION ON mode for
long periods of time when the engine is not running.
■ Electronic key battery depletion
→ P. 11 7
■ Conditions affecting operation
→ P. 11 5
■ Notes for the entry function
→ P. 11 6
■ If the engine does not start
● The engine immobilizer system may not have been deactivated. (→P. 69)
Contact any authorized Toyota dealer or repairer, or another duly qualified
and equipped professional.
● The steering lock may not have been canceled.
Changing engine switch modes
Page 157 of 440
1574-2. Driving procedures
4
Driving
AYGO_EE_OM99J92E
■ Steering lock
After turning the engine switch off and opening and closing the doors, the
steering wheel will be locked due to the steering lock function. Operating the
engine switch again automatically cancels the steering lock.
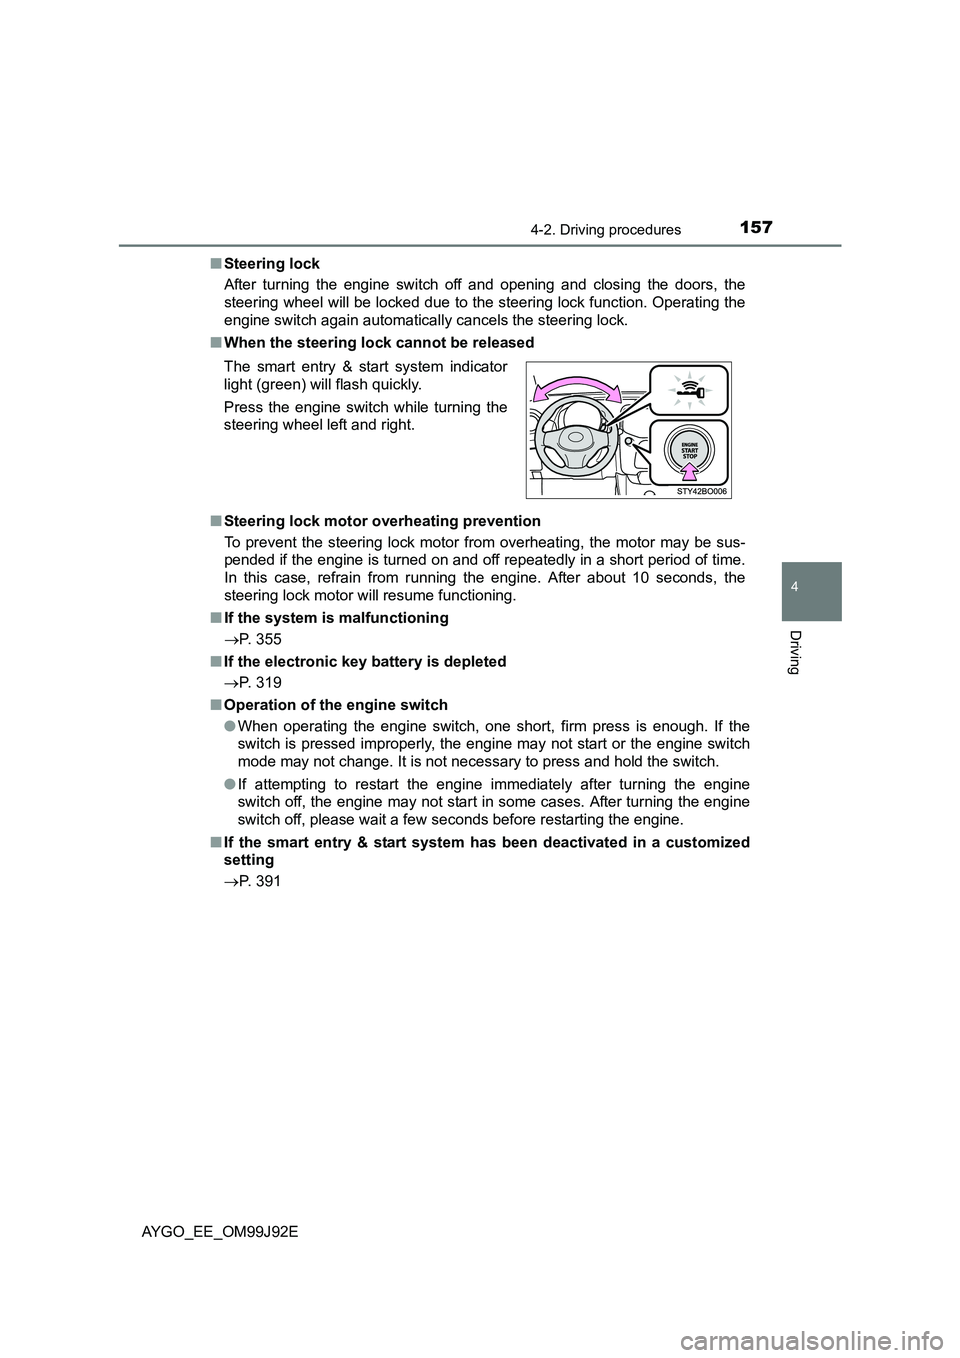
■ When the steering lock cannot be released
■ Steering lock motor overheating prevention
To prevent the steering lock motor from overheating, the motor may be sus-
pended if the engine is turned on and off repeatedly in a short period of time.
In this case, refrain from running the engine. After about 10 seconds, the
steering lock motor will resume functioning.
■ If the system is malfunctioning
→ P. 355
■ If the electronic key battery is depleted
→ P. 319
■ Operation of the engine switch
● When operating the engine switch, one short, firm press is enough. If the
switch is pressed improperly, the engi ne may not start or the engine switch
mode may not change. It is not necessary to press and hold the switch.
● If attempting to restart the engine immediately after turning the engine
switch off, the engine may not start in some cases. After turning the engine
switch off, please wait a few seconds before restarting the engine.
■ If the smart entry & start system has been deactivated in a customized
setting
→ P. 391
The smart entry & start system indicator
light (green) will flash quickly.
Press the engine switch while turning the
steering wheel left and right.
Page 221 of 440

2215-4. Using an external device
5
Audio system
AYGO_EE_OM99J92E
■Selecting folders one at a time
Press “ ∧” or “∨” on the “FOLDER” button (type A) or
(
■Selecting a folder and file from folder list
Press (List).
The folder list will be displayed.
Turn and press the “MENU” knob to select a folder and file.
To return to the previous display, press (Back).
■Returning to the first folder
Press and hold “ ∨” on the “FOLDER” button (type A) or
(
ton (type A) or “ ∧” or “∨” button (type B) to select the desired file.
Press and hold “ ∧” or “∨” on the “SEEK/FILE” button (type A) or “∧” or
“ ∨” button (type B).
Pressing (RDM) changes modes in the following order:
Folder random → All folder random → Off
Pressing (RPT) changes modes in the following order:
File repeat → Folder repeat* → Off
*: Available except when RDM (random play) is selected
Selecting a folder
Selecting a file
Fast-forwarding and rewinding files
Random play
Repeat play
1
2
Page 263 of 440
2636-1. Using the air conditioning system and defogger
6
Interior features
AYGO_EE_OM99J92E
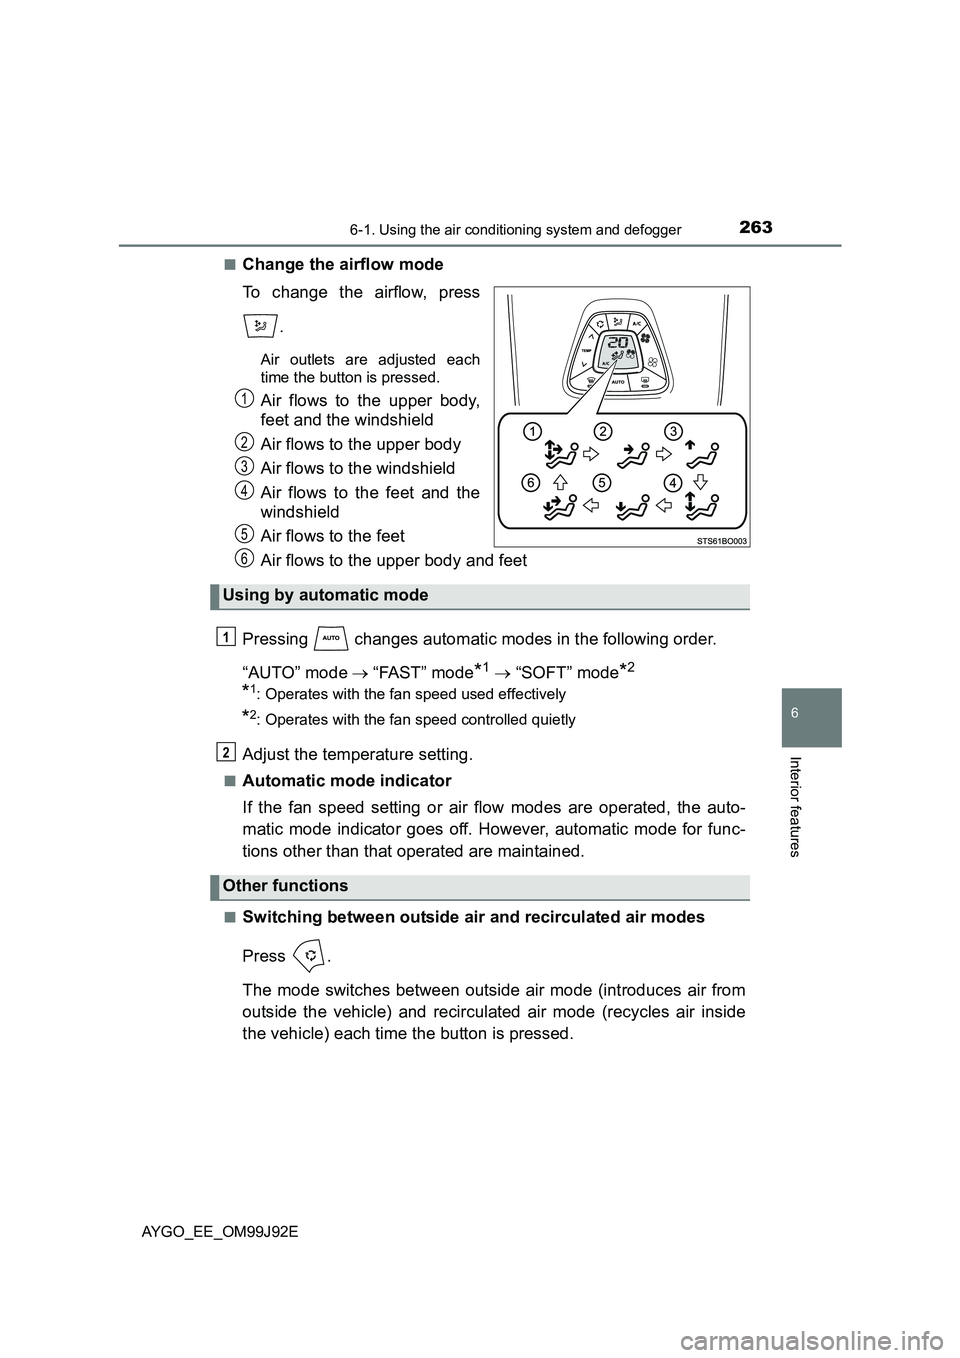
■Change the airflow mode
To change the airflow, press
.
Air outlets are adjusted each
time the button is pressed.
Air flows to the upper body,
feet and the windshield
Air flows to the upper body
Air flows to the windshield
Air flows to the feet and the
windshield
Air flows to the feet
Air flows to the upper body and feet
Pressing changes automatic modes in the following order.
“AUTO” mode → “FAST” mode*1 → “SOFT” mode*2
*1: Operates with the fan speed used effectively
*2: Operates with the fan speed controlled quietly
Adjust the temperature setting.
■Automatic mode indicator
If the fan speed setting or air flow modes are operated, the auto-
matic mode indicator goes off. However, automatic mode for func-
tions other than that operated are maintained.
■Switching between outside air and recirculated air modes
Press .
The mode switches between outside air mode (introduces air from
outside the vehicle) and recirculated air mode (recycles air inside
the vehicle) each time the button is pressed.
1
2
3
4
5
Using by automatic mode
Other functions
6
1
2
Page 279 of 440

2796-4. Other interior features
6
Interior features
AYGO_EE_OM99J92E
The temperature display shows temperature within the range of -40°C
(-40°F) to 50°C (122°F).
■ The outside temperature is displayed when
�XVehicles without a smart entry & start system
The engine switch is in the “ON” position.
�XVehicles with a smart entry & start system
The engine switch is in IGNITION ON mode.
■ Outside temperature display
In the following situations, the correct outside temperature may not be dis-
played, or the display may take longer than normal to change.
● When stopped, or driving at low speeds (approximately 25 km/h [16 mph] or
less)
● When the outside temperature has changed suddenly (at the entrance/exit
of a garage, tunnel, etc.)
● When the time the vehicle runs is very short (approximately 2 minutes or
less)
■ When “– –” is displayed
The system may be malfunctioning. Take your vehicle to any authorized
Toyota dealer or repairer, or another duly qualified and equipped professional.
■ When the outside temperature is low
When the outside temperature becomes 3°C (37°F) or lower, the temperature
reading flashes 10 times to warn the driver that roads may be icy.
Type B only: The display automatically switches over to the outside tempera-
ture display. After flashing 10 times or one of the “DISP” buttons is pushing,
the display will return to the previous display.
Outside temperature display
�XTy pe A�XType B
Page 370 of 440
3708-2. Steps to take in an emergency
AYGO_EE_OM99J92E
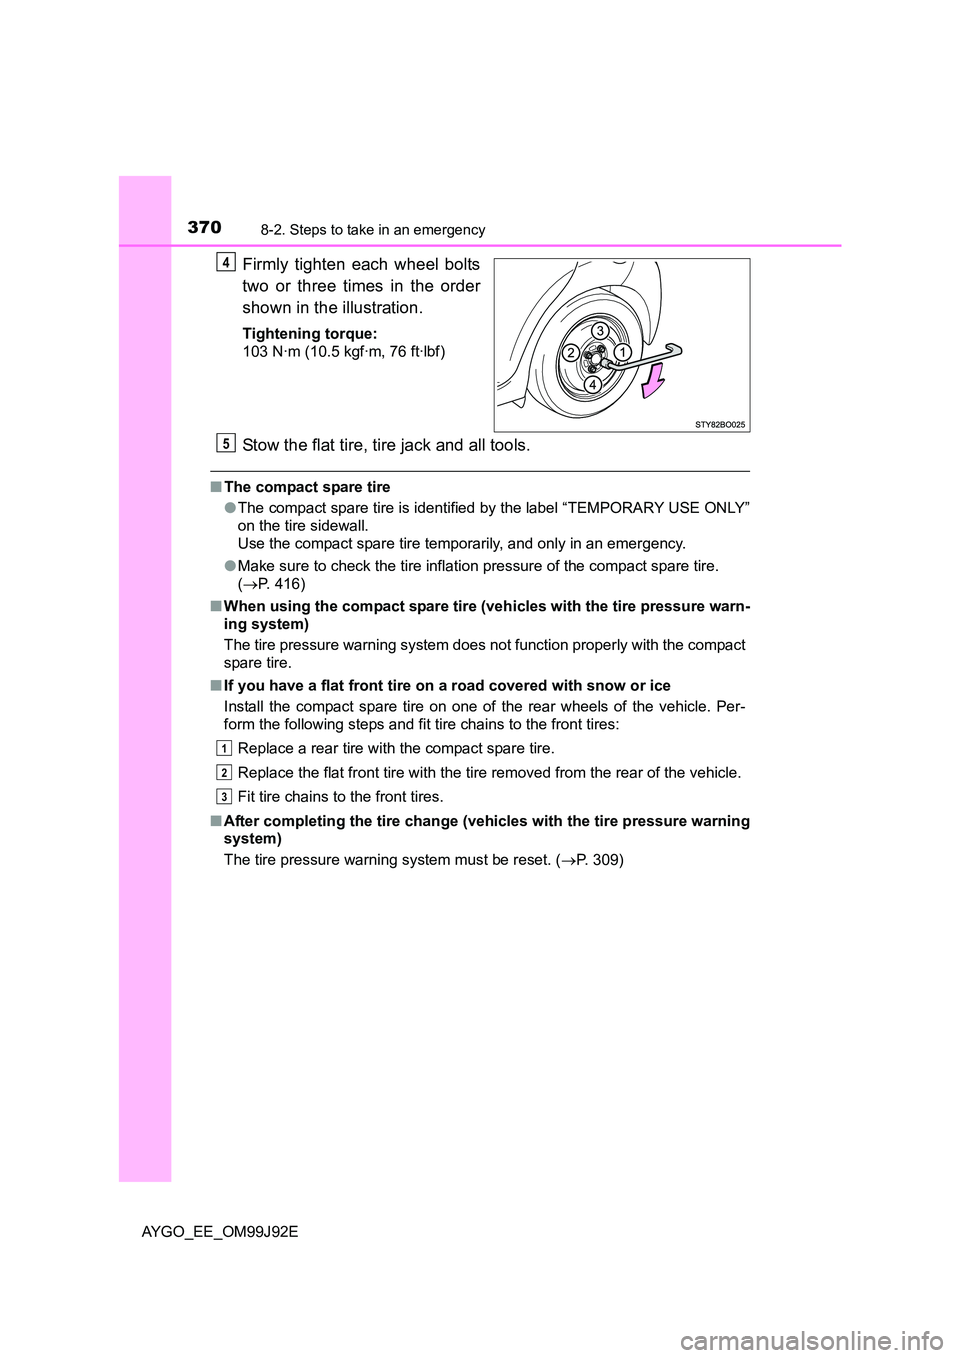
Firmly tighten each wheel bolts
two or three times in the order
shown in the illustration.
Tightening torque:
103 N·m (10.5 kgf·m, 76 ft·lbf)
Stow the flat tire, tire jack and all tools.
■ The compact spare tire
● The compact spare tire is identified by the label “TEMPORARY USE ONLY”
on the tire sidewall.
Use the compact spare tire temporarily, and only in an emergency.
● Make sure to check the tire inflation pressure of the compact spare tire.
( →P. 416)
■ When using the compact spare tire (vehicles with the tire pressure warn-
ing system)
The tire pressure warning system does not function properly with the compact
spare tire.
■ If you have a flat front tire on a road covered with snow or ice
Install the compact spare tire on one of the rear wheels of the vehicle. Per-
form the following steps and fit tire chains to the front tires:
Replace a rear tire with the compact spare tire.
Replace the flat front tire with the tire removed from the rear of the vehicle.
Fit tire chains to the front tires.
■ After completing the tire change (vehicles with the tire pressure warning
system)
The tire pressure warning system must be reset. ( →P. 309)
4
5
1
2
3