2015 TATA SAFARI parking brake
[x] Cancel search: parking brakePage 27 of 161

27
DRIVING CONTROLS
• •• •
•Driving Controls Driving ControlsDriving Controls Driving Controls
Driving Controls
• •• •
•Steering lock & Ignition switch Steering lock & Ignition switchSteering lock & Ignition switch Steering lock & Ignition switch
Steering lock & Ignition switch
• •• •
•Immobiliser ImmobiliserImmobiliser Immobiliser
Immobiliser
• •• •
•Parking brake Parking brakeParking brake Parking brake
Parking brake
• •• •
•Gear shift lever Gear shift leverGear shift lever Gear shift lever
Gear shift lever
• •• •
•Combi switch Combi switchCombi switch Combi switch
Combi switch
• •• •
•T TT T
T
r rr r
r
ansf ansfansf ansf
ansf
er c er cer c er c
er c
ase gear selec ase gear selecase gear selec ase gear selec
ase gear selec
t tt t
t
or oror or
or
• •• •
•Steering wheel position adjustment Steering wheel position adjustmentSteering wheel position adjustment Steering wheel position adjustment
Steering wheel position adjustment
• •• •
•Operating switches Operating switchesOperating switches Operating switches
Operating switches
This section provides information about various
mechanical controls and electrical displays that
help you while driving.
Please read this section carefully and make
yourself familiar with the functions of all the driving
controls listed alongside, so that you can use
them effectively while driving.
ProCarManuals.com
Page 28 of 161

28
D R I V I N G C O N T R O L S
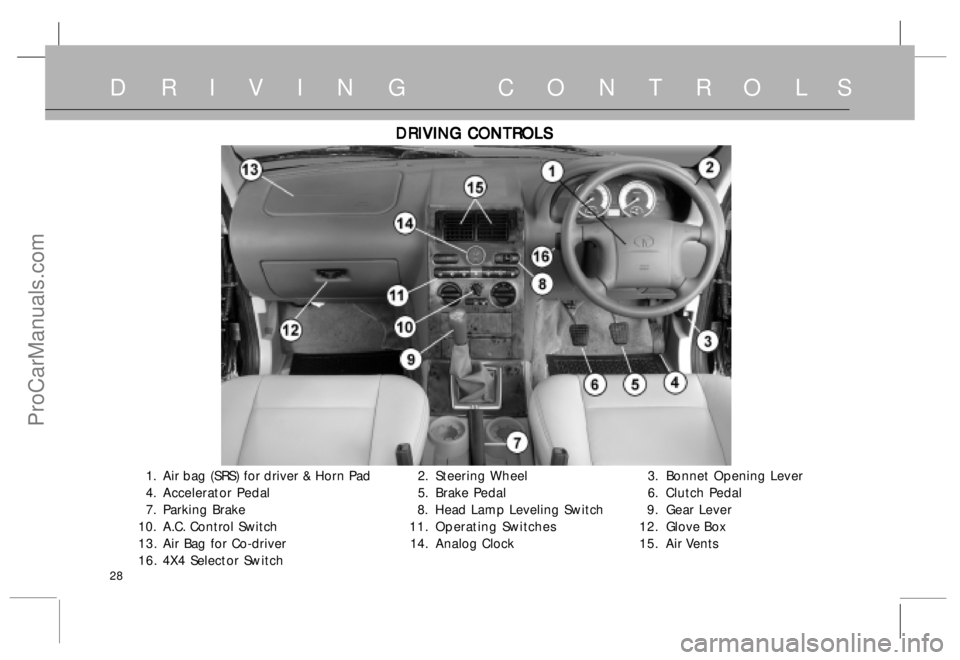
1. Air bag (SRS) for driver & Horn Pad 2. Steering Wheel 3.Bonnet Opening Lever
4. Accelerator Pedal5. Brake Pedal 6. Clutch Pedal
7. Parking Brake 8. Head Lamp Leveling Switch 9 .Gear Lever
10. A.C. Control Switch 11.Operating Switches 12.Glove Box
13. Air Bag for Co-driver 14. Analog Clock 15. Air Vents
16. 4X4 Selector Switch
DRIVING CONTROLS DRIVING CONTROLSDRIVING CONTROLS DRIVING CONTROLS
DRIVING CONTROLS
ProCarManuals.com
Page 32 of 161

32
D R I V I N G C O N T R O L SP PP P
P
ARKING BR ARKING BRARKING BR ARKING BR
ARKING BR
AKE AND GEAR SHIFT LE AKE AND GEAR SHIFT LEAKE AND GEAR SHIFT LE AKE AND GEAR SHIFT LE
AKE AND GEAR SHIFT LE
VER VERVER VER
VER
Parking Brake Parking BrakeParking Brake Parking Brake
Parking Brake
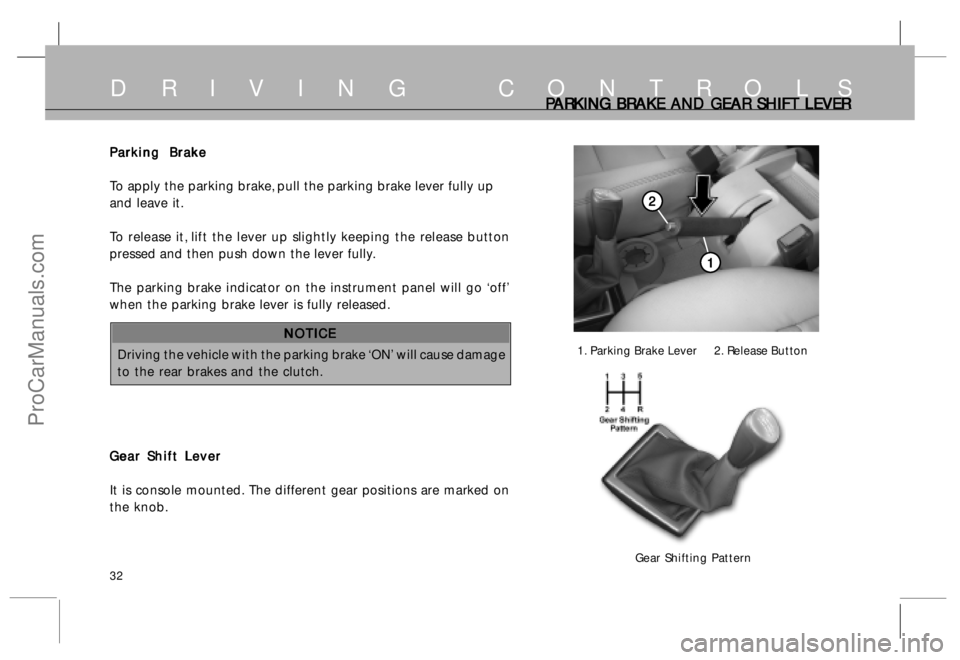
To apply the parking brake, pull the parking brake lever fully up
and leave it.
To release it, lift the lever up slightly keeping the release button
pressed and then push down the lever fully.
The parking brake indicator on the instrument panel will go ‘off’
when the parking brake lever is fully released.
NOTICE NOTICENOTICE NOTICE
NOTICE
Driving the vehicle with the parking brake ‘ON’ will cause damage
to the rear brakes and the clutch.
Gear Shift Lever Gear Shift LeverGear Shift Lever Gear Shift Lever
Gear Shift Lever
It is console mounted. The different gear positions are marked on
the knob.
1. Parking Brake Lever 2. Release Button
Gear Shifting Pattern
1 11 1
1
2 22 2
2
ProCarManuals.com
Page 43 of 161

43
INDICATORS AND INSTRUMENTSINDIC INDICINDIC INDIC
INDIC
A AA A
A
T TT T
T
ORS ORSORS ORS
ORS
T TT T
T
ur urur ur
ur
n S n Sn S n S
n S
ignals ignalsignals ignals
ignals
Indicators IndicatorsIndicators Indicators
Indicators
Turn signal lamps can be operated only when the ignition
supply is 'ON' and by using the turn indicator switch on the
combiswitch.
The direction indicator arrow (LHS) & (RHS) on the
instrument cluster flashes alongwith external indicator lights as
selected.
Parking Brake and Parking Brake andParking Brake and Parking Brake and
Parking Brake and
Low Brake Fluid Indicator Low Brake Fluid IndicatorLow Brake Fluid Indicator Low Brake Fluid Indicator
Low Brake Fluid Indicator
When the parking brake is applied this indicator illuminates.
Ensure that the parking brake is fully released and this
indicator goes off while driving.
When you turn the key to IGN position this indicator
illuminates for few seconds and goes off automatically. It
remains ‘ON’ when brake fluid level in the master cylinder
container is low.
CAUTION CAUTIONCAUTION CAUTION
CAUTION
Do not drive the vehicle if the brake fluid level indicator
remains ‘ON’. Get the defect rectified.High Beam Indicator High Beam IndicatorHigh Beam Indicator High Beam Indicator
High Beam Indicator
This light illuminates with the head lamps in high beam
position.
Low Oil Pressure Indicator Low Oil Pressure IndicatorLow Oil Pressure Indicator Low Oil Pressure Indicator
Low Oil Pressure Indicator
This indicator light will glow when the oil pressure in the
running engine drops low enough to cause damage to the
engine.
It should light when ignition is ‘ON’ and should go off when
engine is running.
If this light glows when engine is running, it indicates serious
problem in engine lubrication system.
Safely pull to the side of the road and shut off the engine as
soon as possible.
Continuously glowing of light indicates fault in lubrication
system.
NOTICE NOTICENOTICE NOTICE
NOTICE
Do not run the engine when low oil pressure, indicator
light is ON. In such a case contact the nearest authorised
workshop for rectification of fault.
ProCarManuals.com
Page 44 of 161

44
INDICATORS AND INSTRUMENTSINDIC INDICINDIC INDIC
INDIC
A AA A
A
T TT T
T
ORS ORSORS ORS
ORS
ABS Indicators ABS IndicatorsABS Indicators ABS Indicators
ABS Indicators
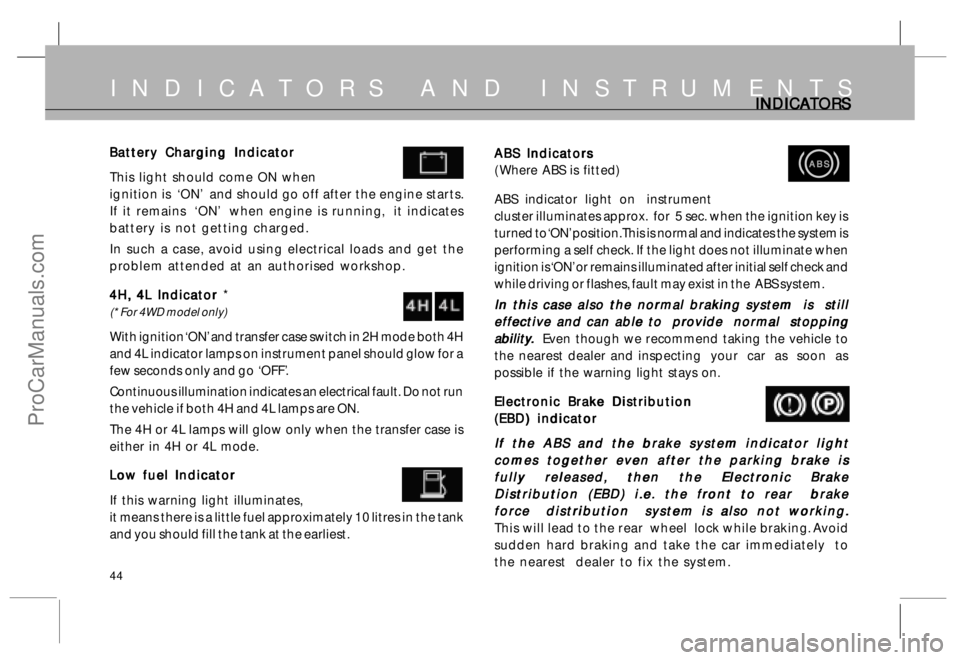
( Where ABS is fitted)
ABS indicator light on instrument
cluster illuminates approx. for 5 sec. when the ignition key is
turned to ‘ON’ position. This is normal and indicates the system is
performing a self check. If the light does not illuminate when
ignition is ‘ON’ or remains illuminated after initial self check and
while driving or flashes, fault may exist in the ABS system.
In this case also the normal braking system is still In this case also the normal braking system is stillIn this case also the normal braking system is still In this case also the normal braking system is still
In this case also the normal braking system is still
effective and can able to provide normal stopping effective and can able to provide normal stoppingeffective and can able to provide normal stopping effective and can able to provide normal stopping
effective and can able to provide normal stopping
abilit abilitabilit abilit
abilit
y yy y
y
.. ..
.
Even though we recommend taking the vehicle to
the nearest dealer and inspecting your car as soon as
possible if the warning light stays on.
Electronic Brake Distribution Electronic Brake DistributionElectronic Brake Distribution Electronic Brake Distribution
Electronic Brake Distribution
(EBD) indicator (EBD) indicator(EBD) indicator (EBD) indicator
(EBD) indicator
If the ABS and the brake system indicator light If the ABS and the brake system indicator lightIf the ABS and the brake system indicator light If the ABS and the brake system indicator light
If the ABS and the brake system indicator light
comes together even after the parking brake is comes together even after the parking brake iscomes together even after the parking brake is comes together even after the parking brake is
comes together even after the parking brake is
fully released, then the Electronic Brake fully released, then the Electronic Brakefully released, then the Electronic Brake fully released, then the Electronic Brake
fully released, then the Electronic Brake
Distribution (EBD) i.e. the front to rear brake Distribution (EBD) i.e. the front to rear brakeDistribution (EBD) i.e. the front to rear brake Distribution (EBD) i.e. the front to rear brake
Distribution (EBD) i.e. the front to rear brake
force distribution system is also not working. force distribution system is also not working.force distribution system is also not working. force distribution system is also not working.
force distribution system is also not working.
This will lead to the rear wheel lock while braking. Avoid
sudden hard braking and take the car immediately to
the nearest dealer to fix the system.
ABS ABSABS ABS
ABSBattery Charging Indicator Battery Charging IndicatorBattery Charging Indicator Battery Charging Indicator
Battery Charging Indicator
This light should come ON when
ignition is ‘ON’ and should go off after the engine starts.
If it remains ‘ON’ when engine is running, it indicates
battery is not getting charged.
In such a case, avoid using electrical loads and get the
problem attended at an authorised workshop.
4H, 4L Indicator 4H, 4L Indicator 4H, 4L Indicator 4H, 4L Indicator
4H, 4L Indicator *
(* For 4WD model only)
With ignition ‘ON’ and transfer case switch in 2H mode both 4H
and 4L indicator lamps on instrument panel should glow for a
few seconds only and go ‘OFF’.
Continuous illumination indicates an electrical fault. Do not run
the vehicle if both 4H and 4L lamps are ON.
The 4H or 4L lamps will glow only when the transfer case is
either in 4H or 4L mode.
Low fuel Indicator Low fuel IndicatorLow fuel Indicator Low fuel Indicator
Low fuel Indicator
If this warning light illuminates,
it means there is a little fuel approximately 10 litres in the tank
and you should fill the tank at the earliest.
ProCarManuals.com
Page 67 of 161

67
COMFORT AND CONVENIENCE
MP3/DVD Player : (if fitted) MP3/DVD Player : (if fitted)MP3/DVD Player : (if fitted) MP3/DVD Player : (if fitted)
MP3/DVD Player : (if fitted)
Your vehicle comes installed with a MP3/DVD player with LCD colour
monitors .
To operate,handle and maintain the system, please refer the
Manufacturer’s operator’s manual, given along with car.
The LCD colour monitor is located on rear side of front seat headrest. The
controls of the monitor are situated below the screen.
T TT T
T
ail Lamp : ail Lamp :ail Lamp : ail Lamp :
ail Lamp :
The tail lamp assembly incorporates the following :
1. Parking/Rear stop lamp
2. Rear Direction indicator
3. Reverse Light
4. Rear fog lamp OR Reflector on rear bumper.
Registration Plate Lamps : Registration Plate Lamps :Registration Plate Lamps : Registration Plate Lamps :
Registration Plate Lamps :
Two concealed lamps are provided for illumination of the rear
registration numbar plate.
High Mounted Stop Lamp : High Mounted Stop Lamp :High Mounted Stop Lamp : High Mounted Stop Lamp :
High Mounted Stop Lamp :
High mounted stop lamp is incorporated in rear spoiler at the rear and it
glows whenever service brake is applied.
LCD monitors LCD monitorsLCD monitors LCD monitors
LCD monitors
High mounted stop lamp High mounted stop lampHigh mounted stop lamp High mounted stop lamp
High mounted stop lamp
Registration plate lamps Registration plate lampsRegistration plate lamps Registration plate lamps
Registration plate lamps
1
2
3
4
ProCarManuals.com
Page 70 of 161

70
P R I O R T O D R I V I N GOPENING AND CL OPENING AND CLOPENING AND CL OPENING AND CL
OPENING AND CL
OSING OSING OSING OSING
OSING
THE BONNET THE BONNETTHE BONNET THE BONNET
THE BONNET
Opening and Closing the Bonnet Opening and Closing the BonnetOpening and Closing the Bonnet Opening and Closing the Bonnet
Opening and Closing the Bonnet
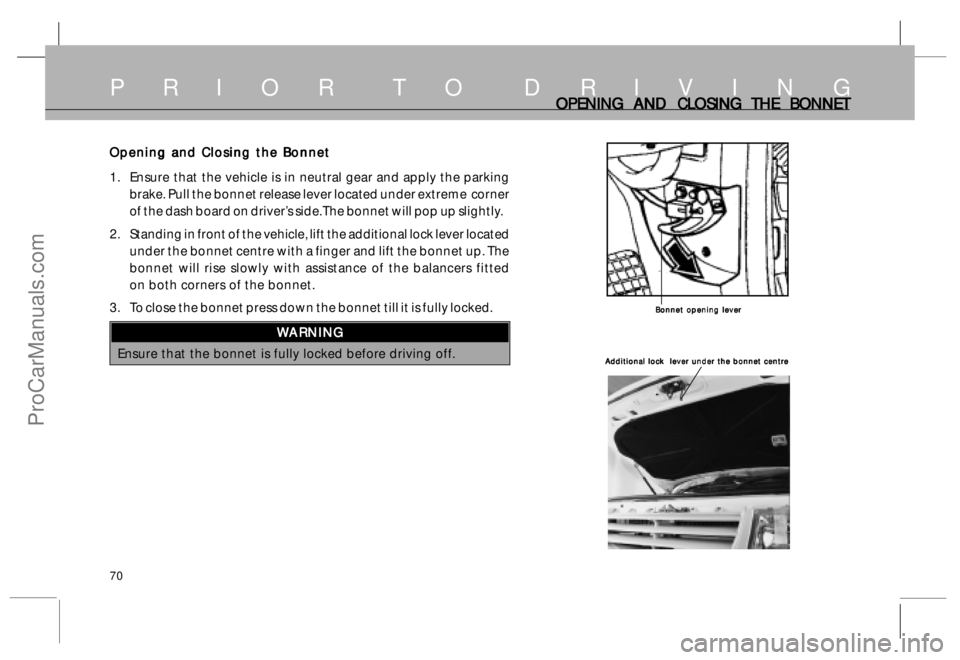
1. Ensure that the vehicle is in neutral gear and apply the parking
brake. Pull the bonnet release lever located under extreme corner
of the dash board on driver’s side. The bonnet will pop up slightly.
2. Standing in front of the vehicle, lift the additional lock lever located
under the bonnet centre with a finger and lift the bonnet up. The
bonnet will rise slowly with assistance of the balancers fitted
on both corners of the bonnet.
3. To close the bonnet press down the bonnet till it is fully locked.
W WW W
W
ARNING ARNINGARNING ARNING
ARNING
Ensure that the bonnet is fully locked before driving off.
Bonnet opening lever Bonnet opening leverBonnet opening lever Bonnet opening lever
Bonnet opening lever
Additional lock lever under the bonnet centre Additional lock lever under the bonnet centreAdditional lock lever under the bonnet centre Additional lock lever under the bonnet centre
Additional lock lever under the bonnet centre
ProCarManuals.com
Page 71 of 161

71
P R I O R T O D R I V I N GCHECKS CHECKSCHECKS CHECKS
CHECKS
CHECK CHECKCHECK CHECK
CHECK
•Fuel level (Refer page No. 72)
•Coolant level (Refer page No. 73)
•Engine oil level (Refer page No. 72)
•Tyre pressure (Refer page No. 124)
•Brake & clutch fluid level
(Refer page No. 115)
ENSURE ENSUREENSURE ENSURE
ENSURE
•Gear shift lever in neutral
position
•All switches & lamps working
•SRS, ABS , Brake fluidlevel indicator
and Engine lamp goes off
•Parking brake released
ADJUST ADJUSTADJUST ADJUST
ADJUST
•Driver Seat (Refer page No. 56)
•Rear view mirrors (Refer page No. 60 & 63)
•Steering column (Refer page No. 37)
ProCarManuals.com