Page 9 of 13
 and MP3-CDs can be played in the internal drive.
Inserting the CD
Insert a CD, with the printed side facing up, into the CD s")
CD player
Using the system
Information on how to use a CD
Audio-CDs (CD-A) and MP3-CDs can be played in the internal drive.
Inserting the CD
Insert a CD, with the printed side facing up, into the CD slot
8
until it is automati-
cally drawn in.
The play function will start automatically.
When a CD is inserted, this will be indicated by the text “ CD-IN ” on the device
screen.
Taking out the CD
Press the
button – the CD is ejected.
If the “ejected” CD is not taken out within 10 seconds, it will be retracted again for
safety reasons.
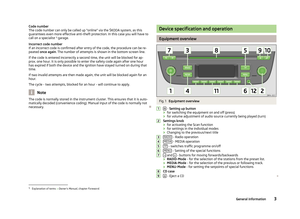
Buttons on the unit for controlling the current audio sources The arrow buttons on unit
or will always affect the currently heard audio
source, irrespective of the current menu used.
- pressing this button briefly within 2 seconds of playback takes you to the be-
ginning of the previous track or chapter, or after 2 seconds to the beginning of
the current title or chapter.
- pressing this button takes you to the start of the next track or chapter.
Playback of the previous or next track can also be selected by turning the menu
button
2
» Fig. 1 on page 3.
Changing between the audio sources
Press the MEDIA
button to select the audio source:
CD (internal CD drive) NAV
(connected MFP) or AUX .
WARNINGThe CD-player is a laser product. On the manufacturing date, this unit was
classified as a class 1 laser product in accordance with the national/interna-
tional standards DIN EN 60825-1: 2008-05 and DHHS Rules 21 CFR,
Subchapter J. The laser used in this class 1 laser product is so weak that there is no risk of danger when operated correctly. This product is designed such
that the laser is restricted to the inside of the unit. However, the installed la- ser could be classified in a higher class were the housing to be removed. Forthis reason, never remove the housing of the unit.
CAUTION
■ Never insert CDs with the designation “into the internal drive. Do not insert in
drives without a drawer ” or use Eco Discs.■
After pressing the button there is a time delay of a few seconds before the
CD is ejected. During this time the lock in front of the CD slot is open.
■
Be sure to wait until the CD has been fully ejected before you try to insert a new
CD. Otherwise you can damage the drive inside the unit.
■
A dirty, mechanically damaged, unreadable or incorrectly inserted CD can cause
playback problems. The CD may not be playable or may jump because of this.
Check the CD and insert it properly into the unit. Should the problem persist , try
using another CD and visit a specialist garage if necessary.
■
If the internal temperature of the device is too high, no CDs will be accepted.
The unit switches into the last active operating mode.
■
Never use liquids such as gasoline, paint thinner or record cleaner to clean the
surface of the CD - this may cause damage.
■
Never expose the CD to direct sunlight!
■
Only write on the CD using appropriate pens.
■
Do not stick anything to the CD.
Note
■ Poor or unpaved road surfaces and severe vibrations may cause the CD to jump.■In cold weather or after rain showers, moisture (condensate) may deposit in the
unit. This can effect the CD jump or impair the play function. Wait until the mois-
ture has evaporated if this happens.■
If a CD is dirty, never clean it in a circular motion, but rather from the inside out.
Use a soft, lint-free cloth. For heavy stains, we recommend that you clean the CD with a commercially available CD cleaner and allow it to dry.
■
It is possible that CDs protected by copyright and home-made CD-R and CD-RW
will not be played back at all or only in certain circumstances.
7CD player
Page 10 of 13

■Please also note the additional information for MP3 mode .■The national copyright laws that apply in your country must be observed.■
The CD-player does not contain parts that need to be serviced or repaired. In
the case of a defective CD player, please visit a specialist garage.
Player operation
Press the MEDIA
button and then the
CD function key (internal CD drive), NAV
(connected MFP) or AUX » page 9 , Advice for dealing with external sources .
■ CD - changes over to an inserted CD
■ SCN - All tracks from the current audio source will be played for 10 seconds;
the scan function can also be started or stopped by briefly pressing the menu
button
2
.
■ SCAN CD - plays a track of a CD
■ SCAN FOLDER - plays a track in the selected folder
■ SCAN PLAYLIST - Plays a playlist (folder of selected tracks from each folder
stored on the CD); only appears when a playlist has been created on the CD
being played
■ MIX - plays all tracks in the current audio source in random order
■ The activated MIX function is underlined to highlight it.
■ MIX CD - plays the tracks on a CD in random order
■ MIX FOLDER - plays the tracks in the selected folder in random order
■ MIX PLAYLIST - Plays a playlist (folder of selected tracks from individual
folders that is stored on the CD) in random order; only appears when a play-
list has been created on the CD being played
■ - scrolls up in the folders
■ - scrolls down in the folders
■ INF - by pressing the INF function button again, additional information about
MP3 files can be selected in the display ■ TITLE - name of the track
■ ARTIST - name of the performer
■ ALBUM - name of the album
■ FILE - file
■ FOLDER - folder
■ SCR - Information about MP3 files with lengths that extend beyond the
screen area; by pressing this button, the entire text information is displayed step by step
■ NAV - Changes to the connected multi-function device
■ AUX - Changes to an external source connected to an AUX multimedia in-
put » page 9 , Advice for dealing with external sources
General information for MP3 operation
Requirements for the MP3 data and data carrier
› CD-ROM, CD-R, CD-RW with a capacity of 650 MB and 700 MB.
› The CDs must correspond to the ISO 9660 Level 2 standard as well as the Joliet
data system (single and multi-session).
› Data names must be no longer than 64 characters.
› The list structure is restricted to a depth of 8 list levels.
› The name of the artist, the album and the title of the MP3 file being played can
be shown, providing this information is available as an ID3 tag » page 8, Player
operation . The list and data name will be displayed if there is no ID3 tag.
› WMA data (
Windows Media Audio) can also be played even if the copyright is
additionally protected by the DRM procedure ( Digital Rights Management). Such
WMA data is not supported by the unit.
Bit rate (data flow per time unit)
› The system supports MP3 data with bit rates of 32 to 320 KB/s as well as MP3
data with variable bit rates.
› The indicated playing time data with variable bit rates is not reliable.
8CD player
Page 11 of 13

External sources
Using the system
Advice for dealing with external sources
An external audio source connected to the AUX input can be played in the car through the speakers of the device.
External audio sources cannot be controlled via the device.
A different audio source can be selected on the device at any time. As long as the
external audio source is not switched off, it always remains active in the back-
ground.
See the owner's manual of the specific manufacturer for operating the external
audio source.
Conditions for successful connection
External audio sources are connected via the AUX input using a 3.5 mm standard
jack plug. If the external audio source does not have this jack plug, an adapter
needs to be used (such as an external source to the USB input).
› Only USB devices with the specification 2.0 can be connected.
› The version of the file allocation table FAT (File Allocation Table) of the connec-
ted device must be FAT16 ( <2 GB) or FAT32 (> 2 GB).
› In order to replay from a unit with a hard disk (HDD) which includes a large data
volume, it can lead to a time delay when reading in the overview of the music
data.
› In order to replay from a unit, which includes a complicated folder structure, it
can lead to a time delay when reading in the overview of the music data.
› The folder structure in the connected unit must not exceed a depth of 8 levels.
One folder must not contain more than 1000 data.
› A USB extension cable or USB distributor (HUB) must not be used to connect
the unit.
Adapter
We recommend that you purchase an adapter for connecting the USB devices, the
devices with Mini USB output or an iPod, at an authorised ŠKODA Service Partner.
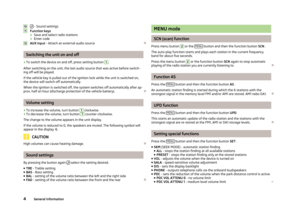
Adjust the play function volume of the external audio source
The play volume of the external audio source can be adjusted via the volume con-
trol
1
» Fig. 1 on page 3.
Depending on the connected audio source, the output volume on the external au-
dio source can be changed.
You can also change the input sensitivity of the external audio source, in order to
adapt the play volume of the external audio source to that of the other audio
sources or to avoid distortions » page 4, Setting special functions .WARNING■
Never place external sources on the dashboard. These could be thrown into
the passenger compartment during sudden driving manoeuvres, injuring the
occupants.■
Never place external sources close to the airbags. These could be thrown in-
to the passenger compartment when the airbags are deployed, injuring the
occupants.
■
Never hold external sources in your hand or on your knees while driving.
These could be thrown into the passenger compartment during sudden driv-
ing manoeuvres, injuring the occupants.
■
Always route the connection cable for the external source such that it does
not restrict you when driving.
CAUTION
The AUX input must only be used for audio sources!
Note
■ See the owner's manual of the specific manufacturer for instructions on operat-
ing the external source.■
If an external audio source equipped with an adapter for external power supply
is connected via AUX, it is possible that the audio signal may be disrupted. This
depends on the quality of the adapter which is used.
AUX input
The input for an external audio source AUX is located on the device
12
.
›
Activate the AUX input by pressing the MEDIA button followed by the AUX se-
lection button.
The play function starts automatically after connecting the source.
External audio sources connected via the AUX input cannot be controlled via the
device.
9External sources
Page 12 of 13
ŠKODA AUTO a.s. pursues a policy of constant product and model development.We trust that you will understand that changes to models in terms of shape,equipment and engineering, may be introduced at any time. The informationabout appearance, performances, dimensions, weights, standards and functions
of the vehicle is correct at the time of publication. Some equipment might only be introduced at a later date, or might only be offered in certain markets; informa-
tion is provided by ŠKODA Partners. It is therefore not possible for legal claims to
be made based on the data, illustrations and descriptions contained in this Own-
er's Manual.Reprinting, reproduction or translation, either in whole or in part, is not permitted without the written consent of ŠKODA AUTO a.s.
ŠKODA AUTO a.s. expressly reserves all rights relating to copyright laws.
Subject to change.
Issued by: ŠKODA AUTO a.s.
© ŠKODA AUTO a.s. 2013
Page 13 of 13
www.skoda-auto.com
Funky
Radio anglicky 11.2013
S00.5615.04.20
1ST 012 720 CF
SIMPLY CLEVER
Radio Funky
Operating instructions