2015 PEUGEOT 5008 tow
[x] Cancel search: towPage 113 of 364

111
High load retaining
net*
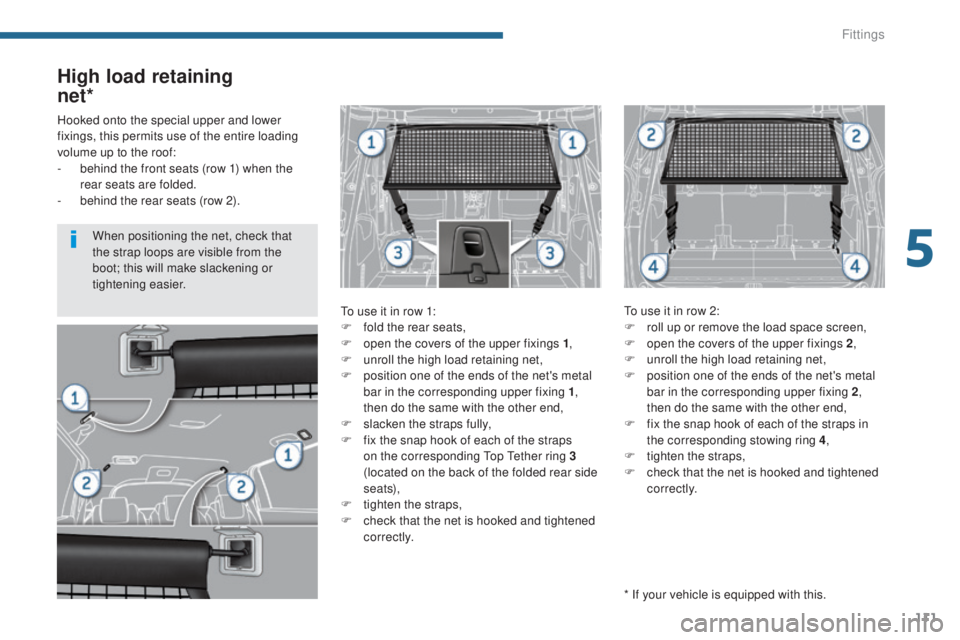
To use it in row 1:
F
f old the rear seats,
F
o
pen the covers of the upper fixings 1 ,
F
u
nroll the high load retaining net,
F
p
osition one of the ends of the net's metal
bar in the corresponding upper fixing 1 ,
then do the same with the other end,
F
s
lacken the straps fully,
F
f
ix the snap hook of each of the straps
on the corresponding Top Tether ring 3
(located on the back of the folded rear side
seats),
F
t
ighten the straps,
F
c
heck that the net is hooked and tightened
c o r r e c t l y. To use it in row 2:
F
r oll up or remove the load space screen,
F
o
pen the covers of the upper fixings 2,
F
u
nroll the high load retaining net,
F
p
osition one of the ends of the net's metal
bar in the corresponding upper fixing 2 ,
then do the same with the other end,
F
f
ix the snap hook of each of the straps in
the corresponding stowing ring 4 ,
F
t
ighten the straps,
F
c
heck that the net is hooked and tightened
c o r r e c t l y.
Hooked onto the special upper and lower
fixings, this permits use of the entire loading
volume up to the roof:
-
b
ehind the front seats (row 1) when the
rear seats are folded.
-
b
ehind the rear seats (row 2).
* If your vehicle is equipped with this.
When positioning the net, check that
the strap loops are visible from the
boot; this will make slackening or
tightening easier.
5
Fittings
Page 114 of 364

112
Luggage retaining net
Hooked onto the stowing rings on the floor and/
or on the load space cover roller, the luggage
retaining net available as an accessory enables
you to secure your luggage.There are 4 possible positions:
-
f
lat at the bottom of the boot,
-
h
orizontal, level with the load space cover,-
v
ertical at the back of the rear seats,
-
f
lat at the bottom of the boot and vertical at
the back of the rear seats.
Fittings
Page 126 of 364

124
Remove and stow the head restraint
before installing a child seat with
backrest on a passenger seating
position. Refit the head restraint when
the child seat is removed.
a:
u
niversal child seat, child seat that can be
installed in all vehicles using a seat belt.
b:
g
roup 0, from birth to 10 kg. Shells seats and
baby carriers cannot be installed in the front
passenger seat.
c:
c
onsult the legislation in force in your
country before installing your child on this
seat.
d:
t
o install a child seat on a rear seat,
rear ward facing or for ward facing, move
the front seat for ward, then straighten the
backrest to allow enough space for the child
seat and the child's legs.
e:
t
o install a child seat on a rear seat, rear ward
facing or for ward facing, adjust the rear seat
to the fully back position, with the backrest
upright. U:
s
eat suitable for the installation of a
child seat secured using a seat belt and
universally approved, rear ward facing and/or
forward facing.
U (R):
s
ame as U , with the vehicle's seat
adjusted to the highest position.
L-:
o
nly the child seats indicated can be
installed on the seat concerned (according
to local legislation).
X:
s
eat position not suitable for installation of a
child seat for the weight class indicated.
Child safety
Page 128 of 364

126
a: universal child seat, child seat that can be
installed in all vehicles using a seat belt.
b:
g
roup 0, from birth to 10 kg. Shells seats and
baby carriers cannot be installed in the front
passenger seat.
c:
c
onsult the legislation in force in your
country before installing your child on
this
seat.
d:
T
o install a child seat on a rear seat,
rear ward facing or for ward facing, move
the front seat for ward, then straighten the
backrest to allow enough space for the child
seat and the child's legs.
e:
T
o install a child seat on a rear seat,
rearward facing or forward facing, adjust the
rear seat to the fully back position, with the
backrest upright. Remove and stow the head restraint
before installing a child seat on a
passenger seat. Refit the head restraint
once the child seat has been removed.
U:
s eat suitable for the installation of a
child seat secured using a seat belt and
universally approved, rear ward facing and/or
forward facing.
U (R):
s
ame as U, with the vehicle's seat
adjusted to the highest position.
L-:
o
nly the child seats indicated can be
installed on the seat concerned (according
to local legislation).
X:
s
eat position not suitable for installation of a
child seat for the weight class indicated.
Child safety
Page 129 of 364

127
"ISOFIX" mountings
The ISOFIX mountings are three rings for each seat:- two rings A, located between the vehicle
seat back and cushion, indicated by a
marking, This ISOFIX mounting system ensures fast,
reliable and safe fitting of the child seat in your
vehicle.
The ISOFIX child seats are fitted with two
latches which are secured easily on the two
rings A
.
Some also have an upper strap (or top tether)
which is attached to ring B .
To secure the child seat to the TOP TETHER :
- r emove and stow the head restraint before
installing the child seat on this seat (refit it
after the child seat has been removed),
-
r
emove the TOP TETHER cover by pulling
at its cut-out,
-
p
ass the child seat strap behind the seat
backrest, centred between the holes for the
head restraint rods,
-
s
ecure the upper strap fixing to the ring B,
-
t
ighten the upper strap.
5 seats
7 seats
Your vehicle has been approved in accordance with the latest ISOFIX
regulations.
The seats, represented below, are fitted with regulation ISOFIX mountings:
-
a r
ing B, located under a cover on the back of
the top of the seat backrest, referred to as the
TOP TETHER for fixing the upper strap.
I
ts position is indicated by a marking.
Located on the back of the seat backrest, the
top tether is used to secure the upper strap of
child seats that have one. This device limits
for ward tipping of the child seat, in the event of
a front impact.
6
Child safety
Page 132 of 364

130
Remove and stow the head restraint
before installing a child seat on a
passenger seat. Refit the head restraint
once the child seat has been removed.
*
P
recautions are required when fitting a child
seat with a support leg. Refer to the section
on "Installing a child seat with a support leg"
for more information. I UF:
s
eat suitable for the installation of an I
sofix
U niversal seat, F or ward facing secured
using the upper strap to the upper ring of
an ISOFIX seating position.
IL- SU:
s
eat suitable for the installation of an
I sofix S emi-Universal seat either:
-
r
ear ward facing fitted with an upper
strap or a support leg,
-
f
or ward facing fitted with a support
leg,
-
a s
hell seat fitted with an upper strap
or a support leg.
For advice on securing of the upper strap, refer
to the section on "ISOFIX mountings".
X:
s
eat not suitable for the installation of a child
seat or shell for the weight group indicated.
Child safety
Page 135 of 364

133
Recommendations
Child seats
The incorrect installation of a child seat in a
vehicle compromises the child's protection in
the event of an accident.
Check that there is no seat belt or seat belt
buckle under the child seat as this could
destabilise it.
Remember to fasten the seat belts or the
child seat harnesses keeping the slack in
relation to the child's body to a minimum,
even for short journeys.
For the installation of a child seat using a seat
belt, ensure that this is well tensioned on the
child seat and that it is holding the child seat
firmly against the seat of your vehicle. If your
front passenger seat is adjustable, move it
forward if necessary.
At the rear seats, always leave sufficient
space between the front seat and:
-
a r
ear ward facing child seat,
-
t
he feet of a child seated in a for ward
facing child seat.
For this, move the front seat for ward and if
necessary straighten its backrest.
Children at the front
For optimum installation of the "forward facing"
child seat, ensure that the back of the child seat
is as close as possible to the backrest of the
vehicle's seat, or in contact if possible.
The head restraint must be removed before
installing a child seat with a backrest on the
passenger seat.
Ensure that the head restraint is stowed or
attached securely so that it is not thrown around
the vehicle in the event of sharp braking.
Refit the head restraint as soon as the child
seat is removed.
The legislation on carrying a child on the front
passenger seat is specific to each country.
Refer to the legislation in force in the country
in which you are driving.
Deactivate the passenger's front airbag when
a "rear ward facing" child seat is installed on
the front passenger seat. Otherwise, the child
would risk being seriously injured or killed if
the airbag were deployed.
Installing a booster
cushion
The chest part of the seat belt must be
positioned on the child's shoulder without
touching the neck.
Ensure that the lap part of the seat belt
passes correctly over the child's thighs.
PEUGEOT recommends the use of a booster
seat which has a back, fitted with a seat belt
guide at shoulder level.
As a safety precaution, do not leave:
-
o
ne or more children alone and
unsupervised in a vehicle,
-
a c
hild or an animal in a vehicle which
is exposed to the sun, with the windows
closed,
-
t
he keys within reach of children inside
the vehicle.
To prevent accidental opening of the doors,
use the "Child lock".
Take care not to open the rear windows by
more than one third.
To protect young children from the rays of the
sun, fit side blinds on the rear windows.
6
Child safety
Page 137 of 364

135
Direction indicators
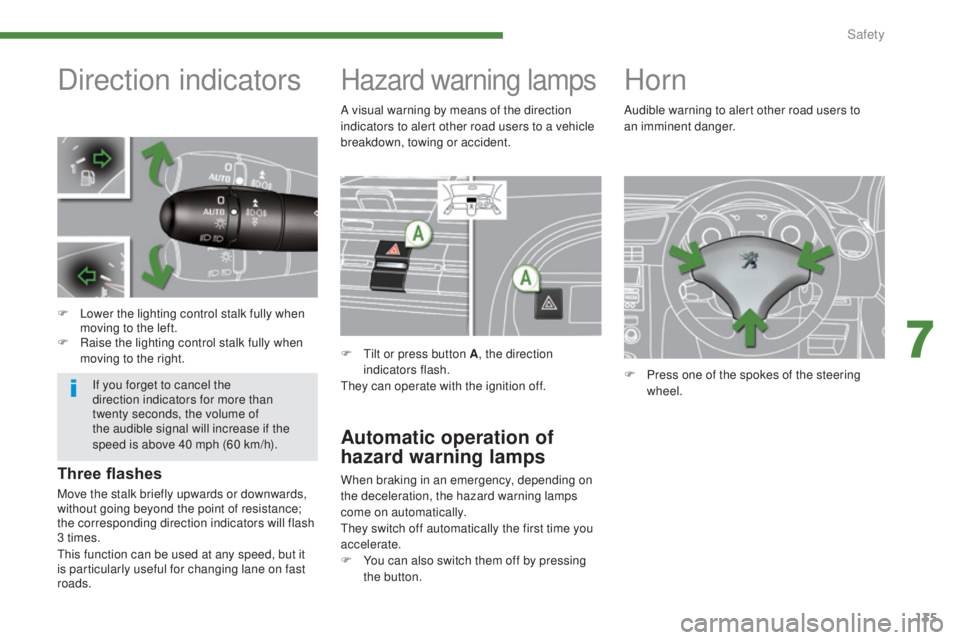
F Lower the lighting control stalk fully when moving to the left.
F
R
aise the lighting control stalk fully when
moving to the right.
Hazard warning lamps
F Tilt or press button A , the direction
indicators flash.
They can operate with the ignition off.
Automatic operation of
hazard warning lamps
When braking in an emergency, depending on
the deceleration, the hazard warning lamps
come on automatically.
They switch off automatically the first time you
accelerate.
F
Y
ou can also switch them off by pressing
the button.
Horn
F Press one of the spokes of the steering wheel.
Audible warning to alert other road users to
an
imminent danger.
Three flashes
Move the stalk briefly upwards or downwards,
without going beyond the point of resistance;
the corresponding direction indicators will flash
3 times.
If you forget to cancel the
direction indicators for more than
twenty
seconds, the volume of
the audible signal will increase if the
speed is above 40 mph (60 km/h). A visual warning by means of the direction
indicators to alert other road users to a vehicle
breakdown, towing or accident.
This function can be used at any speed, but it
is particularly useful for changing lane on fast
roads.
7
Safety