2015 PEUGEOT 5008 fold seats
[x] Cancel search: fold seatsPage 61 of 364

59
Tailgate release
Unlocking
F Fold back the rear seats to gain access to the lock from inside the boot.
F
I
nsert a small screwdriver into hole A of the
lock to unlock the tailgate.
F
M
ove the latch to the left.
Locking after closing
If the fault persists after closing again, the boot
will remain locked.
System allowing the mechanical unlocking
of the boot in the event of a battery or central
locking system malfunction.
2
Access
Page 74 of 364
72
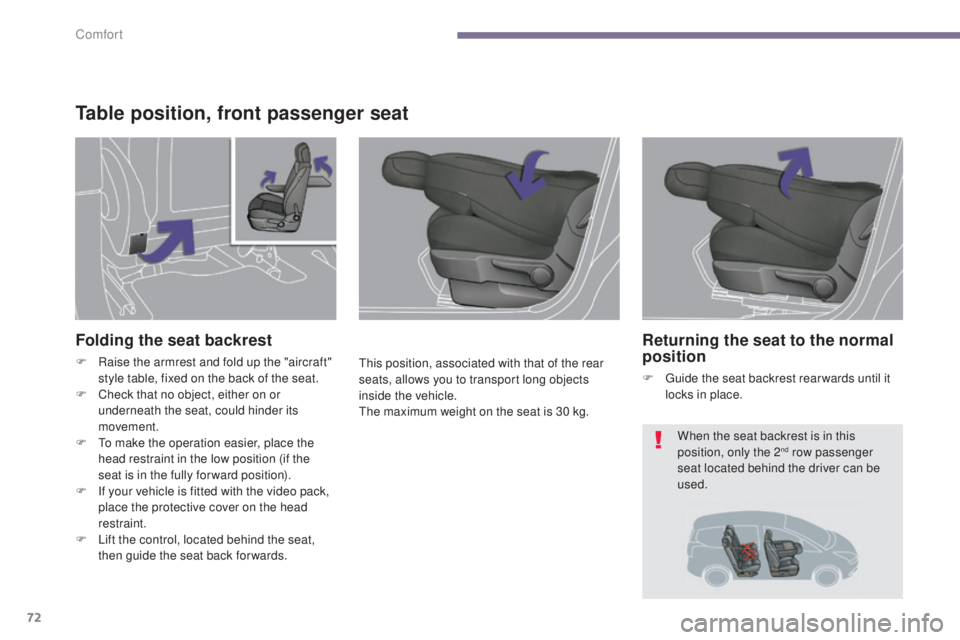
Table position, front passenger seat
This position, associated with that of the rear
seats, allows you to transport long objects
inside the vehicle.
The maximum weight on the seat is 30 kg.
Folding the seat backrest
F Raise the armrest and fold up the "aircraft" style table, fixed on the back of the seat.
F
C
heck that no object, either on or
underneath the seat, could hinder its
movement.
F
T
o make the operation easier, place the
head restraint in the low position (if the
seat is in the fully for ward position).
F
I
f your vehicle is fitted with the video pack,
place the protective cover on the head
restraint.
F
L
ift the control, located behind the seat,
then guide the seat back for wards.
Returning the seat to the normal
position
F Guide the seat backrest rear wards until it locks in place.
When the seat backrest is in this
position, only the 2
nd row passenger
seat located behind the driver can be
used.
Comfort
Page 76 of 364
74
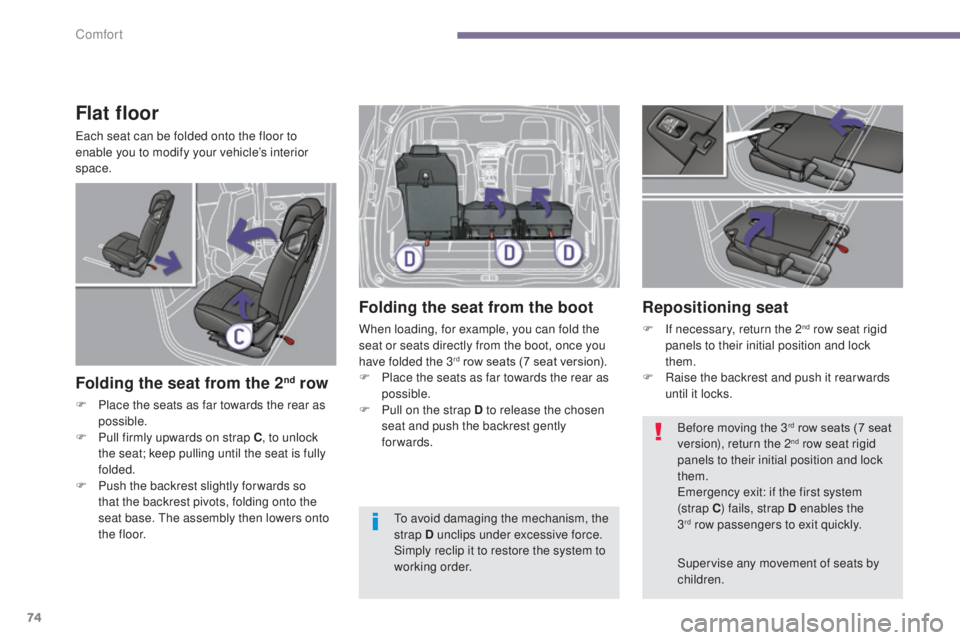
Flat floor
Each seat can be folded onto the floor to
enable you to modify your vehicle’s interior
space.
Folding the seat from the 2nd row
F Place the seats as far towards the rear as possible.
F
P
ull firmly upwards on strap C , to unlock
the seat; keep pulling until the seat is fully
folded.
F
P
ush the backrest slightly for wards so
that the backrest pivots, folding onto the
seat base. The assembly then lowers onto
t h e
f l o o r.
Folding the seat from the boot
When loading, for example, you can fold the
seat or seats directly from the boot, once you
have folded the 3
rd row seats (7 seat version).
F
P
lace the seats as far towards the rear as
possible.
F
P
ull on the strap D to release the chosen
seat and push the backrest gently
forwards.
Repositioning seat
F If necessary, return the 2nd row seat rigid
panels to their initial position and lock
them.
F
R
aise the backrest and push it rear wards
until it locks.
Supervise any movement of seats by
children. Before moving the 3
rd row seats (7 seat
version), return the 2nd row seat rigid
panels to their initial position and lock
them.
Emergency exit: if the first system
(strap C ) fails, strap D enables the
3
rd row passengers to exit quickly.
T
o avoid damaging the mechanism, the
strap D unclips under excessive force.
Simply reclip it to restore the system to
working order.
Comfort
Page 78 of 364
76
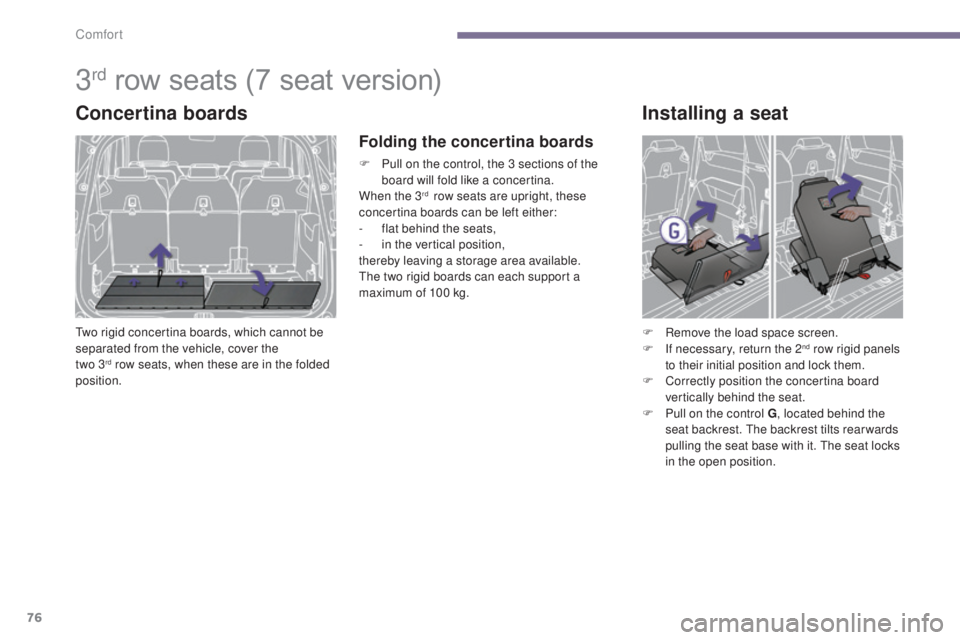
3rd row seats (7 seat version)
Concertina boards
Two rigid concertina boards, which cannot be
separated from the vehicle, cover the
two 3
rd row seats, when these are in the folded
position.
Folding the concertina boards
F Pull on the control, the 3 sections of the board will fold like a concertina.
When the 3
rd row seats are upright, these
concertina boards can be left either:
-
f
lat behind the seats,
-
i
n the vertical position,
thereby leaving a storage area available.
The two rigid boards can each support a
maximum of 100 kg.
Installing a seat
F Remove the load space screen.
F I f necessary, return the 2nd row rigid panels
to their initial position and lock them.
F
C
orrectly position the concertina board
vertically behind the seat.
F
P
ull on the control G , located behind the
seat backrest. The backrest tilts rear wards
pulling the seat base with it. The seat locks
in the open position.
Comfort
Page 79 of 364
77
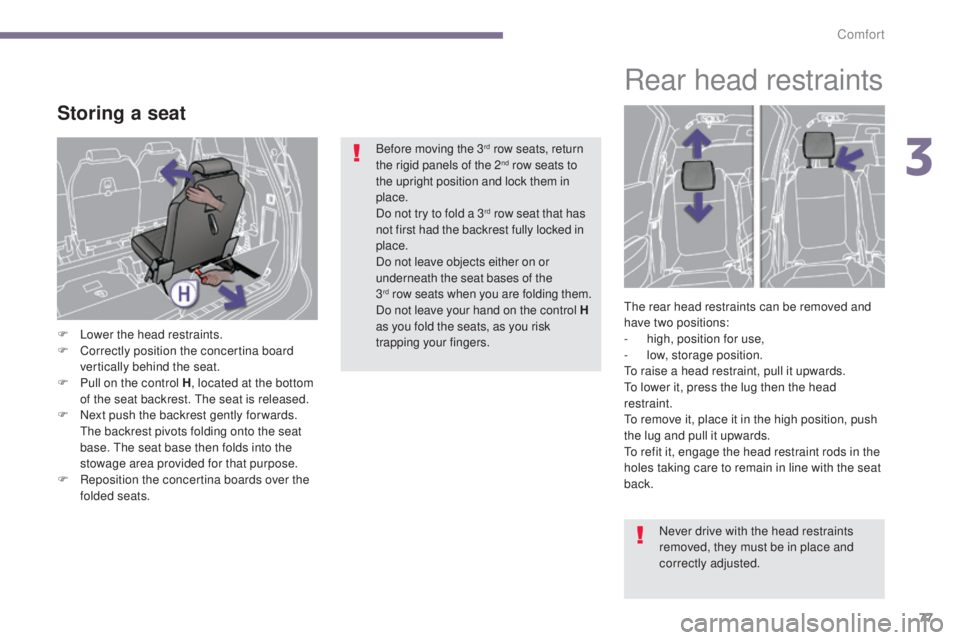
Storing a seat
F Lower the head restraints.
F C orrectly position the concertina board
vertically behind the seat.
F
P
ull on the control H , located at the bottom
of the seat backrest. The seat is released.
F
N
ext push the backrest gently for wards.
The backrest pivots folding onto the seat
base. The seat base then folds into the
stowage area provided for that purpose.
F
R
eposition the concertina boards over the
folded seats. Before moving the 3
rd row seats, return
the rigid panels of the 2nd row seats to
the upright position and lock them in
place.
Do not try to fold a 3
rd row seat that has
not first had the backrest fully locked in
place.
Do not leave objects either on or
underneath the seat bases of the
3
rd row seats when you are folding them.
Do not leave your hand on the control H
as you fold the seats, as you risk
trapping your fingers.
Rear head restraints
The rear head restraints can be removed and
have two positions:
-
h
igh, position for use,
-
lo
w, storage position.
To raise a head restraint, pull it upwards.
To lower it, press the lug then the head
restraint.
To remove it, place it in the high position, push
the lug and pull it upwards.
To refit it, engage the head restraint rods in the
holes taking care to remain in line with the seat
back.
Never drive with the head restraints
removed, they must be in place and
correctly adjusted.
3
Comfort
Page 105 of 364

103
Storage compartments
under the rear footwells
Depending on the configuration, the vehicle
has storage compartments under the footwells,
located for ward of the outer rear seats. Access
is via clipped flaps with a handle A.
"Aircraft" type
tables
Installed on the back of each front seat, these
allow you to set down objects.
F
T
o use the table, lower it fully until it locks
in the low position.
F
T
o store the table, raise it, passing the
point of resistance, to the high position.
On the passenger side, do not forget
to fold the "aircraft" type table before
placing the seat in the table position.
Do not place hard or heavy objects
on the table. They could become
dangerous projectiles in the event of
emergency braking or impact.
Storage drawer
Opening
F Raise the front of the drawer and pull it.
Do not place heavy objects in the drawers. It is located under the driver's seat (manual
adjustment).
5
Fittings
Page 113 of 364
111
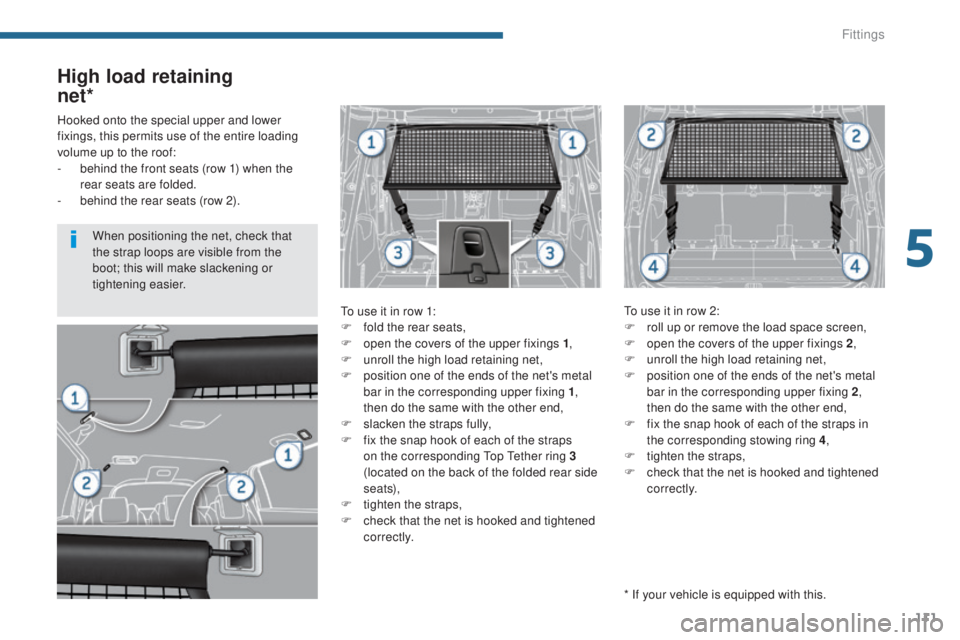
High load retaining
net*
To use it in row 1:
F
f old the rear seats,
F
o
pen the covers of the upper fixings 1 ,
F
u
nroll the high load retaining net,
F
p
osition one of the ends of the net's metal
bar in the corresponding upper fixing 1 ,
then do the same with the other end,
F
s
lacken the straps fully,
F
f
ix the snap hook of each of the straps
on the corresponding Top Tether ring 3
(located on the back of the folded rear side
seats),
F
t
ighten the straps,
F
c
heck that the net is hooked and tightened
c o r r e c t l y. To use it in row 2:
F
r oll up or remove the load space screen,
F
o
pen the covers of the upper fixings 2,
F
u
nroll the high load retaining net,
F
p
osition one of the ends of the net's metal
bar in the corresponding upper fixing 2 ,
then do the same with the other end,
F
f
ix the snap hook of each of the straps in
the corresponding stowing ring 4 ,
F
t
ighten the straps,
F
c
heck that the net is hooked and tightened
c o r r e c t l y.
Hooked onto the special upper and lower
fixings, this permits use of the entire loading
volume up to the roof:
-
b
ehind the front seats (row 1) when the
rear seats are folded.
-
b
ehind the rear seats (row 2).
* If your vehicle is equipped with this.
When positioning the net, check that
the strap loops are visible from the
boot; this will make slackening or
tightening easier.
5
Fittings
Page 144 of 364
142
Advice
In order to be effective, a seat belt must:
- b e tightened as close to the body as
possible,
-
b
e pulled in front of you with a smooth
movement, checking that it does not
twist,
-
b
e used to restrain only one person,
-
n
ot bear any trace of cuts or fraying,
-
n
ot be converted or modified to avoid
affecting its performance.
The driver must ensure that passengers use
the seat belts correctly and that they are all
fastened before setting off.
Wherever you are seated in the vehicle,
always fasten your seat belt, even for short
journeys.
Do not interchange the seat belt buckles as
they will not fulfil their role fully.
The seat belts are fitted with an inertia reel
permitting automatic adjustment of the length
of the strap to your size. The seat belt is
stowed automatically when not in use.
Before and after use, ensure that the seat belt
is reeled in correctly.
The lower part of the strap must be positioned
as low as possible on the pelvis.
The upper part must be positioned in the
hollow of the shoulder.
The inertia reels are fitted with an automatic
locking device which comes into operation in
the event of a collision, emergency braking
or if the vehicle rolls over. You can release
the device by pulling the strap firmly and then
releasing it so that it reels in slightly.
In the event of an impact
Depending on the nature and seriousness
of the impact
, the pretensioning device may
be deployed before and independently of the
airbags. Deployment of the pretensioners
is accompanied by a slight discharge of
harmless smoke and a noise, due to the
activation of the pyrotechnic cartridge
incorporated in the system.
In all cases, the airbag warning lamp comes
on.
Following an impact, have the seat belts
system checked, and if necessary replaced,
by a PEUGEOT dealer or a qualified
workshop.
Recommendations for children
Use a suitable child seat if the passenger is
less than 12 years old or shorter than one and
a half metres.
Never use the same seat belt to secure more
than one person.
Never allow a child to travel on your lap.
For more information on child seats, refer to
the corresponding section.
In accordance with current safety regulations,
for all repairs on your vehicle's seat belts, go
to a qualified workshop with the skills and
equipment needed, which a PEUGEOT dealer
is able to provide.
Have your seat belts checked regularly by a
PEUGEOT dealer or a qualified workshop,
particularly if the straps show signs of
damage.
Clean the seat belt straps with soapy water or
a textile cleaning product, sold by PEUGEOT
dealers.
After folding or moving a seat or rear bench
seat, ensure that the seat belt is positioned
and reeled in correctly.
Safety