Page 76 of 364

74
Flat floor
Each seat can be folded onto the floor to
enable you to modify your vehicle’s interior
space.
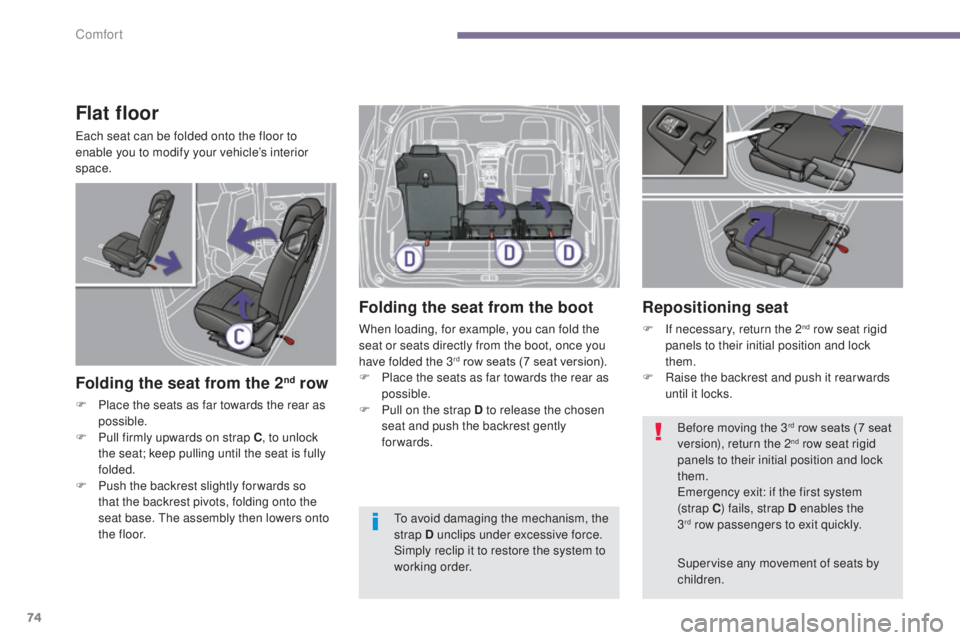
Folding the seat from the 2nd row
F Place the seats as far towards the rear as possible.
F
P
ull firmly upwards on strap C , to unlock
the seat; keep pulling until the seat is fully
folded.
F
P
ush the backrest slightly for wards so
that the backrest pivots, folding onto the
seat base. The assembly then lowers onto
t h e
f l o o r.
Folding the seat from the boot
When loading, for example, you can fold the
seat or seats directly from the boot, once you
have folded the 3
rd row seats (7 seat version).
F
P
lace the seats as far towards the rear as
possible.
F
P
ull on the strap D to release the chosen
seat and push the backrest gently
forwards.
Repositioning seat
F If necessary, return the 2nd row seat rigid
panels to their initial position and lock
them.
F
R
aise the backrest and push it rear wards
until it locks.
Supervise any movement of seats by
children. Before moving the 3
rd row seats (7 seat
version), return the 2nd row seat rigid
panels to their initial position and lock
them.
Emergency exit: if the first system
(strap C ) fails, strap D enables the
3
rd row passengers to exit quickly.
T
o avoid damaging the mechanism, the
strap D unclips under excessive force.
Simply reclip it to restore the system to
working order.
Comfort
Page 77 of 364

75
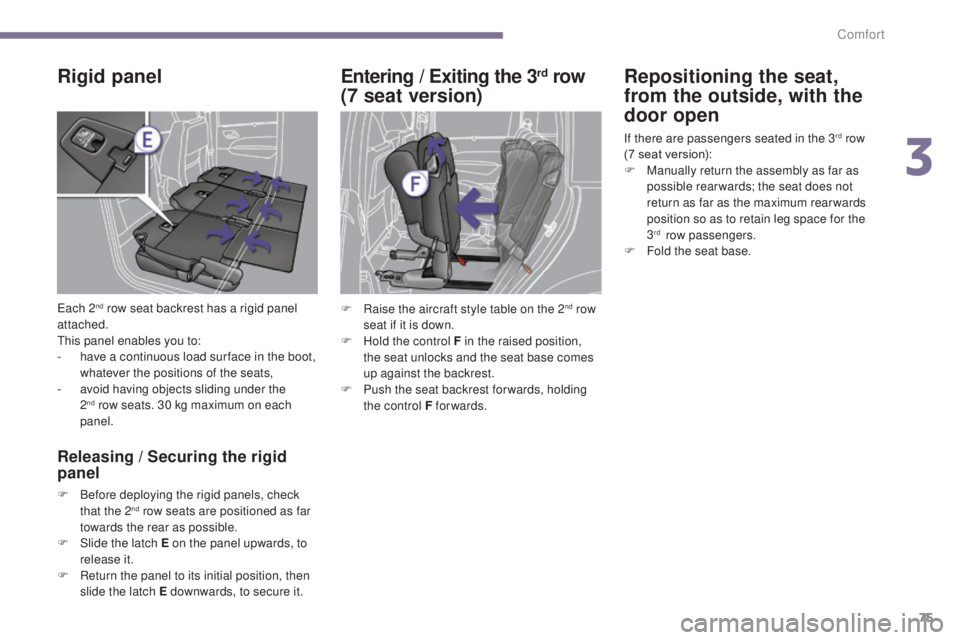
Rigid panel
Each 2nd row seat backrest has a rigid panel
attached.
This panel enables you to:
-
h
ave a continuous load sur face in the boot,
whatever the positions of the seats,
-
a
void having objects sliding under the
2
nd row seats. 30 kg maximum on each
panel.
Releasing / Securing the rigid
panel
F Before deploying the rigid panels, check that the 2nd row seats are positioned as far
towards the rear as possible.
F
S
lide the latch E on the panel upwards, to
release it.
F
R
eturn the panel to its initial position, then
slide the latch E downwards, to secure it.
Entering / Exiting the 3rd row
(7 seat version) Repositioning the seat,
from the outside, with the
door open
If there are passengers seated in the 3rd row
(7 seat version):
F
M
anually return the assembly as far as
possible rear wards; the seat does not
return as far as the maximum rear wards
position so as to retain leg space for the
3
rd row passengers.
F
F
old the seat base.
F
R
aise the aircraft style table on the 2
nd row
seat if it is down.
F
H
old the control F in the raised position,
the seat unlocks and the seat base comes
up against the backrest.
F
P
ush the seat backrest for wards, holding
the control F forwards.
3
Comfort
Page 79 of 364

77
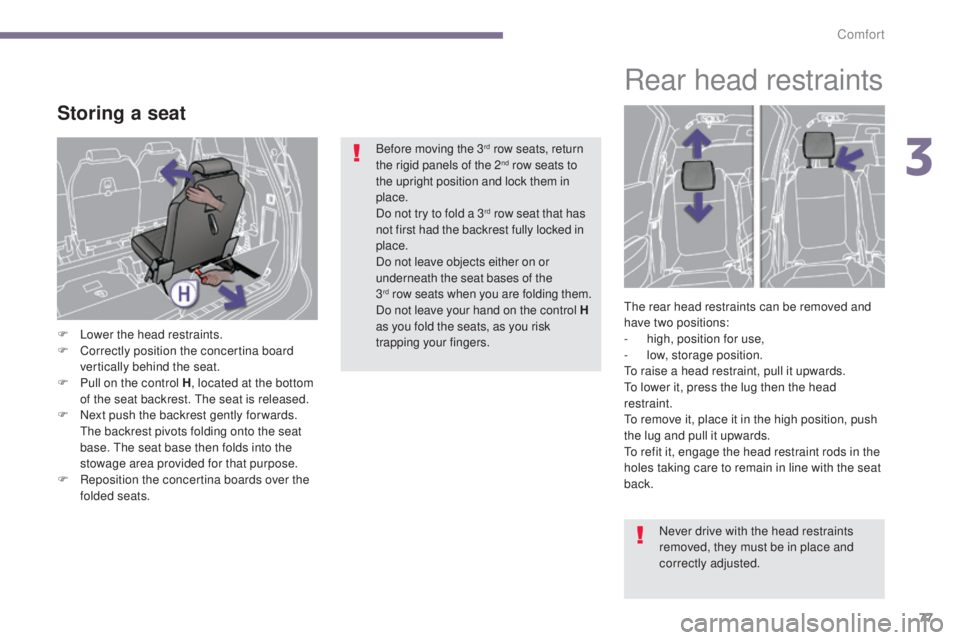
Storing a seat
F Lower the head restraints.
F C orrectly position the concertina board
vertically behind the seat.
F
P
ull on the control H , located at the bottom
of the seat backrest. The seat is released.
F
N
ext push the backrest gently for wards.
The backrest pivots folding onto the seat
base. The seat base then folds into the
stowage area provided for that purpose.
F
R
eposition the concertina boards over the
folded seats. Before moving the 3
rd row seats, return
the rigid panels of the 2nd row seats to
the upright position and lock them in
place.
Do not try to fold a 3
rd row seat that has
not first had the backrest fully locked in
place.
Do not leave objects either on or
underneath the seat bases of the
3
rd row seats when you are folding them.
Do not leave your hand on the control H
as you fold the seats, as you risk
trapping your fingers.
Rear head restraints
The rear head restraints can be removed and
have two positions:
-
h
igh, position for use,
-
lo
w, storage position.
To raise a head restraint, pull it upwards.
To lower it, press the lug then the head
restraint.
To remove it, place it in the high position, push
the lug and pull it upwards.
To refit it, engage the head restraint rods in the
holes taking care to remain in line with the seat
back.
Never drive with the head restraints
removed, they must be in place and
correctly adjusted.
3
Comfort
Page 85 of 364
83
Model without AUTO lighting
Model with AUTO lighting
The lighting is controlled directly by the driver
by means of the ring A and the stalk B.
B. Stalk for switching headlamps: pull the stalk
towards you to switch the lighting between
dipped and main beam headlamps.
In the lamps off and sidelamps modes, the
driver can switch on the main beam headlamps
temporarily ("headlamp flash") by maintaining a
pull on the stalk. Automatic illumination of
headlamps. Lighting off (ignition off) /
Daytime running lamps (engine
running).
Sidelamps.
Dipped headlamps or main
beam headlamps.
Displays
Illumination of the corresponding indicator
lamp in the instrument panel confirms that the
lighting selected is on.
Manual controls
A. Main lighting mode selection ring: turn it
to position the symbol required facing the
mark.
4
Visibility
Page 95 of 364
93
Windscreen wash
Pull the wiper stalk towards you.
The windscreen wash then the wipers operate
for a set time.
The headlamp wash is also activated if the
dipped beam headlamps are on .
Screenwash/headlamp wash low
level
In the case of vehicles fitted with
headlamp washers, when the
minimum level of the reservoir
is reached, this warning lamp is
displayed in the instrument panel, accompanied
by an audible signal and a message.
The warning lamp is displayed when the
ignition is switched on, or every time the stalk is
operated, until the reservoir is refilled.
Next time you stop, refill the screenwash /
headlamp wash reservoir.
Headlamp wash
Press the end of the lighting stalk to activate
the headlamp wash, when the dipped beam
headlamps are on.
4
Visibility
Page 110 of 364
108
Boot fittings (5-seat version)
1. Load space cover
2.
Hoo
ks
3.
1
2 V accessor y socket (120 W)
4.
S
torage compartment under the floor
5.
C
oncertina boards
6.
S
towing rings on the floor
7.
C
up holder
8.
S
torage compartments or audio
amplifier
Fittings
Page 111 of 364
109
1. Load space cover
2.
Hoo
ks
3.
1
2 V accessor y socket (120 W)
4.
B
uckles for the 3
rd row seat belts
5.
C
oncertina boards
6.
S
towing rings on the floor
7.
C
up holder
8.
A
rmrests
9.
S
torage compartments or audio
amplifier
Boot fittings (7-seat version)
5
Fittings
Page 112 of 364

110
Roller load space cover
To install the load space cover:
F p osition one of the ends of the roller in its
support,
F
i
nsert the second end in its support,
F
p
ivot the ends of the roller downwards to
secure it,
F
r
eel out the load space cover to the boot
pillars,
F
i
nsert the load space screen guides in the
rails on the boot pillars.
To remove the load space cover:
F
r
emove the load space cover guides from
the rails on the boot pillars,
F
r
eel in the load space cover in its roller, To store the load space cover, roller uppermost
and flap facing towards the inside of the
vehicle:
F
p
lace the right-hand end in its housing,
F
s
lide the left-hand end into the guide then
into its housing,
F
p
ivot the ends of the roller upwards to
release it,
F
r
emove the roller from its support. F
se
cure the assembly by pivoting the ends
downwards. The roller has two rings for fixing the
luggage retaining net depending on its
location. If you use the 3
rd row seats (7 seat
version), it is essential to store the roller
in its housing.
Fittings