2015 Peugeot 308 wheel
[x] Cancel search: wheelPage 203 of 416
201
308_en_Chap06_securite_ed01-2015
electronic Stability Control (eSC) incorporating
the following systems:
-
a
nti-lock braking system (ABS) and the
electronic brake force distribution (
eB
FD),
-
em
ergency braking assistance (
eBA
),
-
w
heel anti-slip regulation (ASR) or traction
control,
-
d
ynamic stability control (DSC).
electronic stability control (eS C)
Definitions
Anti-lock braking system (ABS)
and electronic brake force
distribution (EBFD)
this system improves the stability and
manoeuvrability of your vehicle when braking
and contributes towards improved control in
corners, in particular on poor or slippery road
surfaces.
th
e ABS prevents wheel lock in the event of
emergency braking.
th
e electronic brake force distribution system
manages the braking pressure wheel by wheel.
Emergency braking assistance
(EBA)
In an emergency, this system enables you to
reach the optimum braking pressure more
quickly and therefore reduce the stopping
distance.
It is triggered according to the speed at which
the brake pedal is pressed.
t
h
is is felt by a
reduction in the resistance of the pedal and an
increase in the effectiveness of the braking.
Anti-slip regulation (ASR)
the ASR system (also known as tr action
Control) optimises traction in order to limit
wheel slip by acting on the brakes of the driving
wheels and on the engine. It also improves
the directional stability of the vehicle on
acceleration.
Dynamic stability control (DSC)
If there is a difference between the path
followed by the vehicle and that required by
the driver, the DSC monitors each wheel and
automatically acts on the brake of one or more
wheels and on the engine to return the vehicle
to the required path, within the limits of the laws
of physics.
6
Safety
Page 204 of 416
202
308_en_Chap06_securite_ed01-2015
Operation
Anti-lock braking system (ABS)
and electronic brake force
distribution (EBFD)
In emergency braking, press
very firmly without releasing the
pressure. When changing wheels (tyres and rims),
make sure that these are approved for
your vehicle.
Normal operation of the ABS may make
itself felt by slight vibrations of the brake
pedal.
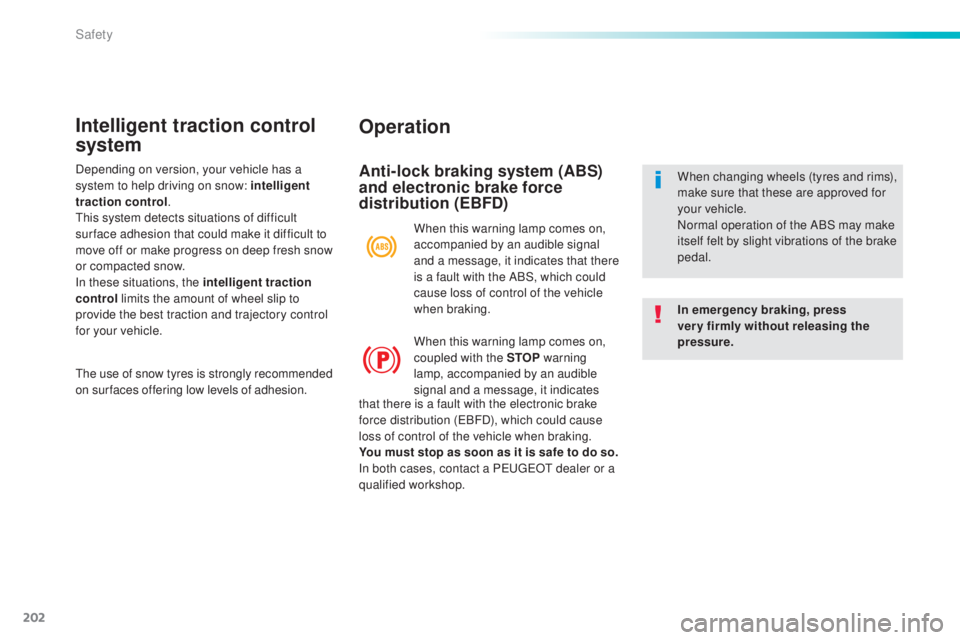
When this warning lamp comes on,
accompanied by an audible signal
and a message, it indicates that there
is a fault with the ABS, which could
cause loss of control of the vehicle
when braking.
When this warning lamp comes on,
coupled with the STOP
warning
lamp, accompanied by an audible
signal and a message, it indicates
Intelligent traction control
system
the use of snow tyres is strongly recommended
on sur faces offering low levels of adhesion. that there is a fault with the electronic brake
force distribution (
eB
FD), which could cause
loss of control of the vehicle when braking.
You must stop as soon as it is safe to do so.
In both cases, contact a P
e
uge
Ot
dealer or a
qualified workshop.
Depending on version, your vehicle has a
system to help driving on snow: intelligent
traction control
.
th
is system detects situations of difficult
sur face adhesion that could make it difficult to
move off or make progress on deep fresh snow
or compacted snow.
In these situations, the intelligent traction
control limits the amount of wheel slip to
provide the best traction and trajectory control
for your vehicle.
Safety
Page 205 of 416
203
308_en_Chap06_securite_ed01-2015
Dynamic stability control (DSC)
and anti-slip regulation (ASR)
Activation
these systems are activated automatically
each time the vehicle is started.
As soon as they detect a problem of grip or
trajectory, these systems act on the operation if
the engine and brakes.
th
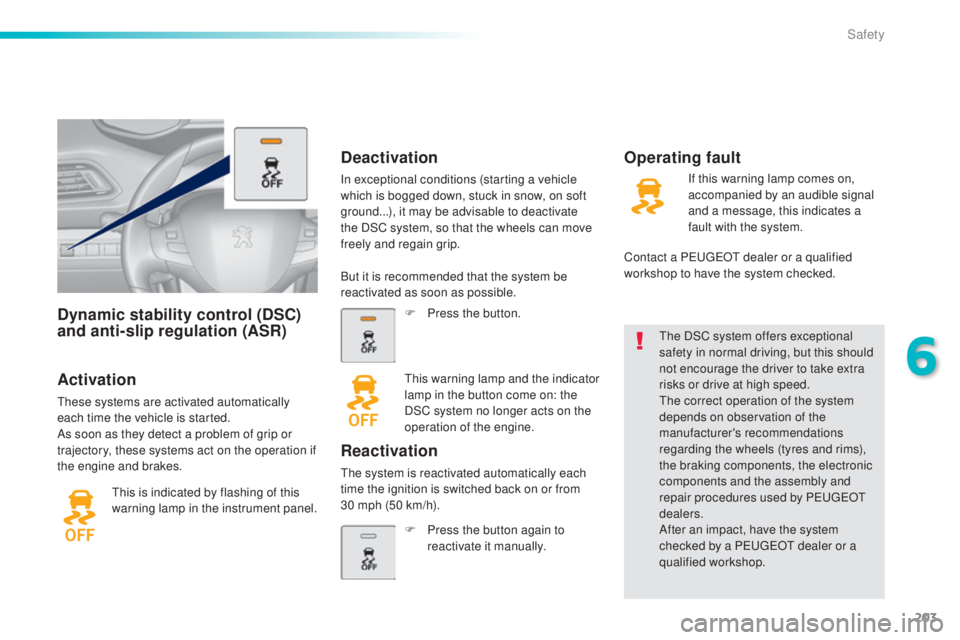
is is indicated by flashing of this
warning lamp in the instrument panel.
th
e DSC system offers exceptional
safety in normal driving, but this should
not encourage the driver to take extra
risks or drive at high speed.th e correct operation of the system
depends on observation of the
manufacturer's recommendations
regarding the wheels (tyres and rims),
the braking components, the electronic
components and the assembly and
repair procedures used by P
e
uge
Ot
dealers.
After an impact, have the system
checked by a P
e
uge
Ot
dealer or a
qualified workshop.
Deactivation
In exceptional conditions (starting a vehicle
which is bogged down, stuck in snow, on soft
ground...), it may be advisable to deactivate
the DSC system, so that the wheels can move
freely and regain grip.
Operating fault
But it is recommended that the system be
reactivated as soon as possible.
F
P
ress the button.
th
is warning lamp and the indicator
lamp in the button come on: the
DSC system no longer acts on the
operation of the engine.
Reactivation
the system is reactivated automatically each
time the ignition is switched back on or from
30
mph (50 km/h). F
P
ress the button again to
reactivate it manually. If this warning lamp comes on,
accompanied by an audible signal
and a message, this indicates a
fault with the system.
Contact a P
e
uge
Ot
dealer or a qualified
workshop to have the system checked.
6
Safety
Page 210 of 416
208
308_en_Chap06_securite_ed01-2015
Deactivating the passenger's
front airbag
Only the passenger's front airbag can be
deactivated.
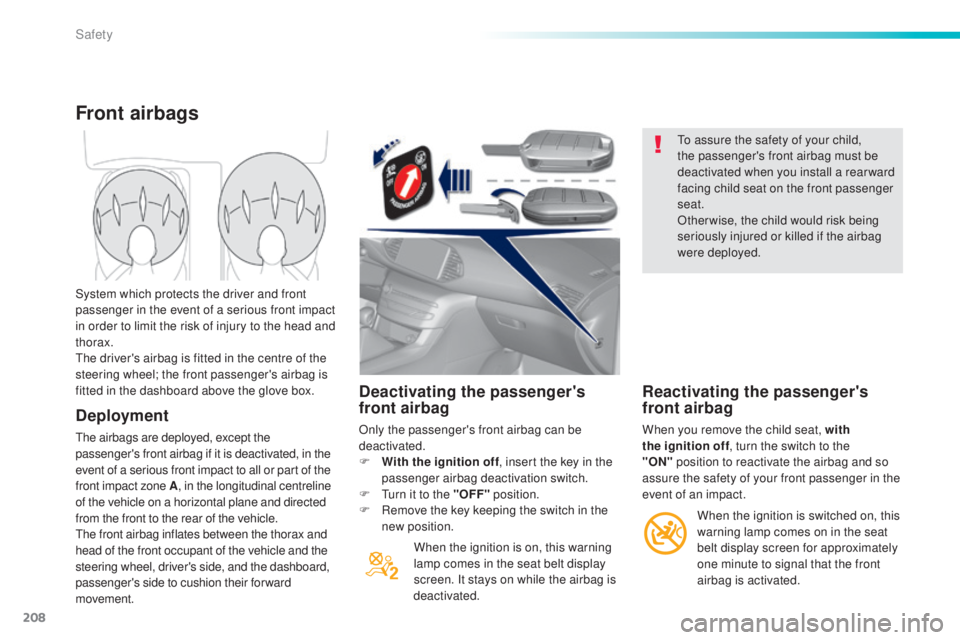
F
W
ith the ignition off , insert the key in the
passenger airbag deactivation switch.
F
t
u
rn it to the "OFF" position.
F
R
emove the key keeping the switch in the
new position.
When the ignition is on, this warning
lamp comes in the seat belt display
screen. It stays on while the airbag is
deactivated.
to a
ssure the safety of your child,
the passenger's front airbag must be
deactivated when you install a rear ward
facing child seat on the front passenger
seat.
Otherwise, the child would risk being
seriously injured or killed if the airbag
were deployed.
Reactivating the passenger's
front airbag
When you remove the child seat, with
the ignition off , turn the switch to the
"ON"
position to reactivate the airbag and so
assure the safety of your front passenger in the
event of an impact.
Front airbags
Deployment
the airbags are deployed, except the
passenger's front airbag if it is deactivated, in the
event of a serious front impact to all or part of the
front impact zone A , in the longitudinal centreline
of the vehicle on a horizontal plane and directed
from the front to the rear of the vehicle.
th
e front airbag inflates between the thorax and
head of the front occupant of the vehicle and the
steering wheel, driver's side, and the dashboard,
passenger's side to cushion their forward
movement. System which protects the driver and front
passenger in the event of a serious front impact
in order to limit the risk of injury to the head and
thorax.
th
e driver's airbag is fitted in the centre of the
steering wheel; the front passenger's airbag is
fitted in the dashboard above the glove box.
When the ignition is switched on, this
warning lamp comes on in the seat
belt display screen for approximately
one minute to signal that the front
airbag is activated.
Safety
Page 213 of 416
211
308_en_Chap06_securite_ed01-2015
Sit in a normal upright position.
Wear a correctly adjusted seat belt.
Do not leave anything between the
occupants and the airbags (a child, pet,
object...). t
h
is could hamper the operation of
the airbags or injure the occupants.
After an accident or if the vehicle has been
stolen or broken into, have the airbag
systems checked.
All work on the airbag system must be
carried out by a P
e
uge
Ot
dealer or a
qualified workshop.
ev
en if all of the precautions mentioned
are observed, a risk of injury or of minor
burns to the head, chest or arms when an
airbag is deployed cannot be ruled out.
t
h
e
bag inflates almost instantly (within a few
milliseconds) then deflates within the same
time discharging the hot gas via openings
provided for this purpose.Lateral airbags
use only approved covers on the seats,
compatible with the deployment the lateral
airbags. For information on the range of seat
covers suitable for your vehicle, you can
contact a P
e
uge
Ot
dealer.
Refer to the "Accessories" section.
Do not fix or attach anything to the seat
backs (clothing...).
t
h
is could cause injury
to the chest or arms if the lateral airbag is
deployed.
Do not sit with the upper part of the body any
nearer to the door than necessary.
Front airbags
Do not drive holding the steering wheel by its
spokes or resting your hands on the centre
part of the wheel.
Passengers must not place their feet on the
dashboard.
Do not smoke as deployment of the airbags
can cause burns or the risk of injury from a
cigarette or pipe.
Never remove or pierce the steering wheel or
hit it violently.
Do not fit or attach anything to the steering
wheel or dashboard, this could cause
injuries with deployment of the airbags.
For the airbags to be fully effective, observe the following safety rules:
Curtain airbags
Do not fix or attach anything to the roof. this
could cause injury to the head if the curtain
airbag is deployed.
If fitted on your vehicle, do not remove the
grab handles installed on the roof, they play
a part in securing the curtain airbags.
6
Safety
Page 224 of 416
222
308_en_Chap06_securite_ed01-2015
the incorrect installation of a child seat
in a vehicle compromises the child's
protection in the event of an accident.Observe strictly the fitting instructions provided
with the child seat.
For information regarding the ISOFIX child
seats which can be installed in your vehicle,
refer to the table showing the locations for
installing ISOFIX child seats.
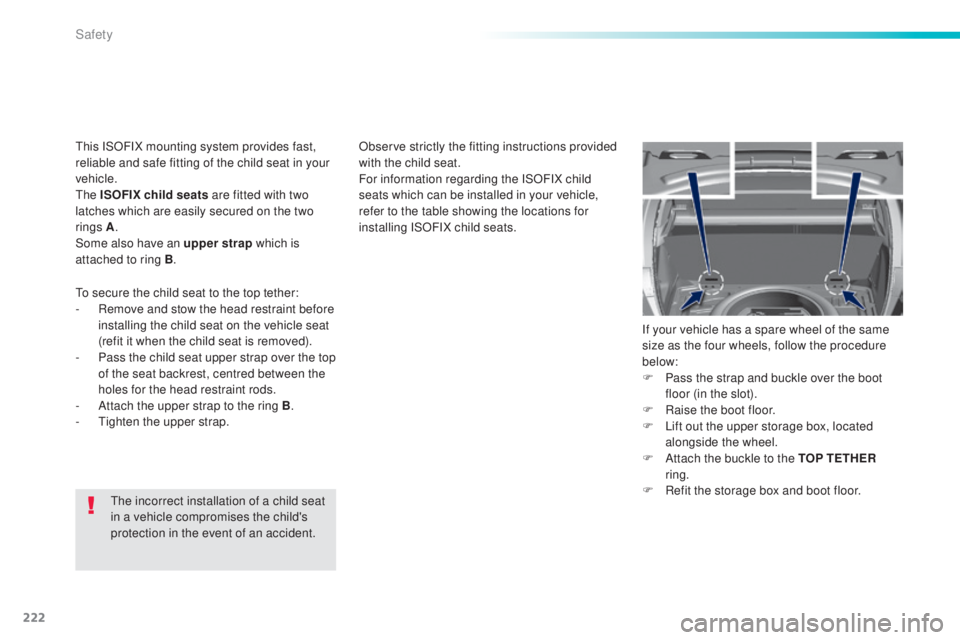
to s
ecure the child seat to the top tether:
-
R
emove and stow the head restraint before
installing the child seat on the vehicle seat
(refit it when the child seat is removed).
-
P
ass the child seat upper strap over the top
of the seat backrest, centred between the
holes for the head restraint rods.
-
A
ttach the upper strap to the ring B
.
-
t
i
ghten the upper strap. If your vehicle has a spare wheel of the same
size as the four wheels, follow the procedure
below:
F
P
ass the strap and buckle over the boot
floor (in the slot).
F
Ra
ise the boot floor.
F
L
ift out the upper storage box, located
alongside the wheel.
F
A
ttach the buckle to the TOP TETHER
ring.
F R efit the storage box and boot floor.
th
is ISOFIX mounting system provides fast,
reliable and safe fitting of the child seat in your
vehicle.
th
e ISOFIX child seats are fitted with two
latches which are easily secured on the two
rings A .
Some also have an upper strap which is
attached to ring B .
Safety
Page 232 of 416
230
308_en_Chap07_info-pratiques_ed01-2015
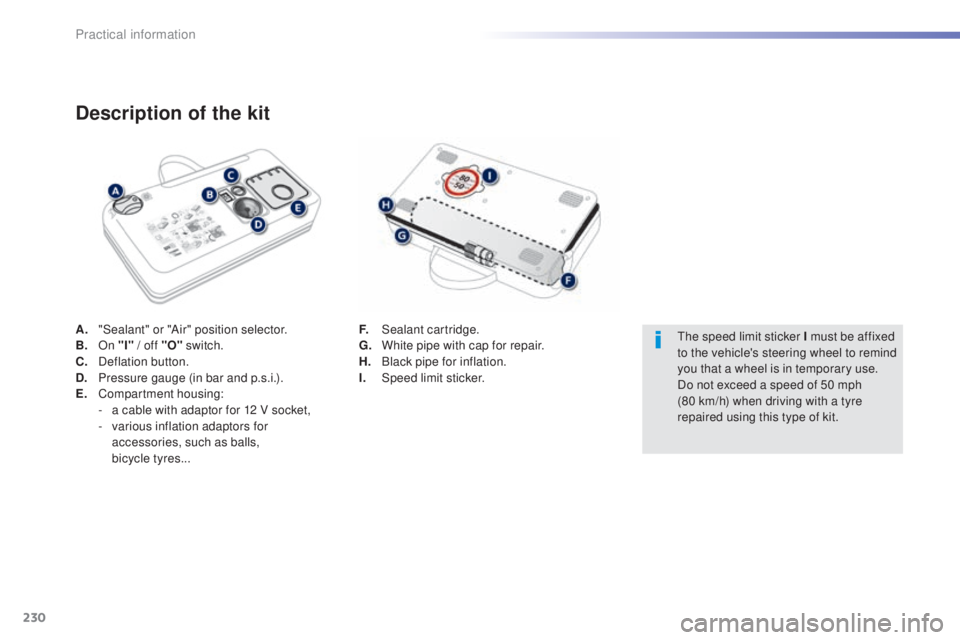
A. "Sealant" or "Air" position selector.
B. On "I" / off "O" switch.
C.
D
eflation button.
D.
P
ressure gauge (in bar and p.s.i.).
E.
C
ompartment housing:
-
a c
able with adaptor for 12 V socket,
-
v
arious inflation adaptors for
accessories, such as balls,
bicycle
tyres...
Description of the kit
F. Sealant cartridge.
G. White pipe with cap for repair.
H.
B
lack pipe for inflation.
I.
Spe
ed limit sticker.th e speed limit sticker I must be affixed
to the vehicle's steering wheel to remind
you that a wheel is in temporary use.
Do not exceed a speed of 50 mph
(80
km/h) when driving with a tyre
repaired using this type of kit.
Practical information
Page 235 of 416
233
308_en_Chap07_info-pratiques_ed01-2015
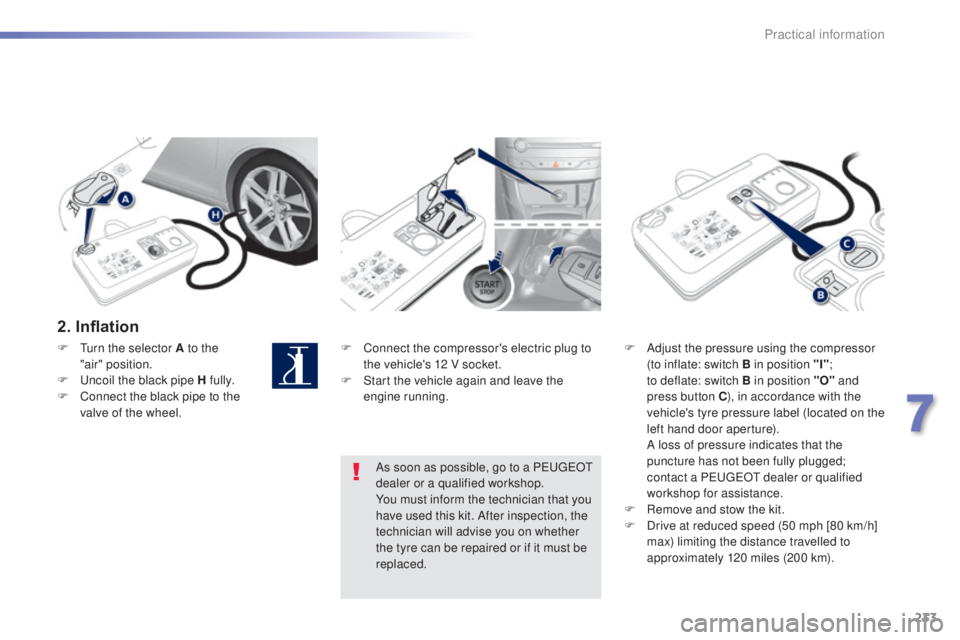
2. Inflation
F Connect the compressor's electric plug to the vehicle's 12 V socket.
F
S
tart the vehicle again and leave the
engine running. F
A djust the pressure using the compressor
(to inflate: switch B in position "I" ;
to
deflate: switch B in position "O" and
press button C ), in accordance with the
vehicle's tyre pressure label (located on the
left hand door aperture).
A l
oss of pressure indicates that the
puncture has not been fully plugged;
contact a P
e
uge
Ot
dealer or qualified
workshop for assistance.
F
R
emove and stow the kit.
F
D
rive at reduced speed (50 mph [80 km/h]
max) limiting the distance travelled to
approximately 120 miles (200 km).
As soon as possible, go to a P
e
uge
Ot
dealer or a qualified workshop.
You must inform the technician that you
have used this kit. After inspection, the
technician will advise you on whether
the tyre can be repaired or if it must be
replaced.
F
tu
rn the selector A to the
"air"
position.
F
u
n
coil the black pipe H fully.
F
C
onnect the black pipe to the
valve of the wheel.
7
Practical information