2015 Peugeot 308 spare wheel
[x] Cancel search: spare wheelPage 241 of 416
239
308_en_Chap07_info-pratiques_ed01-2015
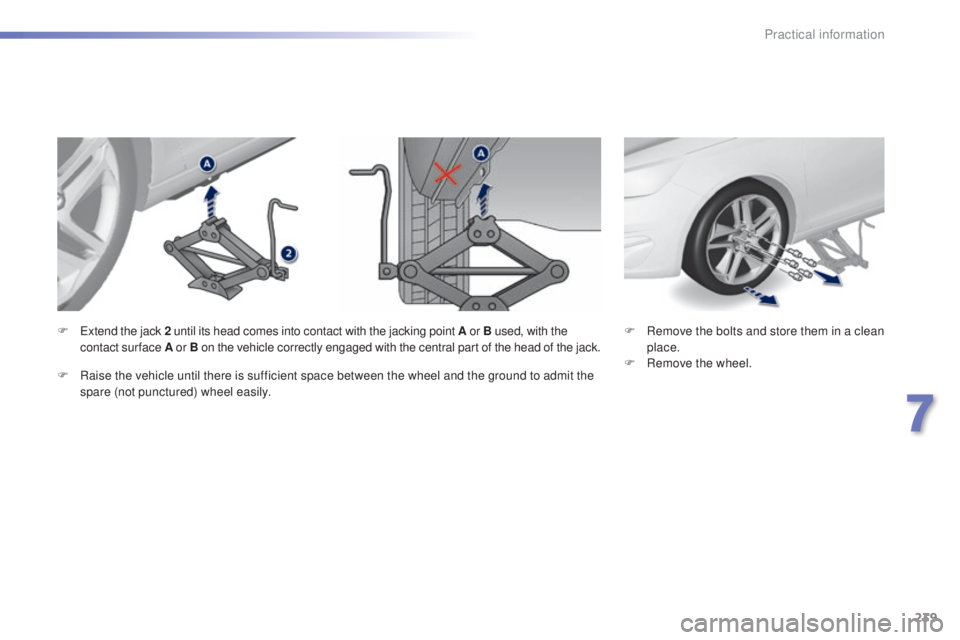
F Remove the bolts and store them in a clean place.
F
R
emove the wheel.
F
ex
tend the jack 2
until its head comes into contact with the jacking point A or B used, with the
contact sur face A or B on the vehicle correctly engaged with the central part of the head of the jack.
F
Ra
ise the vehicle until there is sufficient space between the wheel and the ground to admit the
spare (not punctured) wheel easily.
7
Practical information
Page 242 of 416
240
308_en_Chap07_info-pratiques_ed01-2015
Fitting a wheel
Fitting the "space-saver"
spare wheel
If your vehicle is fitted with alloy wheels,
when tightening the bolts on fitting, it
is normal to notice that the washers
do not come into contact with the
"space-saver" spare wheel. t
h
e wheel
is secured by the conical sur face of
each bolt. F
P
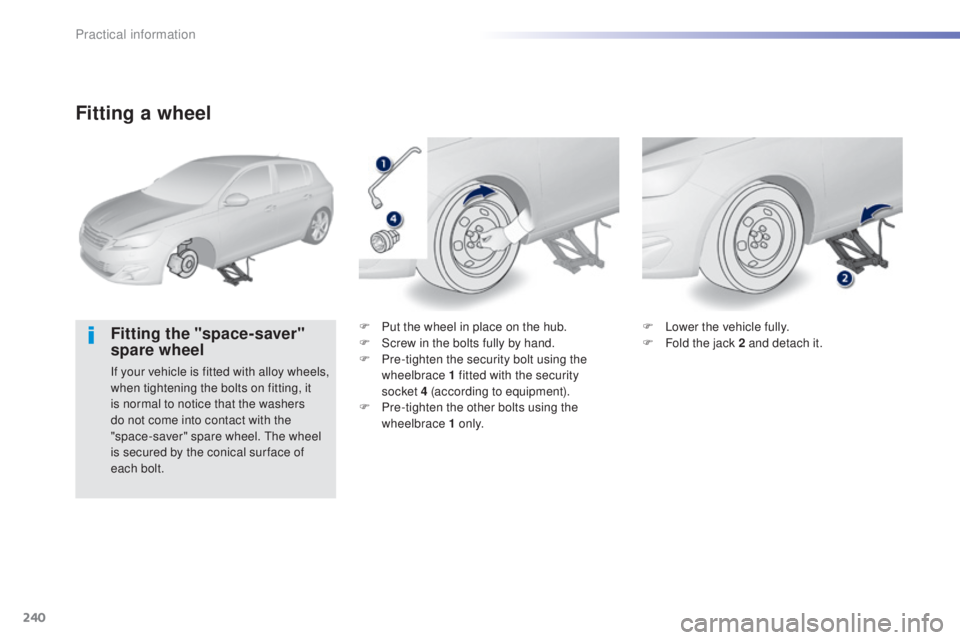
ut the wheel in place on the hub.
F
S
crew in the bolts fully by hand.
F P re-tighten the security bolt using the
wheelbrace 1 fitted with the security
socket 4 (according to equipment).
F
P
re-tighten the other bolts using the
wheelbrace 1 o n l y. F
L
ower the vehicle fully.
F
F
old the jack 2 and detach it.
Practical information
Page 243 of 416
241
308_en_Chap07_info-pratiques_ed01-2015
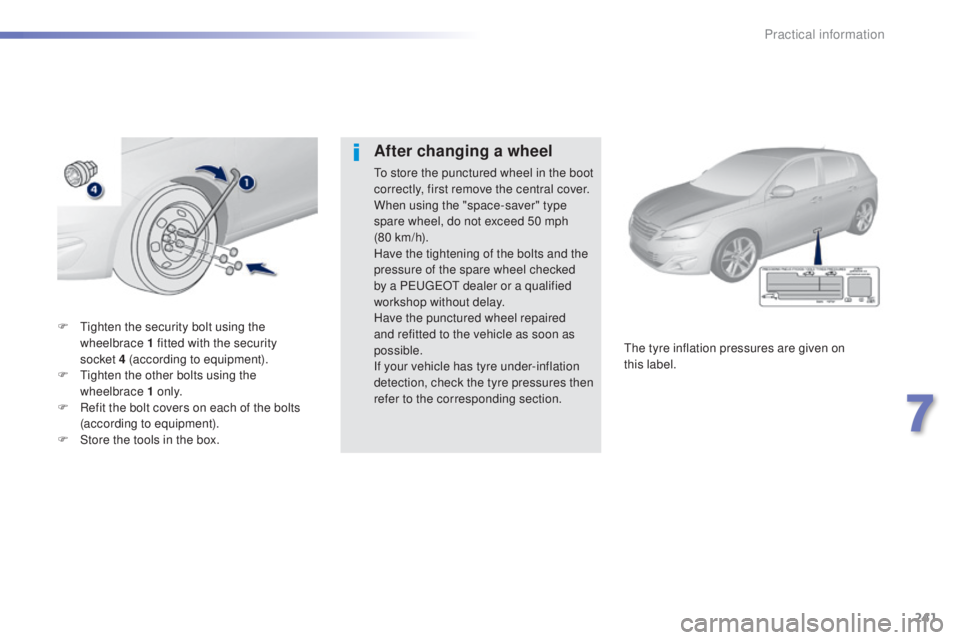
F tighten the security bolt using the wheelbrace 1 fitted with the security
socket
4 (according to equipment).
F
t
i
ghten the other bolts using the
wheelbrace 1 o n l y.
F
R
efit the bolt covers on each of the bolts
(according to equipment).
F
S
tore the tools in the box.
th
e tyre inflation pressures are given on
this
label.
After changing a wheel
to store the punctured wheel in the boot
correctly, first remove the central cover.
When using the "space-saver" type
spare wheel, do not exceed 50 mph
(80
km/h).
Have the tightening of the bolts and the
pressure of the spare wheel checked
by a P
e
uge
Ot
dealer or a qualified
workshop without delay.
Have the punctured wheel repaired
and refitted to the vehicle as soon as
possible.
If your vehicle has tyre under-inflation
detection, check the tyre pressures then
refer to the corresponding section.
7
Practical information
Page 244 of 416
242
308_en_Chap07_info-pratiques_ed01-2015
Snow chains
In wintry conditions, snow chains improve traction as well as the behaviour of the vehicle
when braking.
th
e snow chains must be fitted only
to the front wheels.
t
h
ey must never
be fitted to "space-saver" type spare
wheels.
ta
ke account of the legislation in force
in your country on the use of snow
chains and the maximum running speed
authorised. Avoid driving with snow chains on roads
that have been cleared of snow, to
avoid damaging your vehicle's tyres and
the road sur face. If your vehicle is fitted
with alloy wheels, check that no part of
the chain or its fixings is in contact with
the wheel rim.
us
e only the chains designed to be fitted to the
type of wheel fitted to your vehicle:
You can also use non-slip tyre covers.
For more information on snow chains, contact a
P
e
uge
Ot
dealer or a qualified workshop.
Advice on installation
F If you have to fit the chains during a journey, stop the vehicle on a flat sur face
on the side of the road.
F
A
pply the parking brake and position any
wheel chocks to prevent movement of
your
vehicle.
F
F
it the chains following the instructions
provided by the manufacturer.
F
M
ove off gently and drive for a few
moments, without exceeding 30 mph
(50
km/h).
F
S
top your vehicle and check that the snow
chains are correctly tightened.
Original
tyre size
ty
pe of chain.
195/65 R15 9 mm links
205/55 R16
2 2 5 /4 5 R17
225/40 R18 K-Summit K23
It is strongly recommended that before
you leave, you practise fitting the snow
chains on a level and dry sur face.
Practical information
Page 287 of 416
285
308_en_Chap08_verifications_ed01-2015
Recommendations on storage
Never store bottles of AdBlue® in your
vehicle.
AdBlue
® freezes at about -11°C and
deteriorates above 25°C. It is recommended
that bottles be stored in a cool area and
protected from direct sunlight.
und
er these conditions, the additive can be
kept for at least a year.
If the additive has frozen, can be used once it
has completely thawed out.
Procedure
Before topping-up, ensure that the vehicle is
parked on a flat and level sur face.
In wintry conditions, ensure that the
temperature of the vehicle is above -11°C.
Otherwise, by freezing, the AdBlue
® cannot
be poured into its tank. Park your vehicle in a
warmer area for a few hours to allow the top-up
to be carried out.
F
S
witch off the ignition and remove the
key, or if your vehicle has one, press
the S
tA
R
t/
S
tO
P button to switch off
the
engine. F
F
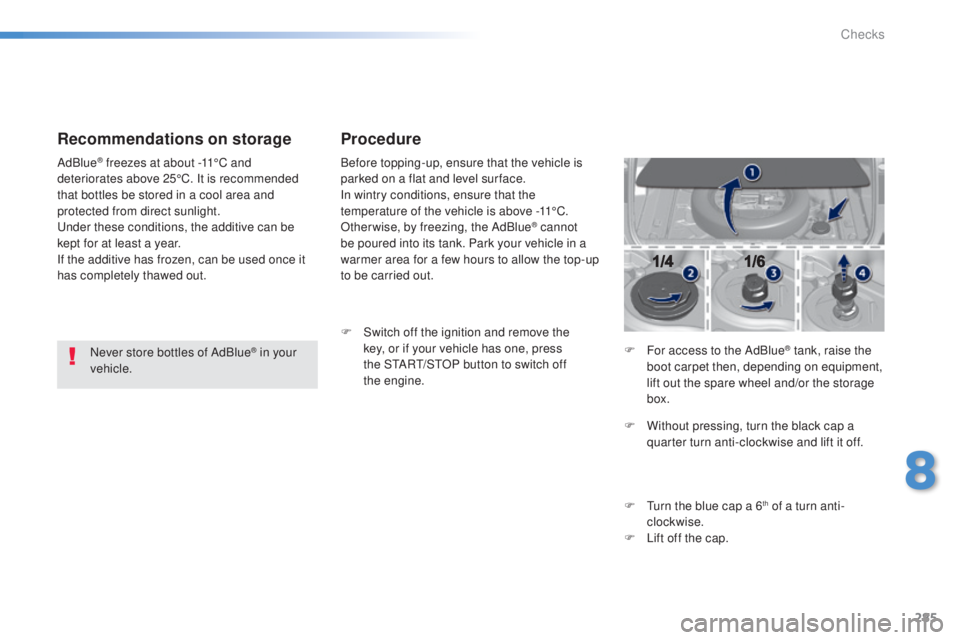
or access to the AdBlue
® tank, raise the
boot carpet then, depending on equipment,
lift out the spare wheel and/or the storage
box.
F
W
ithout pressing, turn the black cap a
quarter turn anti-clockwise and lift it off.
F
t
u
rn the blue cap a 6
th of a turn anti-
clockwise.
F
L
ift off the cap.
8
Checks
Page 288 of 416
286
308_en_Chap08_verifications_ed01-2015
Never dispose of AdBlue® additive
bottles in the household waste. Place
them in a special container provided
this purpose or take them to your dealer.
Important
: if your vehicle's
AdBlue
® tank is completely empty -
w
hich is confirmed by the alert
messages and the impossibility of
starting the engine, you must add at
least 3.8 litres (so two 1.89 litre bottles). F
A
fter emptying the bottle, wipe away any
spillage around the tank filler using a damp
cloth.
If any additive is split or splashed, wash
immediately with cold water or wipe with
a damp cloth.
If the additive has crystallised, clean it
off using a sponge and hot water.
F
R
efit the blue cap to the tank and turn it a
6
th of a turn clockwise, to its stop.
F
R
efit the black cap and turn it a quarter of
a turn clockwise without pressing.
e
n
sure
that the indicator on the cap lines up with
the indicator on the support.
F
D
epending on equipment, return the spare
wheel and/or the storage box to the bottom
of the boot.
F
R
efit the boot carpet and close the tailgate. Important: when topping
-up after
running out of additive , signalled
by the message "
to
p up emissions
additive: Starting prevented", you
must wait for about 5 minutes before
switching on the ignition, without
opening the driver's door, unlocking
the vehicle, introducing the key
into the ignition switch, or placing
the key of the "Keyless Entr y and
Star ting" system inside the vehicle.
Switch on the ignition, then wait for
10 seconds before starting the engine.
F
O
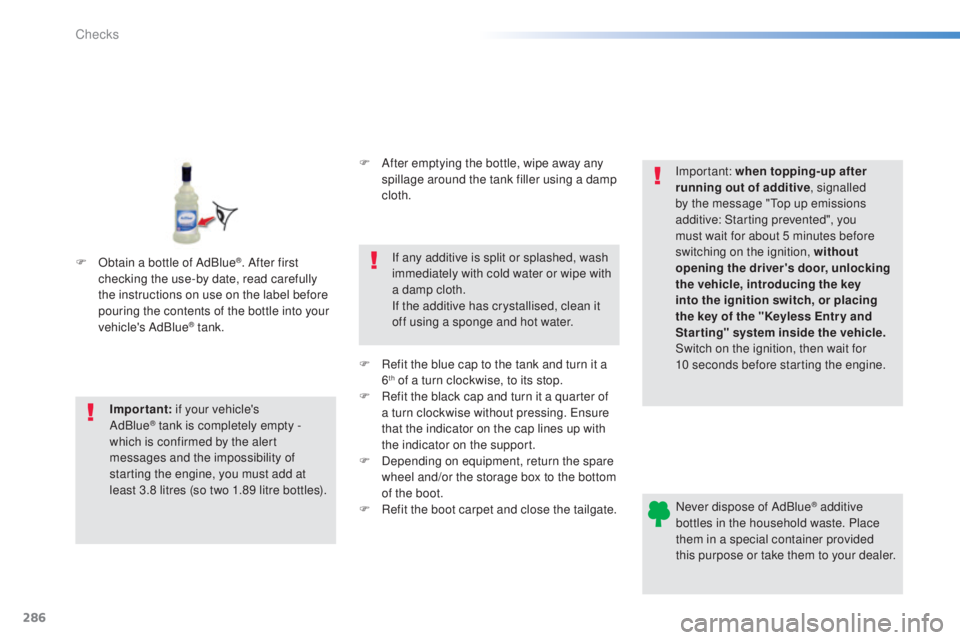
btain a bottle of AdBlue
®. After first
checking the use-by date, read carefully
the instructions on use on the label before
pouring the contents of the bottle into your
vehicle's AdBlue
® tank.
Checks
Page 298 of 416

296
308_en_Chap09_caracteristiques-techniques_ed01-2015
Identification markingsVarious visible markings for the identification of your vehicle.
A.
V
ehicle Identification Number (VIN)
under the bonnet.
t
h
is number is engraved on the chassis
near the right hand front wheel arch.
th
e tyre pressures must be checked
when the tyres are cold, at least once
a month.
If the tyre pressures are too low, this
increases fuel consumption.
B.
V
ehicle Identification Number (VIN) on
the windscreen lower cross member.
t
h
is number is indicated on a self-
adhesive label which is visible through the
windscreen. C.
M
anufacturer's label.
t
h
is self-destroying label on the middle
door pillar, right or left hand side, contains
the following information:
-
t
he manufacturer's name,
-
t
he e
u
ropean whole vehicle type
approval number,
-
t
he vehicle identification number (VIN),
-
t
he maximum authorised weight (gross
vehicle weight),
-
t
he maximum authorised weight with
trailer (gross train weight),
-
t
he maximum front axle weight,
-
t
he maximum rear axle weight.D.
T
yre/paint label.
t
h
is label on the middle door pillar, driver's
side, contains the following information:
-
t
he tyre inflation pressures, laden and
unladen,
-
t
he tyre sizes (including the tyre load
index and speed rating),
-
t
he inflation pressure for the spare
wheel,
-
t
he paint colour code.
technical data
Page 400 of 416

398
Seat adjustment ........................................80, 81
Seat belts ...................................... 20
4-206, 218
Seats, electric
................................................. 81
Seats, rear
................................................. 85, 86
Serial number, vehicle
......................................................... 296
Service indicator
............................................. 29
Servicing
...............................
..........................10
Setting the clock
...........................46, 47, 48, 49
Sidelamps
.................................... 181, 243, 244,
246 -248, 250
Side repeater
..............................
..................247
Ski flap
..............................
..............................93
Snow chains
.................................................. 2
42
Spare wheel
...............................
..........235, 236
Speed limiter
......................................... 13 9, 14 0
Spotlamps, side
.................................... 187, 247
Starting the engine
........................113 , 11 6 , 118
Starting using another battery
...................... 2
61
Steering mounted controls, audio
................................................... 305, 375
Stop & Start
........................ 24, 38, 76, 110, 136,
137, 259, 275, 291
Storage
.......................................... 88, 90, 93 -95
Storage wells
............................................ 94, 95
Storing driving positions ........................................................ 82
Stowing rings
............................................ 94, 95
Switching off the engine
................ 11
5 , 117, 118
Synchronising the remote control
..................................................... 5
6, 66
Synthesiser, voice ............................................................ 343
System settings
............................................. 352
Paint colour code
..........................................
296
Panoramic glass sunroof
................................ 75
Park Assist
............................................. 170 -17 7
Parking brake, electric
............. 20, 121-127, 292
Parking brake manual
..................... 1
5, 120, 292
Parking sensors, front
................................... 167
Parking sensors, rear .................................... 166
Particle filter
.......................................... 290, 291
Passenger compartment filter
...................... 291
P
e
uge
Ot C
ONN
eCt A
PPS
....................... 35
5
Peuge
O
t Connect Assistance
................... 298
Peuge
O
t Connect SOS
............................. 29
8
Peuge
O
t Connect Sound (RD5)
................ 37
3
Player, CD MP3
..................................... 318, 379
Port,
u
S
B
......................... 8
8, 91, 318, 382, 384
Priming the fuel system
................................ 278
Protecting children
................ 206, 208, 212-228
Puncture
........................................................ 229
Radio
..................................................... 312, 37 7
RDS
....................................................... 315, 377
Rear foglamp .................183, 248, 249, 250, 251
Rear screen (demisting)
................................ 111
Recharging the battery
................................. 2
62
Reduction of electrical load
.......................... 263
Refilling AdBlue ..................................... 284-287
Regeneration of the particle filter
................. 2
91
Reinitialising the remote control
............... 5
6, 66
Remote control
.......................................... 5
0- 67
Removable screen (snow shield).......... 267, 268Safety for children
................. 206, 208, 212-228
Screen, instrument panel
.................. 12, 35, 130
Screen menu map
....... 306, 308, 310, 324, 326,
328, 344, 356, 358, 388 -390
Screen, multifunction (with audio equipment)
........... 4
7, 48, 376, 388
Screen, without audio equipment
................... 49
Screenwash
.................................................. 19 0
Screenwash fluid level
.......................... 191, 29 0
Screenwash reservoir
................................... 290
SCR (Selective Catalytic Reduction)
............ 279
P
RS
Removing a wheel ........................................ 23 8
Removing the mat ........................................... 89
Repair kit, puncture
....................................... 229
Replacing bulbs
.................................... 243-252
Replacing fuses
..............................
......253-258
Replacing the air filter
...................................291
Replacing the oil filter
................................... 2
91
Replacing the passenger compartment filter
...................................... 291
Replacing wiper blades .........................192, 26 4
Resetting the service indicator
.......................31
Resetting the trip recorder
..............................33
Reversing camera
......................................... 169
Reversing lamp
..................................... 2
48, 250
Risk areas (update)
....................................... 333
Roof bars
............................................... 2
70, 271
Roof blind
........................................................ 75
Routine checks
..................................... 291, 292
Running out of fuel (Diesel)
..........................2
78
Alphabetical index