Page 160 of 416

158
308_en_Chap04_conduite_ed01-2015
emergency collision alert system and emergency collision braking system
Emergency collision alert
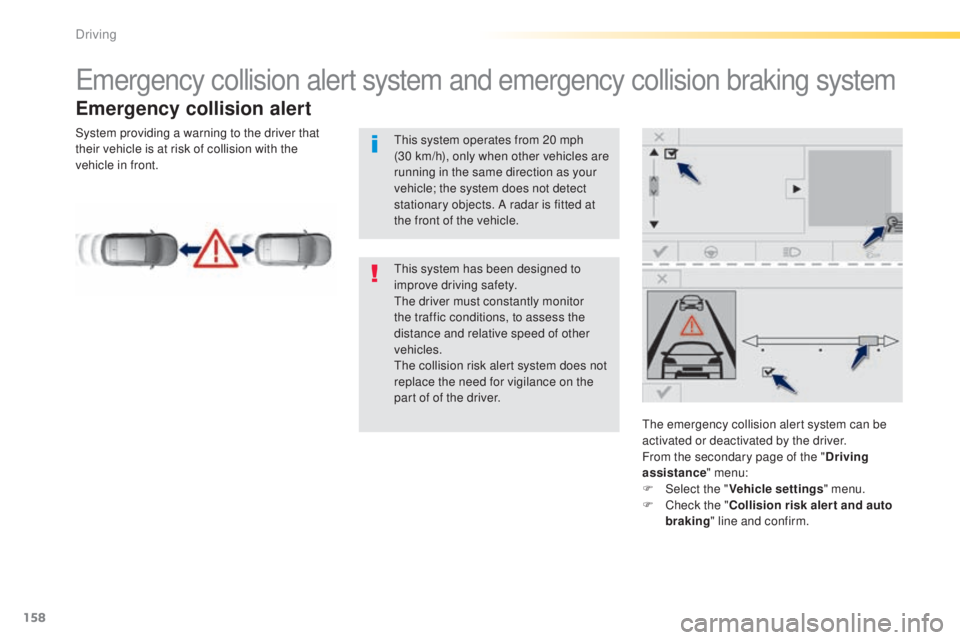
the emergency collision alert system can be
activated or deactivated by the driver.
From the secondary page of the "Driving
assistance " menu:
F
Sel
ect the " Vehicle settings " menu.
F
C
heck the " Collision risk alert and auto
braking " line and confirm.
th
is system has been designed to
improve driving safety.
th
e driver must constantly monitor
the traffic conditions, to assess the
distance and relative speed of other
vehicles.
th
e collision risk alert system does not
replace the need for vigilance on the
part of of the driver.
th
is system operates from 20 mph
(30
km/h), only when other vehicles are
running in the same direction as your
vehicle; the system does not detect
stationary objects. A radar is fitted at
the front of the vehicle.
System providing a warning to the driver that
their vehicle is at risk of collision with the
vehicle in front.
Driving
Page 161 of 416
159
308_en_Chap04_conduite_ed01-2015
From the secondary page of the "Driving
assistance " menu:
F
Sel
ect the " Vehicle settings " menu.
F
C
heck the " Collision risk alert and auto
braking " line.
th
e alert thresholds determine how you want to
be alerted to the presence of a vehicle running
in front of you.
You can choose from three thresholds:
-
1
: "Distant", to be given an early alert
(cautious driving).
-
2
: "Normal".
-
3
: "Close", to be given a later alert (sporty
driving).
Setting the thresholds for the
alert
F Press on the magnifying glass. F
M
odify the alert threshold and press on
" Finish " to memorise the threshold and
leave the menu.
F
P
ress on "
Confirm" to save the change.
4
Driving
Page 163 of 416

161
308_en_Chap04_conduite_ed01-2015
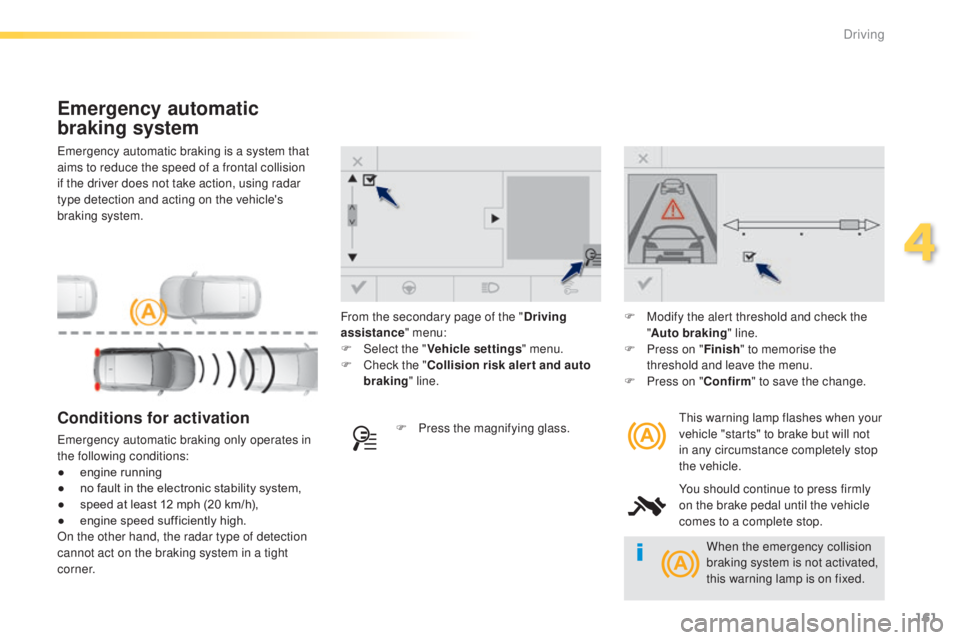
emergency automatic braking is a system that
aims to reduce the speed of a frontal collision
if the driver does not take action, using radar
type detection and acting on the vehicle's
braking system.
Emergency automatic
braking system
this warning lamp flashes when your
vehicle "starts" to brake but will not
in any circumstance completely stop
the vehicle.
You should continue to press firmly
on the brake pedal until the vehicle
comes to a complete stop.Conditions for activation
emergency automatic braking only operates in
the following conditions:
●
e
ngine running
●
n
o fault in the electronic stability system,
●
s
peed at least 12 mph (20 km/h),
●
e
ngine speed sufficiently high.
On the other hand, the radar type of detection
cannot act on the braking system in a tight
c o r n e r. F
P ress the magnifying glass.F
M
odify the alert threshold and check the
" Auto braking " line.
F
P
ress on "
Finish" to memorise the
threshold and leave the menu.
F
P
ress on "
Confirm" to save the change.
From the secondary page of the "
Driving
assistance " menu:
F
Sel
ect the "
Vehicle settings " menu.
F
C
heck the "
Collision risk alert and auto
braking " line.
When the emergency collision
braking system is not activated,
this warning lamp is on fixed.
4
Driving
Page 188 of 416

186
308_en_Chap05_visibilite_ed01-2015
Automatic illumination of
headlamps
Activation
F turn the ring to the "AUTO" position. th e
activation of the function is accompanied
by the display of a message.
When a low level of ambient light is detected
by a sunshine sensor, the number plate
lamps,
s
idelamps and dipped beam headlamps
are switched on automatically, without any
action on the part of the driver. t
h
ey can also
come on if rain is detected, at the same time as
automatic operation of the windscreen wipers.
As soon as the brightness returns to a
sufficient level or after the windscreen wipers
are switched off, the lamps are switched off
automatically.
Deactivation
F turn the ring to another position. Deactivation of the function is
accompanied by the display of a message.
Operating fault
In the event of a malfunction of the
sunshine sensor, the lighting comes
on, this warning lamp is displayed
In fog or snow, the sunshine sensor
may detect sufficient light. In this
case, the lighting will not come on
automatically.
Do not cover the sunshine sensor,
coupled with the rain sensor and
located in the centre of the windscreen
behind the rear view mirror; the
associated functions would no longer
be controlled.
Automatic "guide-me-
home" lighting
When the automatic illumination of headlamps
function is activated, under low ambient
light the dipped beams headlamps come on
automatically when the ignition is switched off.
Activation or deactivation, as well as the
duration of the guide-me-home lighting, is
set in the " Driving assistance " menu, then
" Vehicle settings " in the secondary page.
Contact a P
e
uge
Ot
dealer or a qualified
workshop. in the instrument panel accompanied by an
audible signal and/or a message.
Visibility
Page 192 of 416

190
308_en_Chap05_visibilite_ed01-2015
Rear wiper
If a significant accumulation of snow or
ice is present, or when using a bicycle
carrier on the boot, deactivate the
automatic rear wiper.
Park.
Intermittent wipe.
Wash-wipe (set duration). F
P
ull the windscreen wiper stalk towards
you. t
he
screenwash then the wipers
operate for a fixed period.
th
e headlamp wash is only activated if the
dipped headlamps are on and the vehicle is
moving .
With daytime running lamps, to activate the
headlamp wash, position the lighting stalk in
the dipped beam position.
Windscreen and headlamp
wash
On vehicles fitted with digital air
conditioning, any action on the
windscreen wash control results in
temporary closing of the air intake to
avoid odours inside the passenger
compartment.
Rear wiper selection ring:
th
is function is activated by default.
F
I
n the secondary page, press "
Vehicle
settings ".
F
Sel
ect the "
Driving assistance "
menu.
Reverse gear
When reverse gear is engaged, the rear wiper
will come into operation automatically if the
windscreen wipers are operating.
Activation or deactivation of this automatic
function can be set in the touch screen.
Visibility
Page 255 of 416

253
308_en_Chap07_info-pratiques_ed01-2015
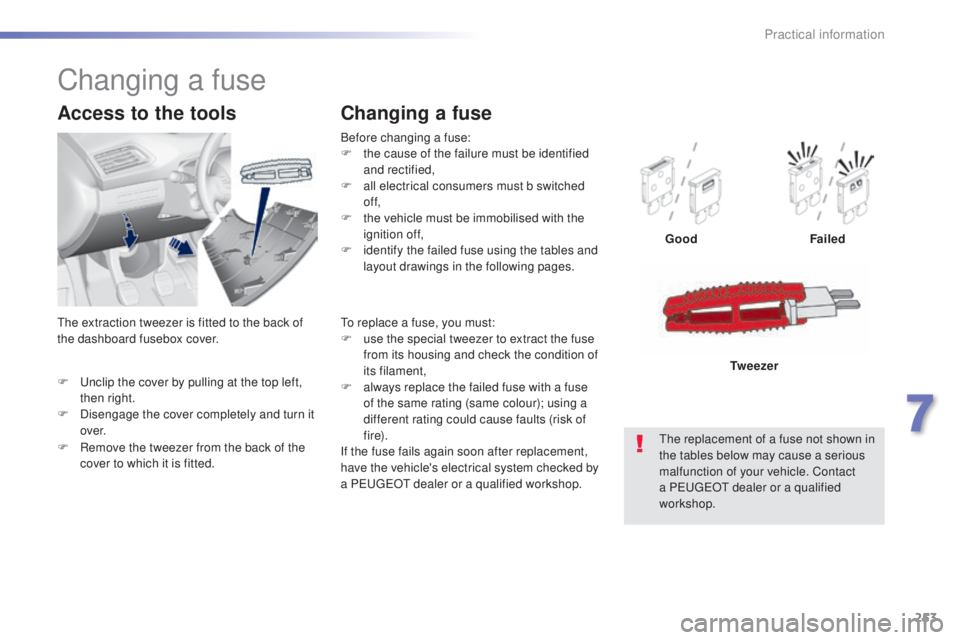
F unclip the cover by pulling at the top left, then right.
F
D
isengage the cover completely and turn it
ove r.
Access to the tools
Before changing a fuse:
F t he cause of the failure must be identified
and rectified,
F
a
ll electrical consumers must b switched
of f,
F
t
he vehicle must be immobilised with the
ignition off,
F
i
dentify the failed fuse using the tables and
layout drawings in the following pages.
Changing a fuse
Good Failed
th
e replacement of a fuse not shown in
the tables below may cause a serious
malfunction of your vehicle. Contact
a P
e
uge
Ot
dealer or a qualified
workshop. Tw e e z e r
Changing a fuse
to replace a fuse, you must:
F
u se the special tweezer to extract the fuse
from its housing and check the condition of
its filament,
F
a
lways replace the failed fuse with a fuse
of the same rating (same colour); using a
different rating could cause faults (risk of
f i r e).
If the fuse fails again soon after replacement,
have the vehicle's electrical system checked by
a P
e
uge
Ot
dealer or a qualified workshop.
F
R
emove the tweezer from the back of the
cover to which it is fitted.th
e extraction tweezer is fitted to the back of
the dashboard fusebox cover.
7
Practical information
Page 305 of 416
01
use the buttons on either side of the touch screen for access to the menu\
s, then press the
virtual buttons in the touch screen.
e
ach menu is displayed in one or two pages (primary page and secondary p\
age).
GENERAL OPERATION
In very hot conditions, the system may go into stand-by (screen and sou\
nd completely off) for a minimum period of 5 minutes. Secondary page
Primary page
303
Page 308 of 416
04
306
MEDIA
Level 1Level 2
List of FM stations
"Media"
Primary page
Preset