Page 30 of 341
28
208_en_Chap02_ Acces-Demarrage_ed01-2015
Boot
Using the key.
Using the remote control.
OpeningClosing
F Lower the tailgate using the interior grab
handle.
F If necessary, press down on the tailgate to
fully close it.
- With the engine is running , this
is signalled by this warning lamp
coming on and an alert message
displayed for a few seconds,
- With the vehicle moving (speed above
6 mph (10 km/h)), by an audible signal as
well.
Boot still open
F After unlocking the boot or the vehicle,
press the opening control which releases
the tailgate, and then guide it open.
Access and starting
Page 33 of 341
31
208_en_Chap02_ Acces-Demarrage_ed01-2015
Advice
Doors
Driver's door
Insert the key in the lock to lock or unlock the
d o o r.
Tailgate release
System for mechanical unlocking of the boot in
the event of a central locking malfunction.
Unlocking
F Fold back the rear seats to gain access to
the lock from inside the boot.
F Insert a small screwdriver into hole A of the
lock to unlock the tailgate.
Back-up manual locking
For mechanically locking and unlocking the
doors in the event of a fault with the central
locking system or a battery failure.
Passenger doors
F On the rear doors, check that the child lock
is not on.
F Remove the black cap located on the edge
of the door, using the key.
F Insert the key into the aperture without
forcing, then without turning, move the
latch sideways towards the inside of the
d o o r.
F Remove the key and refit the cap.
Boot
2
Access and starting
Page 123 of 341

121
208_en_Chap05_conduite_ed01-2015
Reversing camera
The reversing camera function may be
completed with parking sensors.The reversing camera cannot in any
circumstances be a substitute for
vigilance on the part of the driver.
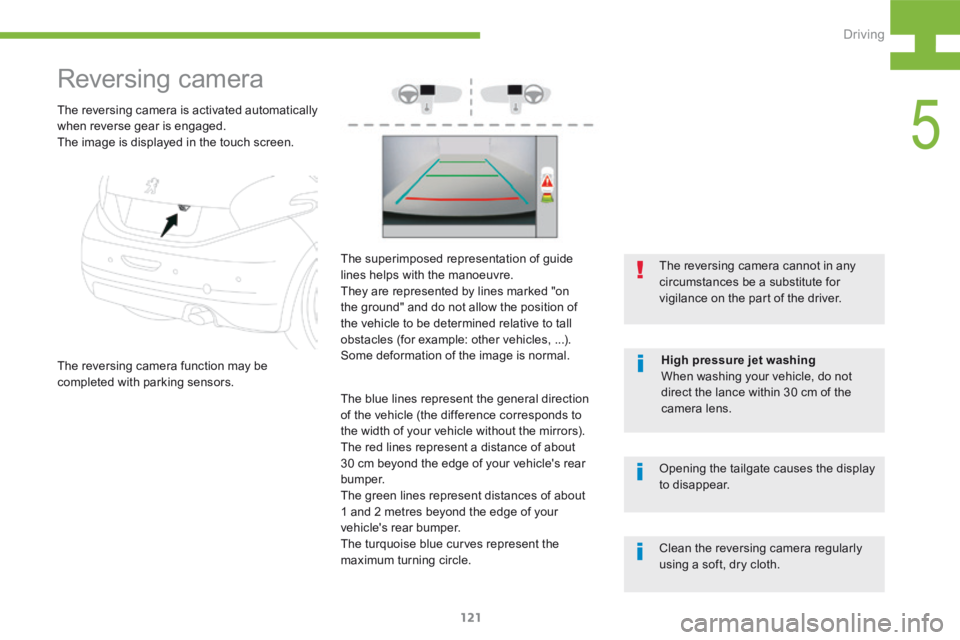
The superimposed representation of guide
lines helps with the manoeuvre.
They are represented by lines marked "on
the ground" and do not allow the position of
the vehicle to be determined relative to tall
obstacles (for example: other vehicles, ...).
Some deformation of the image is normal.
High pressure jet washing
When washing your vehicle, do not
direct the lance within 30 cm of the
camera lens.
The reversing camera is activated automatically
when reverse gear is engaged.
The image is displayed in the touch screen.
The blue lines represent the general direction
of the vehicle (the difference corresponds to
the width of your vehicle without the mirrors).
The red lines represent a distance of about
30 cm beyond the edge of your vehicle's rear
b u m p e r.
The green lines represent distances of about
1 and 2 metres beyond the edge of your
vehicle's rear bumper.
The turquoise blue curves represent the
maximum turning circle. Opening the tailgate causes the display
to disappear.
Clean the reversing camera regularly
using a soft, dry cloth.
5
Driving
Page 162 of 341

160
208_en_Chap06_Feux-Signalisations_ed01-2015
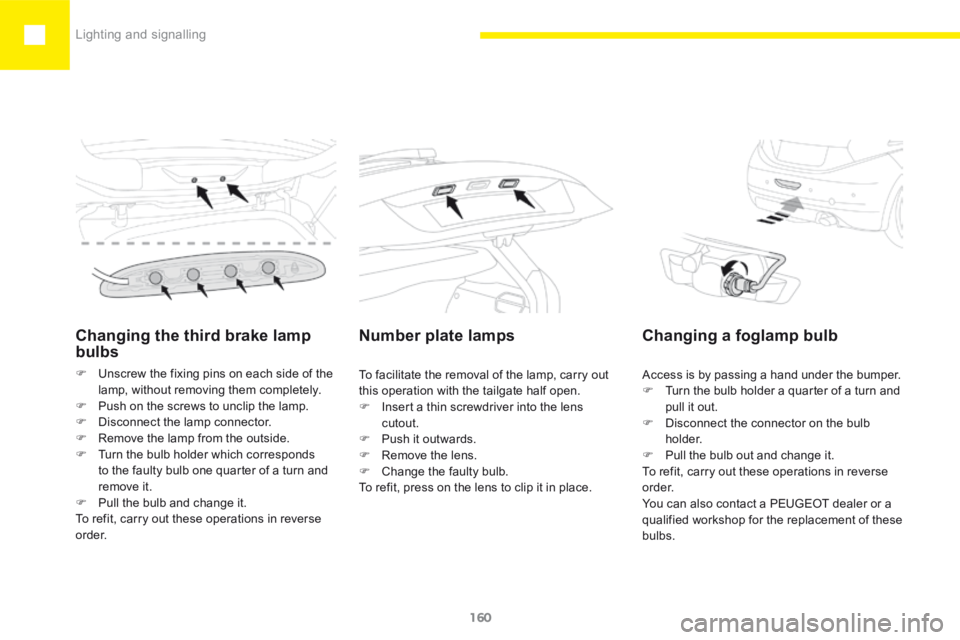
Changing the third brake lamp
bulbs
F Unscrew the fixing pins on each side of the
lamp, without removing them completely.
F Push on the screws to unclip the lamp.
F Disconnect the lamp connector.
F Remove the lamp from the outside.
F Turn the bulb holder which corresponds
to the faulty bulb one quarter of a turn and
remove it.
F Pull the bulb and change it.
To refit, carry out these operations in reverse
o r d e r.
Number plate lamps
To facilitate the removal of the lamp, carry out
this operation with the tailgate half open.
F Insert a thin screwdriver into the lens
cutout.
F Push it outwards.
F Remove the lens.
F Change the faulty bulb.
To refit, press on the lens to clip it in place. Access is by passing a hand under the bumper.
F
Turn the bulb holder a quarter of a turn and
pull it out.
F Disconnect the connector on the bulb
h o l d e r.
F Pull the bulb out and change it.
To refit, carry out these operations in reverse
o r d e r.
You can also contact a PEUGEOT dealer or a
qualified workshop for the replacement of these
bulbs.
Changing a foglamp bulb
Lighting and signalling
Page 190 of 341

188
208_en_Chap08_Informations-pratiques_ed01-2015
Filling
F Pour the contents of the bottle into your
vehicle's AdBlue® tank.
Important : if your vehicle's AdBlue
®
tank is completely empty - which is
confirmed by the alert messages and
the impossibility of starting the engine,
you must add at least 3.8 litres (so two
1.89 litre bottles).
If any additive is split or splashed, wash
immediately with cold water or wipe with
a damp cloth.
If the additive has crystallised, clean it
off using a sponge and hot water.
F
Wipe away any spillage around the tank
filler using a damp cloth.
Closing
F Refit the blue cap to the tank and turn it
a 6th of a turn clockwise, to its stop.
F Refit the black cap and turn it a quarter of
a turn clockwise without pressing. Ensure
that the indicator on the cap lines up with
the indicator on the support.
F Depending on equipment, return the spare
wheel and/or the storage box to the bottom
of the boot.
F Refit the boot carpet and close the tailgate.
Access
F For access to the AdBlue® tank, raise the
boot carpet then, depending on equipment,
lift out the spare wheel and/or the storage
box.
Opening
F Without pressing, turn the black cap a
quarter turn anti-clockwise and lift it off.
F Turn the blue cap a 6
th of a turn anti-
clockwise.
F Lift off the cap.
Practical information