2015 NISSAN MURANO ECO mode
[x] Cancel search: ECO modePage 17 of 203
*3<>:
Push to display the hands-free phone
operation screen.
When you receive a phone call, push this
button to answer the call.
“4. Hands-Free Phone”
*4<>/<>:
The buttons are used mainly for the vehicle
information display operation. Refer to the
vehicle Owner’s Manual for details.
During voice recognition operation, <
>
can be used to return to the previous
screen.
*5
Push to change the audio source to the
available mode.
*6<+> /<->:
Push to adjust the volume.
INFO:
Steering wheel switches are mainly for the
vehicle information display control and may not
be able to operate the touch screen display
depending on the conditions. Follow the pop-up
guide messages and labels shown on the vehicle
information display.
Some of the information displayed on the vehicle information display are linked with the touch
screen display.
“Control panel and vehicle information
display interaction” (page 5-8)
For other details of the vehicle information
display, refer to the vehicle Owner’s Manual.
USB (Universal Serial Bus) CONNEC-
TION PORTS AND AUX (auxiliary)
INPUT JACK
WARNING
Do not connect, disconnect or operate
the USB device while driving. Doing so
can be a distraction. If distracted you
could lose control of your vehicle and
cause an accident or serious injury.
CAUTION
. Do not force the USB device into the
USB port. Inserting the USB device
tilted or up-side-down into the port
may damage the port. Make sure that
the USB device is connected correctly
into the USB port.
. Do not grab the USB port cover (if so
equipped) when pulling the USB
device out of the port. This could damage the port and the cover.
. Do not leave the USB cable in a place
where it can be pulled unintention-
ally. Pulling the cable may damage
the port.
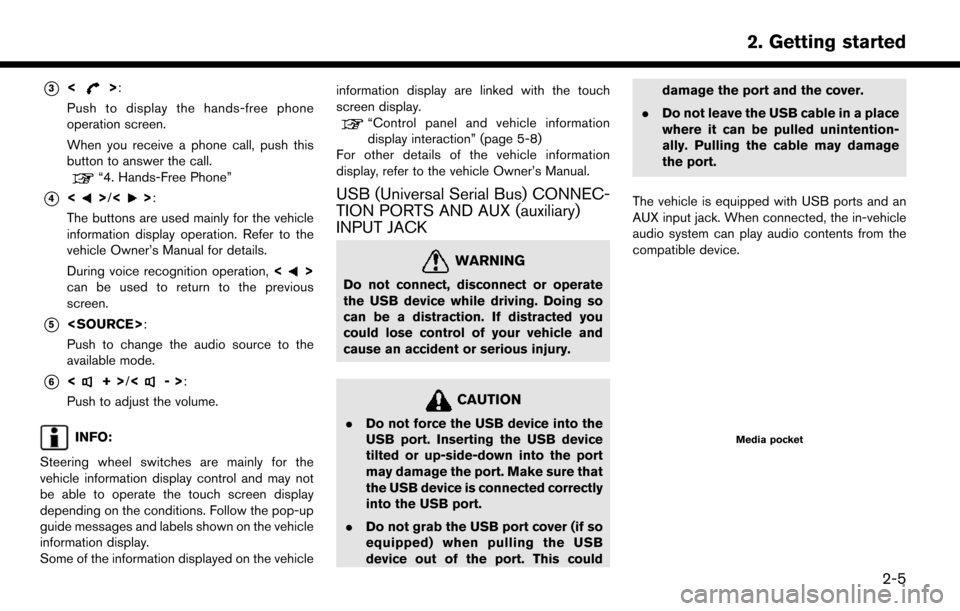
The vehicle is equipped with USB ports and an
AUX input jack. When connected, the in-vehicle
audio system can play audio contents from the
compatible device.Media pocket
2. Getting started
2-5
Page 27 of 203
![NISSAN MURANO 2015 3.G LC2 Kai Navigation Manual [Clock]Displays the clock adjust-
ment screen.
“Clock settings”
(page 2-16)
[Edit Home Menu] Displays the menu editing screen.
“Customizing
HOME MENU
screen”
(page 2-11)
[Voice Recognition] Di NISSAN MURANO 2015 3.G LC2 Kai Navigation Manual [Clock]Displays the clock adjust-
ment screen.
“Clock settings”
(page 2-16)
[Edit Home Menu] Displays the menu editing screen.
“Customizing
HOME MENU
screen”
(page 2-11)
[Voice Recognition] Di](/manual-img/5/436/w960_436-26.png)
[Clock]Displays the clock adjust-
ment screen.
“Clock settings”
(page 2-16)
[Edit Home Menu] Displays the menu editing screen.
“Customizing
HOME MENU
screen”
(page 2-11)
[Voice Recognition] Displays the voice recog- nition system settings
screen.
“Voice recognition
settings”
(page 7-17)
[Language & Units] Displays the Language and Units settings screen.
“Language and unit
settings”
(page 2-16)
[Camera]
(models with Rear-
View Monitor) Displays the Camera
setting screen.
See vehicle Owner’s
Manual for details of the
monitor system.
DISPLAY SETTINGS
Menu items to adjust display settings are
available.
1. Touch [Settings] on the Launch Bar.
2. Touch [Display].
3. Touch a preferred adjustment item and
adjust to the preferred setting.
Available setting items
Setting item Action
[Display] Turns the screen off. Pushing and holding <
>
will also turn off the screen.
Push the <
>to turn the
screen back on.
[Brightness] Adjusts the brightness of the display.
[Contrast] Adjusts the contrast of the dis- play.
[Background
Color] Changes the background color
of the map screen. Select the
color mode from [Day] and
[Night].
Pushing
<
>will also
change the background color.
VOLUME AND BEEPS SETTINGS
The volume of various functions including audio,
phone, navigation voice guidance, and system
beeps can be adjusted.
1. Touch [Settings] on the Launch Bar.
2. Touch [Volume & Beeps].
2. Getting started
2-15
Page 28 of 203
![NISSAN MURANO 2015 3.G LC2 Kai Navigation Manual 2. Getting started
Available setting items
Setting item Action
[Audio Volume] Adjusts the volume level of theaudio system.
[Guidance Vo-
lume] Adjusts the volume level of the
guidance voice and the vo NISSAN MURANO 2015 3.G LC2 Kai Navigation Manual 2. Getting started
Available setting items
Setting item Action
[Audio Volume] Adjusts the volume level of theaudio system.
[Guidance Vo-
lume] Adjusts the volume level of the
guidance voice and the vo](/manual-img/5/436/w960_436-27.png)
2. Getting started
Available setting items
Setting item Action
[Audio Volume] Adjusts the volume level of theaudio system.
[Guidance Vo-
lume] Adjusts the volume level of the
guidance voice and the voice
recognition system voice re-
sponses.
[Ringtone] Adjusts the volume level of the ringtone of incoming calls.
[Incoming Call] Adjusts the incoming call vo- lume.
[Outgoing Call] Adjusts the outgoing call vo- lume.
[NissanConnect
Svcs.] Adjusts the volume level of
“text-to-speech” for text mes-
saging.
[Button Beeps] Turns on/off the button beep sound and alarm for a prohib-
ited operations.
[Guidance Voice] Turns on/off the voice gui- dance.
LANGUAGE AND UNIT SETTINGS
This changes the display language and measure-
ment unit used in the system.
1. Touch [Settings] on the Launch Bar.
2. Touch [Language & Units].
Available setting items
Setting item Action
[Select Lan-
guage]Selects the system language.
The language setting is applied
to the touch screen display,
voice announcements, the
voice recognition system.
It can also be applied to the
vehicle information display.
[Select Units] Selects the system unit. The unit setting can also be applied
to the information vehicle dis-
play.
INFO:
Do not change the position of the ignition switch
while changing the language.
If the selected language is also supported by the
vehicle information display, a confirmation mes-
sage asking if you would like to also change the
language for the vehicle information display is
displayed. Select [Yes] to change the language on the vehicle information display.
CLOCK SETTINGS
Clock settings of the system can be changed.
1. Touch [Settings] on the Launch Bar.
2. Touch [Clock].
Available setting items
Setting item Action
[On-screen
Clock]
Sets the clock display on/off.
When this item is on, the clock
display appears.
[Clock Format
(24h)] Turns on/off the 24-hour display
mode. When turned off, the
clock is set to the 12-hour
mode.
[Offset (hour)] Adjusts the offset value (hour).
[Offset (min)] Adjusts the offset value (min- utes) .
[Daylight Sav-
ings Time] Turns on/off the daylight saving
time setting.
[Time Zone] Select an appropriate time zone from the list. When selecting
[Auto], the system selects the
time zone automatically.
2-16
Page 49 of 203
Ejecting CD:
Push<
>to eject a CD. If the CD is ejected
and left unremoved, it will be reloaded into the
slot for protection.
INFO:
The ignition switch must be placed in the “ACC”
or “ON” position in order for the CD to eject.
CD Menu
Touch [CD Menu] on the CD screen to display
the CD menu screen.
The following items are available.
[Now Playing] Touch to display the CD screen.
[Scan] Touch to scan the tracks on the CD. During scanning, the first
several seconds of all the tracks
will be played. Touching [Scan]
again will cancel the scanning
mode and the CD will return to
play normally from the track
which is playing.
[Folder List]* Touch to display the folder list. Touch an item on the list to
select the folder.
Track List A list of the tracks on the CD is displayed. Touch an item on the
list to select the track.
*: Displayed only when available.
3. Audio system
3-19
Page 56 of 203
![NISSAN MURANO 2015 3.G LC2 Kai Navigation Manual 3. Audio system
[] Each time [] is touched, the
mode changes.
“Changing play mode”
(page 3-26)
[
] Touch to return to the beginning of the current track. Touch again to
select the previous track. NISSAN MURANO 2015 3.G LC2 Kai Navigation Manual 3. Audio system
[] Each time [] is touched, the
mode changes.
“Changing play mode”
(page 3-26)
[
] Touch to return to the beginning of the current track. Touch again to
select the previous track.](/manual-img/5/436/w960_436-55.png)
3. Audio system
[] Each time [] is touched, the
mode changes.
“Changing play mode”
(page 3-26)
[
] Touch to return to the beginning of the current track. Touch again to
select the previous track. Touch and
hold to rewind the current track.
[
] Touch to play the track.
[
] Touch to pause the track.
[
] Touch to select the next tack. Touch and hold to fast-forward the track.
[
] Each time [] is touched, the
mode changes.
“Changing play mode”
(page 3-26)
*8Track number:
Indicates the track number and the total
number of tracks.
iPod�Šplayer operation
Activation and playing:
Connecting iPod
�Što the vehicle via USB cable
will activate the iPod�Šmode.
The iPod�Šcan also be played by selecting the
source on the audio source menu screen.
“Selecting audio source” (page 3-11) To play the iPod
�Štouch []. Touch []to
pause.
Selecting search method:
A list of search methods is displayed in the iPod
�Š
menu. Touch and select an item to play the iPod�Š
in your preferred settings.
Skipping tracks:
Push <
>/<>, touch []/[] on the
screen, or tilt up/down <>/<>on the
steering wheel briefly to skip to the next or the
previous track.
Turning
track is playing will also skip the tracks.
Skipping items:
When a list is displayed, turn
Fast-forwarding/rewinding:
To fast-forward or rewind the track, push and
hold <
>/<>, touch and hold []/[],
or tilt and hold <>/<>on the steering
wheel. Changing play mode:
Repeat mode
Touch [
] on the screen to change the repeat
mode as follows.
(off) ?[One] ?[All] ?(off)
Random mode
Touch [
] on the screen to change the random
mode as follows.
(off) ?[Songs] ?[Albums] ?(off)
INFO:
Even when iPod
�Šor iPhone�Šare inserted into
both of the two USB ports, the system recog-
nizes only one connected iPod
�Šor iPhone�Šat a
time.
iPod�ŠMenu
Touch [iPod Menu] on the iPod�Šscreen to
display the iPod�Šmenu screen.
The following items are available.
3-26
Page 128 of 203
6. Navigation
4. Touch a preferred events from the list tocheck the detailed information and the map.
Displaying urgent traffic information
When an urgent event is found around the
current vehicle location, a message pops up
automatically on the touch screen display with a
voice announcement.
The message includes the icon, event type, event
information and the direct distance from the
current location to the event.
INFO:
. Urgent traffic information is displayed re-
gardless of whether [Use Traffic Info] func-
tion is on or off.
“Traffic information setting”
(page 6-45)
. When there are multiple urgent events, the
event with the shortest direct distance from
the current location is displayed.
. If the urgent event is on the recommended
route, and if a detour is found, the detour
route notification screen is displayed when
the vehicle approaches the detour point.
Traffic information on map
With a subscription to SiriusXM Traffic service,
traffic information is displayed on both 2D map
and Birdview
TMmap screen.“Notes on SiriusXM Traffic information”
(page 5-7)
Screen information
*1Road conditions
Free Flow: Green arrow
Moderate traffic: Yellow arrow
Heavy traffic: Red arrow
Section affected by serious traffic event:
Purple arrow
*2Traffic information icon:
If a route is not already set, all of the traffic
information icons on the map screen are
displayed in color. When a route is already
set, the icons on the route are displayed in
color, and the icons outside the route are
displayed in gray.
: Accident
: Closed road
: Information
: Road work
: Slippery road
: Weather
: Incident
*3Traffic indicator:
Displays the reception condition of traffic
information transmitted from the provider.
When reception condition of traffic infor-
mation transmitted from the provider is not
detected, the traffic indicator will be
“grayed-out”.
6-44
Page 166 of 203
7. Voice recognition
1st Command 2nd Command 3rd Command ActionAM
AM Turns to the AM band, selecting the station last played.
AM Preset <1-6> Plays the spoken AM preset station.
FM
FM Turns to the FM band, selecting the station last played.
FM Preset <1-12> Plays the spoken FM preset station.
SXM
SXM
SXM Turns to the SiriusXM Satellite Radio band, selecting the channel last played.
SXM Preset <1-18> Plays the spoken SXM preset channel.
Play AM Turns to the AM band, selecting the station last played.
FM Turns to the FM band, selecting the station last played.
SXM Turns to the SiriusXM Satellite Radio band, selecting the channel last played.
USB Turns on the USB, selecting the last played mode.
iPod Turns on the iPod
�Š, selecting the last played mode.
CD Turns on the CD, selecting the last played mode.
Bluetooth Audio Turns on the Bluetooth
�ŠAudio, selecting the last played mode.
AUX Turns on the AUX audio, selecting the last played mode.
Play AM Turns to the AM band, selecting the station last played.
Play FM Turns to the FM band, selecting the station last played.
7-14
Page 167 of 203
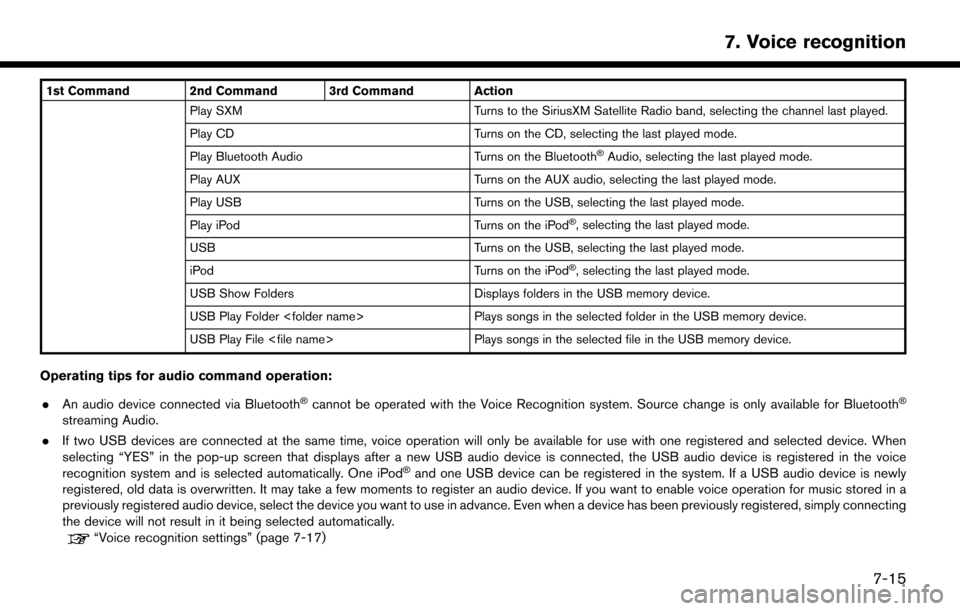
1st Command 2nd Command 3rd Command ActionPlay SXM Turns to the SiriusXM Satellite Radio band, selecting the channel last played.
Play CD Turns on the CD, selecting the last played mode.
Play Bluetooth Audio Turns on the Bluetooth
�ŠAudio, selecting the last played mode.
Play AUX Turns on the AUX audio, selecting the last played mode.
Play USB Turns on the USB, selecting the last played mode.
Play iPod Turns on the iPod
�Š, selecting the last played mode.
USB Turns on the USB, selecting the last played mode.
iPod Turns on the iPod
�Š, selecting the last played mode.
USB Show Folders Displays folders in the USB memory device.
USB Play Folder
USB Play File
Operating tips for audio command operation:
. An audio device connected via Bluetooth
�Šcannot be operated with the Voice Recognition system. Source change is only available for Bluetooth�Š
streaming Audio.
. If two USB devices are connected at the same time, voice operation will only be available for use with one registered and selected device. When
selecting “YES” in the pop-up screen that displays after a new USB audio device is connected, the USB audio device is registered in the voice
recognition system and is selected automatically. One iPod
�Šand one USB device can be registered in the system. If a USB audio device is newly
registered, old data is overwritten. It may take a few moments to register an audio device. If you want to enable voice operation for music stored in a
previously registered audio device, select the device you want to use in advance. Even when a device has been previously registered, simply connecting
the device will not result in it being selected automatically.
“Voice recognition settings” (page 7-17)
7. Voice recognition
7-15