2015 MITSUBISHI OUTLANDER SPORT steering wheel
[x] Cancel search: steering wheelPage 132 of 384
Active stability control (ASC) Features and controls 5-69
5
start moving from a stopped condition. It also provides sufficient driving force and steering performance as the vehicle turns while press- ing the acceleration pedal.
N00559300051
The skid control function is designed to helpthe driver maintain control of the vehicle onslippery roads or during rapid steering maneuvers. It works by controlling the engine output and the brake on each wheel.
N00559400241
The ASC is automatically activated when the ignition switch is turned to the “ON” position or the operation mode is put in ON. You candeactivate the system by pressing down the“ASC OFF” switch for 3 seconds or longer.
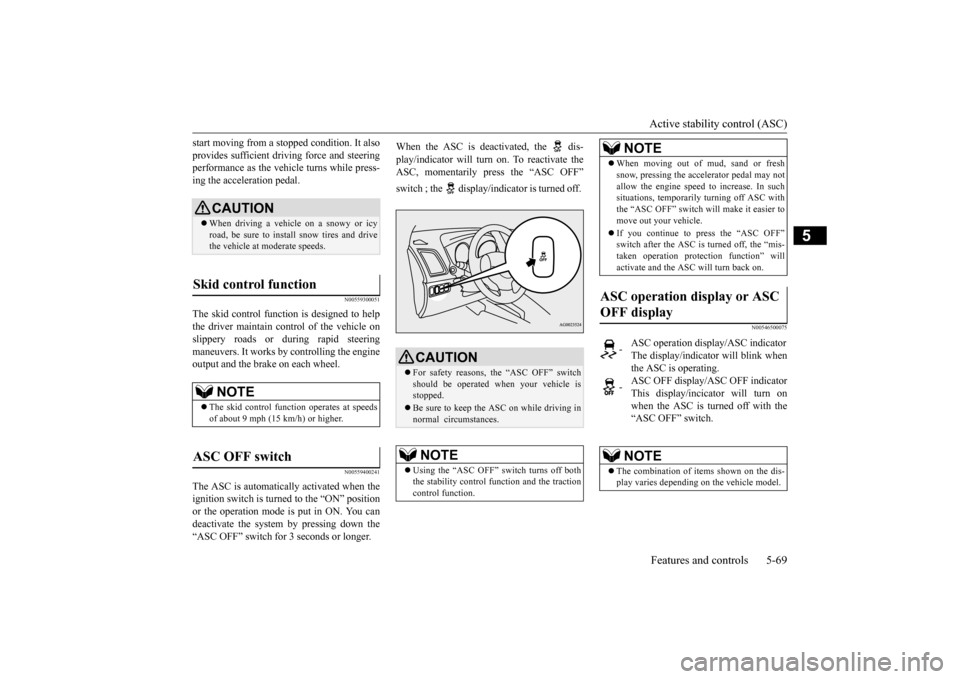
When the ASC is deactivated, the dis- play/indicator will turn on. To reactivate the ASC, momentarily press the “ASC OFF” switch ; the display/indicator is turned off.
N00546500075
CAUTION When driving a vehicle on a snowy or icy road, be sure to install snow tires and drivethe vehicle at moderate speeds.
Skid control function
NOTE
The skid control function operates at speeds of about 9 mph (15 km/h) or higher.
ASC OFF switch
CAUTION For safety reasons, the “ASC OFF” switch should be operated when your vehicle isstopped. Be sure to keep the ASC on while driving in normal circumstances.NOTE
Using the “ASC OFF” switch turns off both the stability control function and the tractioncontrol function.
When moving out of mud, sand or fresh snow, pressing the accelerator pedal may not allow the engine speed to increase. In such situations, temporarily turning off ASC with the “ASC OFF” switch will make it easier tomove out your vehicle. If you continue to press the “ASC OFF” switch after the ASC is turned off, the “mis- taken operation protection function” will activate and the ASC will turn back on.
ASC operation display or ASC OFF display
-
ASC operation display/ASC indicator The display/indicator will blink whenthe ASC is operating.
-
ASC OFF display/ASC OFF indicator This display/incicator will turn onwhen the ASC is turned off with the “ASC OFF” switch.NOTE
The combination of items shown on the dis- play varies depending on the vehicle model.NOTE
BK0206700US.bo
ok 69 ページ 2014年3月25日 火曜日 午後4時42分
Page 141 of 384
Tire pressure monitoring system 5-78 Features and controls
5
TPMS malfunctions may occur for a variety of reasons, including the installation of replacement or alternate tires or wheels on the vehicle that prevent the TPMS from function-ing properly. Always check the TPMS mal- function telltale after replacing one or more tires or wheels on your vehicle to ensure thatthe replacement or alternate tires and wheels allow the TPMS to continue to function prop- erly.
N00532801524
1. If the tire pressure monitoring systemwarning light illuminates, avoiding hardbraking, sharp steering maneuvers and high speeds. You should stop and adjust the tires to the proper inflation pressure assoon as possible. Adjust the spare tire at the same time. Refer to “Tires” on page 9-13.
2. If the tire pressure monitoring system warning light remains illuminated after you have been driving for about 20 min- utes after you adjust the tire inflation pres-sure, one or more of the tires may have a puncture. Inspect the tire and if it has a puncture, have it repaired by an autho-rized Mitsubishi Motors dealer as soon as possible.
The tire pressure monitoring system may not work normally in the following circum- stances: A wireless facility or device using the same frequency is near the vehicle. Snow or ice is stuck inside the fenders and/or on the wheels. The tire inflation pressure sensor’s battery is dead.
If the warning light/display illu- minates while driving
NOTE
In addition, the warning display is displayed on the information screen in the multi-infor- mation display. When inspecting or adjusting the tire pres- sure, do not apply excessive force to the valve stem to avoid breakage.
After inspecting or adjusting the tire pres- sure, always reinstall the valve cap on the valve stem. Without the valve cap, dirt or moisture could get into the valve, resulting in damage to thetire inflation pressure sensor. Do not use metal valve caps, which may cause a metal reaction, resulting in corrosion and damage of the tire inflation pressure sen- sors. Once adjustments have been made, the warn- ing light will go off after a few minutes ofdriving.WA R N I N G If the warning light/display illuminates while you are driving, avoid hard braking, sharp steering maneuvers and high speeds.Driving with an under-inflated tire adversely affects vehicle performance and can result in an accident.NOTE
CAUTION If a tire has a puncture, replace that tire with the spare tire. Driving on a punctured tire could lead to an accident. The warning light/display may not illuminate immediately in the event of a tire blowout or rapid leak.NOTE
To avoid the risk of damage to the tire infla- tion pressure sensors, have any punctured tire repaired by an authorized Mitsubishi Motors dealer. If the tire repair is not done byan authorized Mitsubishi Motors dealer, it is not covered by your warranty. Do not use an aerosol puncture-repair spray on any tire. Such a spray could damage the tire inflationpressure sensors. Have any puncture repaired by an authorized Mitsubishi Motors dealer.
BK0206700US.bo
ok 78 ページ 2014年3月25日 火曜日 午後4時42分
Page 190 of 384
Headlight leveling switch (if so equipped)
Features and controls 5-127
5
N00537100105
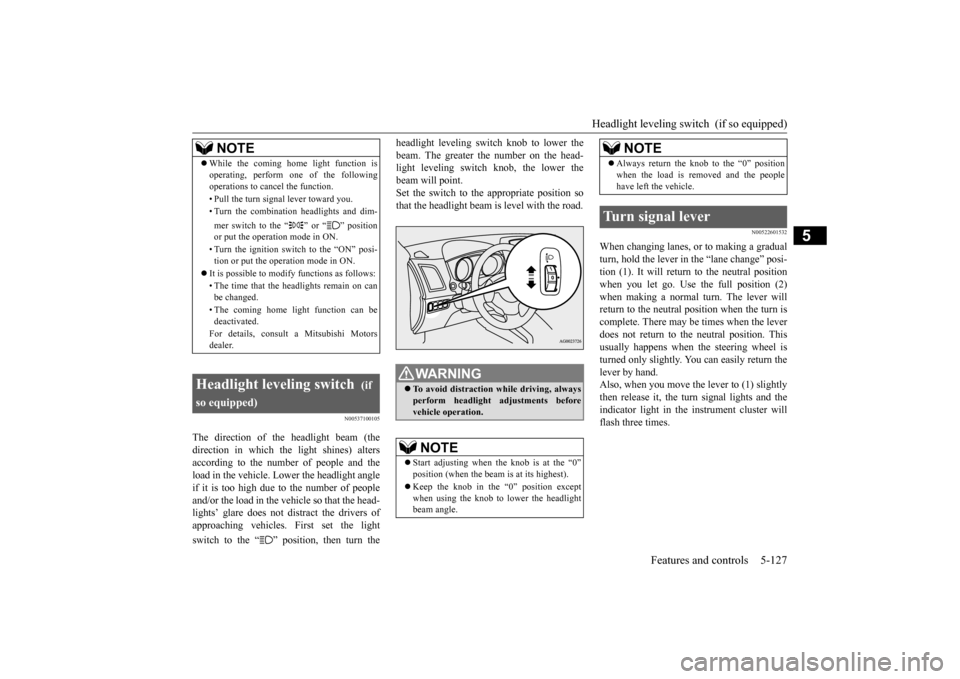
The direction of the headlight beam (the direction in which the light shines) altersaccording to the number of people and the load in the vehicle. Lower the headlight angle if it is too high due to the number of peopleand/or the load in the vehicle so that the head- lights’ glare does not distract the drivers of approaching vehicles. First set the light switch to the “ ” position, then turn the
headlight leveling switch knob to lower the beam. The greater the number on the head- light leveling switch knob, the lower the beam will point.Set the switch to the appropriate position so that the headlight beam is level with the road.
N00522601532
When changing lanes, or to making a gradual turn, hold the lever in
the “lane change” posi-
tion (1). It will return to the neutral positionwhen you let go. Use
the full position (2)
when making a normal turn. The lever will return to the neutral position when the turn iscomplete. There may be times when the lever does not return to the neutral position. This usually happens when the steering wheel isturned only slightly. You can easily return the lever by hand. Also, when you move the lever to (1) slightlythen release it, the turn signal lights and the indicator light in the instrument cluster will flash three times.
NOTE
While the coming home light function is operating, perform one of the following operations to cancel the function. • Pull the turn signal lever toward you.• Turn the combination headlights and dim- mer switch to the “ ” or “ ” position or put the operation mode in ON. • Turn the ignition switch to the “ON” posi- tion or put the operation mode in ON.
It is possible to modify functions as follows: • The time that the headlights remain on can be changed. • The coming home light function can be deactivated. For details, consult a Mitsubishi Motors dealer.
Headlight leveling switch
(if
so equipped)
WA R N I N G To avoid distraction while driving, always perform headlight adjustments beforevehicle operation.NOTE
Start adjusting when
the knob is at the “0”
position (when the beam is at its highest). Keep the knob in the “0” position except when using the knob to lower the headlightbeam angle.
Always return the knob to the “0” position when the load is removed and the people have left the vehicle.
Turn signal lever
NOTE
BK0206700US.book
127 ページ 2014年3月25日 火曜日 午後4時42分
Page 197 of 384
Electric rear window defogger switch 5-134 Features and controls
5
N00523700373
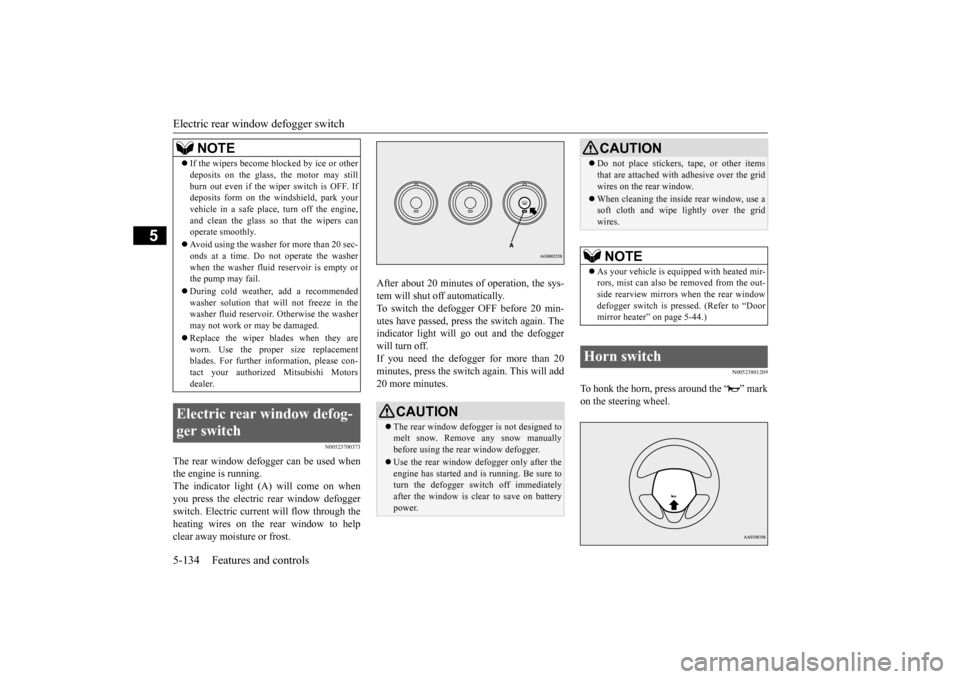
The rear window defogger can be used when the engine is running.The indicator light (A) will come on when you press the electric rear window defogger switch. Electric current will flow through theheating wires on the rear window to help clear away moisture or frost.
After about 20 minutes of operation, the sys- tem will shut off automatically. To switch the defogger OFF before 20 min-utes have passed, press the switch again. The indicator light will go out and the defogger will turn off.If you need the defogger for more than 20minutes, press the switch again. This will add 20 more minutes.
N00523801209
To honk the horn, press around the “ ” mark on the steering wheel.
If the wipers become blocked by ice or other deposits on the glass, the motor may still burn out even if the wiper switch is OFF. If deposits form on the windshield, park your vehicle in a safe place, turn off the engine,and clean the glass so that the wipers can operate smoothly. Avoid using the washer for more than 20 sec- onds at a time. Do not operate the washer when the washer fluid reservoir is empty orthe pump may fail. During cold weather, add a recommended washer solution that will not freeze in the washer fluid reservoir. Otherwise the washer may not work or may be damaged. Replace the wiper blades when they are worn. Use the proper size replacementblades. For further information, please con- tact your authorized Mitsubishi Motors dealer.
Electric rear window defog- ger switch
NOTE
CAUTION The rear window defogger is not designed to melt snow. Remove any snow manuallybefore using the rear window defogger. Use the rear window defogger only after the engine has started and is running. Be sure to turn the defogger switch off immediately after the window is clear to save on batterypower.
Do not place stickers, tape, or other items that are attached with adhesive over the grid wires on the rear window. When cleaning the inside rear window, use a soft cloth and wipe lightly over the grid wires.NOTE
As your vehicle is equipped with heated mir- rors, mist can also be removed from the out-side rearview mirrors when the rear window defogger switch is pressed. (Refer to “Door mirror heater” on page 5-44.)
Horn switch
CAUTION
BK0206700US.book
134 ページ 2014年3月25日 火曜日 午後4時42分
Page 212 of 384
Bluetooth® 2.0 interface (if so equipped)
Features and controls 5-149
5
“
N00565801058
If an incoming phone call is received whilethe ignition switch is in the “ACC” or “ON”position, the audio system will be automati- cally turned on and switched to the incoming call, even when the audio system was origi-nally off. The voice guide announcement for the incoming call will be emitted from the frontpassenger’s seat speaker. If the CD player or radio was playing when the incoming call was received, the audio sys-tem will mute the sound from the CD player or radio and emit only the incoming call. To receive the call, press the PICK-UP buttonon the steering wheel control switch. When the call is over,
the audio system will
return to its previous state.
N00565900010
At any time during a call, you can mute thevehicle microphone. Pressing the SPEECH button and then saying “Mute” during a call will turn ON the mute function and mute the microphone.Saying “Mute off” in the same way will turn off the mute function and cancel the mute on the microphone.
N00566600014
The Bluetooth
® 2.0 interface can switch
between hands-free mode (hands-free calls) and private mode (calls using cellular phone). If you press the SPEECH button and say“Transfer call” during a hands-free call, you can stop the hands-free mode and talk in pri- vate mode. To return to hands-free mode, press the SPEECH button again and say “Transfer call.”
N00566000018
The Bluetooth
® 2.0 interface has 2 types of
unique phonebooks that are different from thephonebook stored in the cellular phone. They
are the vehicle phonebook and the mobile phonebook. These phonebooks are used to register tele- phone numbers and make calls to desirednumbers via voice recognition function.
N00566101146
This phonebook is us
ed when making calls
with the voice recognition function. Up to 32 names can be registered in the vehi- cle phonebook per language.Also, each entry has 4 locations associated with: home, work, mobile and other. You can register one telephone number for each loca-tion. You can register a desired name as a name for any phonebook entry registered in the vehicle phonebook.Names and telephone numbers can be changed later on. The vehicle phonebook can be used with all paired cellular phones.
Receiving calls
Mute function Switching between hands-free mode and private mode Phonebook function
NOTE
Disconnecting the battery cable will not delete information registered in the phone- book.
Vehicle phonebook
BK0206700US.book
149 ページ 2014年3月25日 火曜日 午後4時42分
Page 237 of 384
Vehicle preparation before driving 6-4 Driving safety
6
N00629000669
For a safer and more enjoyable trip, always check for the following: Before starting the vehicle, make certain that you and all passengers are seated and wearing their seat belts properly (with children in the rear seat, in appropriaterestraints), and that all the doors and lift- gate are locked. Move the driver’s seat as far backward as possible, while still keeping good visibil- ity, and good control of the steering wheel, brakes, accelerator, and controls.Check the instrument panel indicators and multi-information display for any possible problem. In the same way, the front passenger seat should also be moved as far back as possi- ble. Make sure that infants and small children are properly restrained in accordance with all laws and regulations.
Check these by selecting the defroster mode, and set the blower switch on high. You shouldbe able to feel the air blowing against the windshield. Refer to “Defrosting or defogging (wind-shield, door windows)” on page 7-8, 7-13, 7-19, 7-24. Check all the tires for heavy tread wear or uneven wear patterns. Look for stones, nails, glass, or other objects stuck in the tread. Look for any tread cuts or sidewall cracks. Checkthe wheel nuts for tightness, and the tires (including spare tire) for proper pressure. Replace your tires before they are heavilyworn out. As your vehicle is equipped with a tire pres- sure monitoring system, there is a risk ofdamage to the tire inflation pressure sensors when the tire is replaced on the rim. Tire replacement should, therefore, be performedonly by an authorized Mitsubishi Motors dealer.
Have someone watch while you turn all the exterior lights on and off. Also check the turnsignal indicators and high-beam indicators on the instrument panel. Check the ground under the vehicle after parking overnight, for fuel, water, oil, or other leaks. Make sure all the fluid levels are correct. Also, if you can smell fuel, you needto find out why immediately and have it fixed.
N00629200094
Even this vehicle’s safety equipment, andyour safest driving, cannot guarantee that you can avoid an accident or injury. However, ifyou give extra attention to the following areas, you can better protect yourself and your passengers: Drive defensively. Be aware of traffic, road and weather conditions. Leave plenty of stopping distance between your vehicle and the vehicle ahead.
Vehicle preparation before driving Seat belts and seats
Defrosters Tires
Lights Fluid leaks Safe driving techniques
BK0206700US.bo
ok 4 ページ 2014年3月25日 火曜日 午後4時42分
Page 240 of 384
Loading information Driving safety 6-7
6
More effort could be required to turn the steering wheel.Refer to “Electric power steering system (EPS)” on page 5-67. Always remove the key from the ignition switch and lock all doors and the liftgate when leaving the vehicle unattended.Always try to park your vehicle in a well lit area.
N00629900408
It is very importan
t to know how much
weight your vehicle can carry. This weight is called the vehicle capacity weight andincludes the weight of all occupants, cargo (including the roof load), non-factory-
installed options, if any, being towed. The tire and loading information placard located on the driver’s door sill of your vehicle will show how much weight it may properly carry. It is important to fami
liarize yourself with the
following terms before loading your vehicle: Vehicle maximum load on the tire: load on an individual tire that is determined by distributing to each axle its share of the maximum loaded vehicle weight anddividing by two. Vehicle normal load on the tire: load on an individual tire that is determined by dis-tributing to each axle its share of the curb weight, accessory weight, and normal occupant weight and dividing by two. Maximum loaded vehicle weight: the sum of - (a) Curb weight;(b) Accessory weight; (c) Vehicle capacity weight; and (d) Production options weight.
Curb weight: the weight of a motor vehi- cle with standard equipment including the maximum capacity of fuel, oil, and cool- ant. Accessory weight: the combined weight (in excess of those standard items which may be replaced) of automatic transmis-sion, power steering, power brakes, power windows, power seats, radio, and heater, to the extent that these items are availableas factory- installed equipment (whetherinstalled or not). Vehicle capacity weight: the rated cargo and luggage load plus 150 lbs (68 kg)
*
times the vehicle’s designated seating capacity. Production options weight: the combined weight of those installed regular produc- tion options weighing over 5 lbs (2.3 kg) in excess of those standard items whichthey replace, not previously considered in curb weight or accessory weight, includ- ing heavy duty brakes, ride levelers, roofrack, heavy duty battery, and special trim. Normal occupant weight: 150 lbs (68 kg)
* times the number of specified
occupants. (In your vehicle the number is 3)
WA R N I N G Do not park your vehicle in areas where combustible materials such as dry grass or leaves can come in contact with a hot exhaust, since a fire could occur.
Do not keep the steering wheel fully turned for a long time When leaving the vehicle Loading information
WA R N I N G Never overload your vehicle. Overloading can damage your vehicle, adversely affectvehicle performance, including handling and braking, cause tire failure, and result in an accident.
BK0206700US.bo
ok 7 ページ 2014年3月25日 火曜日 午後4時42分
Page 285 of 384
Listen to Radio 7-38 Comfort controls
7
N00716800068
N00716900043
This explains how to
listen to AM and FM
radio broadcasts. Press the RADIO key to switch the band. Switch between AM and FM bands. The selected band is indicated on the display.
13-
5 key Play/Pause Bluetooth Audio
*2, and use
as preset key 5 for radio.
14-
6 key Return during audio track search, and stop Bluetooth Audio
*2.
For radio, use as preset key 6.
15-
key/ key
For audio, select audio track/file; forradio, perform automatic station selec- tion. Select channels in the satellite radio*
1.
16- MENU key
Switch to Menu mode.
17-
/SEL key
Adjust audio quality and select items.For radio, manually select stations. Select channels in the satellite radio*
1.
*1: Requires a satellite tuner connection.*2: Requires a separately-purchased Blue- tooth-capable audio device in equip- ment by type (vehicles with a Bluetooth
® 2.0 interface).
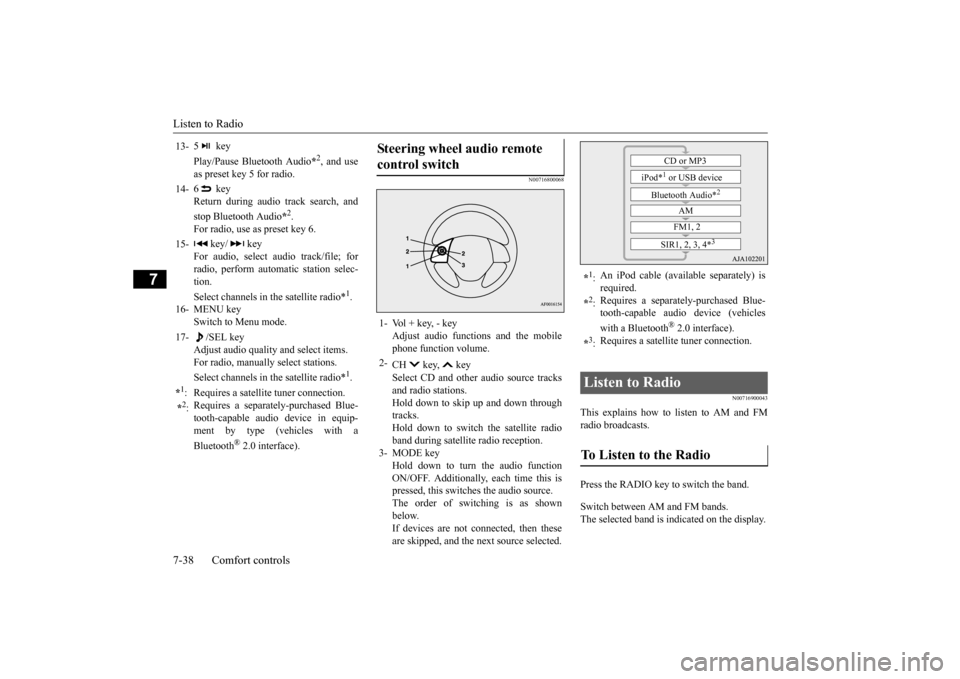
Steering wheel audio remote control switch 1- Vol + key, - key
Adjust audio functions and the mobilephone function volume.
2-
CH key, key Select CD and other audio source tracks and radio stations.Hold down to skip up and down through tracks. Hold down to switch the satellite radioband during satellite radio reception.
3- MODE key
Hold down to turn the audio functionON/OFF. Additionally, each time this is pressed, this switches the audio source. The order of switching is as shownbelow.If devices are not connected, then these are skipped, and the next source selected.
*1: An iPod cable (available separately) is required.
*2: Requires a separately-purchased Blue- tooth-capable audio device (vehicles with a Bluetooth
® 2.0 interface).
*3: Requires a satellite tuner connection.
Listen to Radio To Listen to the Radio
CD or MP3
iPod*
1 or USB device
Bluetooth Audio*
2
AM FM1, 2
SIR1, 2, 3, 4*
3
BK0206700US.bo
ok 38 ページ 2014年3月25日 火曜日 午後4時42分