2015 MITSUBISHI OUTLANDER SPORT clock
[x] Cancel search: clockPage 317 of 384

How to change a tire 8-10 For emergencies
8
8. Lower the vehicle slowly until the tire touches the ground, by rotating the wheel nut wrench counterclockwise. 9. Tighten the nuts in the order shown in the illustration until each nut has been tight- ened to the torque listed here.65 to 80 ft-lb (88 to 108 N•m)
10. Lower the jack all the way and remove it. 11. Check the tire inflation pressure. The rec-
ommended tire pressure for your vehicle is listed on the tire and loading informa-tion placard attached to the driver’s doorsill as shown in the illustration. Refer to “Tire inflation pressures” on page 9-17.
N00850000162
Reverse the removing procedure when stor- ing the flat tire or spare tire, jack, bar and wheel nut wrench. Refer to “To remove the spare tire” on page8-7 and “Jack and tools” on page 8-5.
CAUTION Never use your foot or a pipe extension to apply added force to the wheel nut wrench when tightening the wheel nuts. If you do so, you can over-tighten the wheel nuts and damage the wheel, wheel nuts and hub bolts.
CAUTION Driving with an improperly inflated tire can cause an accident. If
you have no choice but
to drive with an under-inflated tire, keep your speed down and avoid sudden steering or braking, if possible
. Inflate the tire to the
correct pressure as soon as possible. Refer to “Tire inflation pressures” on page 9-17. After changing the tire and driving the vehi- cle about 620 miles (1,000 km), retighten the wheel nuts to make sure that they have notcome loose. If the steering wheel vibrates when driving after changing the tire, have the tire checked for balance at an authorized Mitsubishi Motors dealer or a repair facility of yourchoice. Do not mix one type of tire with another or use a different size from the one listed. This would cause early wear and poor handling.
To store the flat tire or spare tire, jack, bar and wheel nut wrench
BK0206700US.bo
ok 10 ページ 2014年3月25日 火曜日 午後4時42分
Page 354 of 384
Replacement of light bulbs
Vehicle care and maintenance 9-31
9
N00901801144
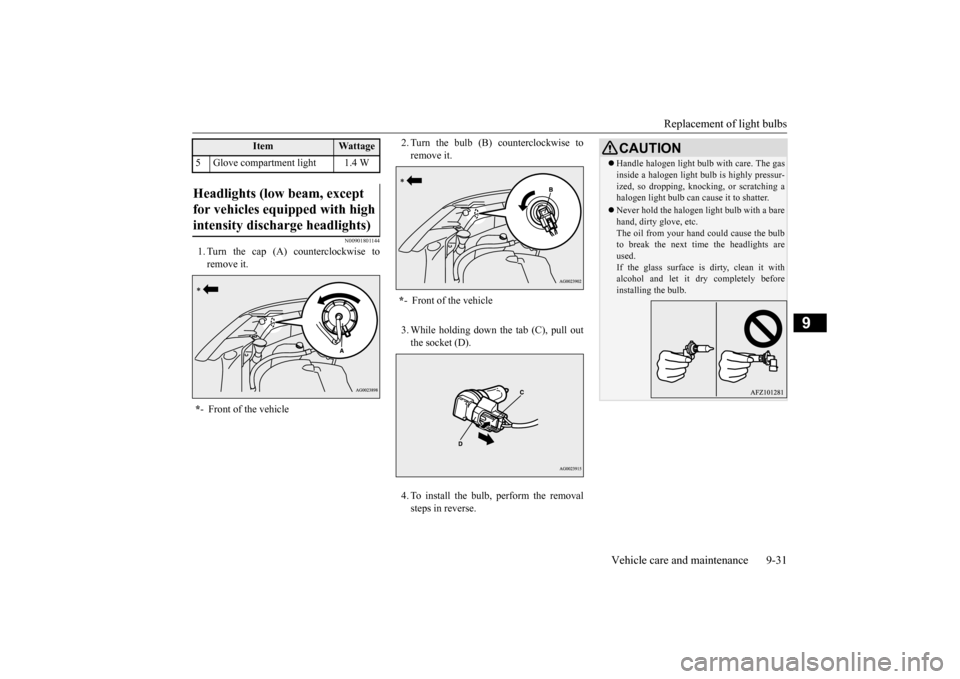
1. Turn the cap (A) counterclockwise to remove it.
2. Turn the bulb (B) counterclockwise to remove it. 3. While holding down the tab (C), pull out the socket (D). 4. To install the bulb, perform the removal steps in reverse.
5 Glove compartment light 1.4 WHeadlights (low beam, except for vehicles equipped with high intensity discharge headlights) * - Front of the vehicle
Item
Wattage
*- Front of the vehicle
CAUTIONHandle halogen light bulb with care. The gas inside a halogen light bulb is highly pressur- ized, so dropping, knocking, or scratching a halogen light bulb can cause it to shatter. Never hold the halogen light bulb with a bare hand, dirty glove, etc. The oil from your hand could cause the bulbto break the next time the headlights are used. If the glass surface is dirty, clean it withalcohol and let it dry completely before installing the bulb.
BK0206700US.bo
ok 31 ページ 2014年3月25日 火曜日 午後4時42分
Page 355 of 384
Replacement of light bulbs 9-32 Vehicle care and maintenance
9
N00901901103
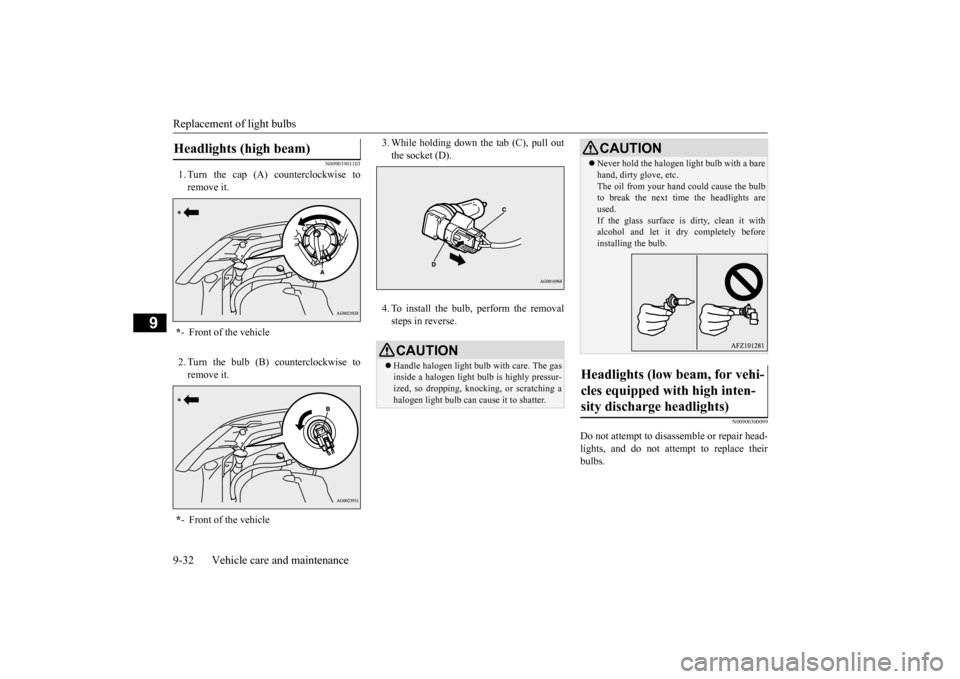
1. Turn the cap (A) counterclockwise to remove it. 2. Turn the bulb (B) counterclockwise to remove it.
3. While holding down the tab (C), pull out the socket (D). 4. To install the bulb, perform the removal steps in reverse.
N00900300099
Do not attempt to disassemble or repair head-lights, and do not attempt to replace their bulbs.
Headlights (high beam) * - Front of the vehicle * - Front of the vehicle
CAUTIONHandle halogen light bulb with care. The gas inside a halogen light bulb is highly pressur- ized, so dropping, knocking, or scratching a halogen light bulb can cause it to shatter.
Never hold the halogen light bulb with a bare hand, dirty glove, etc. The oil from your hand could cause the bulb to break the next time the headlights are used.If the glass surface is dirty, clean it with alcohol and let it dry completely before installing the bulb.
Headlights (low beam, for vehi- cles equipped with high inten- sity discharge headlights)
CAUTION
BK0206700US.bo
ok 32 ページ 2014年3月25日 火曜日 午後4時42分
Page 356 of 384
Replacement of light bulbs
Vehicle care and maintenance 9-33
9
N00943200121
The alignment of the headlights should be checked by an authorized Mitsubishi Motorsdealer or a repair facility of your choice.
N00917301607
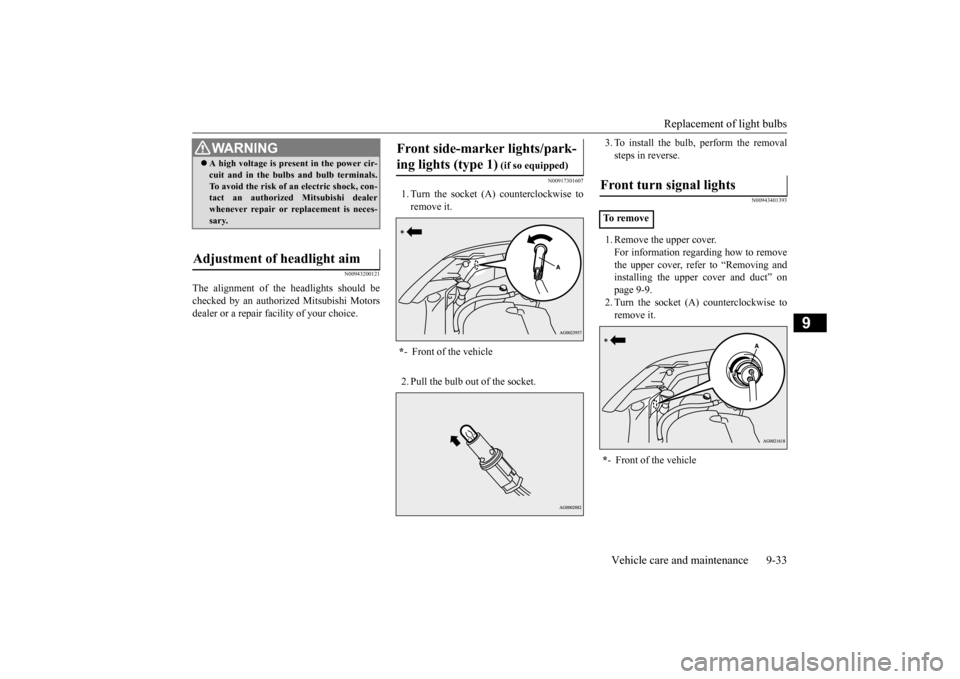
1. Turn the socket (A) counterclockwise toremove it. 2. Pull the bulb out of the socket.
3. To install the bulb, perform the removal steps in reverse.
N00943401393
1. Remove the upper cover.For information regarding how to removethe upper cover, refer to “Removing andinstalling the upper cover and duct” on page 9-9. 2. Turn the socket (A) counterclockwise toremove it.
WA R N I N G A high voltage is present in the power cir- cuit and in the bulbs and bulb terminals. To avoid the risk of an electric shock, con- tact an authorized Mitsubishi dealer whenever repair or replacement is neces-sary.
Adjustment of headlight aim
Front side-marker lights/park- ing lights (type 1)
(if so equipped)
* - Front of the vehicle
Front turn signal lights To r e m o v e * - Front of the vehicle
BK0206700US.bo
ok 33 ページ 2014年3月25日 火曜日 午後4時42分
Page 358 of 384
Replacement of light bulbs
Vehicle care and maintenance 9-35
9
3. While holding down
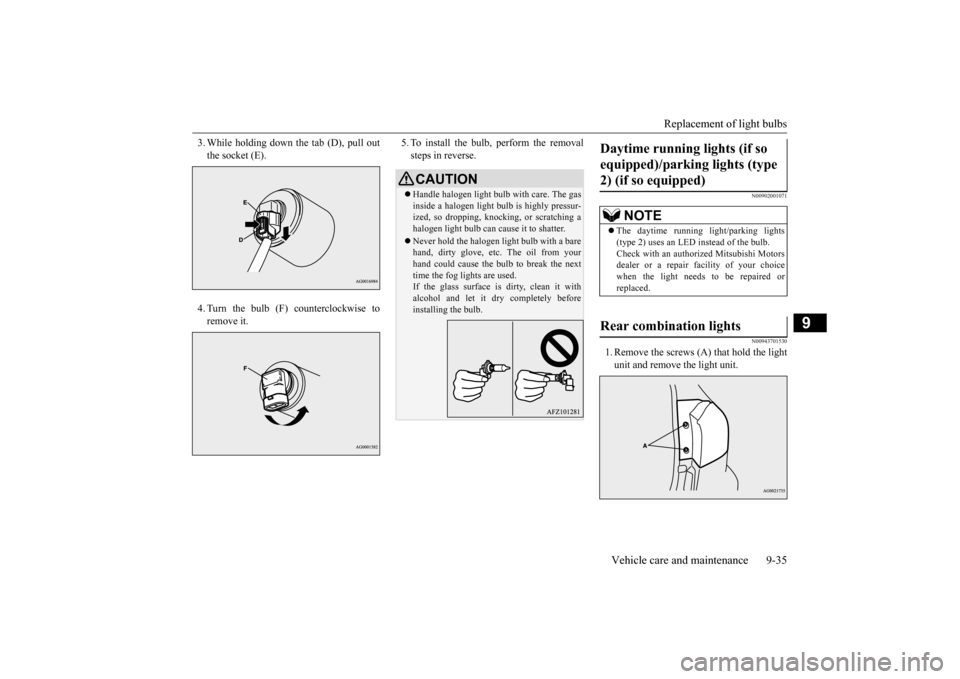
the tab (D), pull out
the socket (E). 4. Turn the bulb (F) counterclockwise to remove it.
5. To install the bulb, perform the removal steps in reverse.
N00902001071 N00943701530
1. Remove the screws (A) that hold the light unit and remove the light unit.
CAUTION Handle halogen light bulb with care. The gas inside a halogen light bulb is highly pressur-ized, so dropping, knocking, or scratching a halogen light bulb can cause it to shatter. Never hold the halogen light bulb with a bare hand, dirty glove, etc. The oil from your hand could cause the bulb to break the nexttime the fog lights are used. If the glass surface is dirty, clean it with alcohol and let it dry completely beforeinstalling the bulb.
Daytime running lights (if so equipped)/parking lights (type 2) (if so equipped)
NOTE
The daytime running light/parking lights (type 2) uses an LED instead of the bulb. Check with an authorized Mitsubishi Motorsdealer or a repair facility of your choice when the light needs to be repaired or replaced.
Rear combination lights
BK0206700US.bo
ok 35 ページ 2014年3月25日 火曜日 午後4時42分
Page 359 of 384
Replacement of light bulbs 9-36 Vehicle care and maintenance
9
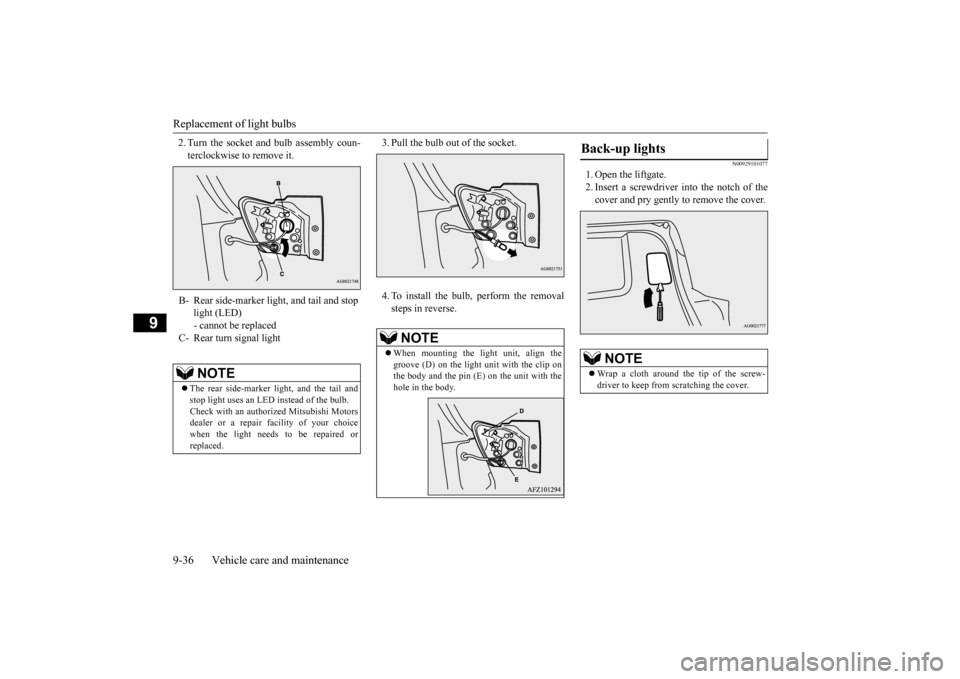
2. Turn the socket and bulb assembly coun- terclockwise to remove it.
3. Pull the bulb out of the socket. 4. To install the bulb, perform the removal steps in reverse.
N00929101077
1. Open the liftgate.2. Insert a screwdriver into the notch of thecover and pry gently to remove the cover.
B- Rear side-marker light, and tail and stop
light (LED) - cannot be replaced
C- Rear turn signal light
NOTE
The rear side-marker light, and the tail and stop light uses an LED instead of the bulb. Check with an authorized Mitsubishi Motors dealer or a repair facility of your choicewhen the light needs to be repaired or replaced.
NOTE
When mounting the light unit, align the groove (D) on the light unit with the clip onthe body and the pin (E) on the unit with the hole in the body.
Back-up lights
NOTE
Wrap a cloth around the tip of the screw- driver to keep from scratching the cover.
BK0206700US.bo
ok 36 ページ 2014年3月25日 火曜日 午後4時42分
Page 360 of 384
Replacement of light bulbs
Vehicle care and maintenance 9-37
9
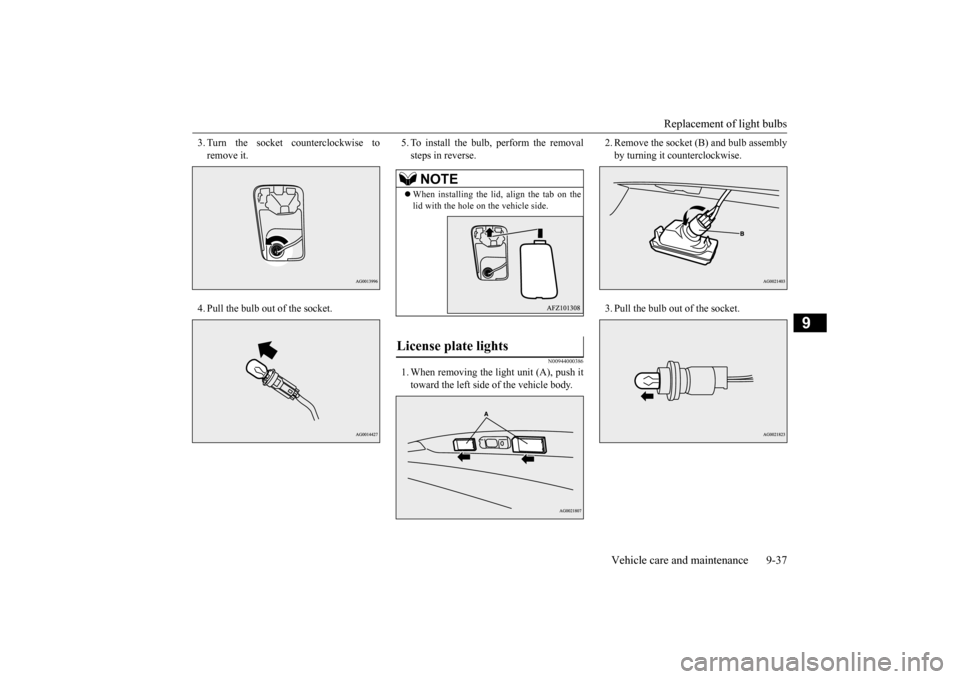
3. Turn the socket counterclockwise to remove it. 4. Pull the bulb out of the socket.
5. To install the bulb, perform the removal steps in reverse.
N00944000386
1. When removing the light unit (A), push ittoward the left side of the vehicle body.
2. Remove the socket (B) and bulb assembly by turning it counterclockwise. 3. Pull the bulb out of the socket.
NOTE
When installing the lid, align the tab on the lid with the hole on the vehicle side.
License plate lights
BK0206700US.bo
ok 37 ページ 2014年3月25日 火曜日 午後4時42分
Page 379 of 384
Alphabetical index 12-2
12
Continuously variable transmission (CVT)
....
5-49 Fluid
.....................
...............
9-10
, 11-5
Selector lever operation
...................
5-49
Selector lever positions
...................
5-52
Sports mode
..................
.................
5-53
Coolant (engine)
..........................
9-7
, 11-5
Cruise control
....................
.................
5-71
Cup holder
....................
...................
5-167
D
Daytime running lights
Bulb capacity
................
.................
9-29
Replacement
.................
.................
9-35
Defogger (rear window)
....................
5-134
Defrosting or defogging (windshield, door windows)
.................
7-8
, 7-13
, 7-19
, 7-24
Digital clock
Time setting
..................
.................
7-55
Dimensions
...................
.....................
11-3
Dimmer (high/low beam change)
.......
5-125
Disc brake pads
.................
.................
9-23
Dome light
Bulb capacity
................
.................
9-30
Doors
Lock
......................
........................
5-28
Power door locks
............................
5-30
Driving during cold weather
..................
6-5
Driving precaution
...............................
6-2
Driving, alcohol and drugs
....................
6-2
E
Electric rear window defogger switch
..5-134
Electronic immobilizer (Anti-theft starting system)
.....................
................
5-4
, 5-23
Electronically controlled 4WD system
..5-56
Emission-control system maintenance
...
9-21
Engine
Compartment
..................
.................
9-5
Coolant
...................
................
9-7
, 11-5
Hood
.......................
........................
9-3
Oil and oil filter
.......................
9-5
, 11-5
Overheating
....................
.................
8-4
Serial number
.................
................
11-2
Specification
...................
................
11-4
Engine coolant temperature display
.......
5-90
Engine hood
....................
....................
9-3
Engine switch
.....................
................
5-16
Exhaust system
...................
................
9-23
F
Floor console box
..............................
5-166
Floor mat
.........................
....................
6-3
Fluid
Automatic transaxle fluid
.................
11-5
Brake fluid
.....................
................
11-5
Continuously variable transmission (CVT) fluid
....................
...............
9-10
, 11-5
Engine coolant
........................
9-7
, 11-5
Power steering fluid
........................
11-5
Washer fluid
.........................
9-11
, 11-5
Fluid capacities and lubricants
.............
11-5
Free-hand advanced security transmitter (F.A.S.T.-key)
.................
.................
5-11
Front fog lights
Bulb capacity
................
.................
9-29
Indicators
..................
...................
5-118
Replacement
.................
.................
9-34
Switch
......................
...................
5-128
Front seat adjustment
............................
4-3
Front side-marker lights
Bulb capacity
................
.................
9-29
Replacement
.................
.................
9-33
Front turn signal light
Bulb capacity
................
.................
9-29
Replacement
.................
.................
9-33
Fuel
Filling the fuel tank
...........................
3-3
Fuel economy
...................
................
6-2
Fuel hoses
.....................
.................
9-22
Fuel selection
...................
................
3-2
Tank capacity
................
.................
11-5
Fuses
.........................
........................
9-24
Fusible links
..................
.....................
9-24
BK0206700US.bo
ok 2 ページ 2014年3月25日 火曜日 午後4時42分