2015 MITSUBISHI OUTLANDER ECO mode
[x] Cancel search: ECO modePage 10 of 446

2-1
2
If this warning light comes on or
flashes while you’re driving...
Quick index
N00200702159
If this warning light comes on
or flashes while you’re driving...
NOTE
For information regarding warning
displays in the multi-information display (Color
liquid crystal display
type), refer to “Mult
i-information display” on
page 5-122. These warning lights will co
me on for a few seconds for a bulb check when the i
gnition switch is
first turned to “ON” or the op
eration mode is put in ON.
Wa rn in g l ig h t s
Do this
Ref. Page
Charging system warning light
Park your vehicle in a safe
place and stop the engine.
Contact your Mitsubishi Motors dealer or a re
pair facility of your choice for assis-
tance.
P. 5-168
Oil pressure warning light
(Vehicles equipped with mono-color
liquid crystal display)
Park your vehicle in a safe
place and stop the engine, then check the engine oil
level. If the light comes on while the engine oil le
vel is normal, have the system checked
at an authorized Mitsubishi
Motors dealer or a repair fa
cility of your choice as soon
as possible.
P. 5-168
or
Brake warning light
If this light comes on while driving, check to see that the parking brake is fully released. If this light stays on after
releasing the parking brake,
immediately stop and check
the brake fluid level. If the brake fluid level is correct, there
may be a system malfunction. Avoid hard
braking and high speed, and contact an au
thorized Mitsubishi Mo
tors dealer or a
repair facility of your
choice for assistance.
P. 5-167
BK0211800US.book 1 ページ 2014年3月12日 水曜日 午後2時42分
Page 17 of 446

If this problem occurs... 2-8 Quick index
2
If your vehicle becomes stuck in sand, mud or snow
1. Slowly press down on the accelerator pedal to
get your vehicle moving again. For an all-
wheel drive vehicle, set the drive mode-sel
ector to the “4WD AUTO” or “4WD LOCK”
position and then slowly press down on the ac
celerator pedal to get your vehicle moving.
2. If there is nothing to stop your tires from sli
pping, rock your vehicle out of the stuck posi-
tion.
P. 8-15
WA R N I N G When attempting to rock your vehi
cle out of a stuck position, be su
re that no one is near the ve
hicle. The rocking motion may c
ause the vehicle to
suddenly lurch forward or backward, possibly injuring bystanders. Avoid revving the engine or spinning the wh
eels. Prolonged efforts to free a stuck ve
hicle may result in
overheating and transa
xle failure.
If the vehicle remains stuck after
several rocking attempts
, have a towing service pull the vehicle out.
Problem
Do this
Ref. Page
The brakes are not functioning properly after crossing a puddle or stream.
Dry out the brakes by driving slowly
while lightly pressing the brake pedal.
P. 5-82, 6-5
The automatic transaxle makes no gear change when accelerat- ing. The initial movement of the vehicle is slow when the vehicle starts moving. (for vehicles with automatic transaxle)
There may be a problem in the automatic transaxle. Have the system inspected by your
authorized Mitsubishi Motors de
aler or a repair facility of
your choice.
P. 5-66
Problem
Do this
Ref. Page
BK0211800US.book 8 ページ 2014年3月12日 水曜日 午後2時42分
Page 21 of 446
Fuel selection 3-2 General information
3
N00301001922
Your vehicle is designe
d to use unleaded gas-
oline only. It is equipped with a fuel tank filler pipe specifically
designed to accept only
a small diameter unlea
ded gasoline dispens-
ing nozzle. In the United States, fuel suppliers are required by law to add detergents to their gas-
oline to minimize fuel-injector clogging and minimize intake-valve
deposits. Detergent
gasoline helps keep your engine in tune and your emission-control system working prop- erly. Your vehicle is de
signed to operate on
unleaded gasoline having a minimum octane number of 87 [(MON+RON)/2] or 91 RON. Unleaded gasoline having a minimum octane number of 87 [(MON+RON)/2] or 91 RON may be used, though it is recommended yourvehicle be operated on premium grade unleaded gasoline having a minimum octane number of 91 [(MON+RON)/2], or 95 RON. To obtain maximum performance, premium gasoline is recommended. Gasoline sold at some
service stations con-
tains oxygenates such as ethanol, although
the oxygenates may not be identified by those names. Oxygenates are required in someareas of the country. Oxygenated fuel can be used in your vehicle. A mixture of up to 10 % ethanol (grain alco- hol) and 90 % unleaded gasoline may be used in your vehicle, provided the octane number is at least as high as
that recommended for
unleaded gasoline. Do not operate your vehicle on gasoline con- taining methanol (wood alcohol). Using thistype of alcohol could adversely affect the vehicle’s performance
and damage critical
parts of the vehicl
e’s fuel system.
Many areas of the country require the use of cleaner burning fuel referred to as “Reformu-lated Gasoline”. Reformulated gasoline
contains oxygenates
and is specially ble
nded to reduce vehicle
emissions and improve air quality.
Fuel selection
WA R N I N G Gasoline is highly flammable and explo- sive. You could be burned, seriously injured or killed when handling it. When-ever you refuel your
vehicle, stop the
engine and keep fl
ames, sparks, and
smoking materials away from the vehicle.Always handle fuel in well-ventilated out- door areas.CAUTION Using leaded gasoline
in your vehicle will
damage the engine, ca
talytic converter, and
the oxygen sensors. Also, using leaded gaso- line is illegal, and
will void your warranty
coverage of the engine
, catalytic converter,
and oxygen sensors.
Gasoline detergent additives
Octane requirement 2.4 liter engine model 3.0 liter engine model Oxygenated gasoline
Ethanol (Gasohol) Methanol Reformulated gasoline
BK0211800US.book 2 ページ 2014年3月12日 水曜日 午後2時42分
Page 35 of 446
Second row seats 4-8 Seat and restraint systems
4
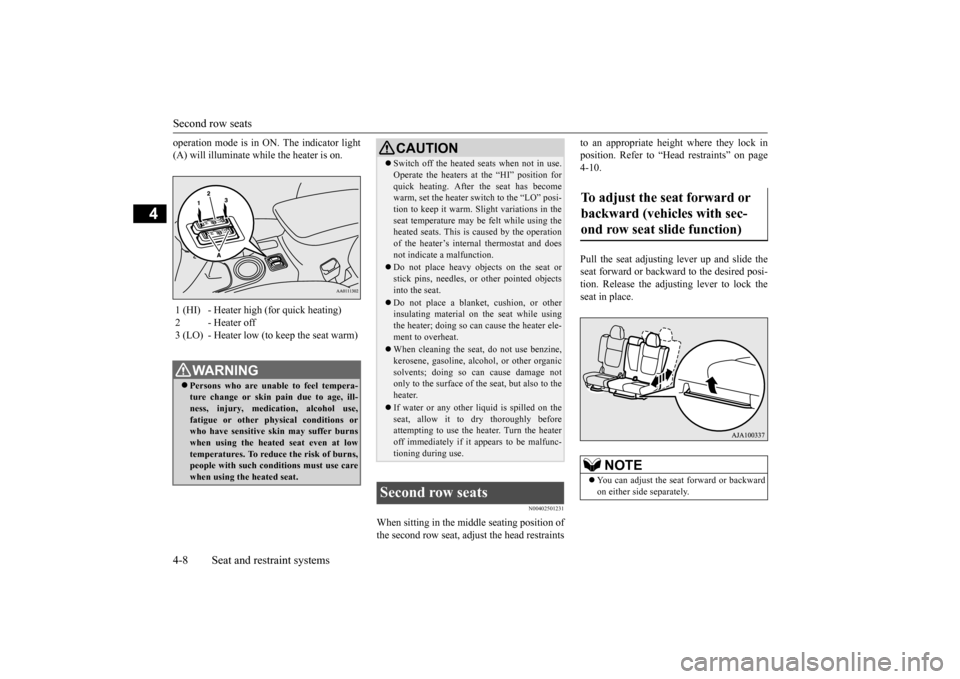
operation mode is in ON. The indicator light (A) will illuminate while the heater is on.
N00402501231
When sitting in the middle seating position of the second row seat, adju
st the head restraints
to an appropriate height where they lock in position. Refer to “Hea
d restraints” on page
4-10. Pull the seat adjusting lever up and slide the seat forward or backward to the desired posi- tion. Release the adjusting lever to lock the seat in place.
1 (HI) - Heater high (for quick heating) 2 - Heater off 3 (LO) - Heater low (to keep the seat warm)
WA R N I N G Persons who are unable
to feel tempera-
ture change or skin
pain due to age, ill-
ness, injury, medication, alcohol use, fatigue or other phys
ical conditions or
who have sensitive skin may suffer burns when using the heated seat even at low temperatures. To reduce the risk of burns,people with such conditions must use care when using the heated seat.
CAUTION Switch off the heated seats when not in use. Operate the heaters at the “HI” position forquick heating. After the seat has becomewarm, set the heater switch to the “LO” posi- tion to keep it warm. Sl
ight variations in the
seat temperature may be felt while using theheated seats. This is caused by the operation of the heater’s internal thermostat and does not indicate a malfunction. Do not place heavy obj
ects on the seat or
stick pins, needles, or
other pointed objects
into the seat. Do not place a blanket,
cushion, or other
insulating material on the seat while using the heater; doing so can
cause the heater ele-
ment to overheat. When cleaning the seat, do not use benzine, kerosene, gasoline, alc
ohol, or other organic
solvents; doing so can cause damage not only to the surface of the seat, but also to the heater. If water or any other liquid is spilled on the seat, allow it to dry thoroughly beforeattempting to use the heater. Turn the heater off immediately if it a
ppears to be malfunc-
tioning during use.
Second row seats
To adjust the seat forward or backward (vehicles with sec- ond row seat slide function)
NOTE
You can adjust the seat
forward or backward
on either side separately.
BK0211800US.book 8 ページ 2014年3月12日 水曜日 午後2時42分
Page 40 of 446
Making a cargo area
Seat and restraint systems 4-13
4
N00405701120
The second row seat can be folded to create an additional cargo area.
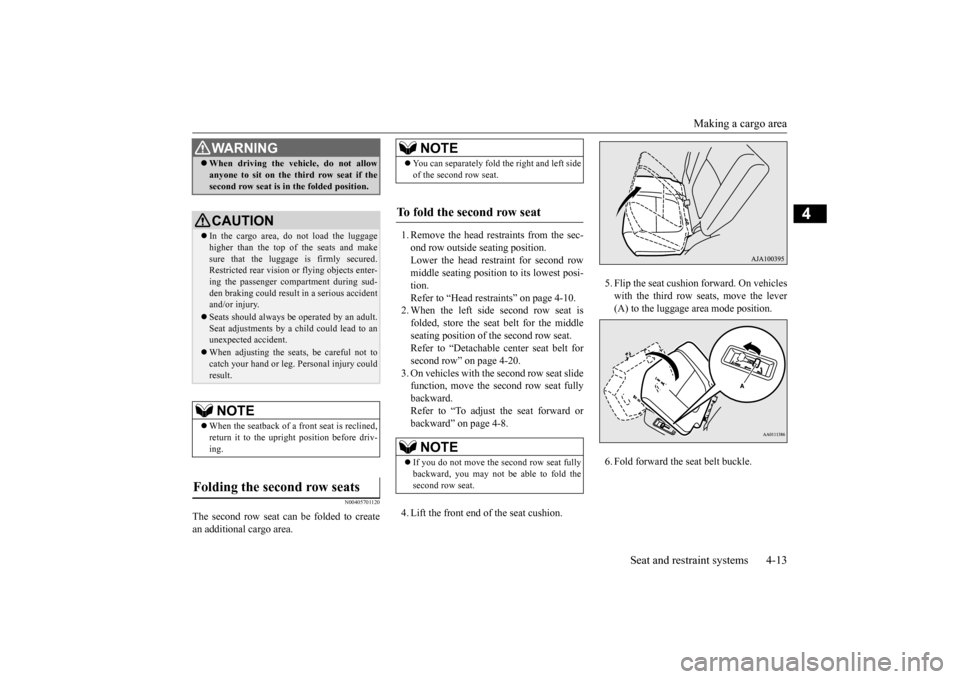
1. Remove the head rest
raints from the sec-
ond row outside seating position. Lower the head restraint for second rowmiddle seating position
to its lowest posi-
tion. Refer to “Head restraints” on page 4-10.2. When the left side second row seat is folded, store the seat belt for the middle seating position of the second row seat.Refer to “Detachable center seat belt for second row” on page 4-20. 3. On vehicles with th
e second row seat slide
function, move the second row seat fully backward. Refer to “To adjust the seat forward orbackward” on page 4-8. 4. Lift the front end of the seat cushion.
5. Flip the seat cushi
on forward. On vehicles
with the third row seats, move the lever(A) to the luggage area mode position. 6. Fold forward the seat belt buckle.
When driving the vehicle, do not allow anyone to sit on the third row seat if thesecond row seat is in the folded position.CAUTION In the cargo area, do not load the luggage higher than the top of the seats and makesure that the luggage is firmly secured. Restricted rear vision
or flying objects enter-
ing the passenger compartment during sud-den braking could result
in a serious accident
and/or injury. Seats should always be
operated by an adult.
Seat adjustments by a child could lead to an unexpected
accident.
When adjusting the seats, be careful not to catch your hand or leg.
Personal injury could
result.NOTE
When the seatback of a front seat is reclined, return it to the upright position before driv- ing.
Folding the second row seats
WA R N I N G
NOTE
You can separately fold
the right and left side
of the second row seat.
To fold the second row seat
NOTE
If you do not move the second row seat fully backward, you may not be able to fold the second row seat.
BK0211800US.book 13 ページ 2014年3月12日 水曜日 午後2時42分
Page 41 of 446
Making a cargo area 4-14 Seat and restraint systems
4
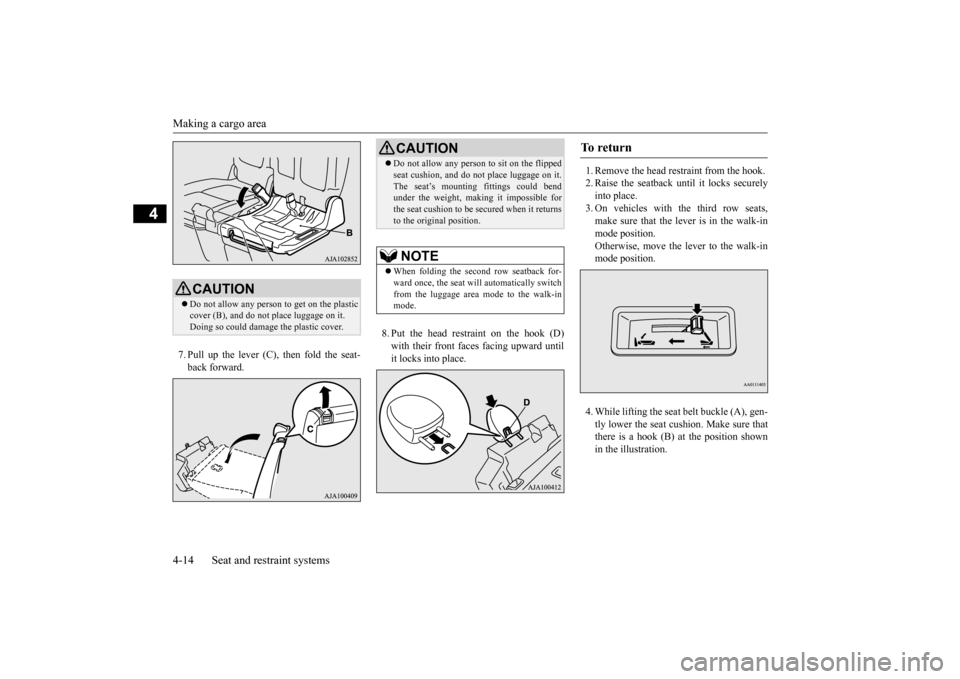
7. Pull up the lever (C), then fold the seat- back forward.
8. Put the head restraint on the hook (D) with their front faces facing upward until it locks into place.
1. Remove the head restraint from the hook. 2. Raise the seatback until it locks securely into place. 3. On vehicles with the third row seats,make sure that the lever is in the walk-in mode position. Otherwise, move the lever to the walk-inmode position. 4. While lifting the seat
belt buckle (A), gen-
tly lower the seat cushion. Make sure thatthere is a hook (B) at the position shown in the illustration.
CAUTION Do not allow any person
to get on the plastic
cover (B), and do not
place luggage on it.
Doing so could damage
the plastic cover.
CAUTIONDo not allow any person to sit on the flipped seat cushion, and do no
t place luggage on it.
The seat’s mounting
fittings could bend
under the weight, maki
ng it impossible for
the seat cushion to be secured when it returns to the original position.NOTE
When folding the second row seatback for- ward once, the seat will automatically switch from the luggage area
mode to the walk-in
mode.
To r e t u r n
BK0211800US.book 14 ページ 2014年3月12日 水曜日 午後2時42分
Page 49 of 446

Seat belts 4-22 Seat and restraint systems
4
N00418401394
A tone and warning light are used to remind the driver to fasten the seat belt. If the ignition switch is turned to the “ON” position or the operation mode is put in ONwithout the driver’s seat belt being fastened, a
warning light will come on and a tone will sound for approximately 6 seconds to remindyou to fasten your seat belt. If the vehicle is driven with the seat belt still unfastened, the warning light will blink andthe tone will sound inte
rmittently until the
seat belt is fastened. At the same time, “FAS- TEN SEAT BELT” is displayed on the infor-mation screen in the multi information display (Type 1 only).
N00418301247
The front passenger seat
belt warning light is
located in the instrument panel. When the ignition switch is turned to the “ON” position or the ope
ration mode is put in
ON, this indicator
normally comes on and
goes off a few seconds later.The light comes on when a person sits on the front passenger seat but does not fasten the seat belt. It goes off wh
en the seat belt is sub-
sequently fastened.
Driver’s seat belt reminder/warning light and display Type 1 Type 2
WA R N I N G In order to reduce the risk of serious injury or death in an accident, always fas- ten your own seat belt. Do not allow any-one to ride in your ve
hicle unless he or she
is also seated and fastening a seat belt. Children should additi
onally be restrained
in a secure child restraint system.NOTE
If the seat belt subs
equently remains unfas-
tened, the warning li
ght and the tone will
issue further warnings
each time the vehicle
starts moving from a stop.
Front passenger seat belt warn- ing light
BK0211800US.book 22 ページ 2014年3月12日 水曜日 午後2時42分
Page 57 of 446
Child restraint systems 4-30 Seat and restraint systems
4
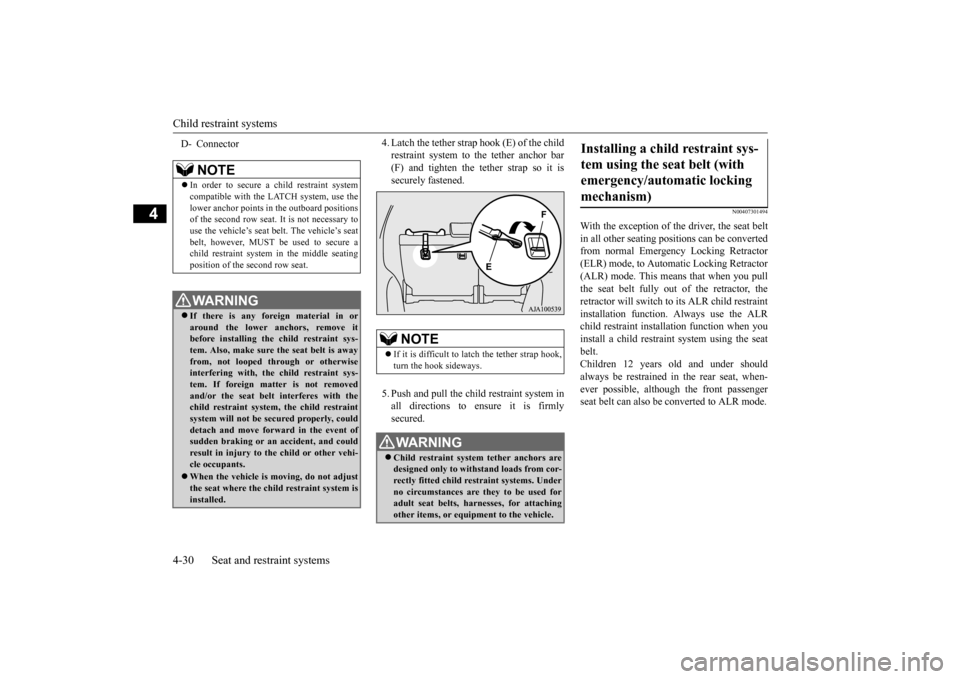
4. Latch the tether strap hook (E) of the child restraint system to the tether anchor bar(F) and tighten the tether strap so it is securely fastened. 5. Push and pull the child restraint system in all directions to en
sure it is firmly
secured.
N00407301494
With the exception of the driver, the seat belt in all other seating po
sitions can be converted
from normal Emergency Locking Retractor(ELR) mode, to Automatic Locking Retractor (ALR) mode. This mean
s that when you pull
the seat belt fully out of the retractor, the retractor will switch to its ALR child restraint installation function.
Always use the ALR
child restraint instal
lation function when you
install a child restraint system using the seat belt.Children 12 years old and under should always be restrained in the rear seat, when- ever possible, although the front passengerseat belt can also be
converted to ALR mode.
D- Connector
NOTE
In order to secure a child restraint system compatible with the LATCH system, use thelower anchor points in the outboard positions of the second row seat.
It is not necessary to
use the vehicle’s seat
belt. The vehicle’s seat
belt, however, MUST be
used to secure a
child restraint system in the middle seating position of the second row seat.WA R N I N G If there is any foreign material in or around the lower anchors, remove it before installing the child restraint sys- tem. Also, make sure the seat belt is awayfrom, not looped through or otherwise interfering with, the child restraint sys- tem. If foreign matter is not removedand/or the seat belt
interferes with the
child restraint system, the child restraint system will not be secured properly, coulddetach and move forward in the event of sudden braking or an
accident, and could
result in injury to the child or other vehi-cle occupants. When the vehicle is
moving, do not adjust
the seat where the child restraint system isinstalled.
NOTE
If it is difficult to
latch the tether strap hook,
turn the hook sideways.WA R N I N G Child restraint system tether anchors are designed only to with
stand loads from cor-
rectly fitted child restraint systems. Underno circumstances are they to be used for adult seat belts, harnesses, for attaching other items, or equipment to the vehicle.
Installing a child restraint sys- tem using the seat belt (with emergency/auto
matic locking
mechanism)
BK0211800US.book 30 ページ 2014年3月12日 水曜日 午後2時42分