2015 MERCEDES-BENZ SLS AMG GT ROADSTER turn signal
[x] Cancel search: turn signalPage 11 of 290
Opening/closing the garage door .. 213
Programming (button in the rear-
view mirror) ................................... 212
Gasoline ............................................. 282
Gear indicator .................................... 123
Gear or selector lever (cleaning
guidelines) ......................................... 229
Genuine parts ...................................... 18
Glove box ...........................................2 00H
Hazard warning lamps ........................ 98
Head bags ............................................ 42
Headlamp cleaning system Notes ............................................. 286
Headlamps
Adding fluid to cleaning system ..... 221
Cleaning system (capacity )............ 286
Cleaning system (function) .............. 99
Cleaning system (notes) ................ 286
Fogging up ....................................... 99
see Automati cheadlamp mode
Hea dlevel heatin g(AIRSCARF) .......... 88
Heating see Climate control
High-beam headlamps
Switching on/of f.............................. 98
High-beam headlamps (display
message) ............................................ 175
Hil lstart assist .................................. 121
Hood Closing ........................................... 219
Displa ymessage ............................ 184
Important safety notes .................. 218
Opening ......................................... 218
Hydroplaning ..................................... 137 I
Ignitio nlock ....................................... 119
see Key positions
Immobilizer .......................................... 58
Indicator lamps see Warning and indicator lamps
Indicators
see Turn signals Instrument cluster
Overview .......................................... 27
Setting s......................................... 157
Warning and indicator lamps ........... 28
Instrument cluste rlighting .............. 158
Interior lighting Automati ccontrol ............................ 99
Delayed switch-off (on-board
computer) ...................................... 159
Emergency lighting ........................ 100
Manua lcontrol ............................... 100
Overview .......................................... 99
Reading lamp ................................... 99 J
Jack Storage location ............................ 234
Using ............................................. 272
Jump starting (engine) ...................... 242 K
KEYLESS-GO start function Displa ymessage ............................ 185
Start/Sto pbutton .......................... 119
Starting the engine ........................ 120
Ke yp ositions
SmartKey ....................................... 119
Kickdown ........................................... 124
Driving tip s.................................... 124
Knee bag .............................................. 41 L
Lamps see Warning and indicator lamps
Lap time (RACETIMER) ...................... 161
License plate lamp Changing bulb s.............................. 101
License plate lamp (display mes-
sage) ................................................... 175
Lights Activating/deactivating the inter-
iorl ighting delaye dswitch-off ........ 159
Automati cheadlamp mod e.............. 96
Displa ymessage ............................ 173
Driving abroa d................................. 96 Index
9
Page 12 of 290
Hazard warning lamps ..................... 98
High bea
mflasher ............................ 98
High-bea mheadlamps ..................... 98
Light switch .................................... .96
Low-bea mheadlamps. ..................... 97
Parking lamps .................................. 97
Standing lamps ................................ 97
Switching the daytime running
lamps on/of f(on -board computer) .. 158
Switching the daytime running
lamps on/of f(switch) ...................... 96
Switching the exterio rlighting
delaye dswitch-off on/of f(on-
board computer) ............................ 158
Switching the surround lighting
on/of f(on -board computer) .......... 158
Turn signal s..................................... 98
see Replacing bulbs
LI Mi ndicator lamp
Cruise control ................................ 139
Locking
see Central locking
Locking (doors)
Automati c........................................ 70
Emergency locking ........................... 71
From inside (central locking but-
ton) .................................................. 70
Locking centrally
see Central locking
Low-beam headlamps
Displa ymessage ............................ 174
Setting for driving abroa d(sym-
metrical ).......................................... 96
Switching on/of f.............................. 97 M
M+S tires ............................................ 252
Malfunctio nmessage
see Displa ymessages
Manual drive program ...................... 127
Matte finis h(clea ning instructions) .. 226
mbrace Call priority .................................... 208
Displa ymessage ............................ 173
Downloading destinations
(COMAND) ..................................... 208
Emergency cal l.............................. 205 Genera
lnotes ................................ 204
Locating astolen vehicl e............... 209
MB info cal lbutton ........................ 207
Remote vehicl eloc king .................. 209
Roadsid eAssistance button .......... 207
Search &Send ............................... 209
Self-test ......................................... 205
System .......................................... 205
Mechanical key
Function/note s................................ 64
Locking vehicl e................................ 71
Unlocking the driver' sdoor.............. 70
Memory card (audio) ......................... 155
Memory function ................................. 92
Messag ememory (on-board com-
puter) .................................................. 164
Messages see Displa ymessages
Mirrors
see Exterior mirrors
see Rear-vie wmirror
see Vanity mirror
Mobil ephone
Menu (on-board computer) ............ 155
Modifying the programming
(SmartKey) ........................................... 63
MP3 Operation ....................................... 155
see separate operating instructions
Multifunctio ndisplay
Function/note s............................. 152
Permanent display ......................... 158
Multifunctio nsteering wheel
Operating the on-board compute r..1 51
Overview .......................................... 29 N
Navigation Menu (on-board computer) ............ 153
On-board computer ....................... 153
see separate operating instructions
Notes on breaking-i nanew vehicle .. 118 10
Index
Page 17 of 290
DOT (Department of Transporta-
tion) (definition) ............................. 268
GAW
R(GrossA xle Weight Rating)
(definition) .................................... .268
GVW (Gross Vehicle Weight) (def-
inition) .......................................... .268
GVW R(Gross Vehicle Weight Rat-
ing) (definition) .............................. 269
Important safety notes .................. 250
Increase dvehicle weight due to
optional equipment (definition) ...... 268
Kilopascal (kPa )(definition) ........... 269
Labeling (overview )........................ 264
Loa dbearing index (definition) ...... 270
Loa dindex ..................................... 266
Loa dindex (definition) ................... 269
Maximu mloaded vehicleweight
(definition) ..................................... 269
Maximu mloadona tire (definition) .. 269
Maximu mpermissibl etire pres-
sure (definition) ............................. 269
Maximu mtire load ......................... 267
Maximu mtire load (definition) ....... 269
Optiona lequipment weight (defi-
nition) ............................................ 269
PSI (pounds pe rsquare inch )(de f-
inition) ........................................... 269
Replacing ....................................... 270
Service life ..................................... 252
Sidewal l(de finition) ....................... 269
Speed rating (definition) ................ 268
Storing ........................................... 271
Structure and characteristics
(definition) ..................................... 268
Technica ldata. .............................. 277
Temperature .................................. 264
TIN (Tire Identification Number)
(definition) ..................................... 270
Tire bead (definition) ...................... 269
Tire pressure (definition) ................ 269
Tire pressures (recommended )...... 268
Tire size (data )............................... 275
Tire size designation, load-bearing capacity, speed rating .................... 264
Tire trea d....................................... 251
Tire trea d(definition) ..................... 269
Tota lloa dlim it (definition) ............. 270
Tractio n......................................... 263 Tractio
n(definition) ....................... 270
Tread wear ..................................... 263
Uniform Tire Quality Grading
Standard s...................................... 263
Uniform Tire Quality Grading
Standard s(de finition) .................... 268
Wea rindicator (definition) ............. 270
Wheel rim (definition) .................... 268
see Fla ttire
Top Tether ............................................ 53
Tow-away alarm .................................. 59
Towing Important safety guideline s........... 244
Installing the towing ey e................ 245
Removing the towing ey e............... 245
With the rea raxler aised ................ 245
Towin gaway
With both axles on the ground ....... 246
Transmission
Driving tip s.................................... 124
Selector lever ................................ 121
Shift rang e..................................... 127
Transmissio nposition display ......... 123
Transmissio npositions .................... 123
Transporting the vehicle .................. 246
Trim piece s(clea ning instructions) .. 230
Trip computer (on-board computer) .. 153
Trip odometer Calling up ....................................... 152
Trunk
Emergency release .......................... 74
Important safety guideline s............. 72
Locking separatel y........................... 74
Opening (automatically from
inside ).............................................. 73
Trunk lid
Displa ymessage ............................ 184
Opening/closing ........................ 72, 73
Opening dimensions ...................... 286
Trunk load (maximum) ...................... 286
see Technical data
Turn signal (display message) ......... 174
Turn signals Switching on/of f.............................. 98
Type identificatio nplate
see Vehicl eide ntification plate Index
15
Page 30 of 290
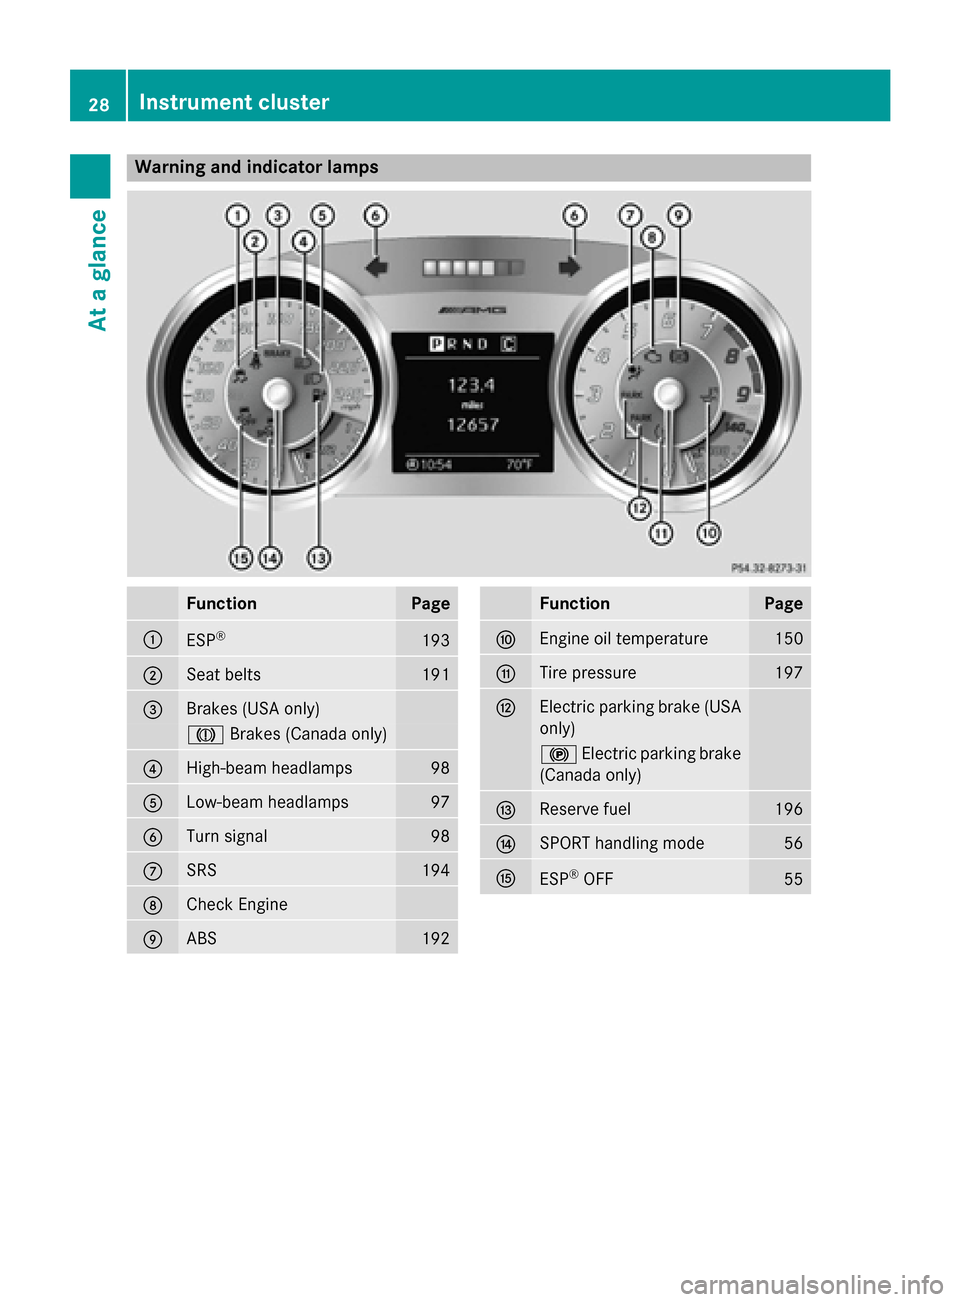
Warning and indicator lamps
Function Page
0043
ESP
® 193
0044
Seat belts 191
0087
Brakes (USA only)
004D
Brakes (Canada only) 0085
High-beam headlamps 98
0083
Low-beam headlamps 97
0084
Turn signal 98
006B
SRS 194
006C
Check Engine
006D
ABS 192 Function Page
006E
Engine oil temperature 150
006F
Tire pressure 197
0070
Electric parking brake (USA
only) 0024
Electric parking brake
(Canada only) 0071
Reserve fuel 196
0072
SPORT handling mode 56
0073
ESP
®
OFF 5528
Instrument clusterAt
ag lance
Page 65 of 290
G
WARNING
When leaving the vehicle, alwaysr emove the
SmartKey from the ignitio nlock. Always take
the SmartKey with you and lock the vehicle.
Do not leave children unsupervised in the
vehicle, even if they are secure dinachild
restraint system, and do not give them access to an unlocked vehicle. Achild's unsupervised
access to avehicl ecouldr esult in an accident
and/or serious personal injury .They could:
R injure themselves on vehicl eparts
R be seriouslyorf atally injured by extreme
heatorc old
R injure themselves or have an accident with
vehicl eequipment that may still be in oper-
ation even after the SmartKey has been
removed from the ignition, such as the seat
adjustment, steering whee ladjustment or
memory function.
If children open adoor, they coul dcause
severe or even fatal injury to other persons; if they get out of the vehicle, they coul dinjure
themselves when doing so or be seriouslyor
even fatally injured by any passing traffic.
Do not expose the child restraint system to
direct sunlight. The child restraint system's
metal parts, for example, coul dbecome very
hot, and achild coul dbeburned on these
parts. G
WARNING
If you attach heavy or larg eobjects to the
SmartKey ,the SmartKey coul dbeuninten-
tionally turned in the ignitio nlock. This could
caus ethe engine to be switched off. There is a
risk of an accident.
Do not attach any heavy or larg eobjects to the
SmartKey .Remove any bulky key rings before
inserting the SmartKey into the ignitio nlock.
! Keep the SmartKey away from strong
magnetic fields. Otherwise, the remote
control function coul dbeaffected.
Strong magnetic fields can occur in the
vicinity of powerful electrical installations. 0043
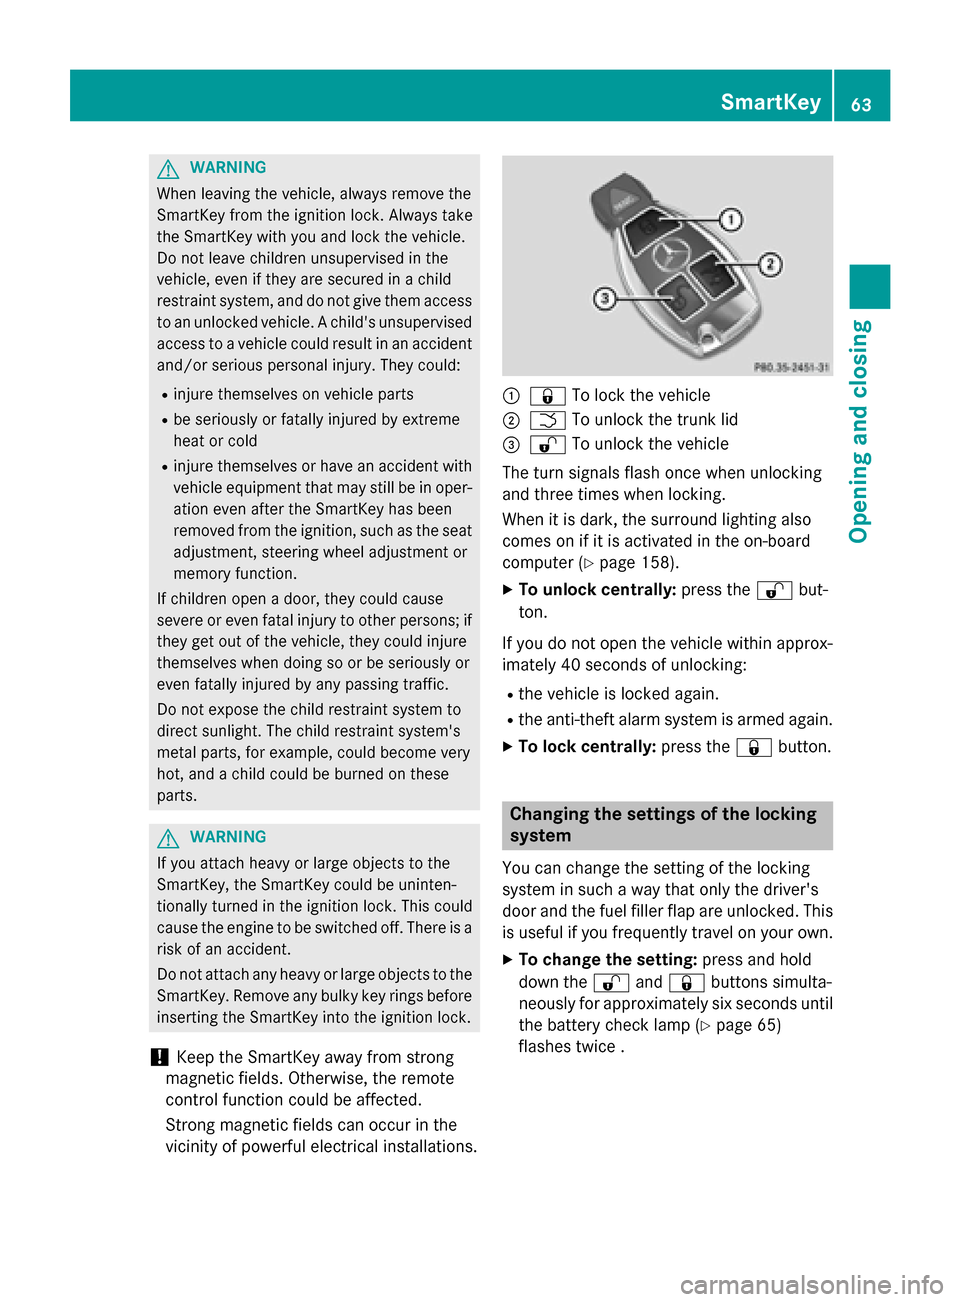
0037 To lock the vehicle
0044 0054 To unlock the trunk lid
0087 0036 To unlock the vehicle
The turn signals flas honce when unlocking
and three times when locking.
When it is dark, the surround lighting also
comes on if it is activated in the on-board
computer (Y page158).
X To unlock centrally: press the0036but-
ton.
If you do not open the vehicl ewithinapprox-
imatel y40seconds of unlocking:
R the vehicl eislocked again.
R the anti-theft alarm system is armed again.
X To lockc entrally: press the 0037button. Changing the setting
softhe locking
system
You can change the setting of the locking
system in such awaythat only the driver's
door and the fuel filler flap are unlocked .This
is useful if you frequently travel on youro wn.
X To chang ethe setting: press and hold
downt he0036 and0037 buttons simulta-
neously for approximatel ysix seconds until
the battery check lamp (Y page65)
flashes twice . SmartKey
63Opening and closing Z
Page 100 of 290
X
To switc honthe standin glamps: the
SmartKe yisnot in the ignition lock or it is in
position 0.
X Turn the light switch to 0063(left-hand side
of the vehicle) or 0064(right-hand side of
the vehicle). Combination switch
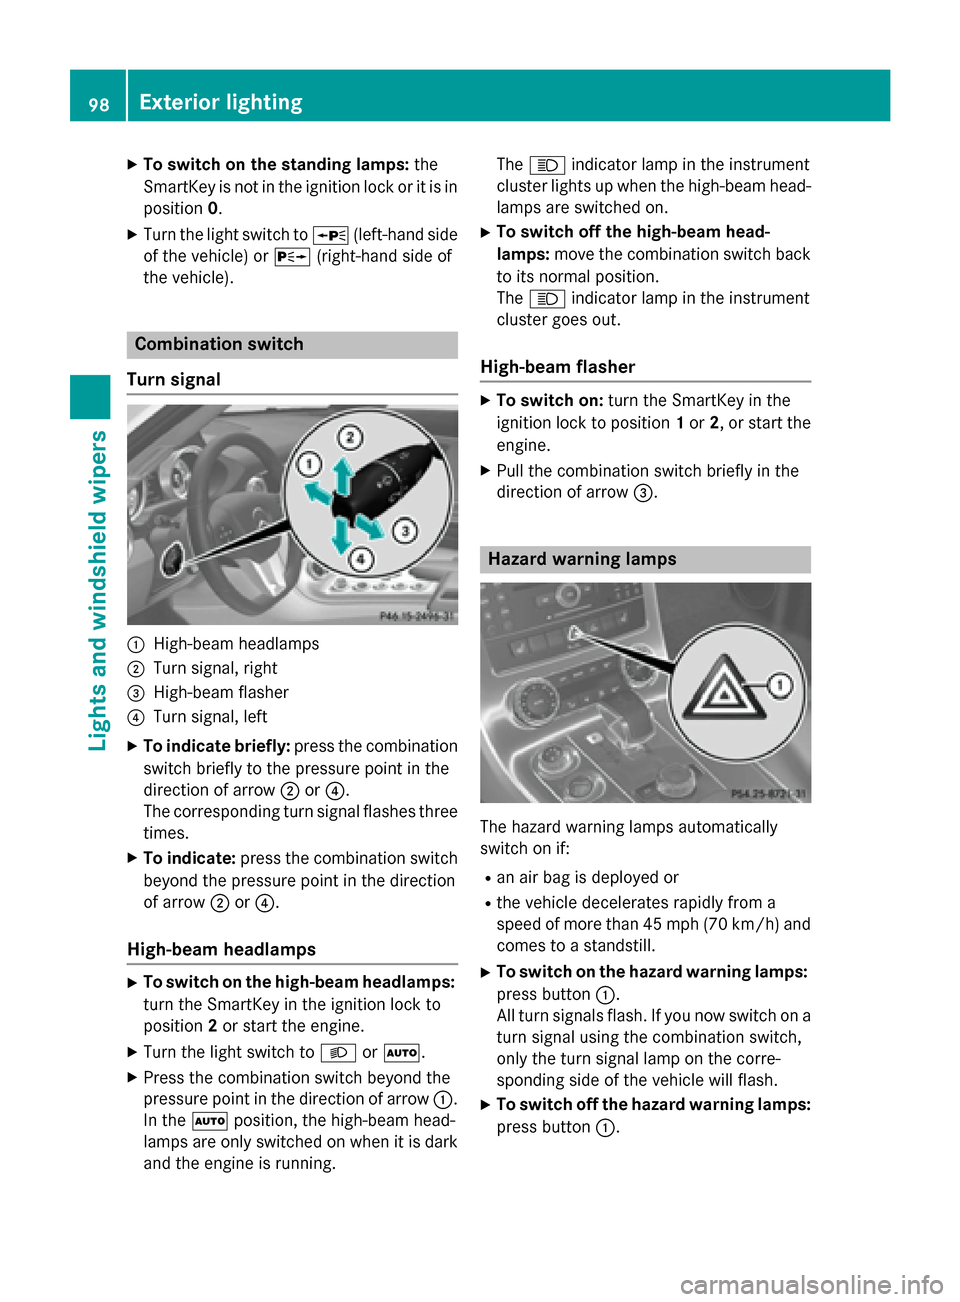
Turn signal 0043
High-bea mheadlamps
0044 Turn signal, right
0087 High-bea mflasher
0085 Turn signal, left
X To indicate briefly: press the combination
switch briefl ytothe pressure point in the
direction of arrow 0044or0085.
The corresponding tur nsigna lflashe sthree
times.
X To indicate: press the combinatio nswitch
beyond the pressure point in the direction
of arrow 0044or0085.
High-beam headlamps X
To switc honthe high-beam headlamps:
tur nthe SmartKe yinthe ignition lock to
position 2or start the engine.
X Turn the light switch to 0058or0058.
X Press the combinatio nswitch beyond the
pressure point in the direction of arrow 0043.
In the 0058position, the high-bea mhead-
lamps ar eonlys witched on when it is dark
and the engine is running. The
0057 indicator lamp in the instrument
cluster lights up when the high-bea mhead-
lamps ar eswitched on.
X To switc hoffthe high-beam head-
lamps: movethe combinatio nswitch back
to its normal position.
The 0057 indicator lamp in the instrument
cluster goe sout.
High-beam flasher X
To switc hon:tur nthe SmartKe yinthe
ignition lock to position 1or 2,ors tart the
engine.
X Pull the combinatio nswitch briefl yinthe
direction of arrow 0087. Hazard warning lamps
The hazar
dwarning lamps automatically
switch on if:
R an ai rbag is deployed or
R the vehicl edecelerates rapidl yfrom a
speed of mor ethan45m ph (70 km/h) and
come stoas tandstill.
X To switc honthe hazard warning lamps:
press button 0043.
All tur nsignals flash. If yo unow switch on a
tur ns igna lusing the combinatio nswitch,
onl ythe tur nsigna llam pont he corre-
sponding side of the vehicl ewillf lash.
X To switc hoffthe hazard warning lamps:
press button 0043.98
Exterior lightingLights and
windshield wipers
Page 149 of 290
(30 km/h), warnin
glamp 0043on the corre-
sponding side lights up red. This warnin gis
always given when avehicle enters the blind
spot monitoring range from behind or from
the side. When you overtake avehicle, the
warnin gonly occurs if the differenc einspeed
is less than 7mph (12 km/h).
The yellow indicator lamp goes out if reverse gear is engaged. In this event, Blin dSpot
Assist is no longer active.
The brightness of the indicator/warning
lamps is adjusted automatically according to
the ambient light.
Collision warning If
av ehicle is detected in the monitoring range
of Blin dSpot Assist and you switc honthe
corresponding turn signal, adouble warning
ton esounds .Red warnin glamp 0043flashes. If
the turn signal remain son, vehicles detected
are indicated by the flashin gofred warning
lamp 0043.There are no further warnin gtones.
Switching on Blind Spot Assist X
Make sure that Blin dSpot Assist
(Y page 157) is activated in the on-board
computer.
X Ensure that key position 2has been
selected with the Start/Stop button.
Warnin glamps 0043in the exterior mirrors
light up red for approximately 1.5 seconds
and then turn yellow. Driving systems
147Driving and parking Z
Page 215 of 290
i
Usually, you now have 30 seconds to ini-
tiate the next step.
X Press previouslyp rogramed button0044,0087
or 0085 of the integrated garage door opener
until the door closes.
The rolling code synchronization is then
complete.
Notes on programing the remote control
Canadian radio frequency lawsr equire a
"break" (or interruption) of the transmission
signals after broadcasting for afew seconds.
Therefore, these signals may not last long
enough for the integrated garage door
opener. The signal is not recognized during
programing. Comparable with Canadian law,
some U.S. garage door openers also feature a
"break".
Proceed as follows:
R if you live in Canada
R if you have difficulties programing the
garage door opener (regardless of where
you live) when using the programing steps
X Press and hold one of buttons 0044to0085 on
the integrated garage door opener.
After ashort time, indicator lamp 0043lights
up yellow.
X Release the button.
Indicator lamp 0043flashes yellow.
X Press button 0084of garage door remote
control 0083for two seconds, then release it
for two seconds.
X Press button 0084againf or two seconds.
X Repeatt his sequence on button 0084of
remote control 0083until indicator lamp 0043
lights up green.
If indicator lamp 0043turns red, repeat the
process.
X Continue with the other programing steps
(see above). Problems when programing
If you are experiencing problems programing
the integrated garage door opener on the
rear-view mirror, take note of the following
instructions:
R Check the transmitter frequency of garage
door drive remote control 0083.This can usu-
ally be found on the back of the remote
control.
The integrated garage door opener is com-
patible with devices that have units which
operate in the frequency range of 280 to
433 MHz .
R Replace the batteries in garage door
remote control 0083.This increases the like-
lihood that garage door remote control 0083
will transmit astrong and precise signal to
the integrated garage door opener in the
rear-view mirror.
R When programing, hold remote control 0083
at varying distances and angles from the
button that you are programing. Try various angles at adistance between 2and
12 inches (5to 30 cm) or at the same angle
but at varying distances.
R If another remote control for the same
garage door drive is available,r epeat the
same programing steps with this remote
control. Before performing these steps,
make sure that new batteries have been
installed in garage door drive remote
control 0083.
R Note that some remote controls only trans-
mit for alimited amount of time (the indi-
cator lamp on the remote control goes out). Press button 0084on remote control 0083again
before transmission ends.
R Align the antennac able of the garage door
opener unit. This can improve signal recep- tion/transmission.
Opening/closing the garage door Once programed, the integrated garage door
opener 0083will assume the function of the
garage door system's remote control. Please Features
213Stowage and features Z