Page 209 of 290

Roadside Assistanc
ebutton X
Press Roadsid eAssistance button 0043for
more than two seconds.
Thi sinitiates acalltot he Mercedes-Benz
Custome rAssistance Center. The indicator
lamp in Roadsid eAssistance button 0043
flashe swhile the cal lisactive. The Con‐
Con‐
necting Call
necting Call message appears on the
multifunction display .The audi ooutpu tis
muted.
If ac onnection can be made, the Call Con‐
Call Con‐
nected nected message appears in the multifunction
display.
If ac ellula rphone network is available and
there is sufficient GP Sreception, the mbrace
system transmits data to the Mercedes-Benz Custome rAssistance Center, for example:
R Current location of the vehicle
R Vehicl eide ntification number
i The COMAND display shows that an
mbrace cal lisactive. During the call, you
can change to the navigation menu by
pressing the NAVI button on COMAND, for
example.
Voice outpu tisn ot available.
Av oice connection is established between
the Mercedes-Benz Custome rAssistance
Center and the vehicl eoccupants.
The Mercedes-Benz Custome rAssistance
Center either send saqualified Mercedes-
Benz technicia norarranges for your vehicle
to be transported to the neares tauthorized
Mercedes-Benz Center. Yo umay be charged
for service ssuchasr epairworka nd/or tow- ing. Further detail
sare available in your
mbrace manual.
i The mbrace system faile dtoinitiate a
Roadsid eAssistance cal lif:
R the indicator lamp for Roadsid eAssis-
tance cal lbutton 0043is flashing contin-
uously.
R no voice connection to the Mercedes-
Benz Custome rAssistance Center was
established.
Thi sm ay be because the corresponding
mobil ephone network is not available.
The Call Failed
Call Failed message appears in the
multifunction display.
X To en dacall:press the 0076button on the
multifunction steering wheel.
or
X Press the corresponding button for ending
ap hone cal lonCOMAND.
MB Info cal lbutton X
Press MB Info cal lbutton 0043for more than
two seconds.
Thi sinitiates acalltot he Mercedes-Benz
Custome rAssistance Center. The indicator
lamp in MB Info cal lbutton 0043flashe swhile
the connection is being made. The Con‐ Con‐
necting Call
necting Call message appears in the
multifunction display and the COMAND
system is muted.
If ac onnection can be made, the Call Con‐ Call Con‐
nected
nected message appears in the multifunction
display. Features
207Stowage and features Z
Page 210 of 290

If
ac ellular phone network is available and
there is sufficient GPS reception, the mbrace
system transmits data to the Mercedes-Benz Customer Assistance Center, for example:
R Current location of the vehicle
R Vehicle identification number
i The COMAND display shows that an
mbrace call is active. During the call, you
can change to the navigation menu by
pressing the NAVI button on COMAND, for
example.
Voice outputisn ot available.
Av oice connection is established between
the Mercedes-Benz Customer Assistance
Center and the vehicle occupants. You can
obtain information on how to operate your
vehicle's systems, on the location of the near- est authorized Mercedes-Benz Center, and on
further products and services offered by
Mercedes-Benz USA.
USA only: you can find further information on
the mbrace system under "Owners Online" at
http://www.mbusa.com.
i The mbrace system failed to initiate an
MB Info call if:
R the indicator lamp in MB Info call but-
ton 0043is flashing continuously.
R no voice connection to the Mercedes-
Benz Customer Assistance Center was
established.
This may be because the corresponding
mobilep hone network is not available.
The Call Failed
Call Failed messageappears in the
multifunction display.
X To end acall: press the 0076button on the
multifunction steering wheel.
or
X Press the corresponding button for ending
ap hone call on COMAND. Call priority When service calls are active, e.g. Roadside
Assistance or MB Info calls,ane mergency
call can still be initiated .Inthis case, an emer-
gency call willt ake priority and override all
other active calls.
The indicator lamp of the respective button
flashes until the call is ended. An emergency call can only be terminated by the Mercedes-
Benz Customer Assistance Center.
All other calls can be ended by pressing:
R the 0076 button on the multifunction steer-
ing wheel
R or the corresponding COMAND button for
ending atelephone call
i If an mbrace call is initiated
,audio output
is muted. The mobilep hone is no longer
connected to COMAND. If you must use
yourm obilephone, we recommend that
you do this only when the vehicle is sta-
tionary and in asafe location.
Downloading destination sinCOMAND Downloadin
gdestinations
i Information on the components and oper-
ating principles of COMAND can be found
in the separate COMAND operating instruc-
tions.
This service is part of the mbrace PLUS Pack-
age and cannot be purchased separately.
i You can only use the Destination Down-
loadf unction if the vehicle is equippedw ith
an avigation system.
Destination Download gives you access to a
data bank with over 15 million Points of Inter-
est (POIs) .These can be downloaded on the
navigation system in yourv ehicle.Ifyou know
the destination, the address can be down-
loaded. Alternatively ,you can obtain the loca-
tion of Points of Interest (POIs)/important
destinations in the vicinity.
You are prompted to confirm route guidance
to the address entered. 208
FeaturesStowagea
nd features
Page 211 of 290

The system calculates the route and subse-
quently start sthe route guidance with the
address entered.
i If you select
No
No,t he address can be stored
in the address book.
i The Destination Download function is
available if the corresponding mobile
phone network is available and data trans- fer is possible.
Route Assistance
This service is part of the mbrace PLUS Pack- age and cannot be purchased separately.
i You can also use the Route Assistance
function if your vehicle is not equipped with
an avigation system.
Within the framework of this service, you
receive aprofessional and reliable form of
navigation support without having to leave
your vehicle.
The customer service representative deter-
mines asuitable driving route based on your
curren tvehicle position and the desired des-
tination and guides you live through the cur-
rent sections of the route.
Search &Send "Search
&Send" is adestination entry
service. You can find further information on
"Search &Send" in the separate COMAND
operating instructions.
Vehicle remot eclosing The remot
eclosing feature can be used when
you have forgotten to lock the vehicle and you
are no longer nearby. The vehicle can then be
locked by the Mercedes-Benz Customer
Assistance Center.
The vehicle can be locked remotely up to four
days after the ignition was last switched off.
X Contact the following service hotlines: R
USA: Mercedes-Benz Customer Assis-
tanceC enter at 1-800-FOR-MERCedes
(1-800-367-6372)o r1-866-990-9007
R Canada: Customer Servic eat
1-888-923-8367
You will be asked for your PIN.
The next time you are inside the vehicle and
you switch on the ignition, the Tele Aid
Tele Aid
Doors Locked Remotely Doors Locked Remotely message appears
in the multifunction display.
USA only: alternatively, the vehicle can be
locked via:
R the Internet,u nder the "Owners Online"
section
R the telephone application (e.g. iPhone ®
,
Blackberry)
To do this, you will need your identification
number and password.
i The vehicle remote closing feature is
available when the relevant mobile phone
network is available and data connection is
possible.
Stolen vehicle recovery service If your vehicle has been stolen:
X Notify the police.
The police will issue anumbered incident
report.
X This number will be forwarded to the
Mercedes-Benz Customer Assistance
Center together with your PIN.
The Mercedes-Benz Customer Assistance
Center then attempt stolocate the mbrace
system. The Mercedes-Benz Customer
Assistance Center contacts you and the
local law enforcement agency if the vehicle
is located. However, only the law enforce-
ment agency is informed of the location of
the vehicle.
i If the anti-theft alarm system is active for
longer than 30 seconds, mbrace automat-
ically informs the Mercedes-Benz Cus-
tomer Assistance Center. Features
209Stowage and features Z
Page 212 of 290

Extendable rea
rspoiler
The rear spoiler improve sthe handlin gofthe
vehicle .Itadapt sthe vehicle's aerodynamics
to th eoperatin gconditions, dependen tonthe
spee doft hevehicle. Example
:Coupe
i If th
evehicle is equippe dwith AM Gadap-
tiv es por tsuspension system, th ebutton is
in th eswitch strip above th eair condition-
ing control panel.
Only use button 0043to exten dand retrac tthe
rear spoiler manually for cleaning. Button 0043
is no tused to operate th erear spoiler.
If you driv eatspeeds above 75 mph
(12 0km/ h),t he rear spoiler extends auto-
matically. Button 0043flashes until the rear
spoiler has extended and then lights up in red.
If you drive at speeds above 50 mph
(8 0k m/ h),t he rear spoiler remains
extended. Button 0043remain slit in red.
If you drive at speeds below 50 mph
(8 0k m/ h),t he rear spoiler retract sautomat-
ically. Button 0043flashes until the rear spoiler
has retracted and then goes out.
Extending and retracting ther ear
spoiler manually You can extend and retract the rear spoiler
manually for cleaning. G
WARNING
Body parts could becom etrappe difyou man-
ually retract the rear spoiler. There is arisk of
injury. Make sure that nobody is within the range of
movement of the rear spoiler. Release the
switc himmediately if somebod ybecomes
trapped. The rear spoiler then extends again.
When leaving the vehicle, always tak ethe
SmartKe ywith you and lock the vehicle. Never
leave children unsupervised in the vehicle.
! Do not enter an automatic car wash with
the rear spoiler extended. Otherwise, the
rear spoiler may be damaged.
Only extend the rear spoiler in order to
clean it by hand. Retrac titagain when you
have finished cleanin git.
X Close the trunk lid.
X Selec tkey position 2with the Start/Stop
button (Y page 119).
X To extend: press button 0043.
The rear spoiler is extended.
Button 0043flashes until the rear spoiler has
extended and then lights up in red.
X To retract: press and hold button 0043until
the rear spoiler is completely retracted.
Button 0043flashes until the rear spoiler has
retracted and then goes out.
Rear Spoiler retracts manually Rear Spoiler retracts manually
appears in the display.
i If you release button
0043while retracting
the rear spoiler, it extends again automati-
cally. 210
FeaturesStowage and features
Page 213 of 290

Problems with the rear spoiler
Problem
Possible causes/consequences and
0050
0050Solutions The rear spoiler stops
before reaching the
end position when
retracting manually. You have opened the trunk lid while manually retracting the rear
spoiler.
X Close the trunk lid.
The rear spoiler extends or, if you press and hold button 0043,
continues retracting. The rear spoiler stops
before reaching the
end position when
retracting/extending
manually. You have switched off the ignition.
X Switch the ignition back on.
X Press button to extend/retract the rear spoiler.
The rear spoiler extends/retracts. The rear spoiler cannot
be retracted again after
manually extending it. You have opened the trunk lid while manually extending the rear
spoiler.
X Close the trunk lid. The rear spoiler does
not extendorr
etract
automatically. The rear spoiler's movement is blocked, e.g. by an object jammed
between the body and the rear spoiler.
X Remove the object. Garage door opener
Important safety notes G
WARNING
When you operate or program the garage door with the integrated garage door opener, per-
sons in the range of movement of the garage
door can become trapped or struck by the
garage door. There is arisk of injury.
When using the integrated garage door
opener, always make sure that nobody is
within the range of movement of the garage
door. G
WARNING
Combustion engines emit poisonous exhaust
gases such as carbon monoxide. Inhaling
these exhaust gases leads to poisoning. There is ar isk of fatal injury. Therefore never leave
the engine running in enclosed spaces with-
out sufficient ventilation. The HomeLink
®
garage door opener inte-
grated in the rear-view mirror allowsy ou to
operate up to three different door and gate
systems.
Use the integrated garage door opener only
on garage doors that:
R have safety stop and reverse features and
R meet current U.S. federal safety standards
When programing agarage door opener, park
the vehicle outside the garage.
i Certain garage door drives are incompat-
ible with the integrated garage door
opener. If you have difficulty programing
the integrated garage door opener, contact
an authorized Mercedes-Benz Center.
Alternatively, you can call the following
telephone assistance services:
R USA: Mercedes-Benz Customer Assis-
tanceC enter at 1-800-FOR-MERCedes
R Canada: Customer Service at
1-800-387-0100 Features
211Stowage and features Z
Page 214 of 290
.
USA: FCC ID: CB2HMIHL4
Canada: IC: 279B-HMIHL4
Programming Programing buttons
Pay attention to the \"Important safety notes\"
(")
i
Notes aboutt
he declaration of conformity
can be found here (Y page 22).
USA: FCC ID: CB2HMIHL4
Canada: IC: 279B-HMIHL4
Programming Programing buttons
Pay attention to the "Important safety notes"
(Y page 211). Integrated garaged
oor opener in the rear-view mir-
ror
Garage door remote control 0083is not part of
the integrated garaged oor opener.
X Before programing for the first time, clear
the integrated garaged oor opener memory
(Y page 214).
X Select key position 2with the Start/Stop
button (Y page 119).
X Press and hold one of buttons 0044to0085 on
the integrated garaged oor opener.
After ashort time, indicator lamp 0043lights
up yellow.
i Indicator lamp
0043lights up yellow as soon
as button 0044,0087or0085 is programed for the
first time. If the selected button has already been programed ,indicator lamp 0043will
only light up yellow after ten seconds have
elapsed.
X Release button 0044,0087or0085.
Indicator lamp 0043flashesy ellow.
X Point garaged oor remote control 0083
towards buttons 0044to0085 on the rear-view mirror at
adistance of 2to8i nches (5 to
20 cm).
i The required distance between remote
control 0083and the integrated garaged oor
opener depends on the garaged oor drive
system. Several attempts might be neces-
sary. You shouldt est every position for at
least 25 seconds before trying another
position.
X Press and hold button 0084on remote control
0083 until indicator lamp 0043lights up green.
If indicator lamp 0043lights up green or
flashes, then programing was successful.
X Release button 0084on remote control 0083for
the garaged oor drive system.
X If indicator lamp 0043lights up red: repeatt he
programing procedure for the correspond-
ing button on the rear-view mirror. When
doing so, vary the distance between remote
control 0083and the rear-view mirror.
i If the indicator lamp flashesg
reen after
successful programing, the garaged oor
system is using arolling code. After pro-
graming, you must synchronize the garage
door opener integrated in the rear-view mir- ror with the receiver of the garaged oor
system.
Synchronizing the rollingc ode
Pay attention to the "Important safety notes" (Y page 211).
Your vehicle must be within reach of the
garaged oor or exterior gate drive. Make sure
that neither yourv ehicle nor any persons/
objects are present within the sweep of the
door or gate.
X Select key position 2with the Start/Stop
button (Y page 119).
X Press the programing button of the door or
gate drive (see the door or gate drive oper- ating instructions, e.g. under "Programing
additional remote controls"). 212
FeaturesStowagea
nd features
Page 215 of 290

i
Usually, you now have 30 seconds to ini-
tiate the next step.
X Press previouslyp rogramed button0044,0087
or 0085 of the integrated garage door opener
until the door closes.
The rolling code synchronization is then
complete.
Notes on programing the remote control
Canadian radio frequency lawsr equire a
"break" (or interruption) of the transmission
signals after broadcasting for afew seconds.
Therefore, these signals may not last long
enough for the integrated garage door
opener. The signal is not recognized during
programing. Comparable with Canadian law,
some U.S. garage door openers also feature a
"break".
Proceed as follows:
R if you live in Canada
R if you have difficulties programing the
garage door opener (regardless of where
you live) when using the programing steps
X Press and hold one of buttons 0044to0085 on
the integrated garage door opener.
After ashort time, indicator lamp 0043lights
up yellow.
X Release the button.
Indicator lamp 0043flashes yellow.
X Press button 0084of garage door remote
control 0083for two seconds, then release it
for two seconds.
X Press button 0084againf or two seconds.
X Repeatt his sequence on button 0084of
remote control 0083until indicator lamp 0043
lights up green.
If indicator lamp 0043turns red, repeat the
process.
X Continue with the other programing steps
(see above). Problems when programing
If you are experiencing problems programing
the integrated garage door opener on the
rear-view mirror, take note of the following
instructions:
R Check the transmitter frequency of garage
door drive remote control 0083.This can usu-
ally be found on the back of the remote
control.
The integrated garage door opener is com-
patible with devices that have units which
operate in the frequency range of 280 to
433 MHz .
R Replace the batteries in garage door
remote control 0083.This increases the like-
lihood that garage door remote control 0083
will transmit astrong and precise signal to
the integrated garage door opener in the
rear-view mirror.
R When programing, hold remote control 0083
at varying distances and angles from the
button that you are programing. Try various angles at adistance between 2and
12 inches (5to 30 cm) or at the same angle
but at varying distances.
R If another remote control for the same
garage door drive is available,r epeat the
same programing steps with this remote
control. Before performing these steps,
make sure that new batteries have been
installed in garage door drive remote
control 0083.
R Note that some remote controls only trans-
mit for alimited amount of time (the indi-
cator lamp on the remote control goes out). Press button 0084on remote control 0083again
before transmission ends.
R Align the antennac able of the garage door
opener unit. This can improve signal recep- tion/transmission.
Opening/closing the garage door Once programed, the integrated garage door
opener 0083will assume the function of the
garage door system's remote control. Please Features
213Stowage and features Z
Page 216 of 290

also read th
eoperatin ginstruction sfor the
garag edoor system.
X Select ke yposition 2wit hthe Start/Stop
button.
X Press button 0044,0087or0085 whic hyou have
programed to operate th egarag edoor.
Garage door system wit hafixed code: indi-
cator lamp 0043light supg reen.
Garage door system wit harolling code:
indicator lamp 0043flashes green.
i The transmitte
rwill transmit asignal as
lon gast hebutto nisp ressed. The trans-
mission is halted after amaximum of ten
seconds and indicator lamp 0043light sup
yellow. Press button 0044,0087or0085 again if
necessary.
Clearing th ememory X
Select ke yposition 2wit hthe Start/Stop
button.
X Press buttons 0044and 0085.
The indicator lamp light supyellow.
X Press and hold buttons 0044and 0085until the
indicator lamp turns green.
i Mak
esure that you clear th ememory of
th ei ntegrate dgarag edoor opener before
sellin gthe vehicle. Charg
emaintenance socket
The battery may drain if th evehicle is left sta-
tionar yfor lon gperiods. In this case,
Mercedes-Ben zrecommends attaching the
trickle charge rtothecharge maintenance
socket.
The charge maintenance socke tisdesigned
solely for connecting atrickle charger. A
trickle charge rcan be obtaine dfroman
authorized Mercedes-Ben zCenter, for exam-
ple. X
Switch th eignition off.
X Open th etrunk lid.
X Connect th ecabl ep rovide dinthetrunk to
th et rickle charger.
X Connect th etrickle charge rtocharge main-
tenance socket 0043.Consult th emanufac-
turer' soperatin ginstruction sonhow to do
so.
i At
rickle charge rconnected to charge
maintenance socket 0043only maintain sthe
curren tcharge leve lofthevehicle's elec-
trical system battery. If th evehicle's elec-
trical system battery is discharged, it needs
to be charge dwithab attery charger. You
will fin dfurther informatio nonchargin gthe
battery at (Y page 238). Floorma
tonthedriver's side G
WARNING
Object sinthedriver' sfootwell can restrict the
pedal travel or obstruc tadepressed pedal.
The operatin gand road safety of th evehicle is
jeopardized. Ther eisariskofana ccident.
Mak esure that all object sinthevehicle are
stowed correctly, and that they canno tenter
th ed river' sfootwell. Install th efloormats
securely and as specifie dinorder to ensure
sufficient clearance for th epedals .Don otuse
loos efloormats and do no tplac efloormats on
to pofo neanother. 214
FeaturesStowage and features
 1
1 2
2 3
3 4
4 5
5 6
6 7
7 8
8 9
9 10
10 11
11 12
12 13
13 14
14 15
15 16
16 17
17 18
18 19
19 20
20 21
21 22
22 23
23 24
24 25
25 26
26 27
27 28
28 29
29 30
30 31
31 32
32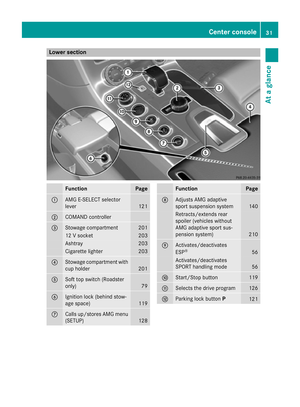 33
33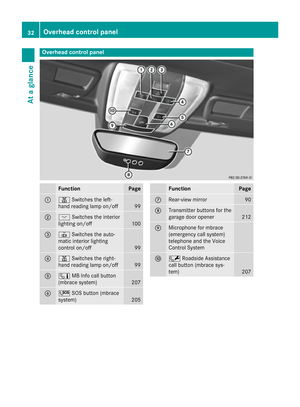 34
34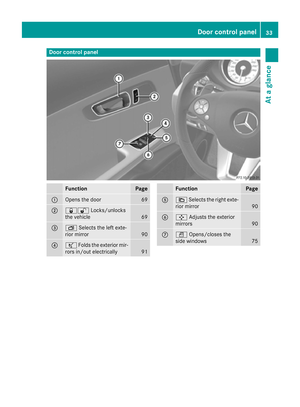 35
35 36
36 37
37 38
38 39
39 40
40 41
41 42
42 43
43 44
44 45
45 46
46 47
47 48
48 49
49 50
50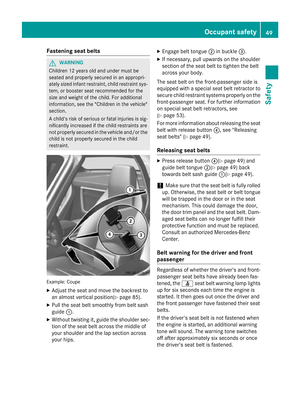 51
51 52
52 53
53 54
54 55
55 56
56 57
57 58
58 59
59 60
60 61
61 62
62 63
63 64
64 65
65 66
66 67
67 68
68 69
69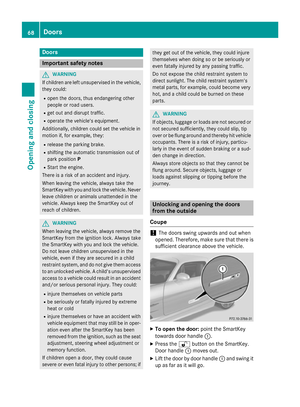 70
70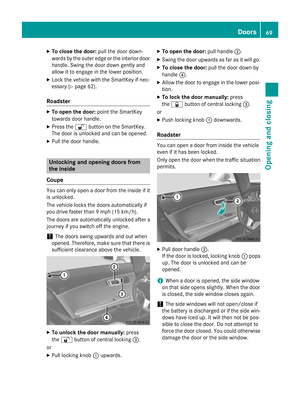 71
71 72
72 73
73 74
74 75
75 76
76 77
77 78
78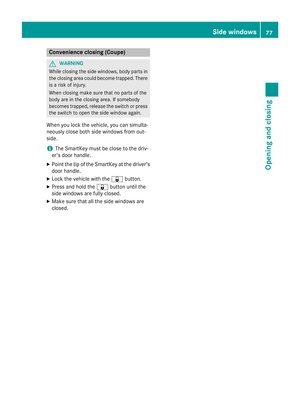 79
79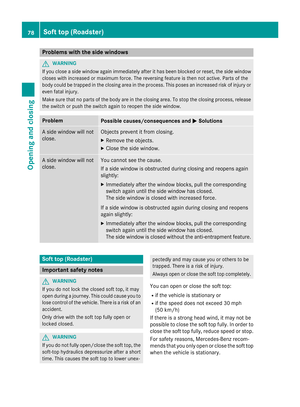 80
80 81
81 82
82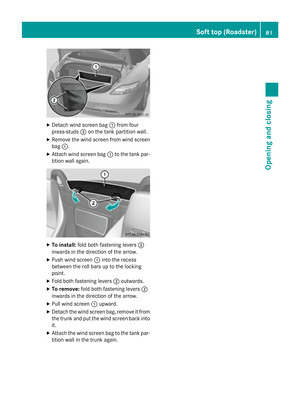 83
83 84
84 85
85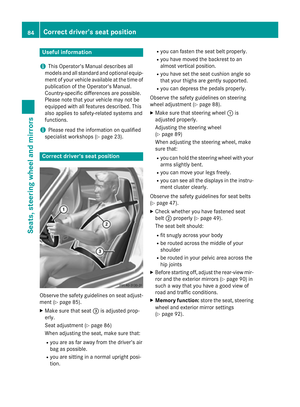 86
86 87
87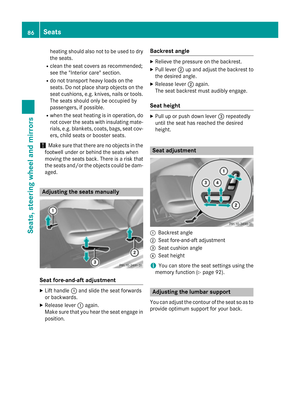 88
88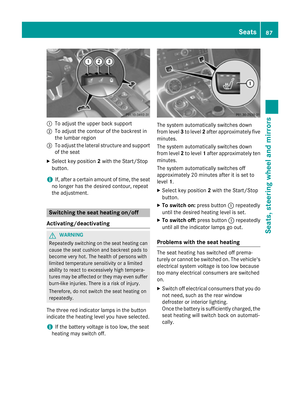 89
89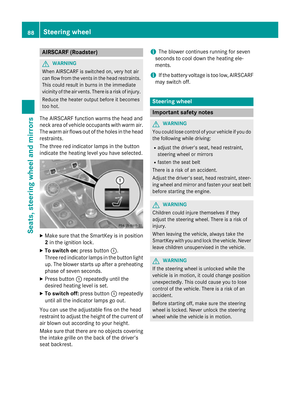 90
90 91
91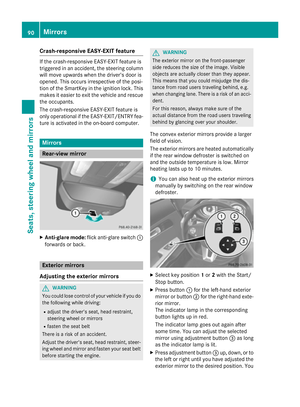 92
92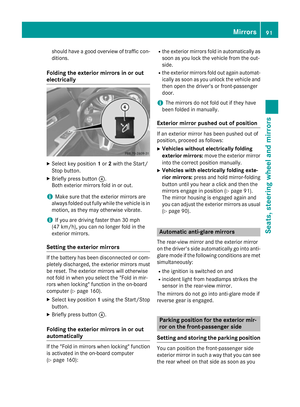 93
93 94
94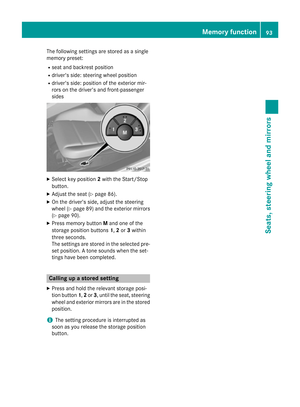 95
95 96
96 97
97 98
98 99
99 100
100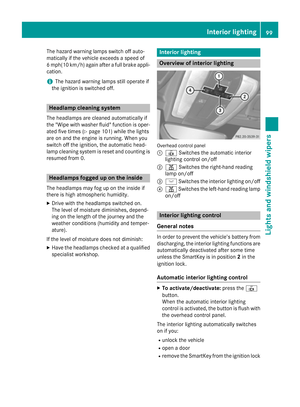 101
101 102
102 103
103 104
104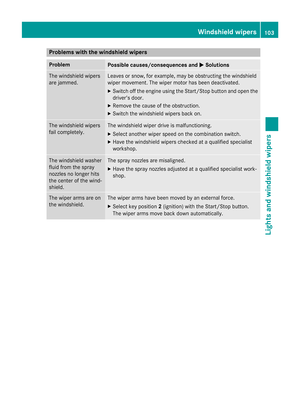 105
105 106
106 107
107 108
108 109
109 110
110 111
111 112
112 113
113 114
114 115
115 116
116 117
117 118
118 119
119 120
120 121
121 122
122 123
123 124
124 125
125 126
126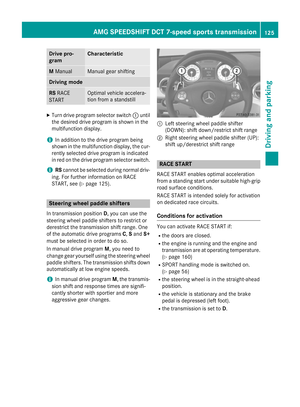 127
127 128
128 129
129 130
130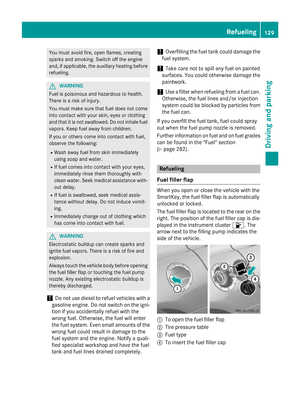 131
131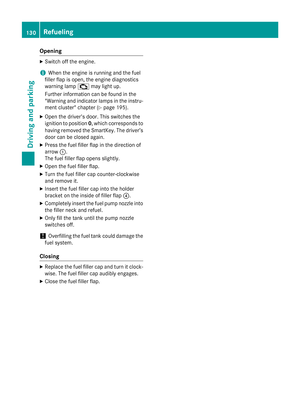 132
132 133
133 134
134 135
135 136
136 137
137 138
138 139
139 140
140 141
141 142
142 143
143 144
144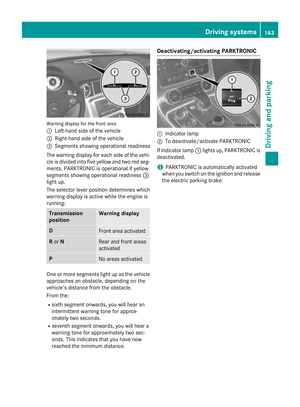 145
145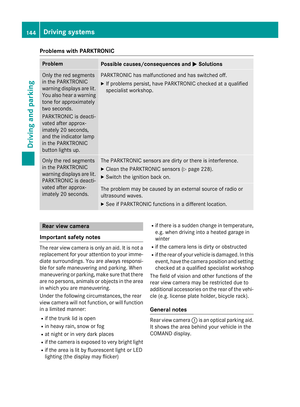 146
146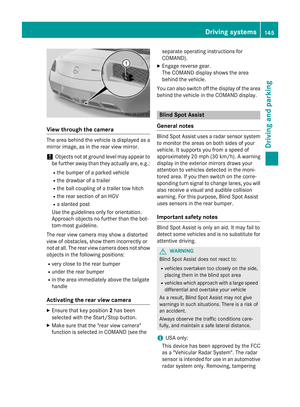 147
147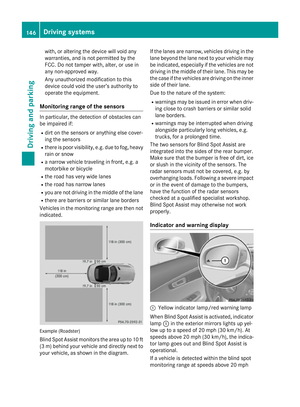 148
148 149
149 150
150 151
151 152
152 153
153 154
154 155
155 156
156 157
157 158
158 159
159 160
160 161
161 162
162 163
163 164
164 165
165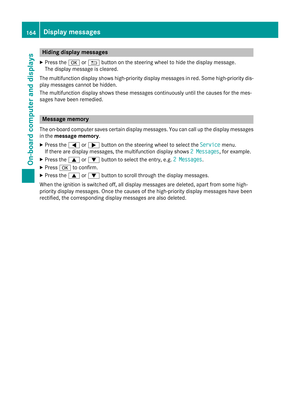 166
166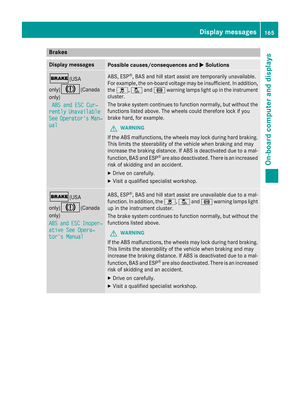 167
167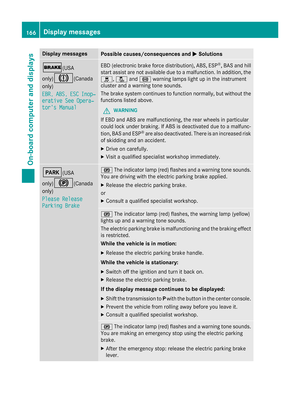 168
168 169
169 170
170 171
171 172
172 173
173 174
174 175
175 176
176 177
177 178
178 179
179 180
180 181
181 182
182 183
183 184
184 185
185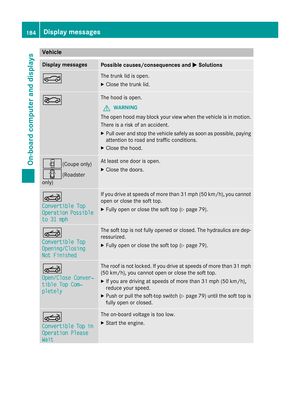 186
186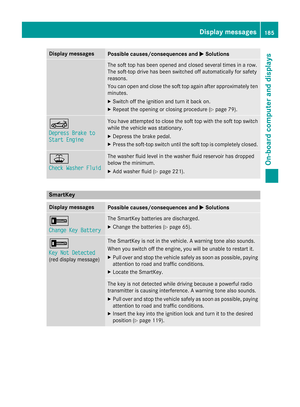 187
187 188
188 189
189 190
190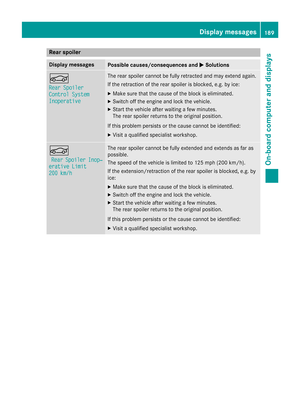 191
191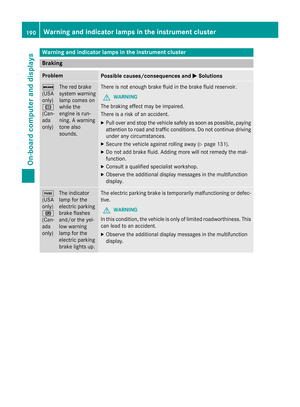 192
192 193
193 194
194 195
195 196
196 197
197 198
198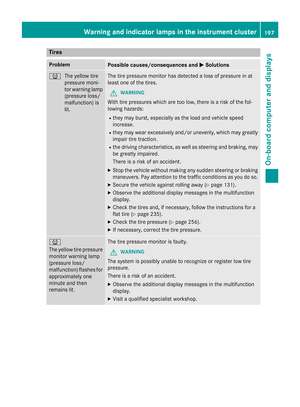 199
199 200
200 201
201 202
202 203
203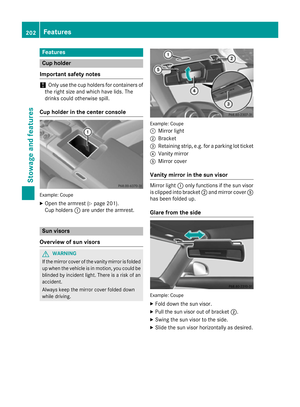 204
204 205
205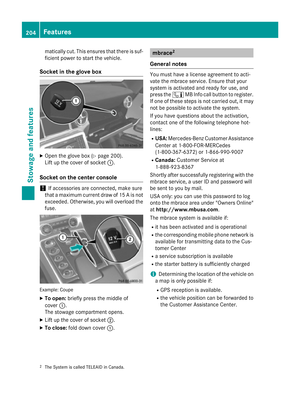 206
206 207
207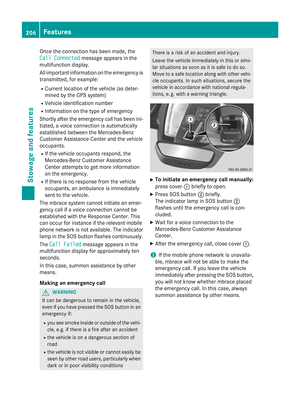 208
208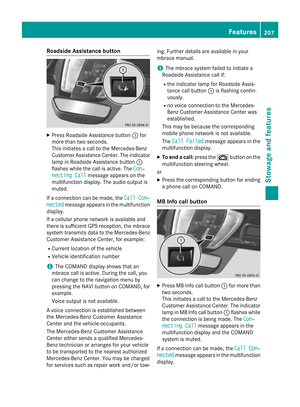 209
209 210
210 211
211 212
212 213
213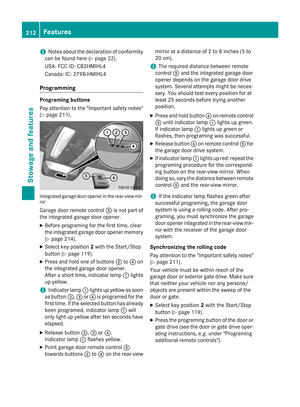 214
214 215
215 216
216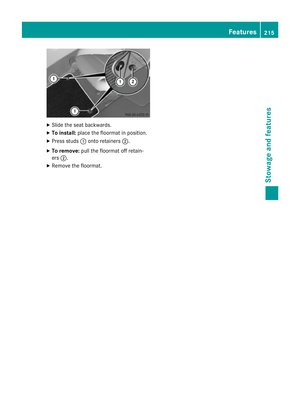 217
217 218
218 219
219 220
220 221
221 222
222 223
223 224
224 225
225 226
226 227
227 228
228 229
229 230
230 231
231 232
232 233
233 234
234 235
235 236
236 237
237 238
238 239
239 240
240 241
241 242
242 243
243 244
244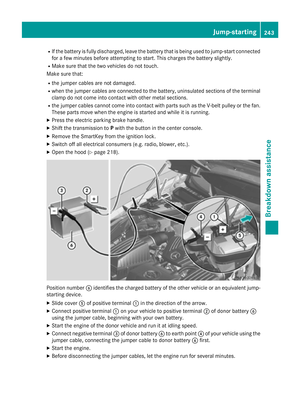 245
245 246
246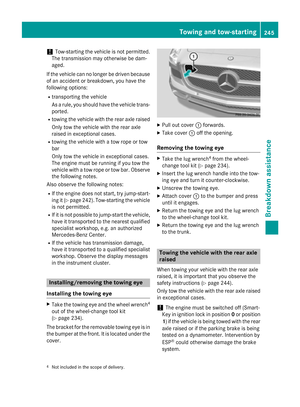 247
247 248
248 249
249 250
250 251
251 252
252 253
253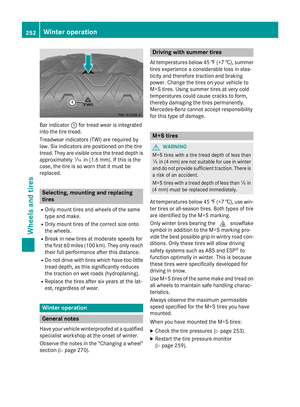 254
254 255
255 256
256 257
257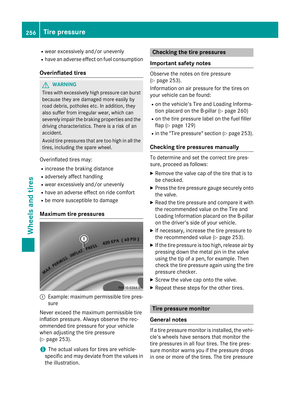 258
258 259
259 260
260 261
261 262
262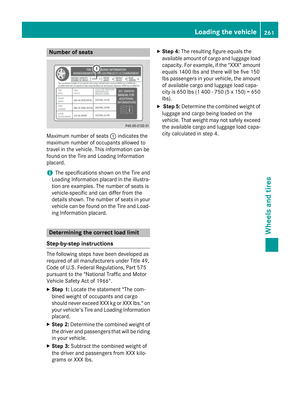 263
263 264
264 265
265 266
266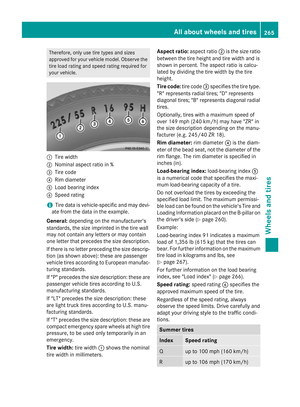 267
267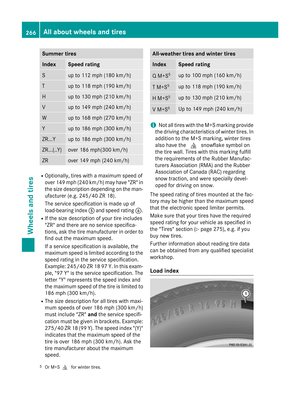 268
268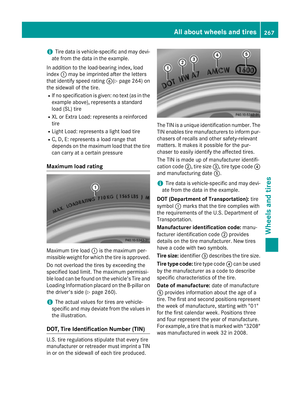 269
269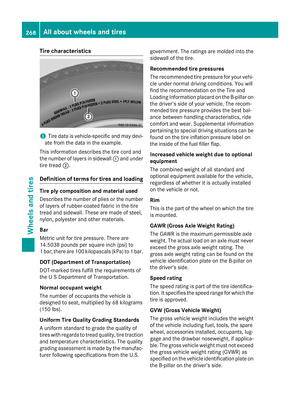 270
270 271
271 272
272 273
273 274
274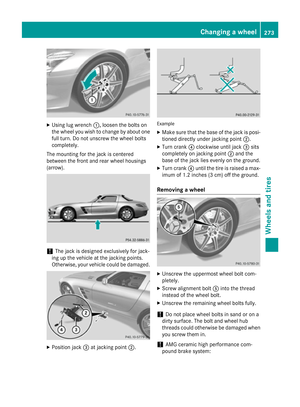 275
275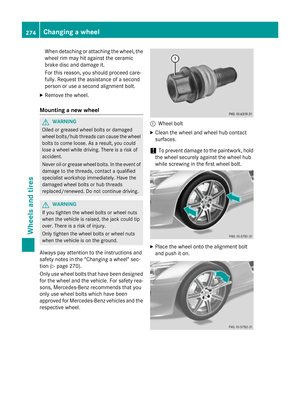 276
276 277
277 278
278 279
279 280
280 281
281 282
282 283
283 284
284 285
285 286
286 287
287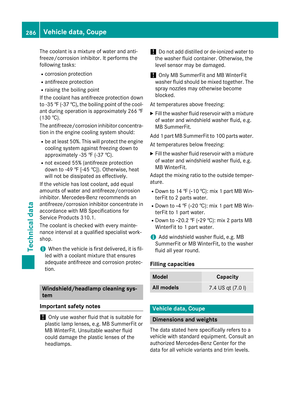 288
288 289
289