2015 MERCEDES-BENZ SLS AMG GT COUPE light
[x] Cancel search: lightPage 205 of 290
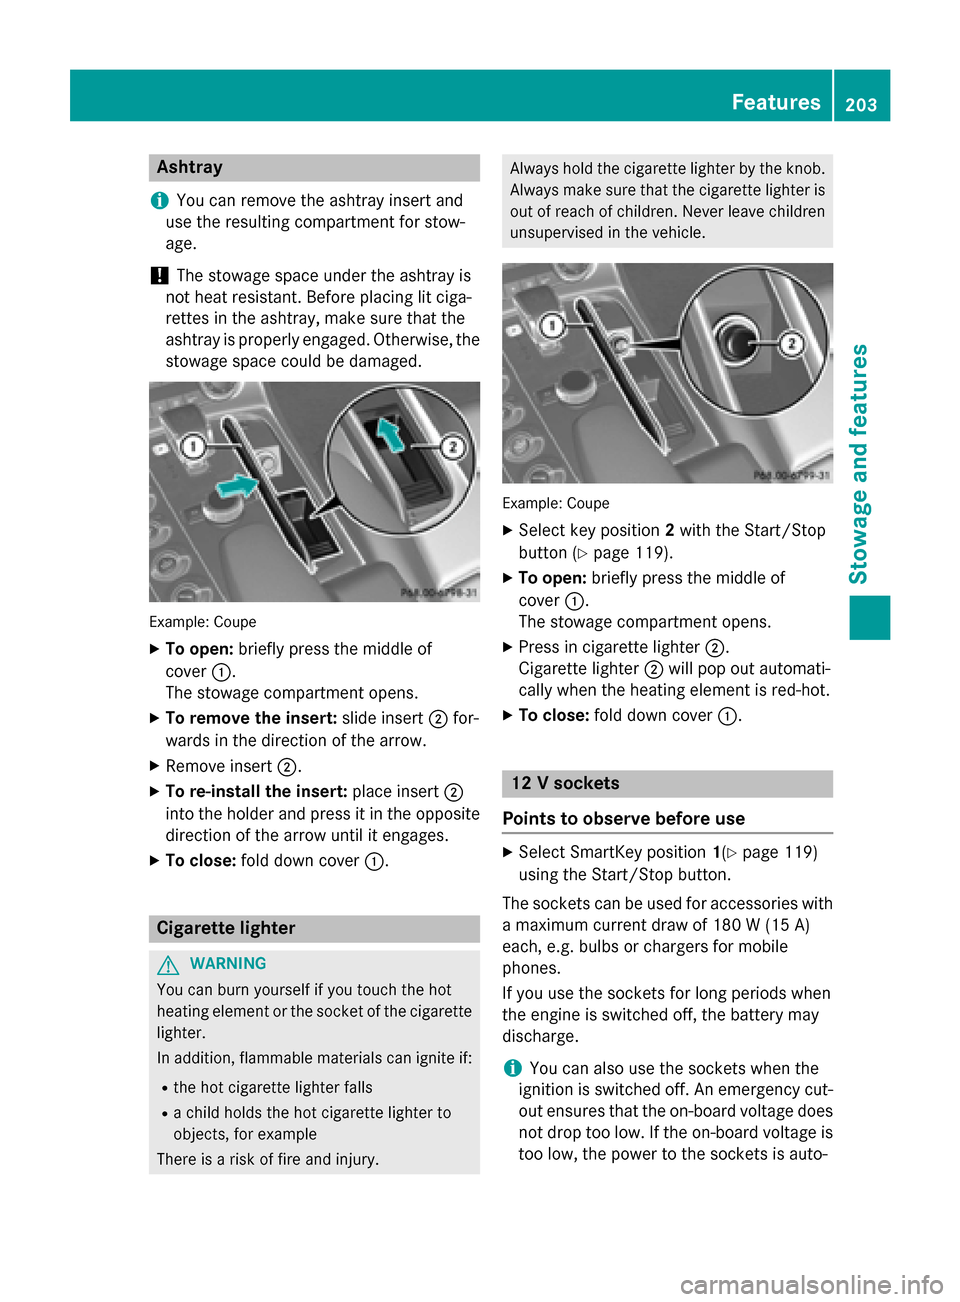
Ashtray
i You can remove th
eashtray insert and
use th eresulting compartmen tfor stow-
age.
! The stowage spac
eunder th eashtray is
no th eat resistant .Befor ep lacing lit ciga-
rette sint heashtray, mak esuret hatthe
ashtray is properly engaged. Otherwise, the
stowage spac ecould be damaged. Example: Coupe
X To open: briefly press th emiddle of
cover 0043.
The stowage compartmen topens.
X To remove th einsert: slide insert 0044for-
wards in th edirection of th earrow.
X Remove insert 0044.
X To re-install th einsert: placeinsert 0044
int ot he holder and press it in th eopposite
direction of th earrow until it engages.
X To close: foldd own cover 0043. Cigarette lighter
G
WARNING
You can burn yourself if you touch th ehot
heating elemen torthesocke tofthecigarette
lighter.
In addition ,flammabl ematerials can ignit eif:
R theh ot cigarette lighte rfalls
R ac hild hold sthe hot cigarette lighte rto
objects ,for example
There is ariskoff irea nd injury. Always hold th
ecigarette lighte rbytheknob.
Always mak esuret hatthe cigarette lighte ris
out of reac hofchildren .Never leav echildren
unsupervised in th evehicle. Example: Coupe
X Selec tkey position 2wit hthe Start/Stop
butto n(Ypage 119).
X To open: briefly press th emiddle of
cover 0043.
The stowage compartmen topens.
X Press in cigarette lighter 0044.
Cigarette lighter 0044will pop out automati-
call ywhen th eheating elemen tisred-hot.
X To close: foldd own cover 0043. 12
Vsockets
Point stoo bserve befor euse X
Selec tSma rtKey position 1(Y page 119)
usin gthe Start/Sto pbutton.
The sockets can be used for accessories with am aximum curren tdraw of 18 0W(15 A)
each, e.g. bulbs or chargers for mobile
phones.
If you use th esockets for lon gperiods when
th ee ngineiss witched off ,the battery may
discharge.
i You can also use th
esockets when the
ignition is switched off .Anemergenc ycut-
out ensures that th eon-bo ard voltag edoes
no td ropt oo low. If th eon-bo ard voltag eis
to ol ow, th epower to th esockets is auto- Features
203Stowage and featu res Z
Page 207 of 290
The mbrac
esystem To adjus
tthe volum eduring an mbrace call,
procee dasfollows:
X Press the 0081or0082 button on the mul-
tifunctio nsteering wheel.
or
X Use the volum econtroller of COMAND.
The mbrace system provides various serv-
ices, e.g.:
R Automatic and manua lemergency call
R Roadside Assistance call
R MB Info call
USA only: yo ucan find informatio nand a
description of al lavailable features under
"Owners Online "athttp://www.mbusa.com.
Self-diagnosi softhe system After yo
uhaves witched on the ignition, the
system carrie soutas elf-diagnosis.
Am alfunctio ninthe system ha sbeen
detecte difone of the following conditions
occurs:
R The indicator lamp in the SOS button does
not come on during the system self-test.
R The indicator lamp in the 0052Roadside
Assistance button does not light up during
self-diagnosi softhe system.
R The indicator lamp in the 00D9MB Info call
button does not light up during self-diag-
nosi soft he system.
R The indicator lamp in one or mor eofthe
following buttons continue stolight up red
after the system self-diagnosis:
- SOS button
- 0052 Roadside Assistance cal lbutton
- 00D9 MB Info cal lbutton
R the Tele Tele Aid
AidInoperative
Inoperative orTele
Tele Aid
Aid
Not Activated
Not Activated message appearsinthe
multifunctio ndisplay after the system self-
diagnosis.
If am alfunctio nisindicated as outlined
above ,the system ma ynot operate as expected. In the event of an emergency
,help
will have to be summoned by othe rmeans.
Hav ethe system checked at the nearest
authorize dMercedes-Benz Center or contact
the following service hotlines:
R USA: Mercedes-Benz Customer Assistance
Center at 1-800-FOR-MERCedes
(1-800-367-6372) or 1-866-990-9007
R Canada: Customer Service at
1-888-923-8367
Emergenc ycall Important safety notes
! Yo
um usth aveal icens eagreement to
activate the mbrace service. Ensure that
your system is activated and ready for use, and press the 00D9MB Info cal lbutton to
register. If one of these step sisnot carried
out, it ma ynot be possibl etoactivate the
system.
If yo uhaveq uest ions abou tthe activation,
contact one of the following telephone hot- lines:
R USA: Mercedes-Benz Customer Assis-
tance cente rat1 -800-FOR-MERCedes
(1-800-367-6372) or 1-866-990-9007
R Canada: Customer Service at
1-888-923-8367
General notes
An emergency cal lisdialedautomaticall yifan
ai rb ag or Emergency Tensioning Device is
triggered.
i Yo
uc anno tend an automaticall ytrig-
gered emergency cal lyoursel f.
An emergency cal lcan also be initiated man-
ually.
As soo nasthe emergency cal lhas been ini-
tiated ,the indicator lamp in the SOS button
flashes. The ConnectingCall
Connectin gCall message
appear sinthe multifunctio ndisplay.
The audi ooutpu tism uted. Features
205Stowag eand featur es Z
Page 212 of 290
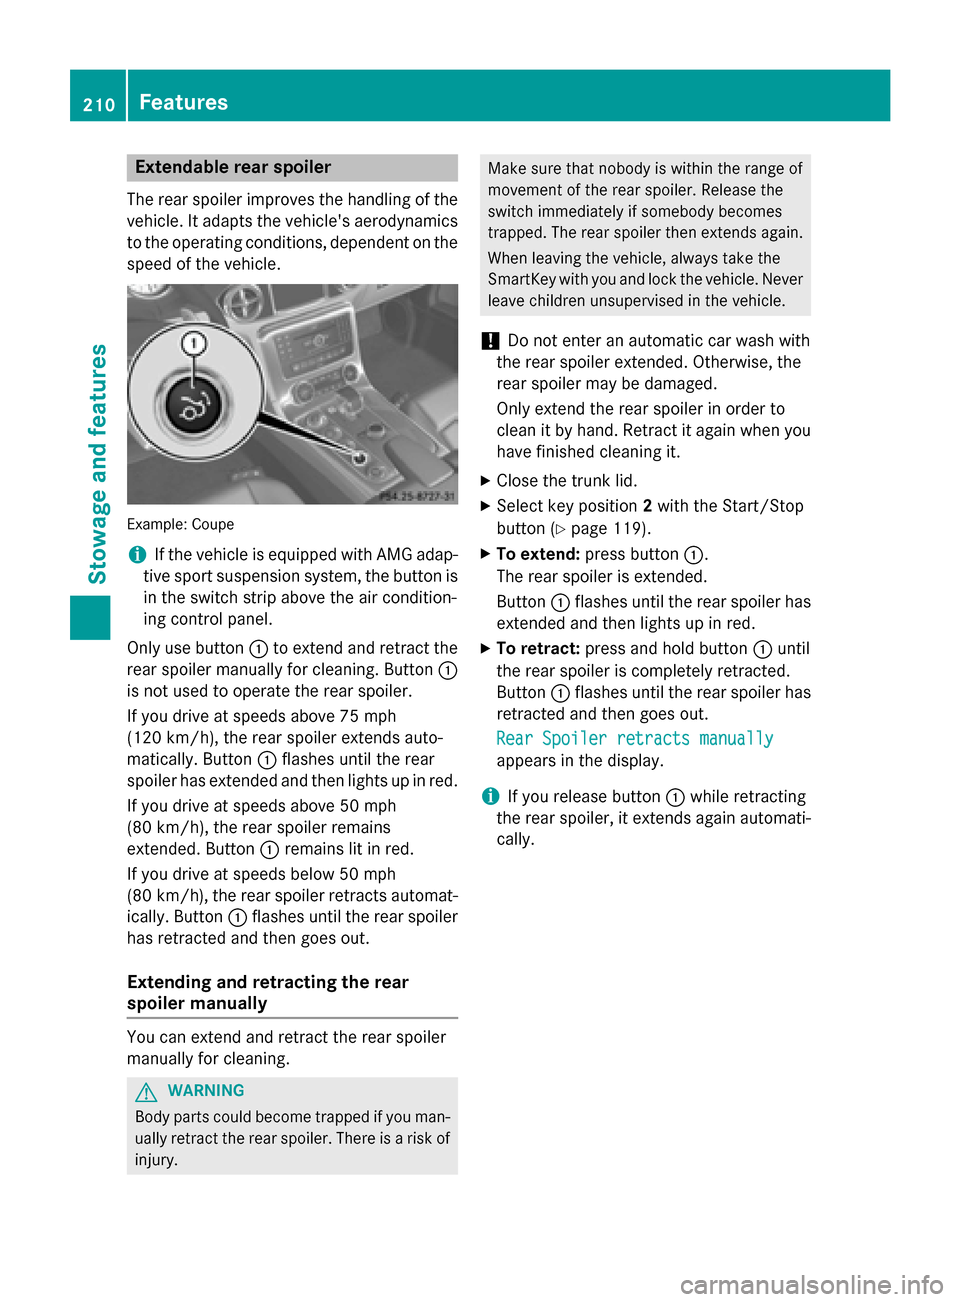
Extendable rea
rspoiler
The rear spoiler improve sthe handlin gofthe
vehicle .Itadapt sthe vehicle's aerodynamics
to th eoperatin gconditions, dependen tonthe
spee doft hevehicle. Example
:Coupe
i If th
evehicle is equippe dwith AM Gadap-
tiv es por tsuspension system, th ebutton is
in th eswitch strip above th eair condition-
ing control panel.
Only use button 0043to exten dand retrac tthe
rear spoiler manually for cleaning. Button 0043
is no tused to operate th erear spoiler.
If you driv eatspeeds above 75 mph
(12 0km/ h),t he rear spoiler extends auto-
matically. Button 0043flashes until the rear
spoiler has extended and then lights up in red.
If you drive at speeds above 50 mph
(8 0k m/ h),t he rear spoiler remains
extended. Button 0043remain slit in red.
If you drive at speeds below 50 mph
(8 0k m/ h),t he rear spoiler retract sautomat-
ically. Button 0043flashes until the rear spoiler
has retracted and then goes out.
Extending and retracting ther ear
spoiler manually You can extend and retract the rear spoiler
manually for cleaning. G
WARNING
Body parts could becom etrappe difyou man-
ually retract the rear spoiler. There is arisk of
injury. Make sure that nobody is within the range of
movement of the rear spoiler. Release the
switc himmediately if somebod ybecomes
trapped. The rear spoiler then extends again.
When leaving the vehicle, always tak ethe
SmartKe ywith you and lock the vehicle. Never
leave children unsupervised in the vehicle.
! Do not enter an automatic car wash with
the rear spoiler extended. Otherwise, the
rear spoiler may be damaged.
Only extend the rear spoiler in order to
clean it by hand. Retrac titagain when you
have finished cleanin git.
X Close the trunk lid.
X Selec tkey position 2with the Start/Stop
button (Y page 119).
X To extend: press button 0043.
The rear spoiler is extended.
Button 0043flashes until the rear spoiler has
extended and then lights up in red.
X To retract: press and hold button 0043until
the rear spoiler is completely retracted.
Button 0043flashes until the rear spoiler has
retracted and then goes out.
Rear Spoiler retracts manually Rear Spoiler retracts manually
appears in the display.
i If you release button
0043while retracting
the rear spoiler, it extends again automati-
cally. 210
FeaturesStowage and features
Page 214 of 290
i
Notes aboutt
he declaration of conformity
can be found here (Y page 22).
USA: FCC ID: CB2HMIHL4
Canada: IC: 279B-HMIHL4
Programming Programing buttons
Pay attention to the "Important safety notes"
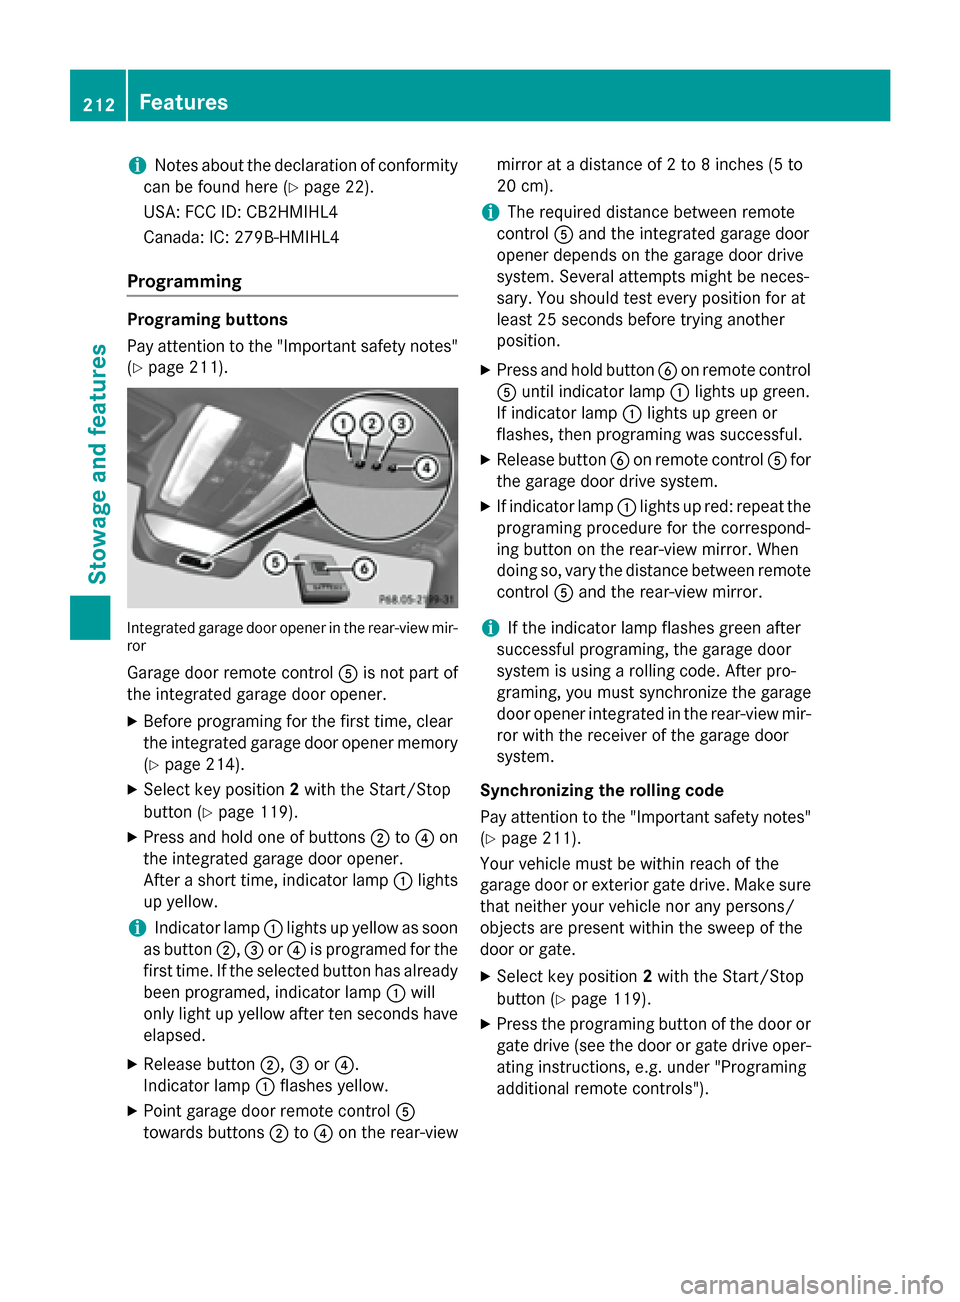
(Y page 211). Integrated garaged
oor opener in the rear-view mir-
ror
Garage door remote control 0083is not part of
the integrated garaged oor opener.
X Before programing for the first time, clear
the integrated garaged oor opener memory
(Y page 214).
X Select key position 2with the Start/Stop
button (Y page 119).
X Press and hold one of buttons 0044to0085 on
the integrated garaged oor opener.
After ashort time, indicator lamp 0043lights
up yellow.
i Indicator lamp
0043lights up yellow as soon
as button 0044,0087or0085 is programed for the
first time. If the selected button has already been programed ,indicator lamp 0043will
only light up yellow after ten seconds have
elapsed.
X Release button 0044,0087or0085.
Indicator lamp 0043flashesy ellow.
X Point garaged oor remote control 0083
towards buttons 0044to0085 on the rear-view mirror at
adistance of 2to8i nches (5 to
20 cm).
i The required distance between remote
control 0083and the integrated garaged oor
opener depends on the garaged oor drive
system. Several attempts might be neces-
sary. You shouldt est every position for at
least 25 seconds before trying another
position.
X Press and hold button 0084on remote control
0083 until indicator lamp 0043lights up green.
If indicator lamp 0043lights up green or
flashes, then programing was successful.
X Release button 0084on remote control 0083for
the garaged oor drive system.
X If indicator lamp 0043lights up red: repeatt he
programing procedure for the correspond-
ing button on the rear-view mirror. When
doing so, vary the distance between remote
control 0083and the rear-view mirror.
i If the indicator lamp flashesg
reen after
successful programing, the garaged oor
system is using arolling code. After pro-
graming, you must synchronize the garage
door opener integrated in the rear-view mir- ror with the receiver of the garaged oor
system.
Synchronizing the rollingc ode
Pay attention to the "Important safety notes" (Y page 211).
Your vehicle must be within reach of the
garaged oor or exterior gate drive. Make sure
that neither yourv ehicle nor any persons/
objects are present within the sweep of the
door or gate.
X Select key position 2with the Start/Stop
button (Y page 119).
X Press the programing button of the door or
gate drive (see the door or gate drive oper- ating instructions, e.g. under "Programing
additional remote controls"). 212
FeaturesStowagea
nd features
Page 215 of 290
i
Usually, you now have 30 seconds to ini-
tiate the next step.
X Press previouslyp rogramed button0044,0087
or 0085 of the integrated garage door opener
until the door closes.
The rolling code synchronization is then
complete.
Notes on programing the remote control
Canadian radio frequency lawsr equire a
"break" (or interruption) of the transmission
signals after broadcasting for afew seconds.
Therefore, these signals may not last long
enough for the integrated garage door
opener. The signal is not recognized during
programing. Comparable with Canadian law,
some U.S. garage door openers also feature a
"break".
Proceed as follows:
R if you live in Canada
R if you have difficulties programing the
garage door opener (regardless of where
you live) when using the programing steps
X Press and hold one of buttons 0044to0085 on
the integrated garage door opener.
After ashort time, indicator lamp 0043lights
up yellow.
X Release the button.
Indicator lamp 0043flashes yellow.
X Press button 0084of garage door remote
control 0083for two seconds, then release it
for two seconds.
X Press button 0084againf or two seconds.
X Repeatt his sequence on button 0084of
remote control 0083until indicator lamp 0043
lights up green.
If indicator lamp 0043turns red, repeat the
process.
X Continue with the other programing steps
(see above). Problems when programing
If you are experiencing problems programing
the integrated garage door opener on the
rear-view mirror, take note of the following
instructions:
R Check the transmitter frequency of garage
door drive remote control 0083.This can usu-
ally be found on the back of the remote
control.
The integrated garage door opener is com-
patible with devices that have units which
operate in the frequency range of 280 to
433 MHz .
R Replace the batteries in garage door
remote control 0083.This increases the like-
lihood that garage door remote control 0083
will transmit astrong and precise signal to
the integrated garage door opener in the
rear-view mirror.
R When programing, hold remote control 0083
at varying distances and angles from the
button that you are programing. Try various angles at adistance between 2and
12 inches (5to 30 cm) or at the same angle
but at varying distances.
R If another remote control for the same
garage door drive is available,r epeat the
same programing steps with this remote
control. Before performing these steps,
make sure that new batteries have been
installed in garage door drive remote
control 0083.
R Note that some remote controls only trans-
mit for alimited amount of time (the indi-
cator lamp on the remote control goes out). Press button 0084on remote control 0083again
before transmission ends.
R Align the antennac able of the garage door
opener unit. This can improve signal recep- tion/transmission.
Opening/closing the garage door Once programed, the integrated garage door
opener 0083will assume the function of the
garage door system's remote control. Please Features
213Stowage and features Z
Page 216 of 290
also read th
eoperatin ginstruction sfor the
garag edoor system.
X Select ke yposition 2wit hthe Start/Stop
button.
X Press button 0044,0087or0085 whic hyou have
programed to operate th egarag edoor.
Garage door system wit hafixed code: indi-
cator lamp 0043light supg reen.
Garage door system wit harolling code:
indicator lamp 0043flashes green.
i The transmitte
rwill transmit asignal as
lon gast hebutto nisp ressed. The trans-
mission is halted after amaximum of ten
seconds and indicator lamp 0043light sup
yellow. Press button 0044,0087or0085 again if
necessary.
Clearing th ememory X
Select ke yposition 2wit hthe Start/Stop
button.
X Press buttons 0044and 0085.
The indicator lamp light supyellow.
X Press and hold buttons 0044and 0085until the
indicator lamp turns green.
i Mak
esure that you clear th ememory of
th ei ntegrate dgarag edoor opener before
sellin gthe vehicle. Charg
emaintenance socket
The battery may drain if th evehicle is left sta-
tionar yfor lon gperiods. In this case,
Mercedes-Ben zrecommends attaching the
trickle charge rtothecharge maintenance
socket.
The charge maintenance socke tisdesigned
solely for connecting atrickle charger. A
trickle charge rcan be obtaine dfroman
authorized Mercedes-Ben zCenter, for exam-
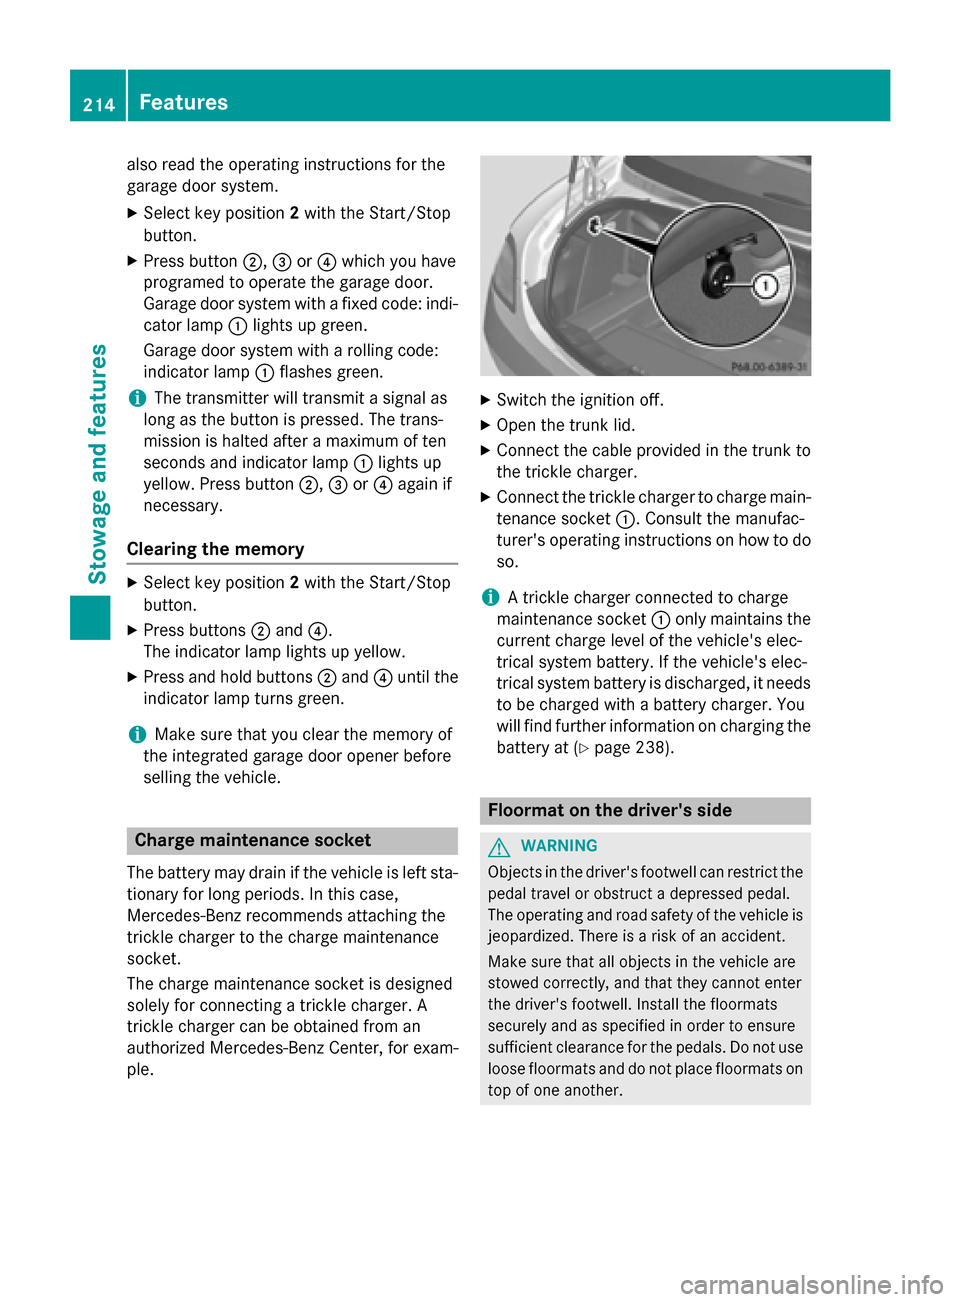
ple. X
Switch th eignition off.
X Open th etrunk lid.
X Connect th ecabl ep rovide dinthetrunk to
th et rickle charger.
X Connect th etrickle charge rtocharge main-
tenance socket 0043.Consult th emanufac-
turer' soperatin ginstruction sonhow to do
so.
i At
rickle charge rconnected to charge
maintenance socket 0043only maintain sthe
curren tcharge leve lofthevehicle's elec-
trical system battery. If th evehicle's elec-
trical system battery is discharged, it needs
to be charge dwithab attery charger. You
will fin dfurther informatio nonchargin gthe
battery at (Y page 238). Floorma
tonthedriver's side G
WARNING
Object sinthedriver' sfootwell can restrict the
pedal travel or obstruc tadepressed pedal.
The operatin gand road safety of th evehicle is
jeopardized. Ther eisariskofana ccident.
Mak esure that all object sinthevehicle are
stowed correctly, and that they canno tenter
th ed river' sfootwell. Install th efloormats
securely and as specifie dinorder to ensure
sufficient clearance for th epedals .Don otuse
loos efloormats and do no tplac efloormats on
to pofo neanother. 214
FeaturesStowage and features
Page 221 of 290
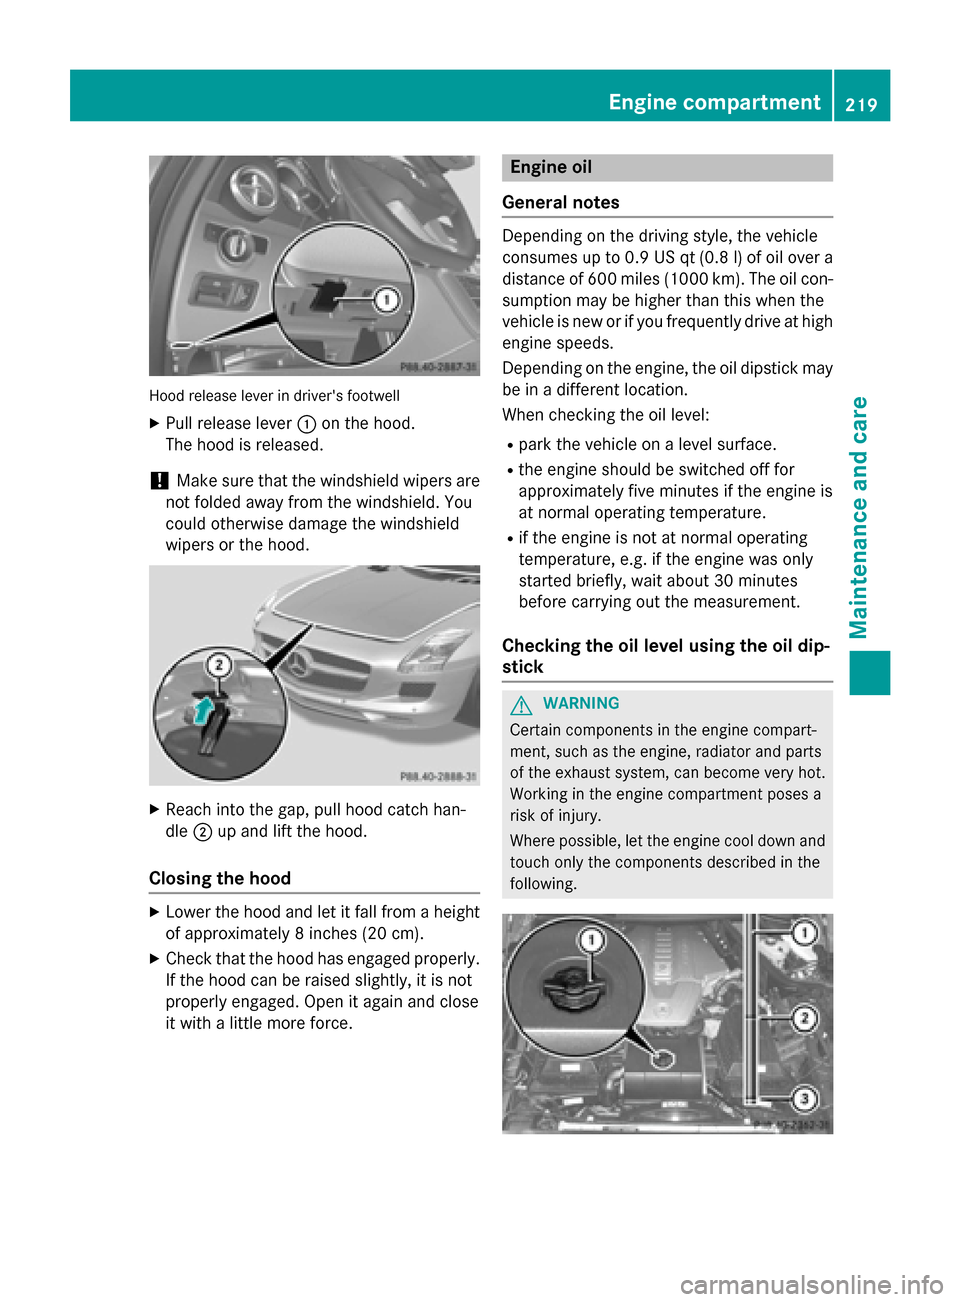
Hood release leve
rindriver's footwell
X Pull release lever 0043on the hood.
The hood is released.
! Make sure that the windshield wipers are
not folded away from the windshield .You
coul dotherwise damag ethe windshield
wipers or the hood. X
Reach into the gap ,pullh ood catch han-
dle 0044up and lift the hood.
Closing the hood X
Lower the hood and let it fal lfrom aheight
of approximatel y8inches (20 cm).
X Check that the hood has engaged properly.
If the hood can be raised slightly ,itisnot
properl yengaged .Openita gain and close
it with alittle more force. Engine oil
General notes Depending on the driving style, the vehicle
consumes up to 0.9 US qt (0.8 l) of oil over a
distance of 600 miles (1000 km). The oil con- sumptio nmay be higher than this whe nthe
vehicle is new or if yo ufrequently drive at high
engine speeds.
Depending on the engine, the oil dipstick may
be in adifferent location.
Whe nchecking the oil level:
R park the vehicle on aleve lsurface.
R the engine should be switched off for
approximatel yfive minutes if the engine is
at normal operating temperature.
R if the engine is not at normal operating
temperature, e.g. if the engine wa sonly
started briefly ,waita bout 30 minutes
before carrying out the measurement.
Checking the oill evel usin gthe oild ip-
stick G
WARNING
Certai ncomponents in the engine compart-
ment, such as the engine, radiator and parts
of the exhaust system, can become very hot.
Working in the engine compartment pose sa
risk of injury.
Where possible, let the engine cool dow nand
touch only the components describe dinthe
following. Engine compartment
219Maintenance and care Z
Page 227 of 290
and reduc
ewipin gnoises caused by residue
on th ewindshield.
Washin gbyhand In som
ecountries ,washin gbyh andiso nly
allowed at specially equippe dwashin gbays.
Observ ethe legal requirements in each coun-
try.
X Do no tuse hot wate rand do no twash the
vehicle in direct sunlight.
X Use asofts ponge to clean.
X Use amild cleanin gagent, suc hasacar
shampoo approved by Mercedes-Benz.
X Thoroughl yhosed own th evehicle wit ha
gentle je tofwater.
X Do no tpoin tthe wate rjet directly towards
th ea ir inlet.
X Use plenty of wate rand rinse out the
sponge frequently.
X Rins ethe vehicle wit hclean wate rand dry
thoroughly wit hachamois.
X Do no tlet th ecleanin gagen tdry on the
paintwork.
Carefully remove all deposits of road salt as
soon as possible when driving in winter.
Power washers G
WARNING
The wate rjet from acircular je tnozzle (dirt
blasters )can caus einvisible exterior damage
to th etires or chassis components. Compo-
nent sdamaged in this way may fail unexpect-
edly. Ther eisariskofana ccident.
Do no tuse power washers wit hcircular jet
nozzles to clean th evehicle .Haved amaged
tires or chassis component sreplace dimme-
diately.
! Always maintain
adistanc eofatl east
11.8 in (30 cm)between thev ehicle and the
power washe rnozzle .Inf ormation about
th ec orrec tdistanc eisavailabl efromt he
equipmen tmanufacturer. Mov
ethe power washe rnozzle around
when cleanin gyour vehicle.
Do no taim directly at any of th efollowing:
R tires
R door gaps, roo fgaps, joints, etc.
R electrical components
R battery
R connectors
R lights
R seals
R trim
R ventilatio nslots
Damaged seals or electrical components
can lead to leak sorfailures.
Cleaning th ewheels !
Do no
tuse acidic wheel cleanin gproducts
to remove brak edust .This could damage
wheel bolt sand brak ecom ponents.
! Do no
tpark th evehicle for an extended
period straigh tafter cleanin git, particularly
after havin gcleane dthe wheels wit hwheel
cleaner. Whee lcleaners could cause
increased corrosio nofthebrak ediscsa nd
brak epads/linings. For this reason ,you
should driv efor afew minute safter clean-
ing .Brakin gh eat sthe brak ediscsa nd the
brak epads/linings, thus dryin gthem. The
vehicle can then be parked.
Cleaning th epaintwork Scratches, corrosiv
edeposits ,areas affected
by corrosio nand damag ecaused by inade-
quat ecarec anno talways be completely
repaired. In suc hcases, visit aqualified spe-
cialist workshop, e.g .anauthorized
Mercedes-Ben zCenter.
X Remove impurities immediately, where
possible, whils tavoiding rubbing to ohard.
X Soak insect remains wit hinsect remover
and rinse off th etreated areas afterwards.
X Soak bird droppings wit hwaterand rinse
off th etreated areas afterwards. Care
225Maintenance and care Z