2015 MERCEDES-BENZ SLK-CLASS ROADSTER wheel size
[x] Cancel search: wheel sizePage 20 of 358

Overview ........................................312
PSI (pounds per square inch) (def-
inition) .......................................... .333
Replacing ....................................... 334
Service life ..................................... 314
Sidewall (definition) ....................... 333
Speed rating (definition) ................ 332
Storing .......................................... .334
Structure and characteristics
(definition) ..................................... 331
Summer tires ................................. 314
Temperature .................................. 327
TIN (Tire Identification Number)
(definition) ..................................... 333
Tire bead (definition) ..................... .333
Tire pressure (definition) ................ 333
Tire pressures (recommended) ...... 332
Tire size (data) ............................... 339
Tire size designation, load-bearing capacity, speed rating .................... 328
Tire tread ....................................... 313
Tire tread (definition) ..................... 333
Total load limit (definition) ............. 334
Traction ......................................... 327
Traction (definition) ....................... 334
Tread wea r..................................... 327
Uniform Tire Quality Grading
Standards ...................................... 326
Uniform Tire Quality Grading
Standards (definition) .................... 332
Wear indicator (definition) ............. 334
Wheel and tire combination ........... 341
Wheel rim (definition) .................... 332
see Flat tire
Tow-starting
Emergency engine starting ............ 307
Important safety notes .................. 305
Installing the towing eye ................ 306
Removing the towing eye ............... 306
Towing away
Important safety guidelines ........... 305
Installing the towing eye ................ 306
Removing the towing eye ............... 306
With both axles on the ground ....... 306
With the rear axle raised ................ 307
Transmission
Selector lever ................................ 151
see Automatic transmission see Manual transmission
Transporting the vehicle .................. 307
Trim pieces (cleaning instruc-
tions) .................................................. 290
Trip computer (on-board com-puter) .................................................. 197
Trip odometer
Calling up ....................................... 197
Resetting (on-board computer) ...... 198
Trunk
Emergency release .......................... 82
Important safety notes .................... 80
Locking separately ........................... 82
Opening (automatically from out-
side) ................................................. 82
Opening/closing (manually from
outside) ............................................ 81
Overview .......................................... 80
Trunk lid
Display message ............................ 240
Opening dimensions ...................... 355
Opening/closing .............................. 80
Trunk load (maximum) ...................... 355
Trunk partition
Display message ............................ 241
General notes .................................. 89
Opening/closing .............................. 90
Turn signals
Changing bulbs (front) ................... 116
Display message ............................ 225
Switching on/of f........................... 110
Type identification plate
see Vehicle identification plate
U
UnlockingEmergency unlocking ....................... 80
From inside the vehicle (central
unlocking button) ............................. 79
V
Vanity mirror (in the sun visor) ........ 262
Vehicle
Correct use ...................................... 26
Data acquisition ............................... 27
Display message ............................ 238
18Index
Page 21 of 358

Equipment ....................................... 22
Individual settings .......................... 204
Limited Warranty ............................. 26
Loading .......................................... 323
Locking (in an emergency) ............... 80
Locking (SmartKey) .......................... 72
Lowering ........................................ 338
Maintenance .................................... 23
Parking for a long period ................ 164
Pulling away ................................... 142
Raising ........................................... 336
Reporting problems .........................26
Securing from rolling away ............ 335
Tow-starting ................................... 305
Towing away .................................. 305
Transporting .................................. 307
Unlocking (in an emergency) ........... 80
Unlocking (SmartKey) ...................... 72
Vehicle data ................................... 355
Vehicle battery
see Battery (vehicle)
Vehicle data ....................................... 355
Vehicle dimensions ........................... 355
Vehicle emergency locking ................ 80
Vehicle identification number
see VIN
Vehicle identification plate .............. 348
Vehicle tool kit .................................. 294
Video
Operating the DVD ......................... 201
VIN ...................................................... 348
W
Warning and indicator lamps
ABS ................................................ 246 Brake s........................................... 246
Check Engine ................................. 252
Coolant .......................................... 252
Distance warning ........................... 254
DISTRONIC PLUS ........................... 254 ESP ®
.............................................. 248
ESP ®
OFF ....................................... 249
Fuel tank ........................................ 252
Overview .......................................... 32
PASSENGER AIR BAG OFF ............... 41
Reserve fue l................................... 252
Restraint system ............................ 251 Seat belt ........................................ 244
SPORT handling mod
e................... 249
Tire pressure monitor .................... 255
Warranty .............................................. 22
Washer fluid
Display message ............................ 242
Wheel and tire combination
see Tires
Wheel bolt tightening torque ........... 338
Wheel chock ...................................... 335
Wheels
Changing a whee l.......................... 334
Checking ........................................ 313
Cleaning ......................................... 288
Emergency spare wheel ................. 343
General notes ................................ 339
Important safety notes .................. 312
Information on driving .................... 312
Interchanging/changing ................ 334
Mounting a new whee l................... 338
Mounting a whee l.......................... 335
Overview ........................................ 312
Removing a whee l.......................... 337
Storing ........................................... 334
Tightening torque ........................... 338
Wheel size/tire size ....................... 339
Wind screen
Inserting and removing .................... 90
Preparing for installation .................. 90
see AIRGUIDE
Windows
see Side windows
Windshield
Defrosting ...................................... 131
Windshield washer fluid
see Windshield washer system
Windshield washer system
Adding washer fluid ....................... 283
Notes ............................................. 353
Windshield wipers
Display message ............................ 242
Problem (malfunction) ................... 120
Replacing the wiper blades ............ 118
Switching on/of f........................... 117
Winter driving
Important safety notes .................. 314
Slippery road surfaces ................... 168
Snow chains .................................. 315
Index19
Page 59 of 358
Important safety notes
!Make sure that there are no objects in the
footwell or behind the seats. There is a dan- ger that the seats and/or objects could be
damaged when PRE-SAFE ®
is activated.
Although your vehicle is equipped with PRE-
SAFE ®
, the possibility of injury in the event of
an accident cannot be ruled out. Always
adapt your driving style to suit the prevailing
road and weather conditions and maintain a
safe distance from the vehicle in front. Drive
carefully.
Function
PRE-SAFE ®
intervenes:
R in emergency braking situations, e.g. when
BAS is activated
R in critical driving situations, e.g. when phys-
ical limits are exceeded and the vehicle
understeers or oversteers severely
R on vehicles with the Driving Assistance
package: if BAS PLUS intervenes power-
fully or the radar sensor system detects an
imminent danger of collision in certain sit-
uations
PRE-SAFE ®
takes the following measures
depending on the hazardous situation detec-
ted:
R the seat belts are pre-tensioned.
R if the vehicle skids, the side windows are
closed so that only a small gap remains.
R vehicles with the memory function: the
front-passenger seat is adjusted if it is in an
unfavorable position.
If the hazardous situation passes without
resulting in an accident, PRE-SAFE ®
slackens
the belt pre-tensioning. All settings made by
PRE-SAFE ®
can then be reversed.
If the seat belt pre-tensioning is not reduced: X Move the seat backrest or seat back
slightly when the vehicle is stationary.
The seat belt pre-tensioning is reduced and
the locking mechanism is released. The seat-belt adjustment is an integral part of
the PRE-SAFE ®
convenience function. Infor-
mation about the convenience function can
be found under "Belt adjustment"( Y page 45).
Automatic measures after an acci-
dent
Immediately after an accident, the following
measures are implemented, depending on
the type and severity of the impact:
R the hazard warning lamps are activated
R the emergency lighting is activated
R the vehicle doors are unlocked
R the front side windows are lowered
R vehicles with a memory function: the elec-
trically adjustable steering wheel is raised
R the engine is switched off and the fuel sup-
ply is cut off
R vehicles with mbrace: automatic emer-
gency call
Children in the vehicle
Important safety notes
If a child younger than 12 years and under 5 ft
(1.50 m) in height is traveling in the vehicle:
R always secure the child in a child restraint
system suitable for Mercedes-Benz vehi-
cles. The child restraint system must be
appropriate to the age, weight and size of
the child
R be sure to observe the instructions and
safety notes in this section in addition to
the child restraint system manufacturer's
installation instructions
R be sure to observe the instructions and
safety notes on the "Occupant classifica-
tion system (OCS)" ( Ypage 49)
Children in the vehicle57
Safety
Z
Page 66 of 358
ETS remains active when you deactivate ESP®
.
iAMG vehicles: your vehicle may be
equipped with 20-inch tires on the rear
axle. If replaced with a 19-inch tire, ETS
may intervene noticeably sooner for the
first few kilometers. After approximately
10 km ETS will function as usual again.
Information on the dimensions and types of
wheels and tires for your vehicle can be
found in the "Wheel/tire combinations"
section ( Ypage 339).
Important safety notes
GWARNING
If ESP ®
is malfunctioning, ESP ®
is unable to
stabilize the vehicle. Additionally, further driv- ing safety systems are deactivated. This
increases the risk of skidding and an accident.
Drive on carefully. Have ESP ®
checked at a
qualified specialist workshop.
When towing the vehicle with the rear axle
raised, observe the notes on ESP ®
( Y page 307).
ESP ®
is only deactivated if the åwarning
lamp is lit continuously.
If the ÷ warning lamp and the åwarn-
ing lamp are lit continuously, ESP ®
not avail-
able due to a malfunction.
Observe the information on warning lamps ( Y page 248) and display messages which
may be shown in the instrument cluster( Y page 213).
iOnly use wheels with the recommended
tire sizes. Only then will ESP ®
function
properly.
Characteristics of ESP®
General information
If the ÷ ESP®
warning lamp goes out
before beginning the journey, ESP ®
is auto-
matically active. If ESP
®
intervenes, the ÷ESP®
warning
lamp flashes in the instrument cluster.
If ESP ®
intervenes:
X Do not deactivate ESP ®
under any circum-
stances.
X Only depress the accelerator pedal as far as
necessary when pulling away.
X Adapt your driving style to suit the prevail-
ing road and weather conditions.
ECO start/stop function
The ECO start/stop function switches the
engine off automatically when the vehicle
stops moving. The engine starts automati-
cally when the driver wants to pull away again. ESP ®
remains in its previously selected sta-
tus. Example: if ESP®
was deactivated before
the engine was switched off, ESP ®
remains
deactivated when the engine is switched on
again.
Deactivating/activating ESP®(except
AMG vehicles)
Important safety notes
iObserve the "Important safety notes" sec-
tion ( Ypage 61).
You can select between the following states
of ESP ®
:
R ESP ®
is activated.
R ESP ®
is deactivated.
GWARNING
If you deactivate ESP ®
, ESP ®
no longer sta-
bilizes the vehicle. There is an increased risk
of skidding and an accident.
Only deactivate ESP ®
in the situations descri-
bed in the following.
It may be best to deactivate ESP ®
in the fol-
lowing situations:
R when using snow chains
R in deep snow
R on sand or gravel
64Driving safety systems
Safety
Page 105 of 358
tion of the SmartKey in the ignition lock. This
makes it easier to exit the vehicle and rescue
the occupants.
The crash-responsive EASY-EXIT feature is
only operational if the EASY-EXIT/ENTRY fea- ture is activated in the on-board computer( Y page 207).
Mirrors
Rear-view mirror
X
Anti-glare mode: flick anti-glare lever :
forwards or back.
Exterior mirrors
Adjusting the exterior mirrors
GWARNING
You could lose control of your vehicle if you do the following while driving:
R adjust the driver's seat, head restraint,
steering wheel or mirrors
R fasten the seat belt
There is a risk of an accident.
Adjust the driver's seat, head restraint, steer-
ing wheel and mirror and fasten your seat belt before starting the engine.
GWARNING
The exterior mirror on the front-passenger
side reduces the size of the image. Visible
objects are actually closer than they appear.
This means that you could misjudge the dis-
tance from road users traveling behind, e.g.
when changing lane. There is a risk of an acci-
dent.
For this reason, always make sure of the
actual distance from the road users traveling
behind by glancing over your shoulder.
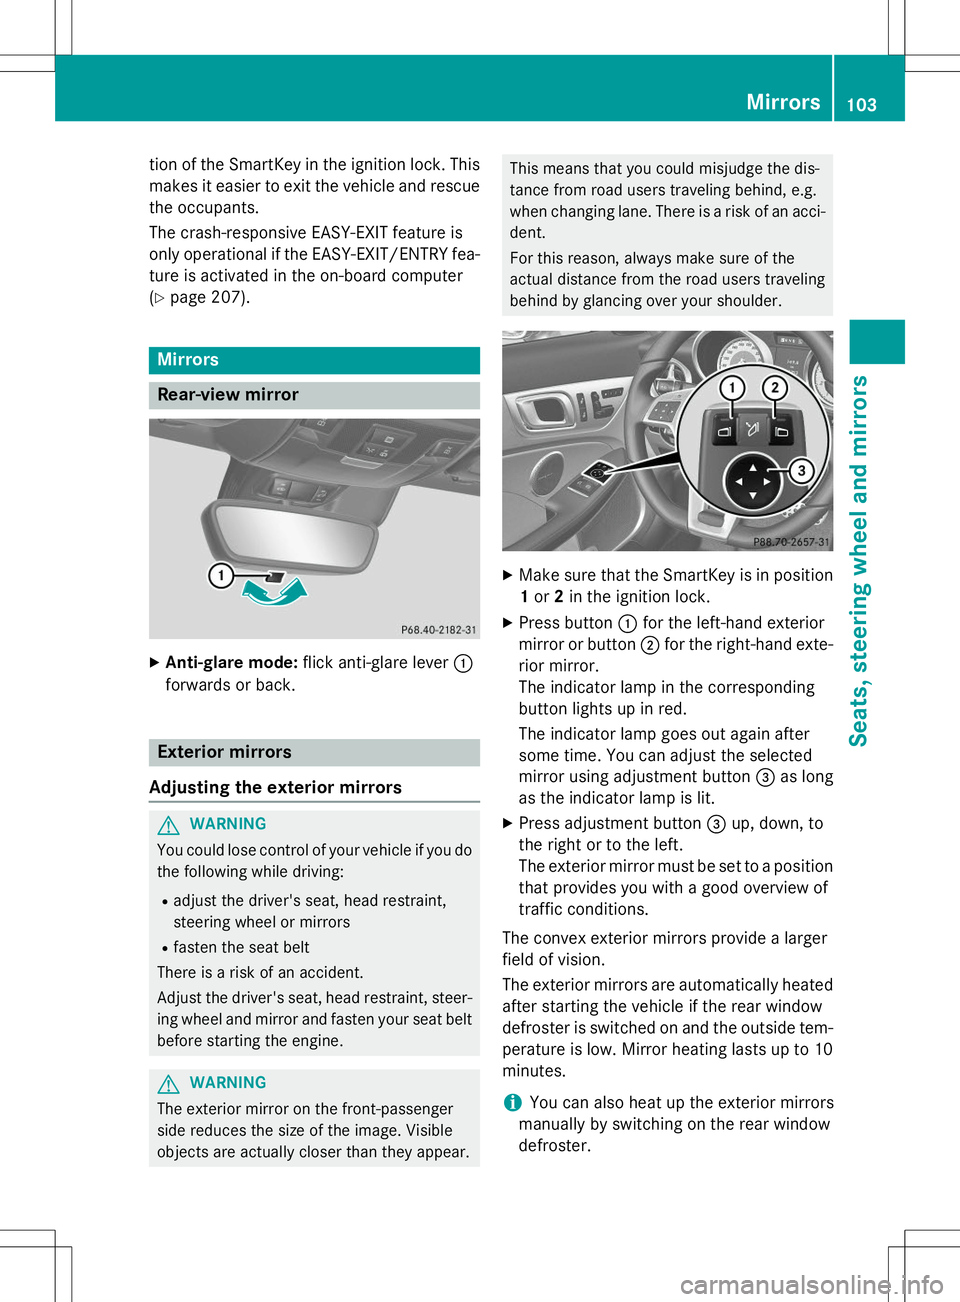
X Make sure that the SmartKey is in position
1 or 2in the ignition lock.
X Press button :for the left-hand exterior
mirror or button ;for the right-hand exte-
rior mirror.
The indicator lamp in the corresponding
button lights up in red.
The indicator lamp goes out again after
some time. You can adjust the selected
mirror using adjustment button =as long
as the indicator lamp is lit.
X Press adjustment button =up, down, to
the right or to the left.
The exterior mirror must be set to a position
that provides you with a good overview of
traffic conditions.
The convex exterior mirrors provide a larger
field of vision.
The exterior mirrors are automatically heated after starting the vehicle if the rear window
defroster is switched on and the outside tem-
perature is low. Mirror heating lasts up to 10 minutes.
iYou can also heat up the exterior mirrors
manually by switching on the rear window
defroster.
Mirrors103
Seats, steering wheel and mirrors
Z
Page 297 of 358
Flat tire
Preparing the vehicle
Your vehicle may be equipped with:R MOExtended tires (tires with run-flat prop-
erties) ( Ypage 295)
Vehicle preparation is not necessary on
vehicles with MOExtended tires
R an emergency spare wheel ( Ypage 343)
Information on changing/mounting a wheel( Y page 334).
X Stop the vehicle on solid, non-slippery and
level ground, as far away as possible from
traffic.
X Switch on the hazard warning lamps.
X Secure the vehicle against rolling away(Y page 161).
X If possible, bring the front wheels into the
straight-ahead position.
X Switch off the engine.
X Vehicles without KEYLESS-GO: remove
the SmartKey from the ignition lock.
X Vehicles with KEYLESS-GO: open the
driver's door.
The on-board electronics now have status0 . This is the same as the SmartKey having
been removed.
X Vehicles with KEYLESS-GO: remove the
Start/Stop button from the ignition lock( Y page 140).
X All occupants must get out of the vehicle.
Make sure that they are not endangered as
they do so.
X Make sure that no one is near the danger
area while a wheel is being changed. Any-
one who is not directly assisting in the
wheel change should, for example, stand
behind the barrier.
X Get out of the vehicle. Pay attention to traf-
fic conditions when doing so.
X Close the driver's door.
MOExtended tires (tires with run-flat
properties)
General notes
With MOExtended tires (tires with run flat
characteristics), you can continue to drive
your vehicle even if there is a total loss of
pressure in one or more tires. The affected
tire must not show any clearly visible damage.
You can recognize MOExtended tires by the
MOExtended marking which appears on the
sidewall of the tire. You will find this marking next to the tire size designation, the load-
bearing capacity and the speed index( Y page 328).
MOExtended tires may only be used in con-
junction with an active tire pressure loss
warning system or with an active tire pressure
monitor.
If a pressure loss warning message
appears in the multifunction display:
R observe the instructions in the display mes-
sages ( Ypage 236).
R check the tire for damage.
R if driving on, observe the following notes.
The driving distance possible in run-flat mode is approximately 50 miles (80 km) when the
vehicle is partially laden and approximately
18 miles (30 km) when the vehicle is fully
laden.
In addition to the vehicle load, the driving dis-tance possible depends upon:
R vehicle speed
R road condition
R outside temperature
The driving distance possible in run-flat mode may be reduced by extreme driving condi-
tions/maneuvers, or it can be increased
through a moderate style of driving.
The driving distance possible in run-flat mode
is counted from the moment the tire pressure loss warning appears in the multifunction dis- play.
Flat tire295
Roadside Assistance
Page 298 of 358

You must not exceed a maximum speed of
50 mph (80 km/h).
iWhen replacing one or all tires, please
observe the following specifications for
your vehicle's tires:
R size
R type and
R the "MOExtended" mark
If a tire has gone flat and cannot be
replaced with a MOExtended tire, a stand-
ard tire may be used as a temporary meas- ure. Make sure that you use the proper size
and type (summer or winter tire).
iVehicles equipped with MOExtended tires
are not equipped with a TIREFIT kit at the
factory. It is therefore recommended that
you additionally equip your vehicle with a
TIREFIT kit if you mount tires that do not
feature run-flat properties, e.g. winter tires. A TIREFIT kit is available, for example, from
a qualified specialist workshop.
Important safety notes
GWARNING
When driving in emergency mode, the driving characteristics deteriorate, e.g. when corner-
ing, accelerating quickly and when braking.
There is a risk of an accident.
Do not exceed the stated maximum speed.
Avoid abrupt steering and driving maneuvers,
and driving over obstacles (curbs, potholes,
off-road). This applies in particular to a laden
vehicle.
Stop driving in emergency mode if:
R you hear banging noises.
R the vehicle starts to shake.
R you see smoke and smell rubber.
R ESP ®
is intervening constantly.
R there are tears in the sidewalls of the tire.
After driving in emergency mode, have the
wheel rims checked at a qualified specialist
workshop with regard to their further use. The defective tire must be replaced in every case.
TIREFIT kit
Important safety notes
TIREFIT is a tire sealant.
You can use TIREFIT to seal punctures of up to 0.16 in (4 mm), particularly those in the tire
tread. You can use TIREFIT at outside tem-
peratures down to Ò4 ‡ ( Ò20 †).
GWARNING
In the following situations, the tire sealant is
unable to provide sufficient breakdown assis-
tance, as it is unable to seal the tire properly:
R there are cuts or punctures in the tire larger
than those mentioned above.
R the wheel rim is damaged.
R you have driven at very low tire pressures or
on a flat tire.
There is a risk of an accident.
Do not drive the vehicle. Contact a qualified
specialist workshop.
GWARNING
The tire sealant is harmful and causes irrita-
tion. It must not come into contact with your
skin, eyes or clothing or be swallowed. Do not inhale TIREFIT fumes. Keep tire sealant away
from children. There is a risk of injury.
If you come into contact with the tire sealant,
observe the following:
R Rinse off the tire sealant from your skin
immediately with water.
R If the tire sealant comes into contact with
your eyes, immediately rinse them thor-
oughly with clean water.
R If tire sealant is swallowed, immediately
rinse your mouth out thoroughly and drink
plenty of water. Do not induce vomiting,
and seek medical attention immediately.
R Immediately change out of clothing which
has come into contact with tire sealant.
R If an allergic reaction occurs, seek medical
attention immediately.
296Flat tire
Roadside Assistance
Page 314 of 358
Useful information
iThis Operator's Manual describes all
models and all standard and optional equip- ment of your vehicle available at the time of
publication of the Operator's Manual.
Country-specific differences are possible.
Please note that your vehicle may not be
equipped with all features described. This
also applies to safety-related systems and
functions.
iRead the information on qualified special-
ist workshops ( Ypage 25).
Important safety notes
GWARNING
If wheels and tires of the wrong size are used,
the wheel brakes or suspension components
may be damaged. There is a risk of an acci-
dent.
Always replace wheels and tires with those
that fulfill the specifications of the originalpart.
When replacing wheels, make sure to use the
correct:
R designation
R model
When replacing tires, make sure to use the
correct:
R designation
R manufacturer
R model
GWARNING
A flat tire severely impairs the driving, steer-
ing and braking characteristics of the vehicle.
There is a risk of accident.
Tires without run-flat characteristics:
R do not drive with a flat tire.
R immediately replace the flat tire with your
emergency spare wheel or spare wheel, or
consult a qualified specialist workshop.
Tires with run-flat characteristics:
R pay attention to the information and warn-
ing notices on MOExtended tires (tires with
run-flat characteristics).
Accessories that are not approved for your
vehicle by Mercedes-Benz or are not being
used correctly can impair operating safety.
Before purchasing and using non-approved
accessories, visit a qualified specialist work-
shop and inquire about: R suitability
R legal stipulations
R factory recommendations
Information on the sizes and types of wheels
and tires for your vehicle can be found under "Wheel/tire combinations" ( Ypage 339).
Information on tire pressure can be found:
R on the vehicle's Tire and Loading Informa-
tion placard on the B-pillar ( Ypage 323)
R on the tire pressure label on the fuel filler
flap ( Ypage 159)
R in the "Tire pressure" section
Operation
Information on driving
Check the tire pressure when the vehicle is
heavily laden and adjust prior to a trip.
While driving, pay attention to vibrations,
noises and unusual handling characteristics,
e.g. pulling to one side. This may indicate that
the wheels or tires are damaged. If you sus-
pect that a tire is defective, reduce your
speed immediately. Stop the vehicle as soon
as possible to check the wheels and tires for
damage. Hidden tire damage could also be
causing the unusual handling characteristics. If you find no signs of damage, have the tires
and wheels checked at a qualified specialist
workshop.
When parking your vehicle, make sure that
the tires do not get deformed by the curb or
other obstacles. If it is necessary to drive over
312Operation
Wheels and tires