2015 MERCEDES-BENZ SLK-CLASS ROADSTER wiper blades
[x] Cancel search: wiper bladesPage 8 of 358
Carsee Vehicle
Car key
see SmartKey
Care
Car wash ........................................ 286 Carpet s .......................................... 292
Disp lay .......................................... .290
Exhaust pipe .................................. 289
Exterior lights ................................ 289
Gear or selector lever .................... 290
Interior .......................................... .290
Matte finish ................................... 288
Notes ............................................. 285
Paint .............................................. 287
Plastic trim ................................... .290
Power washer ................................ 287
Roof lining ...................................... 292
Seat belt ........................................ 291
Seat cover ..................................... 291
Sensors ......................................... 289
Steering wheel ............................... 290
Trim pieces ................................... .290
Washing by hand ........................... 286
Wheels .......................................... .288
Windows ........................................ 288
Wiper blades .................................. 289
Wooden trim .................................. 290
CD player/CD changer (on-board
computer) .......................................... 201
Center console
Lower section .................................. 35
Upper section .................................. 34
Central locking
Automatic locking (on-board com-
puter) ............................................. 206
Locking/unlocking (SmartKey) ....... .72
Changing bulbs
High-beam headlamps .................. .116
Low-beam headlamps .................... 116
Reversing lamps ............................ 117
Side marker lamps (rear) .............. .116
Turn signals (front) ......................... 116
Child
Restraint system .............................. 59
Child seat
Forward-facing restraint system ...... 60
On the front-passenger sea t............ 60 Rearward-facing restraint system .... 60
Children
In the vehicl e................................... 57
Special seat belt retractor ............... 58
Cigarette lighter ................................ 262
Cleaning
Mirror turn signal ........................... 289
Climate control
Air-conditioning system ................. 123
Automatic climate control (dual-
zone) .............................................. 125
Controlling automaticall y............... 129
Cooling with air dehumidification .. 127
Defrosting the window s................. 131
Defrosting the windshield .............. 131
General notes ................................ 122
Indicator lamp ................................ 129
Information about using auto-
matic climate control ..................... 126
Maximum cooling .......................... 131
Notes on using the air-condition-
ing system ..................................... 124
Overview of systems ...................... 122
Problem with the rear window
defroster ........................................ 133
Problems with cooling with air
dehumidification ............................ 129
Refrigerant ..................................... 354
Refrigerant filling capacity ............. 354
Setting the air distribution ............. 130
Setting the air vents ...................... 134
Setting the airflow ......................... 130
Setting the temperature ................ 129
Switching air-recirculation modeon/of f............................................ 133
Switching on/of f........................... 127
Switching residual heat on/off ...... 133
Switching the rear window
defroster on/of f............................ 132
Switching the ZONE function on/
off .................................................. 130
Cockpit
Overview .......................................... 30
see Instrument cluster
Collapsible spare wheel
Inflating ......................................... 344
see Emergency spare wheel
6Index
Page 21 of 358

Equipment ....................................... 22
Individual settings .......................... 204
Limited Warranty ............................. 26
Loading .......................................... 323
Locking (in an emergency) ............... 80
Locking (SmartKey) .......................... 72
Lowering ........................................ 338
Maintenance .................................... 23
Parking for a long period ................ 164
Pulling away ................................... 142
Raising ........................................... 336
Reporting problems .........................26
Securing from rolling away ............ 335
Tow-starting ................................... 305
Towing away .................................. 305
Transporting .................................. 307
Unlocking (in an emergency) ........... 80
Unlocking (SmartKey) ...................... 72
Vehicle data ................................... 355
Vehicle battery
see Battery (vehicle)
Vehicle data ....................................... 355
Vehicle dimensions ........................... 355
Vehicle emergency locking ................ 80
Vehicle identification number
see VIN
Vehicle identification plate .............. 348
Vehicle tool kit .................................. 294
Video
Operating the DVD ......................... 201
VIN ...................................................... 348
W
Warning and indicator lamps
ABS ................................................ 246 Brake s........................................... 246
Check Engine ................................. 252
Coolant .......................................... 252
Distance warning ........................... 254
DISTRONIC PLUS ........................... 254 ESP ®
.............................................. 248
ESP ®
OFF ....................................... 249
Fuel tank ........................................ 252
Overview .......................................... 32
PASSENGER AIR BAG OFF ............... 41
Reserve fue l................................... 252
Restraint system ............................ 251 Seat belt ........................................ 244
SPORT handling mod
e................... 249
Tire pressure monitor .................... 255
Warranty .............................................. 22
Washer fluid
Display message ............................ 242
Wheel and tire combination
see Tires
Wheel bolt tightening torque ........... 338
Wheel chock ...................................... 335
Wheels
Changing a whee l.......................... 334
Checking ........................................ 313
Cleaning ......................................... 288
Emergency spare wheel ................. 343
General notes ................................ 339
Important safety notes .................. 312
Information on driving .................... 312
Interchanging/changing ................ 334
Mounting a new whee l................... 338
Mounting a whee l.......................... 335
Overview ........................................ 312
Removing a whee l.......................... 337
Storing ........................................... 334
Tightening torque ........................... 338
Wheel size/tire size ....................... 339
Wind screen
Inserting and removing .................... 90
Preparing for installation .................. 90
see AIRGUIDE
Windows
see Side windows
Windshield
Defrosting ...................................... 131
Windshield washer fluid
see Windshield washer system
Windshield washer system
Adding washer fluid ....................... 283
Notes ............................................. 353
Windshield wipers
Display message ............................ 242
Problem (malfunction) ................... 120
Replacing the wiper blades ............ 118
Switching on/of f........................... 117
Winter driving
Important safety notes .................. 314
Slippery road surfaces ................... 168
Snow chains .................................. 315
Index19
Page 22 of 358
Winter operationOverview ........................................ 314
Winter tires
M+S tires ....................................... 314
Wiper blades
Cleaning ......................................... 289
Important safety notes .................. 118
Replacing ....................................... 118
Wooden trim (cleaning instruc-
tions) .................................................. 290
Workshop
see Qualified specialist workshop
Z
ZONE functionSwitching on/off ........................... 130
20Index
Page 119 of 358
Changing the rear bulbs
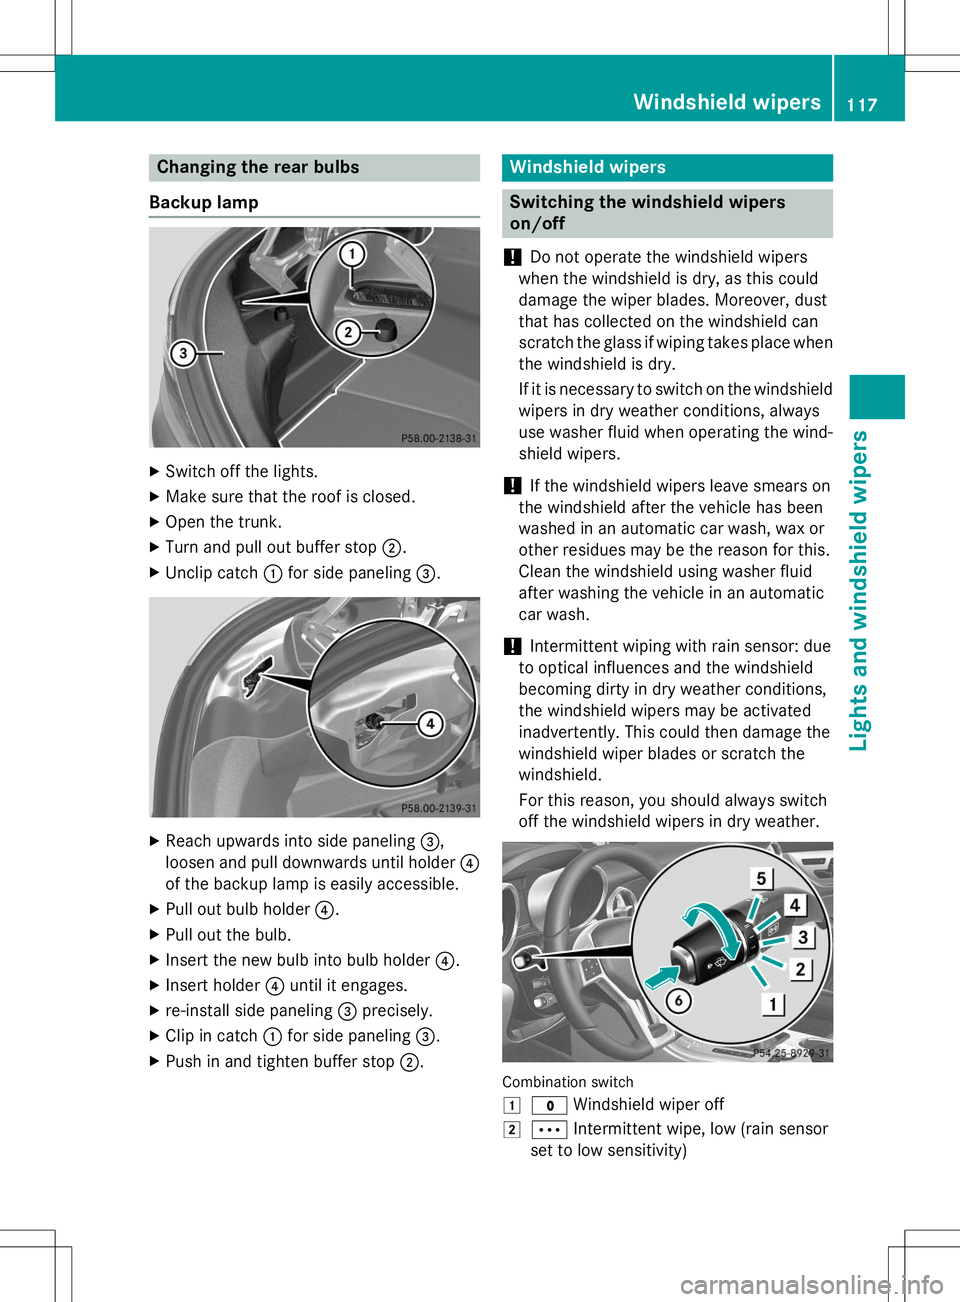
Backup lamp
X Switch off the lights.
X Make sure that the roof is closed.
X Open the trunk.
X Turn and pull out buffer stop ;.
X Unclip catch :for side paneling =.
X
Reach upwards into side paneling =,
loosen and pull downwards until holder ?
of the backup lamp is easily accessible.
X Pull out bulb holder ?.
X Pull out the bulb.
X Insert the new bulb into bulb holder ?.
X Insert holder ?until it engages.
X re-install side paneling =precisely.
X Clip in catch :for side paneling =.
X Push in and tighten buffer stop ;.
Windshield wipers
Switching the windshield wipers on/off
!
Do not operate the windshield wipers
when the windshield is dry, as this could
damage the wiper blades. Moreover, dust
that has collected on the windshield can
scratch the glass if wiping takes place when the windshield is dry.
If it is necessary to switch on the windshield wipers in dry weather conditions, always
use washer fluid when operating the wind-
shield wipers.
!If the windshield wipers leave smears on
the windshield after the vehicle has been
washed in an automatic car wash, wax or
other residues may be the reason for this.
Clean the windshield using washer fluid
after washing the vehicle in an automatic
car wash.
!Intermittent wiping with rain sensor: due
to optical influences and the windshield
becoming dirty in dry weather conditions,
the windshield wipers may be activated
inadvertently. This could then damage the
windshield wiper blades or scratch the
windshield.
For this reason, you should always switch
off the windshield wipers in dry weather.
Combination switch 1
$ Windshield wiper off
2ÄIntermittent wipe, low (rain sensor
set to low sensitivity)
Windshield wipers117
Lights and windshield wipers
Z
Page 120 of 358
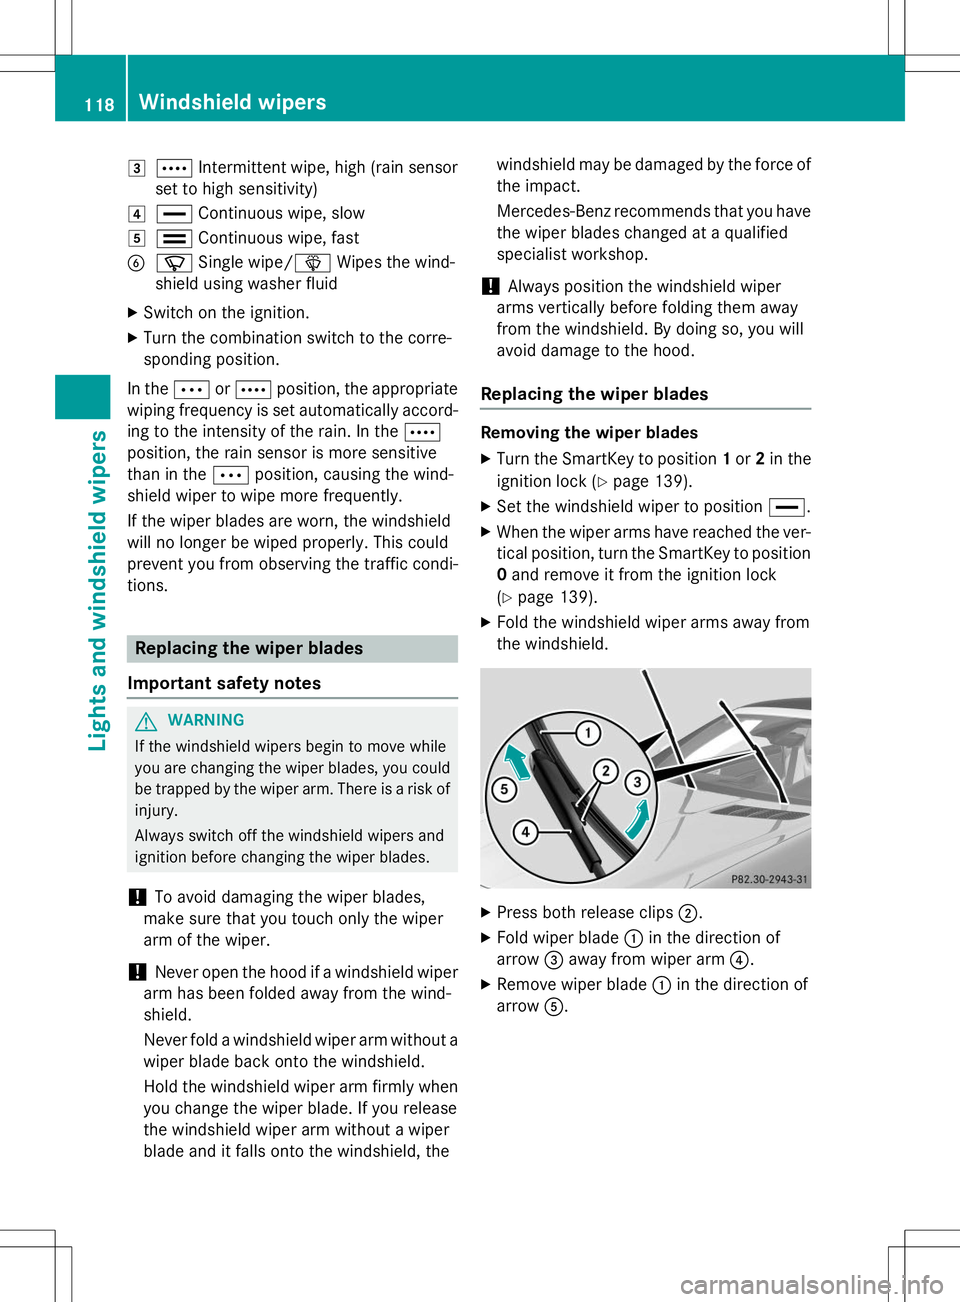
3ÅIntermittent wipe, high (rain sensor
set to high sensitivity)
4° Continuous wipe, slow
5¯Continuous wipe, fast
BíSingle wipe/ îWipes the wind-
shield using washer fluid
X Switch on the ignition.
X Turn the combination switch to the corre-
sponding position.
In the ÄorÅ position, the appropriate
wiping frequency is set automatically accord-
ing to the intensity of the rain. In the Å
position, the rain sensor is more sensitive
than in the Äposition, causing the wind-
shield wiper to wipe more frequently.
If the wiper blades are worn, the windshield
will no longer be wiped properly. This could
prevent you from observing the traffic condi-tions.
Replacing the wiper blades
Important safety notes
GWARNING
If the windshield wipers begin to move while
you are changing the wiper blades, you could be trapped by the wiper arm. There is a risk of
injury.
Always switch off the windshield wipers and
ignition before changing the wiper blades.
!To avoid damaging the wiper blades,
make sure that you touch only the wiper
arm of the wiper.
!Never open the hood if a windshield wiper
arm has been folded away from the wind-
shield.
Never fold a windshield wiper arm without a
wiper blade back onto the windshield.
Hold the windshield wiper arm firmly when
you change the wiper blade. If you release
the windshield wiper arm without a wiper
blade and it falls onto the windshield, the windshield may be damaged by the force of
the impact.
Mercedes-Benz recommends that you have the wiper blades changed at a qualified
specialist workshop.
!Always position the windshield wiper
arms vertically before folding them away
from the windshield. By doing so, you will
avoid damage to the hood.
Replacing the wiper blades
Removing the wiper blades
X Turn the SmartKey to position 1or 2in the
ignition lock ( Ypage 139).
X Set the windshield wiper to position °.
X When the wiper arms have reached the ver-
tical position, turn the SmartKey to position0 and remove it from the ignition lock
( Y page 139).
X Fold the windshield wiper arms away from
the windshield.
XPress both release clips ;.
X Fold wiper blade :in the direction of
arrow =away from wiper arm ?.
X Remove wiper blade :in the direction of
arrow A.
118Windshield wipers
Lights and windshield wipers
Page 121 of 358
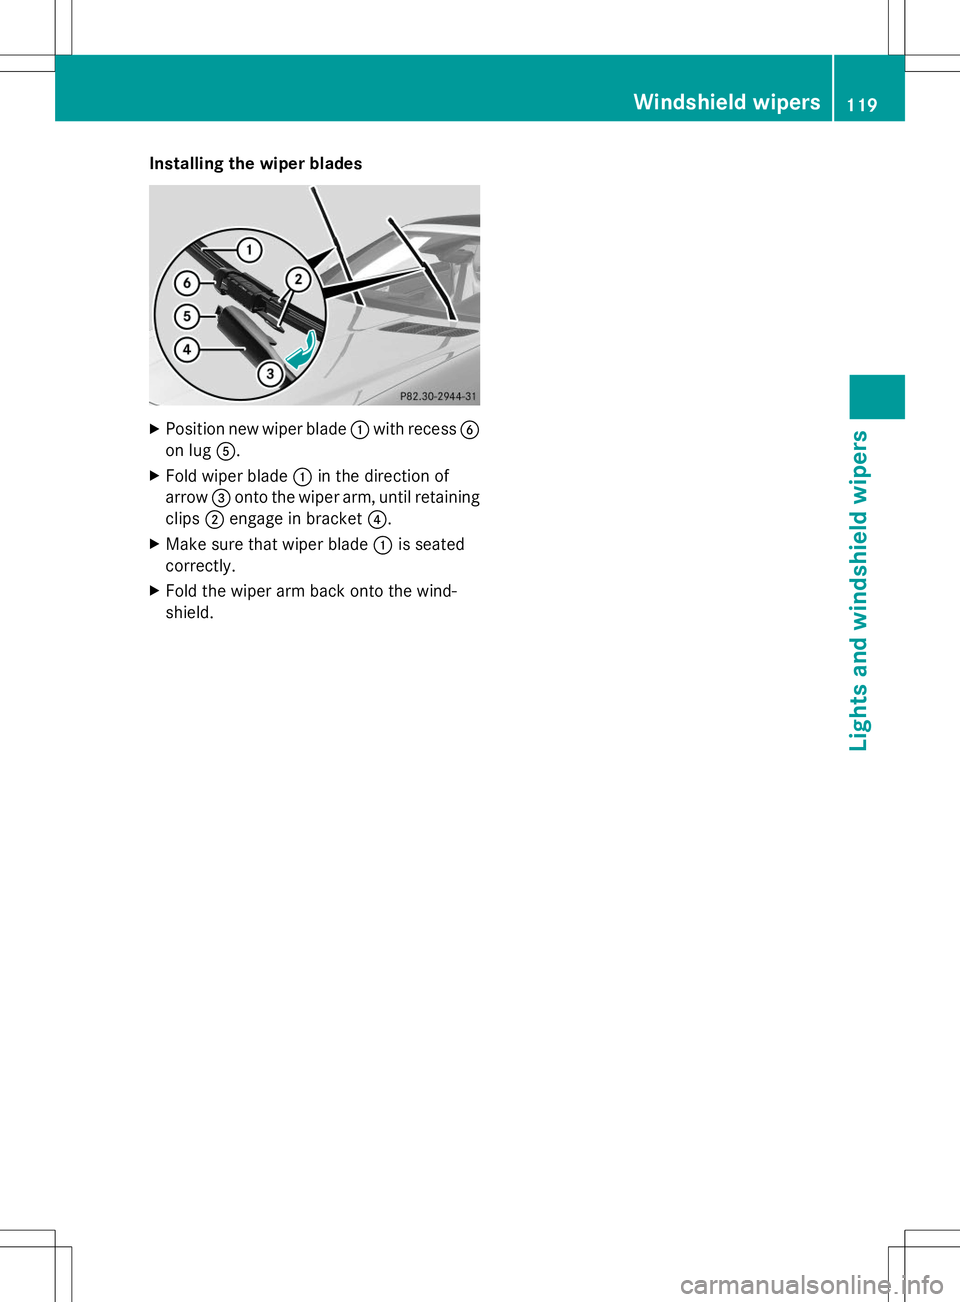
Installing the wiper blades
XPosition new wiper blade :with recess B
on lug A.
X Fold wiper blade :in the direction of
arrow =onto the wiper arm, until retaining
clips ;engage in bracket ?.
X Make sure that wiper blade :is seated
correctly.
X Fold the wiper arm back onto the wind-
shield.
Windshield wipers119
Lights and windshield wipers
Z
Page 288 of 358

should drive for a few minutes after clean-
ing. Braking heats the brake discs and the
brake pads/linings, thus drying them. The
vehicle can then be parked.
Regular care of your vehicle is a condition for
retaining the quality in the long term.
Use care products and cleaning agents rec-
ommended and approved by Mercedes-Benz.
Washing the vehicle and cleaning the paintwork
Automatic car wash
GWARNING
Braking efficiency is reduced after washing
the vehicle. There is a risk of an accident.
After the vehicle has been washed, brake
carefully while paying attention to the traffic
conditions until full braking power is restored.
!If DISTRONIC PLUS or the HOLD function
is activated, the vehicle brakes automati-
cally in certain situations. To prevent dam-
age to the vehicle, deactivate DISTRONIC
PLUS and the HOLD function in the follow-
ing or other similar situations:
R when towing the vehicle
R in the car wash
!It is preferable to use car washes with
adjustable high-pressure pre-cleaning that
corresponds to the specification for the
Cabriolet program. In car washes that use
high water pressures, there is a risk that a
small amount of water may leak into thevehicle.
!Lock the car if you wash it in an automatic
car wash. Otherwise, the vehicle might be
damaged.
!Never clean your vehicle in a Touchless
Automatic Car Wash as these use special
cleaning agents. These cleaning agents can damage the paintwork or plastic parts.
!Make sure that the automatic transmis-
sion is in position Nwhen washing your
vehicle in a tow-through car wash. The vehi-
cle could be damaged if the transmission is
in another position.
!Make sure that:
R the side windows and the roof are com-
pletely closed
R the climate control blower is switched off
R the windshield wiper switch is at position 0
The vehicle could otherwise be damaged.
You can wash the vehicle in an automatic car wash from the very start.
If the vehicle is very dirty, pre-wash it before
cleaning it in an automatic car wash.
After using an automatic car wash, wipe off
wax from the windshield and the wiper
blades. This will prevent smears and reduce
wiping noises caused by residue on the wind-
shield.
Washing by hand
In some countries, washing by hand is only
allowed at specially equipped washing bays.
Observe the legal requirements in all coun-
tries concerned.
X Do not use hot water and do not wash the
vehicle in direct sunlight.
X Use a soft sponge to clean.
X Use a mild cleaning agent, such as a car
shampoo approved by Mercedes-Benz.
X Thoroughly hose down the vehicle with a
gentle jet of water.
X Do not point the water jet directly towards
the air inlet.
X Use plenty of water and rinse out the
sponge frequently.
X Rinse the vehicle with clean water and dry
thoroughly with a chamois.
X Do not let the cleaning agent dry on thepaintwork.
286Care
Maintenance and care
Page 290 of 358
Matte finish care
!Never polish the vehicle or the light alloy
wheels. Polishing causes the finish to shine.
!The following may cause the paint to
become shiny and thus reduce the matteeffect: R Vigorous rubbing with unsuitable mate-
rials.
R Frequent use of car washes.
R Washing the vehicle in direct sunlight.
!Never use paint cleaner, buffing or pol-
ishing products, or gloss preserver, e.g.
wax. These products are only suitable for
high-gloss surfaces. Their use on vehicles
with matte finish leads to considerable sur- face damage (shiny, spotted areas).
Always have paintwork repairs carried out
at a qualified specialist workshop.
!Do not use wash programs with a hot wax
treatment under any circumstances.
Observe these notes if your vehicle has a
clear matte finish. This will help you to avoid
damage to the paintwork due to incorrecttreatment.
These notes also apply to light alloy wheels
with a clear matte finish.
iThe vehicle should preferably be washed
by hand using a soft sponge, car shampoo
and plenty of water.
iUse only insect remover and car shampoo
from the range of recommended and
approved Mercedes-Benz care products.
Cleaning the vehicle parts
Cleaning the wheels
GWARNING
The water jet from a circular jet nozzle (dirt
blasters) can cause invisible exterior damage to the tires or chassis components. Compo-
nents damaged in this way may fail unexpect-edly. There is a risk of an accident.
Do not use power washers with circular jet
nozzles to clean the vehicle. Have damaged
tires or chassis components replaced imme-
diately.
!Do not use acidic wheel cleaning products
to remove brake dust. This could damage
wheel bolts and brake components.
!Do not park the vehicle for an extended
period straight after cleaning it, particularly
after having cleaned the wheels with wheel
cleaner. Wheel cleaners could cause
increased corrosion of the brake discs and
brake pads/linings. For this reason, you
should drive for a few minutes after clean-
ing. Braking heats the brake discs and the
brake pads/linings, thus drying them. The
vehicle can then be parked.
Cleaning the windows
GWARNING
You could become trapped by the windshield wipers if they start moving while cleaning the
windshield or wiper blades. There is a risk of
injury.
Always switch off the windshield wipers and
the ignition before cleaning the windshield or
wiper blades.
!Do not use dry cloths, abrasive products,
solvents or cleaning agents containing sol- vents to clean the inside of the windows. Do
not touch the insides of the windows with
hard objects, e.g. an ice scraper or ring.
There is otherwise a risk of damaging the
windows.
!Clean the water drainage channels of the
windshield and the rear window at regular
intervals. Deposits such as leaves, petals
and pollen may under certain circumstan-
ces prevent water from draining away. This
can lead to corrosion damage and damage to electronic components.
288Care
Maintenance and care