2015 MERCEDES-BENZ SLK-CLASS ROADSTER tire pressure
[x] Cancel search: tire pressurePage 19 of 358
Roadside Assistance button ..........266
Search & Send ............................... 268
Self-test ......................................... 264
Speed alert ................................... .271
System .......................................... 264
Triggering the vehicle alarm ........... 272
Vehicle Health Check .................... 270
Vehicle remote unlocking .............. 269
Telephone
Accepting a call ............................ .202
Display message ............................ 241
Menu (on-board computer) ............ 201
Number from the phone book ....... .202
Redialing ........................................ 202
Rejecting/ending a call ................. 202
Temperature
Coolant .......................................... 194
Coolant (on-board computer) ......... 208
Engine oil (on-board computer) ...... 208
Outside temperature ..................... .195
Setting (climate control) ................ 129
Time
see separate operating instructions
Timing (RACETIMER) ......................... 209
Tire pressure
Calling up (on-board computer) ..... 320
Checking manually ........................ 319
Display message ............................ 236
Important safety notes .................. 320
Maximum ....................................... 318
Not reached (TIREFIT) .................... 298
Notes ............................................. 317
Reached (TIREFIT) .......................... 298
Recommended ............................... 315
Tire pressure loss warning system
General notes ................................ 319
Important safety notes .................. 319
Restarting ...................................... 319
Tire pressure monitor
Checking the tire pressure elec-
tronically ........................................ 322
Function/notes ............................ .320
General notes ................................ 320
Important safety notes .................. 320
Radio type approval for the tire
pressure monitor ........................... 323
Restarting ...................................... 322
Warning lamp ................................. 255 Warning message .......................... 322
TIREFIT kit .......................................... 296
Tires
Aspect ratio (definition) ................. 333
Average weight of the vehicle
occupants (definition) .................... 332
Bar (definition) ............................... 332
Changing a wheel .......................... 334
Characteristics .............................. 331
Checking ........................................ 313
Curb weight (definition) ................. 333
Definition of terms ......................... 331
Direction of rotatio n...................... 334
Display message ............................ 236
Distribution of the vehicle occu-
pants (definition) ............................ 334
DOT (Department of Transporta-
tion) (definition) ............................. 332
DOT, Tire Identification Number
(TIN) ............................................... 331
GAWR (Gross Axle Weight Rating)
(definition) ..................................... 332
General notes ................................ 339
GVW (Gross Vehicle Weight) (def-
inition) ........................................... 332
GVWR (Gross Vehicle Weight Rat- ing) (definition) .............................. 332
Important safety notes .................. 312
Increased vehicle weight due to
optional equipment (definition) ...... 332
Information on driving .................... 312
Kilopascal (kPa) (definition) ........... 332
Labeling (overview) ........................ 328
Load bearing index (definition) ...... 333
Load index ..................................... 330
Load index (definition) ................... 333
M+S tires ....................................... 314
Maximum load on a tire (defini-
tion) ............................................... 333
Maximum loaded vehicle weight
(definition) ..................................... 332
Maximum permissible tire pres-
sure (definition) ............................. 333
Maximum tire load ......................... 330
Maximum tire load (definition) ....... 333
MOExtended tire s.......................... 314
Optional equipment weight (defi-
nition) ............................................ 333
Index17
Page 20 of 358

Overview ........................................312
PSI (pounds per square inch) (def-
inition) .......................................... .333
Replacing ....................................... 334
Service life ..................................... 314
Sidewall (definition) ....................... 333
Speed rating (definition) ................ 332
Storing .......................................... .334
Structure and characteristics
(definition) ..................................... 331
Summer tires ................................. 314
Temperature .................................. 327
TIN (Tire Identification Number)
(definition) ..................................... 333
Tire bead (definition) ..................... .333
Tire pressure (definition) ................ 333
Tire pressures (recommended) ...... 332
Tire size (data) ............................... 339
Tire size designation, load-bearing capacity, speed rating .................... 328
Tire tread ....................................... 313
Tire tread (definition) ..................... 333
Total load limit (definition) ............. 334
Traction ......................................... 327
Traction (definition) ....................... 334
Tread wea r..................................... 327
Uniform Tire Quality Grading
Standards ...................................... 326
Uniform Tire Quality Grading
Standards (definition) .................... 332
Wear indicator (definition) ............. 334
Wheel and tire combination ........... 341
Wheel rim (definition) .................... 332
see Flat tire
Tow-starting
Emergency engine starting ............ 307
Important safety notes .................. 305
Installing the towing eye ................ 306
Removing the towing eye ............... 306
Towing away
Important safety guidelines ........... 305
Installing the towing eye ................ 306
Removing the towing eye ............... 306
With both axles on the ground ....... 306
With the rear axle raised ................ 307
Transmission
Selector lever ................................ 151
see Automatic transmission see Manual transmission
Transporting the vehicle .................. 307
Trim pieces (cleaning instruc-
tions) .................................................. 290
Trip computer (on-board com-puter) .................................................. 197
Trip odometer
Calling up ....................................... 197
Resetting (on-board computer) ...... 198
Trunk
Emergency release .......................... 82
Important safety notes .................... 80
Locking separately ........................... 82
Opening (automatically from out-
side) ................................................. 82
Opening/closing (manually from
outside) ............................................ 81
Overview .......................................... 80
Trunk lid
Display message ............................ 240
Opening dimensions ...................... 355
Opening/closing .............................. 80
Trunk load (maximum) ...................... 355
Trunk partition
Display message ............................ 241
General notes .................................. 89
Opening/closing .............................. 90
Turn signals
Changing bulbs (front) ................... 116
Display message ............................ 225
Switching on/of f........................... 110
Type identification plate
see Vehicle identification plate
U
UnlockingEmergency unlocking ....................... 80
From inside the vehicle (central
unlocking button) ............................. 79
V
Vanity mirror (in the sun visor) ........ 262
Vehicle
Correct use ...................................... 26
Data acquisition ............................... 27
Display message ............................ 238
18Index
Page 21 of 358

Equipment ....................................... 22
Individual settings .......................... 204
Limited Warranty ............................. 26
Loading .......................................... 323
Locking (in an emergency) ............... 80
Locking (SmartKey) .......................... 72
Lowering ........................................ 338
Maintenance .................................... 23
Parking for a long period ................ 164
Pulling away ................................... 142
Raising ........................................... 336
Reporting problems .........................26
Securing from rolling away ............ 335
Tow-starting ................................... 305
Towing away .................................. 305
Transporting .................................. 307
Unlocking (in an emergency) ........... 80
Unlocking (SmartKey) ...................... 72
Vehicle data ................................... 355
Vehicle battery
see Battery (vehicle)
Vehicle data ....................................... 355
Vehicle dimensions ........................... 355
Vehicle emergency locking ................ 80
Vehicle identification number
see VIN
Vehicle identification plate .............. 348
Vehicle tool kit .................................. 294
Video
Operating the DVD ......................... 201
VIN ...................................................... 348
W
Warning and indicator lamps
ABS ................................................ 246 Brake s........................................... 246
Check Engine ................................. 252
Coolant .......................................... 252
Distance warning ........................... 254
DISTRONIC PLUS ........................... 254 ESP ®
.............................................. 248
ESP ®
OFF ....................................... 249
Fuel tank ........................................ 252
Overview .......................................... 32
PASSENGER AIR BAG OFF ............... 41
Reserve fue l................................... 252
Restraint system ............................ 251 Seat belt ........................................ 244
SPORT handling mod
e................... 249
Tire pressure monitor .................... 255
Warranty .............................................. 22
Washer fluid
Display message ............................ 242
Wheel and tire combination
see Tires
Wheel bolt tightening torque ........... 338
Wheel chock ...................................... 335
Wheels
Changing a whee l.......................... 334
Checking ........................................ 313
Cleaning ......................................... 288
Emergency spare wheel ................. 343
General notes ................................ 339
Important safety notes .................. 312
Information on driving .................... 312
Interchanging/changing ................ 334
Mounting a new whee l................... 338
Mounting a whee l.......................... 335
Overview ........................................ 312
Removing a whee l.......................... 337
Storing ........................................... 334
Tightening torque ........................... 338
Wheel size/tire size ....................... 339
Wind screen
Inserting and removing .................... 90
Preparing for installation .................. 90
see AIRGUIDE
Windows
see Side windows
Windshield
Defrosting ...................................... 131
Windshield washer fluid
see Windshield washer system
Windshield washer system
Adding washer fluid ....................... 283
Notes ............................................. 353
Windshield wipers
Display message ............................ 242
Problem (malfunction) ................... 120
Replacing the wiper blades ............ 118
Switching on/of f........................... 117
Winter driving
Important safety notes .................. 314
Slippery road surfaces ................... 168
Snow chains .................................. 315
Index19
Page 23 of 358

Protection of the environment
General notes
HEnvironmental note
Daimler's declared policy is one of compre-
hensive environmental protection.
The objectives are for the natural resources
that form the basis of our existence on this
planet to be used sparingly and in a manner
that takes the requirements of both nature
and humanity into account.
You too can help to protect the environment
by operating your vehicle in an environmen-
tally responsible manner.
Fuel consumption and the rate of engine,
transmission, brake and tire wear are affected by these factors:
R operating conditions of your vehicle
R your personal driving style
You can influence both factors. You should
bear the following in mind:
Operating conditions:
R avoid short trips as these increase fuel con-
sumption.
R always make sure that the tire pressures
are correct.
R do not carry any unnecessary weight.
R remove roof racks once you no longer need
them.
R a regularly serviced vehicle will contribute
to environmental protection. You should
therefore adhere to the service intervals.
R always have service work carried out at a
qualified specialist workshop.
Personal driving style:
R do not depress the accelerator pedal when
starting the engine.
R do not warm up the engine when the vehicle
is stationary.
R drive carefully and maintain a safe distance
from the vehicle in front.
R avoid frequent, sudden acceleration andbraking.
R change gear in good time and use each gear
only up to Ôof its maximum engine speed.
R switch off the engine in stationary traffic.
R keep an eye on the vehicle's fuel consump-
tion.
Environmental concerns and recom-
mendations
Wherever the operating instructions require
you to dispose of materials, first try to regen-
erate or re-use them. Observe the relevant
environmental rules and regulations when
disposing of materials. In this way you will
help to protect the environment.
Genuine Mercedes-Benz parts
HEnvironmental note
Daimler AG also supplies reconditioned major
assemblies and parts which are of the same
quality as new parts. They are covered by the same Limited Warranty entitlements as newparts.
!Air bags and Emergency Tensioning Devi-
ces, as well as control units and sensors for these restraint systems, may be installed in
the following areas of your vehicle:
R doors
R door pillars
R door sills
R seats
R cockpit
R instrument cluster
R center console
Do not install accessories such as audio
systems in these areas. Do not carry out
repairs or welding. You could impair the
operating efficiency of the restraint sys-tems.
Have aftermarket accessories installed at a qualified specialist workshop.
Introduction21
Z
Page 34 of 358
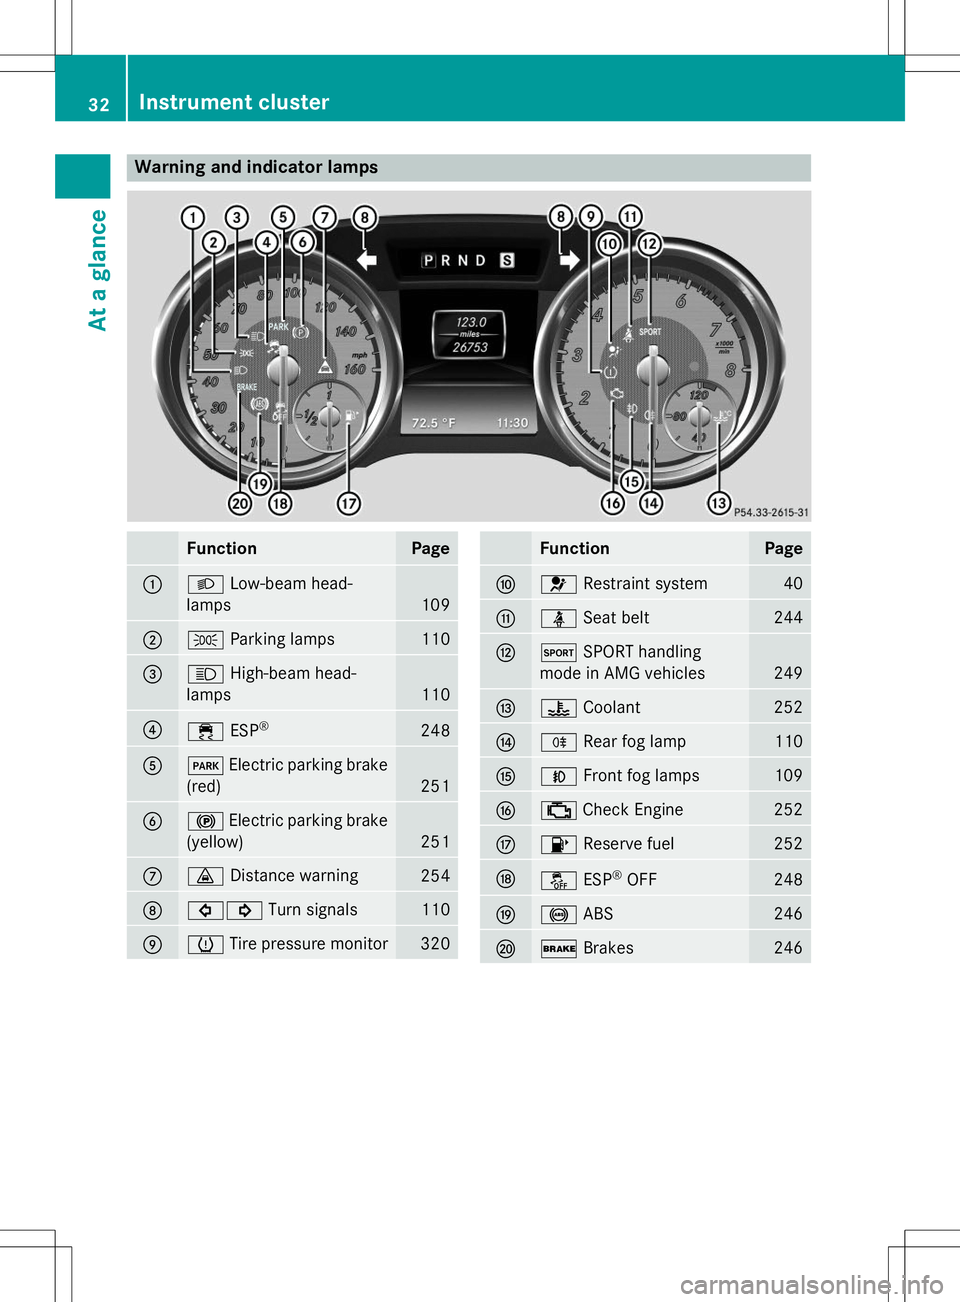
Warning and indicator lamps
FunctionPage
:LLow-beam head-
lamps
109
;T Parking lamps110
=KHigh-beam head-
lamps
110
?÷ ESP®248
AF
Electric parking brake
(red)
251
B! Electric parking brake
(yellow)
251
C· Distance warning254
D#! Turn signals110
EhTire pressure monitor320
FunctionPage
F6 Restraint system40
GüSeat belt244
HMSPORT handling
mode in AMG vehicles
249
I? Coolant252
JRRear fog lamp110
KNFront fog lamps109
L;Check Engine252
M8 Reserve fuel252
NåESP®
OFF248
O! ABS246
P$Brakes246
32Instrument cluster
At a glance
Page 63 of 358
Driving safety systems
Overview of driving safety systems
In this section, you will find information aboutthe following driving safety systems:
R ABS ( Anti-lock Braking System)
( Y page 61)
R BAS ( Brake Assist System) ( Ypage 62)
R BAS PLUS ( Brake Assist System Plus)
( Y page 62)
R ESP ®
(E lectronic Stability Program)
( Y page 63)
R EBD ( Electronic Brake force Distribution)
( Y page 66)
R ADAPTIVE BRAKE ( Ypage 67)
R PRE-SAFE ®
Brake ( Ypage 67)
Important safety notes
If you fail to adapt your driving style or if you
are inattentive, the driving safety systems can
neither reduce the risk of an accident nor
override the laws of physics. Driving safety
systems are merely aids designed to assist
driving. You are responsible for maintaining
the distance to the vehicle in front, for vehicle
speed, for braking in good time, and for stay- ing in lane. Always adapt your driving style to
suit the prevailing road and weather condi-
tions and maintain a safe distance from the
vehicle in front. Drive carefully.
The driving safety systems described only
work as effectively as possible when there is
adequate contact between the tires and the
road surface. Please pay special attention to
the notes on tires, recommended minimum
tire tread depths, etc. ( Ypage 312).
In wintry driving conditions, always use winter
tires (M+S tires) and if necessary, snow
chains. Only in this way will the driving safety systems described in this section work as
effectively as possible.
ABS (Anti-lock Braking System)
General information
ABS regulates brake pressure in such a way
that the wheels do not lock when you brake.
This allows you to continue steering the vehi- cle when braking.
The yellow !ABS warning lamp in the
instrument cluster lights up when the ignition is switched on. It goes out when the engine is
running.
Important safety notes
iObserve the "Important safety notes" sec-
tion ( Ypage 61).
GWARNING
If ABS is faulty, the wheels could lock when
braking. The steerability and braking charac-
teristics may be severely impaired. Addition-
ally, further driving safety systems are deac-
tivated. There is an increased danger of skid-
ding and accidents.
Drive on carefully. Have ABS checked imme-
diately at a qualified specialist workshop.
When ABS is malfunctioning, other systems,
including driving safety systems, will also
become inoperative. Observe the information on the ABS warning lamp ( Ypage 246) and
display messages which may be shown in the
instrument cluster ( Ypage 213).
ABS works from a speed of about 5 mph
(8 km/ h), regardless of road-surface condi-
tions. ABS works on slippery surfaces, even if
you only brake gently.
Braking
X If ABS intervenes: continue to depress the
brake pedal vigorously until the braking sit- uation is over.
X To make a full brake application:
depress the brake pedal with full force.
If ABS intervenes when braking, you will feel a pulsing in the brake pedal.
Driving safety systems61
Safety
Z
Page 65 of 358
Recognition by the radar sensor system is
also impaired in the event of:R there is dirt on the sensors or anything else
covering the sensors
R there is interference by other radar sources
R there are strong radar reflections, for
example in parking garages
R a narrow vehicle traveling in front, e.g. a
motorbike
R a vehicle traveling in front on a different line
relative to the center of your vehicle
Following damage to the front end of the vehi-
cle, have the configuration and operation of
the radar sensors checked at a qualified spe-
cialist workshop. This also applies to colli-
sions at low speeds where there is no visible
damage to the front of the vehicle.
Function
To avoid a collision, BAS PLUS calculates the
brake force necessary if:
R you approach an obstacle, and
R BAS PLUS has detected a risk of collision
When driving at a speed under 20 mph
(30 km/h) : if you depress the brake pedal,
BAS PLUS is activated. The increase in brake pressure will be carried out at the last possi-
ble moment.
When driving at a speed above 20 mph
(30 km/h) : if you depress the brake pedal
sharply, BAS PLUS automatically raises the
brake pressure to a value adapted to the traf-
fic situation.
BAS PLUS provides braking assistance in haz-
ardous situations with vehicles in front within a speed range between 4 mph (7 km/h) and
155 mph (250 km/h).
At speeds of up to approximately 40 mph
(70 km/ h), BAS PLUS can also react to sta-
tionary objects. Examples of stationary
objects are stopped or parked vehicles.
iIf BAS PLUS demands particularly high
braking force, preventative passenger pro- tection measures (PRE-SAFE
®
) are activa-
ted simultaneously.
X Keep the brake pedal depressed until the
emergency braking situation is over.
ABS prevents the wheels from locking.
BAS PLUS is deactivated and the brakes func- tion as usual again, if:
R you release the brake pedal.
R there is no longer a risk of collision.
R no obstacle is detected in front of your
vehicle.
R you depress the accelerator pedal.
R you activate kickdown.
ESP®(Electronic Stability Program)
General notes
iObserve the "Important safety notes" sec-
tion ( Ypage 61).
ESP ®
monitors driving stability and traction,
i.e. power transmission between the tires and
the road surface.
If ESP ®
detects that the vehicle is deviating
from the direction desired by the driver, one
or more wheels are braked to stabilize the
vehicle. The engine output is also modified to keep the vehicle on the desired course within
physical limits. ESP ®
assists the driver when
pulling away on wet or slippery roads. ESP ®
can also stabilize the vehicle during braking.
ETS (Electronic Traction System)
iObserve the "Important safety notes" sec-
tion ( Ypage 61).
ETS traction control is part of ESP ®
.
ETS brakes the drive wheels individually if
they spin. This enables you to pull away and
accelerate on slippery surfaces, for example
if the road surface is slippery on one side. In
addition, more drive torque is transferred to
the wheel or wheels with traction.
Driving safety systems63
Safety
Z
Page 161 of 358
and, if applicable, the auxiliary heating beforerefueling.
GWARNING
Fuel is poisonous and hazardous to health.
There is a risk of injury.
You must make sure that fuel does not comeinto contact with your skin, eyes or clothing
and that it is not swallowed. Do not inhale fuel
vapors. Keep fuel away from children.
If you or others come into contact with fuel,
observe the following:
R Wash away fuel from skin immediately
using soap and water.
R If fuel comes into contact with your eyes,
immediately rinse them thoroughly with
clean water. Seek medical assistance with-
out delay.
R If fuel is swallowed, seek medical assis-
tance without delay. Do not induce vomit-
ing.
R Immediately change out of clothing which
has come into contact with fuel.
GWARNING
Electrostatic buildup can create sparks and
ignite fuel vapors. There is a risk of fire and
explosion.
Always touch the vehicle body before opening
the fuel filler flap or touching the fuel pump
nozzle. Any existing electrostatic buildup is
thereby discharged.
!Do not use diesel to refuel vehicles with a
gasoline engine. Do not switch on the igni- tion if you accidentally refuel with the
wrong fuel. Otherwise, the fuel will enter
the fuel system. Even small amounts of the
wrong fuel could result in damage to the
fuel system and the engine. Notify a quali-
fied specialist workshop and have the fuel
tank and fuel lines drained completely.
!Overfilling the fuel tank could damage the
fuel system.
!Take care not to spill any fuel on painted
surfaces. You could otherwise damage the paintwork.
!Use a filter when refueling from a fuel can.
Otherwise, the fuel lines and/or injection
system could be blocked by particles from
the fuel can.
Do not get into the vehicle again during the
refueling process. Otherwise, electrostatic
charge could build up again.
If you overfill the fuel tank, fuel could spray
out when the fuel pump nozzle is removed.
For further information on fuel and fuel quality
( Y page 350).
Refueling
General information
The fuel filler flap is unlocked or locked auto- matically when you unlock or lock the vehicle
with the key or using KEYLESS-GO.
The position of the fuel filler cap is displayed 8 in the instrument cluster. The arrow
next to the filling pump indicates the side of
the vehicle.
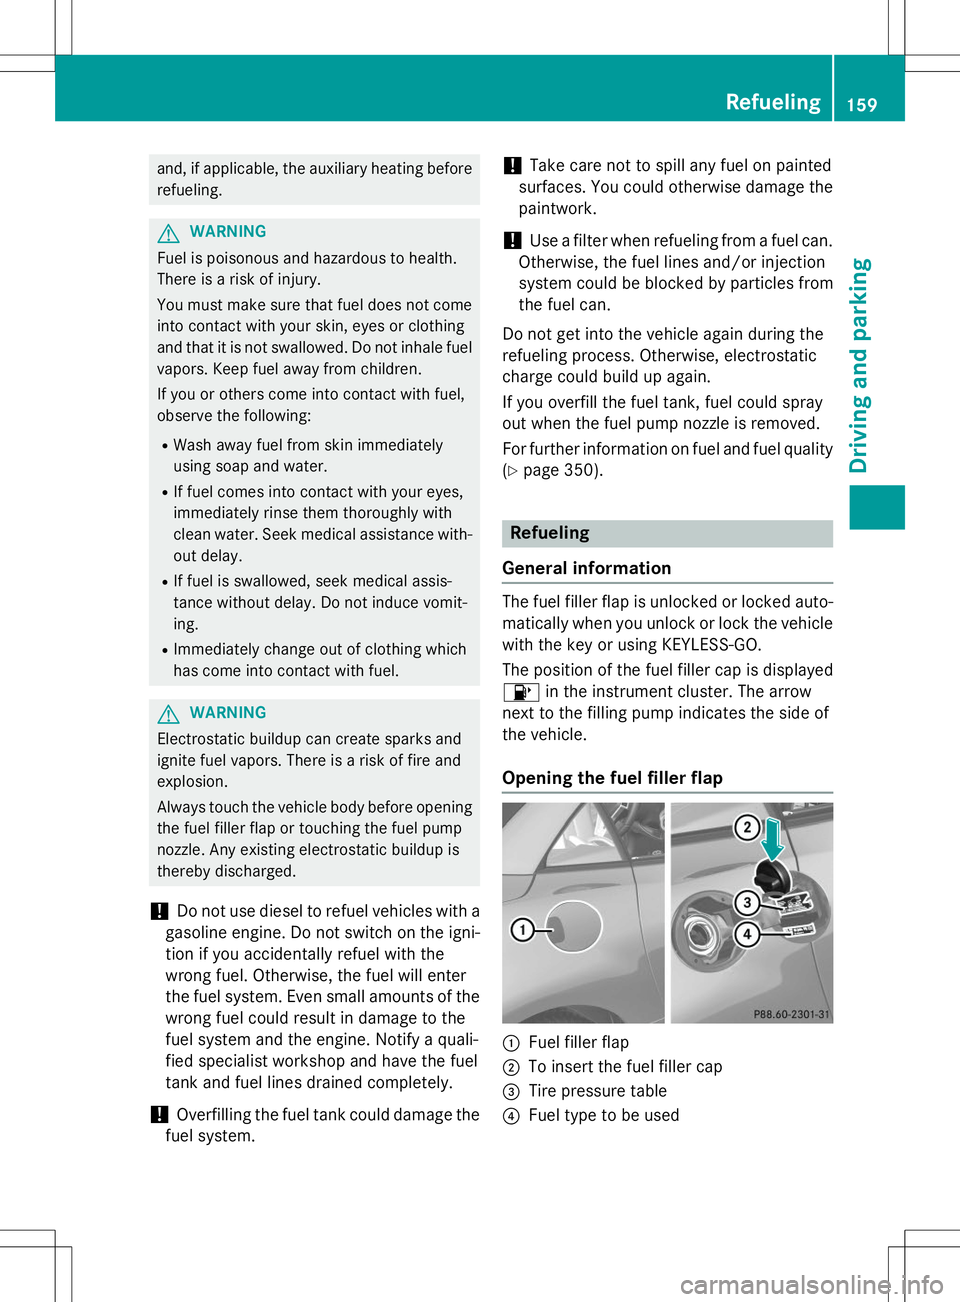
Opening the fuel filler flap
:Fuel filler flap
;To insert the fuel filler cap
=Tire pressure table
?Fuel type to be used
Refueling159
Driving and parking
Z