2015 MERCEDES-BENZ SLK-CLASS ROADSTER turn signal
[x] Cancel search: turn signalPage 228 of 358

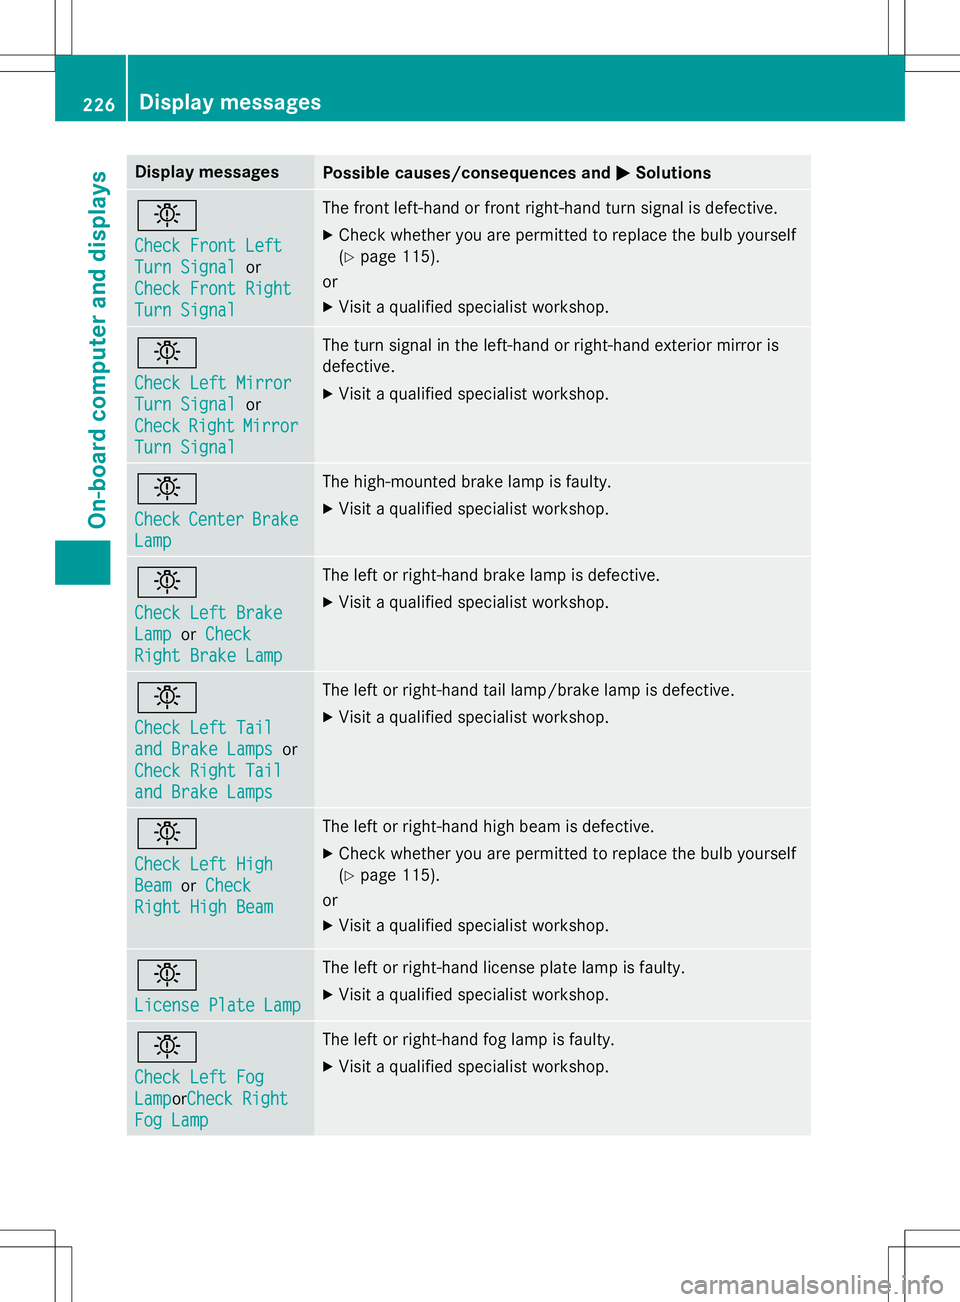
Display messagesPossible causes/consequences andMSolutions
b
Check Front Left
Turn Signalor
Check Front Right
Turn Signal
The front left-hand or front right-hand turn signal is defective.
X Check whether you are permitted to replace the bulb yourself (Y page 115).
or
X Visit a qualified specialist workshop.
b
Check Left Mirror
Turn Signalor
CheckRightMirror
Turn Signal
The turn signal in the left-hand or right-hand exterior mirror is
defective.
X Visit a qualified specialist workshop.
b
CheckCenterBrake
Lamp
The high-mounted brake lamp is faulty. X
Visit a qualified specialist workshop.
b
Check Left Brake
LamporCheck
Right Brake Lamp
The left or right-hand brake lamp is defective. XVisit a qualified specialist workshop.
b
Check Left Tail
and Brake Lampsor
Check Right Tail
and Brake Lamps
The left or right-hand tail lamp/brake lamp is defective.
X Visit a qualified specialist workshop.
b
Check Left High
BeamorCheck
Right High Beam
The left or right-hand high beam is defective.
X Check whether you are permitted to replace the bulb yourself (Y page 115).
or
X Visit a qualified specialist workshop.
b
License Plate Lamp
The left or right-hand license plate lamp is faulty.
X Visit a qualified specialist workshop.
b
Check Left Fog
LamporCheck Right
Fog Lamp
The left or right-hand fog lamp is faulty.
X Visit a qualified specialist workshop.
226Display messages
On-board computer and displays
Page 275 of 358

XTurn the SmartKey to position 2in the igni-
tion lock ( Ypage 139).
X Select one of buttons ;to? to use to
control the garage door drive.
X To start programming mode: press and
hold one of buttons ;to? on the inte-
grated garage door opener.
The garage door opener is now in program- ming mode. After a short time, indicatorlamp :lights up yellow.
Indicator lamp :lights up yellow as soon
as button ;,= or? is programmed for
the first time. If the selected button has
already been programmed, indicatorlamp :will only light up yellow after ten
seconds have elapsed.
X Release button ;,= or? . Indicator
lamp :flashes yellow.
X To program the remote control: point
garage door remote control Atowards
buttons ;to? on the rear-view mirror at
a distance of 2 to 8 inches (5 to 20 cm).
X Press and hold button Bon remote control
A until indicator lamp :lights up green.
When indicator lamp :lights up green:
programming is finished.
When indicator lamp :flashes green: pro-
gramming was successful. The next step is
to synchronize the rolling code ( Y page 273).
X Release button Bon remote control Afor
the garage door drive system.
If indicator lamp :lights up red: repeat the
programing procedure for the correspond-
ing button on the rear-view mirror. When
doing so, vary the distance between remote control Aand the rear-view mirror.
The required distance between remote
control Aand the integrated garage door
opener depends on the garage door drive
system. Several attempts might be neces-
sary. You should test every position for at
least 25 seconds before trying anotherposition. Synchronizing the rolling code
Pay attention to the "Important safety notes"
( Y page 272).
If the garage door system uses a rolling code, you will also have to synchronize the garage
door system with the integrated garage door
opener in the rear-view mirror. To do this you
will need to use the programming button on
the door drive control panel. The program-
ming button may be positioned at different
locations depending on the manufacturer. It
is usually located on the door drive unit on the
garage ceiling.
Familiarize yourself with the garage door
drive operating instructions, e.g. under "Pro-
gramming of additional remote controls",
before carrying out the following steps.
Your vehicle must be within reach of the
garage door or gate opener drive. Make sure
that neither your vehicle nor any persons/
objects are present within the sweep of the
door or gate.
X Turn the SmartKey to position 2in the igni-
tion lock ( Ypage 139).
X Get out of the vehicle.
X Press the programming button on the door
drive unit.
Usually, you now have 30 seconds to ini-
tiate the next step.
X Get into the vehicle.
X Press previously programmed button ;,
= or? on the integrated garage door
opener until the door closes.
The rolling code synchronization is thencomplete.
Notes on programming the remote con-
trol
Canadian radio frequency laws require a
"break" (or interruption) of the transmission
signals after broadcasting for a few seconds. Therefore, these signals may not last long
enough for the integrated garage door
opener. The signal is not recognized during
programming. Comparable with Canadian
Features273
Stowage and features
Z
Page 277 of 358

Please also read the operating instructions
for the garage door system.
X Turn the SmartKey to position 2in the igni-
tion lock ( Ypage 139).
X Press button ;,= or? which you have
programmed to operate the garage door.
Garage door system with a fixed code: indi-
cator lamp :lights up green.
Garage door system with a rolling code:
indicator lamp :flashes green.
The transmitter will transmit a signal as
long as the button is pressed. The trans-
mission is halted after a maximum of ten
seconds and indicator lamp :lights up
yellow.
X Press button ;,= or? again if neces-
sary.
Clearing the memory
Make sure that you clear the memory of the
integrated garage door opener before selling
the vehicle.
X Turn the SmartKey to position 2in the igni-
tion lock ( Ypage 139).
X Press and hold buttons ;and ?.
The indicator lamp initially lights up yellow
and then green.
X Release buttons ;and ?.
The memory of the integrated garage door
opener in the rear-view mirror is cleared.
Compass
Calling up the compass
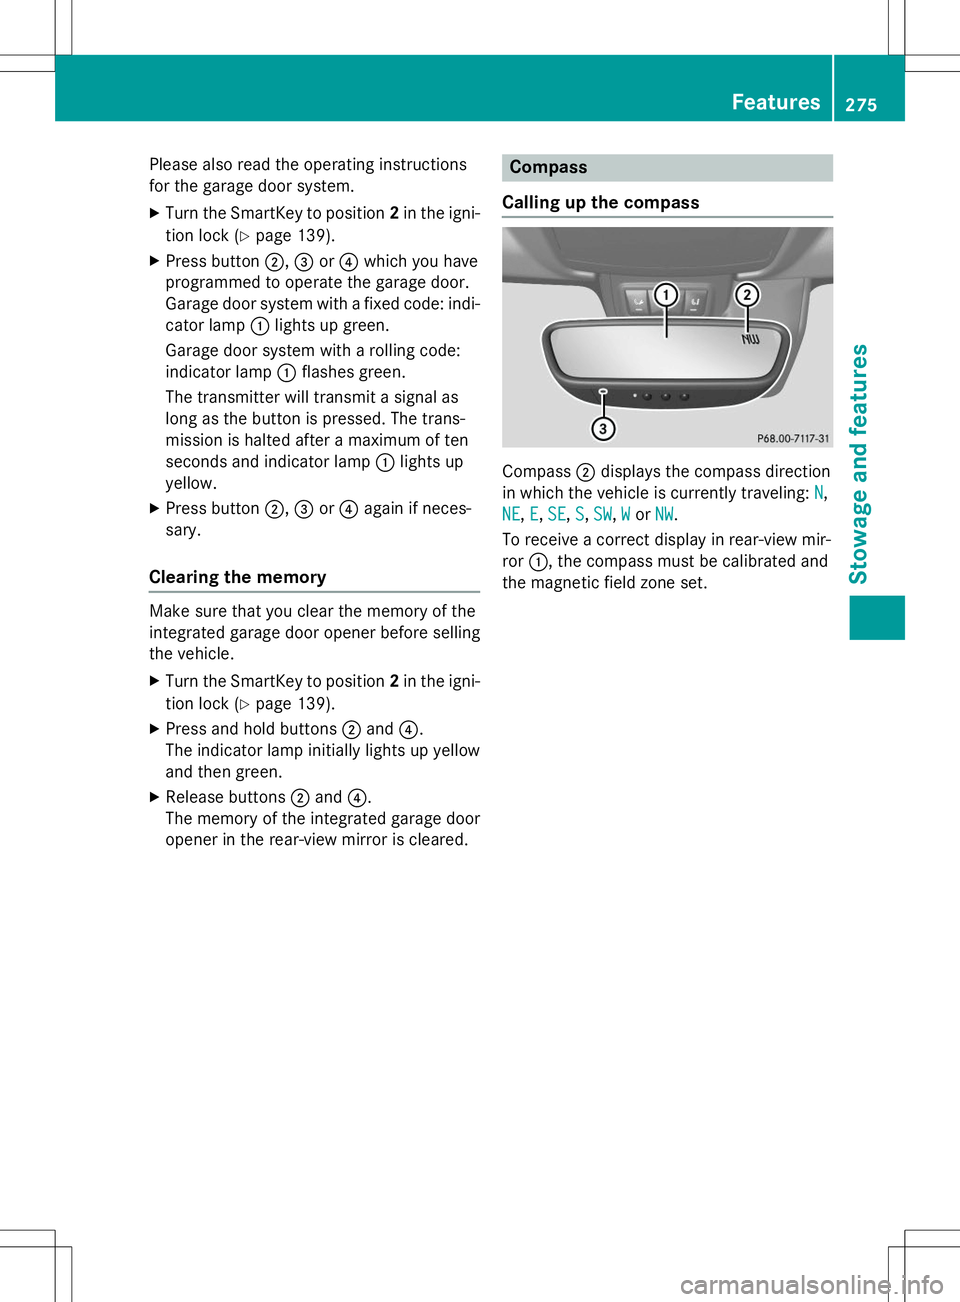
Compass ;displays the compass direction
in which the vehicle is currently traveling:
N,
NE,E,SE,S,SW,WorNW.
To receive a correct display in rear-view mir- ror :, the compass must be calibrated and
the magnetic field zone set.
Features275
Stowage and features
Z
Page 291 of 358

XClean the inside and outside of the win-
dows with a damp cloth and a cleaning
agent that is recommended and approved
by Mercedes-Benz.
Cleaning wiper blades
GWARNING
You could become trapped by the windshield
wipers if they start moving while cleaning the
windshield or wiper blades. There is a risk of
injury.
Always switch off the windshield wipers and
the ignition before cleaning the windshield or
wiper blades.
!Do not pull the wiper blade. Otherwise,
the wiper blade could be damaged.
!Do not clean wiper blades too often and
do not rub them too hard. Otherwise, the
graphite coating could be damaged. This
could cause wiper noise.
!Hold the wiper arm securely when folding
back. The windshield could be damaged if
the wiper arm smacks against it suddenly.
X Fold the windshield wiper arms away from
the windshield.
X Carefully clean the wiper blades with a
damp cloth.
X Fold the windshield wiper arms back again
before switching on the ignition.
Cleaning the exterior lighting
!Only use cleaning agents or cleaning
cloths which are suitable for plastic light
lenses. Unsuitable cleaning agents or
cleaning cloths could scratch or damage
the plastic light lenses.
X Clean the plastic lenses of the exterior
lighting using a wet sponge and a mild
cleaning agent, e.g. Mercedes-Benz car
shampoo or cleaning cloths.
Cleaning the mirror turn signals
!Only use cleaning agents or cleaning
cloths that are suitable for plastic lenses.
Unsuitable cleaning agents or cleaning
cloths could scratch or damage the plastic lenses of the mirror turn signals.
X Clean the plastic lenses of the mirror turn
signals in the exterior mirror housing using
a wet sponge and mild cleaning agent, e.g.
Mercedes-Benz car shampoo or cleaning
cloths.
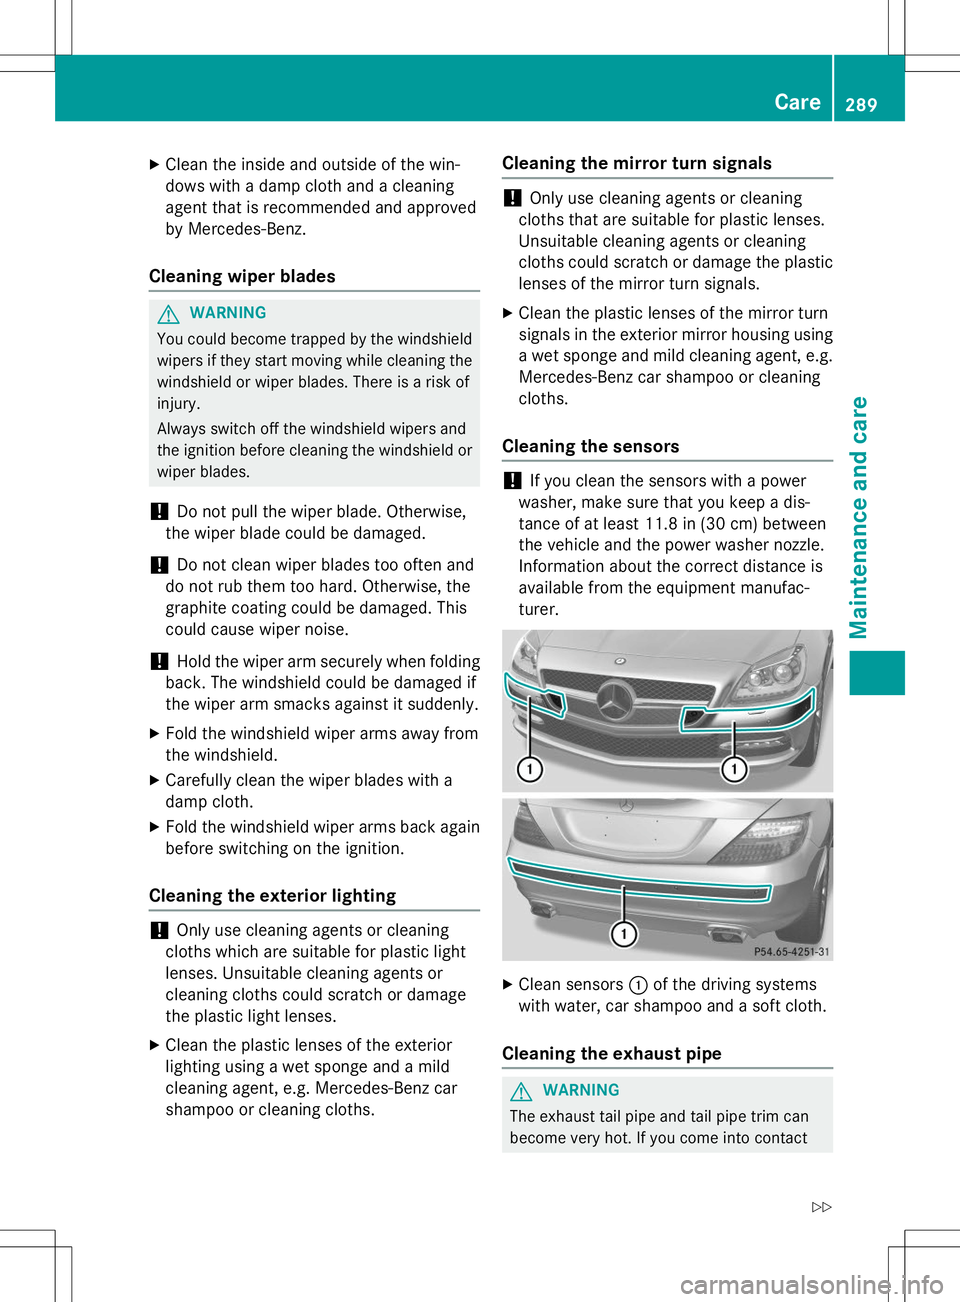
Cleaning the sensors
!If you clean the sensors with a power
washer, make sure that you keep a dis-
tance of at least 11.8 in (30 cm) between
the vehicle and the power washer nozzle.
Information about the correct distance is
available from the equipment manufac-
turer.
X Clean sensors :of the driving systems
with water, car shampoo and a soft cloth.
Cleaning the exhaust pipe
GWARNING
The exhaust tail pipe and tail pipe trim can
become very hot. If you come into contact
Care289
Maintenance and care
Z
Page 309 of 358

XSwitch on the hazard warning lamps (Y page 111).
iWhen towing with the hazard warning
lamps switched on, use the combination
switch as usual to signal a change of direc- tion. In this case, only the indicator lamps
for the direction of travel flash. When you
reset the combination switch, the hazard
warning flashers start flashing again.
X Turn the SmartKey to position 2in the igni-
tion lock.
X When the vehicle is stationary, depress the
brake pedal and keep it depressed.
X Vehicles with manual transmission:
depress the clutch pedal fully and shift to
neutral.
or
X Vehicles with automatic transmission:
shift the automatic transmission to posi- tion N.
X Release the brake pedal.
X Release the electric parking brake.
It is important that you observe the safety
instructions when towing away your vehicle( Y page 305).
Towing the vehicle with the rear axle
raised
!
The ignition must be switched off if you
are towing the vehicle with the rear axle
raised. Intervention by ESP ®
could other-
wise damage the brake system.
X Switch on the hazard warning lamps (Y page 111).
X Bring the front wheels into the straight-
ahead position.
X Turn the SmartKey to position 0in the igni-
tion lock and remove the SmartKey from
the ignition lock.
X When leaving the vehicle, take the Smart-
Key or the KEYLESS-GO key with you. When towing your vehicle with the rear axle
raised, it is important that you observe the
safety instructions (
Ypage 305).
Transporting the vehicle
!
You may only secure the vehicle by the
wheels, not by parts of the vehicle such as
axle or steering components. Otherwise,
the vehicle could be damaged.
The towing eye can be used to pull the vehicle
onto a trailer or transporter for transporting
purposes. X Vehicles with manual transmission:
depress the clutch pedal fully and shift to
neutral.
X Vehicles with automatic transmission:
turn the SmartKey to position 2in the igni-
tion lock.
X Move the selector lever to N.
As soon as the vehicle has been loaded: X Prevent the vehicle from rolling away by
applying the electric parking brake.
X Vehicles with manual transmission:
fully depress the clutch pedal and engage
first or reverse gear.
X Vehicles with automatic transmission:
move the selector lever to P.
X Turn the SmartKey to position 0in the igni-
tion lock and remove the SmartKey from
the ignition lock.
X Secure the vehicle.
Tow-starting (emergency engine
starting)
!
Vehicles with automatic transmission
must not be tow-started. You could other-
wise damage the automatic transmission.
iYou can find information on "Jump-start-
ing" under ( Ypage 303).
Towing and tow-starting307
Roadside Assistance
Z