2015 MERCEDES-BENZ SLK-Class washer fluid
[x] Cancel search: washer fluidPage 17 of 358

Warning lamp ................................. 250
Warning lamp (function) ...................41
Reverse gear
Engaging (automatic transmis-
sion) ............................................... 151
Engaging (manual transmission) .... 150
Reversible floor panel (trunk) .......... 258
Reversing feature Side windows ................................... 83
Trunk lid ........................................... 81
Reversing lamps (display mes-
sage) ................................................... 227
Roadside Assistance (breakdown) .... 23
Roof Display messag e............................ 241
Important safety notes .................... 87
Opening/closing (with roof
switch) ............................................. 88
Opening/closing (with Smart-
Key) ................................................. 89
Overview .......................................... 87
Problem (malfunction) ..................... 94
Relocking ......................................... 89
Roof carrier ........................................ 258
Roof lining and carpets (cleaning
guidelines) ......................................... 289
Roof switch .......................................... 88 S
Safety Children in the vehicle ..................... 57
Child restraint systems .................... 59
Occupant Classification System
(OCS) ............................................... 49
Safety system
see Driving safety systems
Seat belts
Adjusting the driver's and front-
passenger seat belt ......................... 45
Cleaning ......................................... 289
Correct usage .................................. 44
Fastening ......................................... 44
Important safety guidelines ............. 42
Introduction ..................................... 42
Releasing ......................................... 45
Switching belt adjustment on/off
(on-board computer) ...................... 208 Warning lamp ................................. 244
Warning lamp (function) ................... 45
Seats
Adjusting (electrically) ..................... 98
Adjusting (manually) ........................ 98
Adjusting the 4-way lumbar sup-
port .................................................. 99
Adjusting the head restraint ............ 98
Cleaning the cover ......................... 289
Correct driver's seat position ........... 96
Important safety notes .................... 97
Overview .......................................... 97
Seat heating problem ...................... 99
Storing settings (memory func-
tion) ............................................... 106
Switching AIRSCARF on/of f.......... 100
Switching seat heating on/of f......... 99
Selector lever
Cleaning ......................................... 288
Sensors (cleaning instructions) ....... 287
Service center see Qualified specialist workshop
Service Center
see Qualified specialist workshop
Service menu (on-board com-
puter) .................................................. 204
Service products Brake fluid ..................................... 350
Coolant (engine) ............................ 351
Engine oil ....................................... 349
Fuel ................................................ 348
Important safety notes .................. 347
Refrigerant (air-conditioning sys-
tem) ............................................... 352
Washer fluid ................................... 352
Settings
Factory (on-board computer) ......... 208
On-board compute r....................... 204
Setting the air distribution ............... 130
Setting the airflow ............................ 130
SETUP (on-board computer) ............. 209
Side impact air bag ............................. 48
Side marker lamp Changing bulbs (rear) .................... 116
Side marker lamp (display mes-
sage) ................................................... 227 Index
15
Page 21 of 358

Trunk partition
Display message ............................ 241
General notes .................................. 89
Opening/closing .............................. 90
Turn signals
Changing bulbs (front) ................... 116
Display message ............................ 225
Switching on/off ........................... 110
Type identification plate
see Vehicle identification plate U
Unlocking Emergency unlocking ....................... 80
From inside the vehicle (central
unlocking button) ............................. 79 V
Vanity mirror (in the sun visor) ........ 260
Vehicle Correct use ...................................... 26
Data acquisition ............................... 27
Display message ............................ 238
Equipment ....................................... 22
Individual settings .......................... 204
Limited Warranty ............................. 27
Loading .......................................... 322
Locking (in an emergency) ............... 80
Locking (SmartKey) .......................... 72
Lowering ........................................ 336
Maintenance .................................... 23
Parking for a long period ................ 164
Pulling away ................................... 142
Raising ........................................... 334
Reporting problems ......................... 26
Securing from rolling away ............ 333
Towing away .................................. 303
Tow-starting ................................... 303
Transporting .................................. 305
Unlocking (in an emergency) ........... 80
Unlocking (SmartKey) ...................... 72
Vehicle data ................................... 353
Vehicle battery
see Battery (vehicle)
Vehicle data ....................................... 353
Vehicle dimensions ........................... 353 Vehicle emergency locking
................ 80
Vehicle identification number see VIN
Vehicle identification plate .............. 346
Vehicle tool kit .................................. 292
Video Operating the DVD ........................ .201
VIN ...................................................... 346 W
Warning and indicator lamps ABS ................................................ 245
Brakes .......................................... .245
Check Engine ................................. 251
Coolant .......................................... 251
Distance warning ........................... 253
DISTRONIC PLUS ........................... 253
ESP ®
.............................................. 247
ESP ®
OFF ....................................... 248
Overview .......................................... 32
PASSENGER AIR BAG OFF .............. .41
Reserve fuel .................................. .251
Restraint system ............................ 250
Seat belt ........................................ 244
SPORT handling mode ................... 248
Tire pressure monitor .................... 254
Warranty .............................................. 22
Washer fluid Display message ............................ 242
Wheel and tire combination
see Tires
Wheel bolt tightening torque ........... 336
Wheel chock ...................................... 333
Wheels Changing a wheel .......................... 332
Checking ........................................ 311
Cleaning ......................................... 286
Cleaning (warning) ......................... 333
Emergency spare wheel ................. 341
Important safety notes .................. 310
Interchanging/changing ................ 332
Mounting a new wheel ................... 336
Mounting a wheel .......................... 333
Overview ........................................ 310
Removing a wheel .......................... 335
Storing .......................................... .332 Index
19
Page 22 of 358
Tightening torque ........................... 336
Wheel size/tire size ....................... 337
Windows
see Side windows
Wind screen
Inserting and removing .................... 90
Preparing for installation .................. 90
see AIRGUIDE
Windshield
Defrosting ...................................... 131
Windshield washer fluid
see Windshield washer system
Windshield washer system
Adding washer fluid ....................... 281
Notes ............................................. 352
Windshield wipers
Display message ............................2 42
Problem (malfunction) ................... 120
Replacing the wiper blades ............ 118
Switching on/off ........................... 117
Winter driving
Important safety notes .................. 312
Slippery road surfaces ................... 169
Snow chains .................................. 313
Winter operation
Overview ........................................ 312
Winter tires
M+S tires ....................................... 312
Wiper blades
Cleaning ......................................... 286
Important safety notes .................. 118
Replacing ....................................... 118
Wooden trim (cleaning instruc-
tions) ................................................. .288
Workshop see Qualified specialist workshop Z
ZONE function Switching on/off ........................... 130 20
Index
Page 119 of 358
Changing the rear bulbs
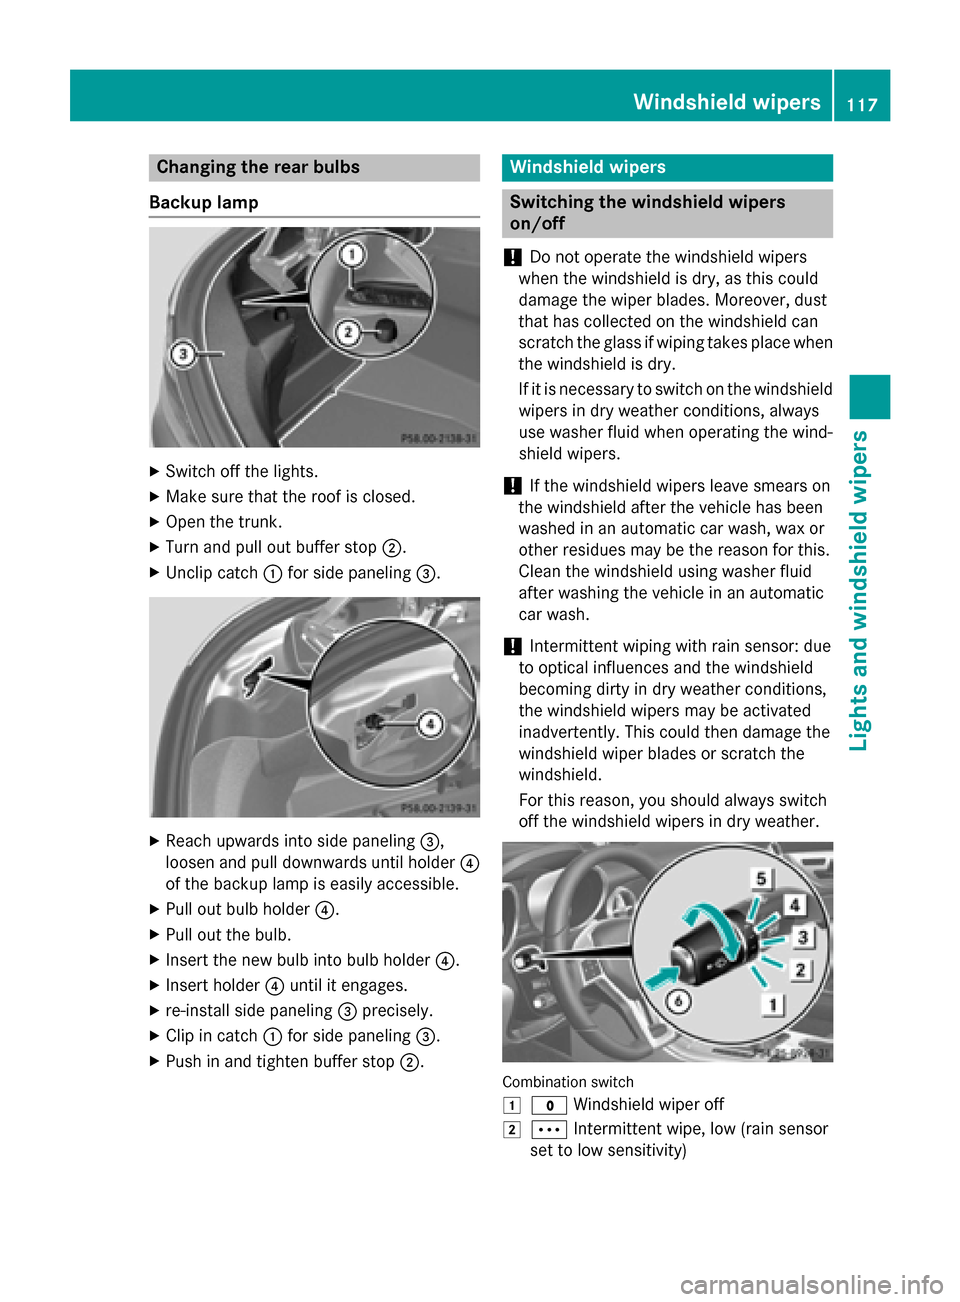
Backup lamp X
Switch off the lights.
X Make sure that the roof is closed.
X Open the trunk.
X Turn and pull out buffer stop 0044.
X Unclip catch 0043for side paneling 0087. X
Reach upwards into side paneling 0087,
loosen and pull downwards until holder 0085
of the backup lamp is easily accessible.
X Pull out bulb holder 0085.
X Pull out the bulb.
X Insert the new bulb into bulb holder 0085.
X Insert holder 0085until it engages.
X re-install side paneling 0087precisely.
X Clip in catch 0043for side paneling 0087.
X Push in and tighten buffer stop 0044. Windshield wipers
Switching the windshield wipers
on/off
! Do not operate the windshield wipers
when the windshield is dry, as this could
damage the wiper blades. Moreover, dust
that has collected on the windshield can
scratch the glass if wiping takes place when the windshield is dry.
If it is necessary to switch on the windshield wipers in dry weather conditions, always
use washer fluid when operating the wind-
shield wipers.
! If the windshield wipers leave smears on
the windshield after the vehicle has been
washed in an automatic car wash, wax or
other residues may be the reason for this.
Clean the windshield using washer fluid
after washing the vehicle in an automatic
car wash.
! Intermittent wiping with rain sensor: due
to optical influences and the windshield
becoming dirty in dry weather conditions,
the windshield wipers may be activated
inadvertently. This could then damage the
windshield wiper blades or scratch the
windshield.
For this reason, you should always switch
off the windshield wipers in dry weather. Combination switch
0047
003F Windshield wiper off
0048 0062 Intermittent wipe, low (rain sensor
set to low sensitivity) Windshield wipers
117Lights and windshield wipers Z
Page 120 of 358
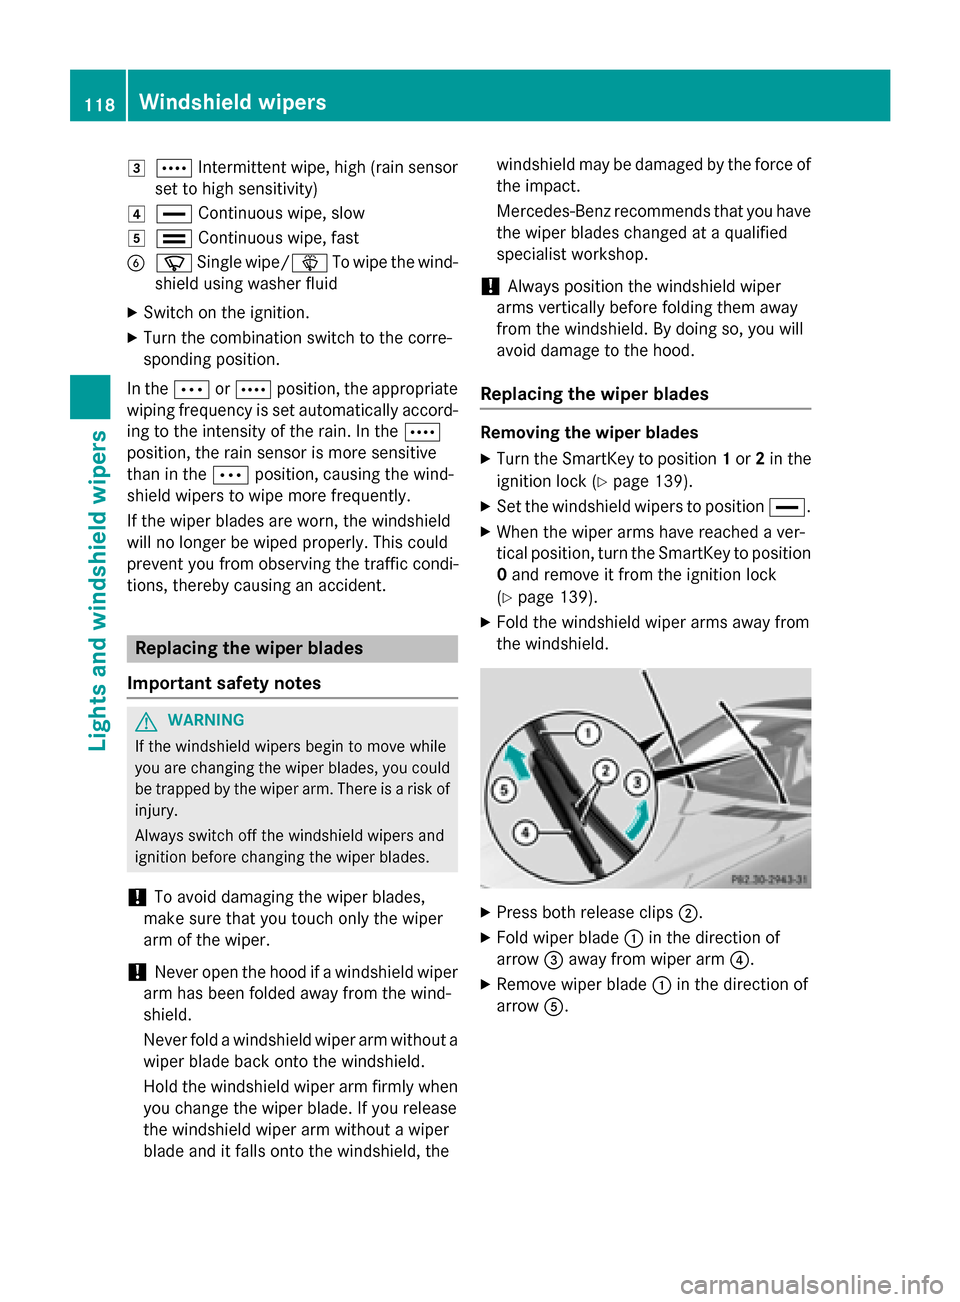
0049
0063 Intermittent wipe, high (rain sensor
set to high sensitivity)
004A 00AA Continuous wipe, slow
004B 00A9 Continuous wipe, fast
0084 00D3 Single wipe/00D4 To wipe the wind-
shield using washer fluid
X Switch on the ignition.
X Turn the combination switch to the corre-
sponding position.
In the 0062or0063 position, the appropriate
wiping frequency is set automatically accord-
ing to the intensity of the rain. In the 0063
position, the rain sensor is more sensitive
than in the 0062position, causing the wind-
shield wipers to wipe more frequently.
If the wiper blades are worn, the windshield
will no longer be wiped properly. This could
prevent you from observing the traffic condi-
tions, thereby causing an accident. Replacing the wiper blades
Important safety notes G
WARNING
If the windshield wipers begin to move while
you are changing the wiper blades, you could be trapped by the wiper arm. There is a risk of
injury.
Always switch off the windshield wipers and
ignition before changing the wiper blades.
! To avoid damaging the wiper blades,
make sure that you touch only the wiper
arm of the wiper.
! Never open the hood if a windshield wiper
arm has been folded away from the wind-
shield.
Never fold a windshield wiper arm without a
wiper blade back onto the windshield.
Hold the windshield wiper arm firmly when you change the wiper blade. If you release
the windshield wiper arm without a wiper
blade and it falls onto the windshield, the windshield may be damaged by the force of
the impact.
Mercedes-Benz recommends that you have the wiper blades changed at a qualified
specialist workshop.
! Always position the windshield wiper
arms vertically before folding them away
from the windshield. By doing so, you will
avoid damage to the hood.
Replacing the wiper blades Removing the wiper blades
X Turn the SmartKey to position 1or 2in the
ignition lock (Y page 139).
X Set the windshield wipers to position 00AA.
X When the wiper arms have reached a ver-
tical position, turn the SmartKey to position
0 and remove it from the ignition lock
(Y page 139).
X Fold the windshield wiper arms away from
the windshield. X
Press both release clips 0044.
X Fold wiper blade 0043in the direction of
arrow 0087away from wiper arm 0085.
X Remove wiper blade 0043in the direction of
arrow 0083. 118
Windshield wipersLights and windshield wipers
Page 122 of 358
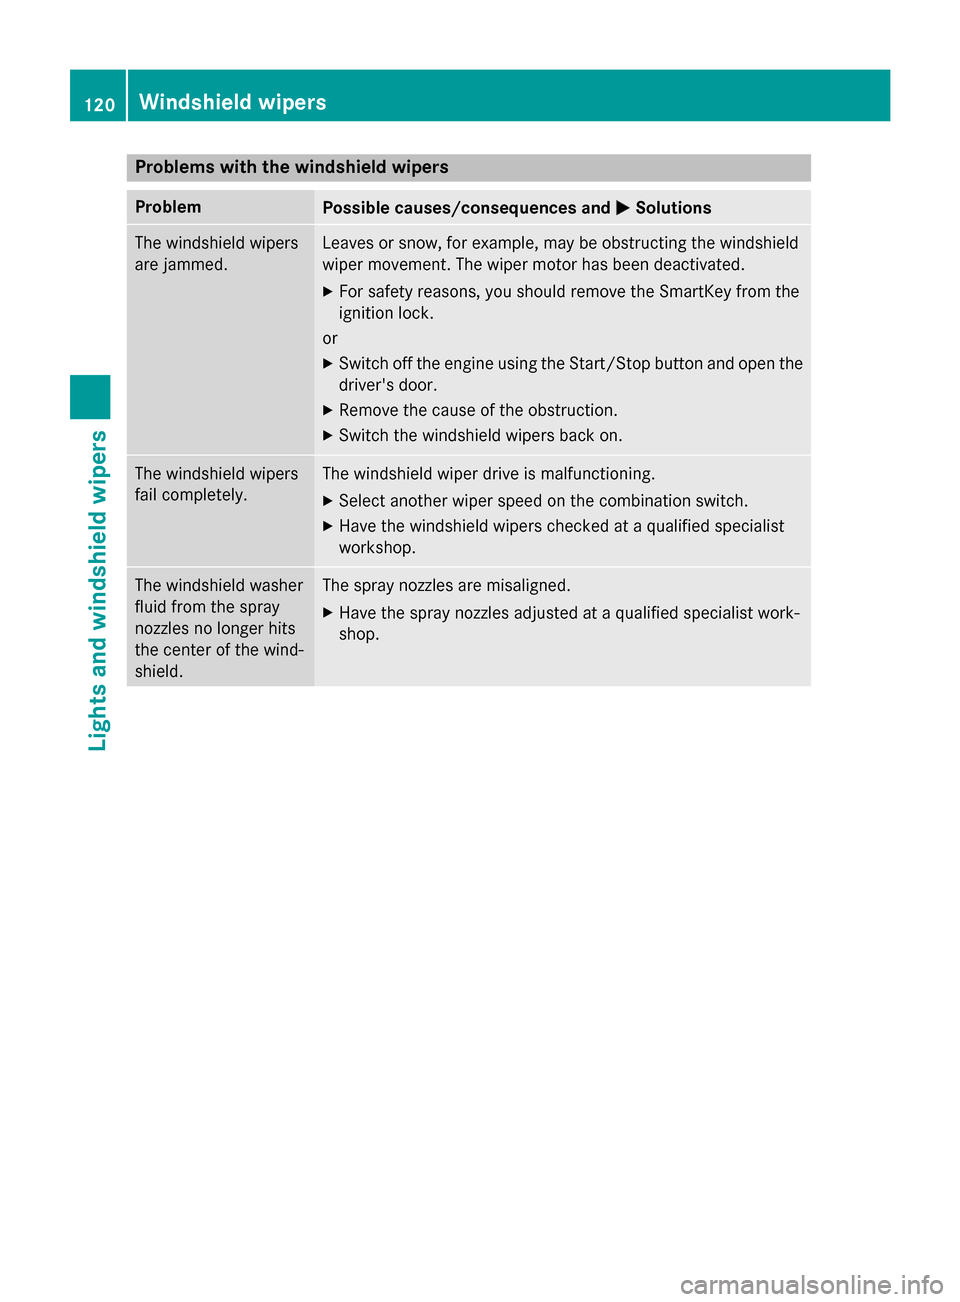
Problems with the windshield wipers
Problem
Possible causes/consequences and
0050
0050Solutions The windshield wipers
are jammed. Leaves or snow, for example, may be obstructing the windshield
wiper movement. The wiper motor has been deactivated.
X For safety reasons, you should remove the SmartKey from the
ignition lock.
or X Switch off the engine using the Start/Stop button and open the
driver's door.
X Remove the cause of the obstruction.
X Switch the windshield wipers back on. The windshield wipers
fail completely. The windshield wiper drive is malfunctioning.
X Select another wiper speed on the combination switch.
X Have the windshield wipers checked at a qualified specialist
workshop. The windshield washer
fluid from the spray
nozzles no longer hits
the center of the wind-
shield. The spray nozzles are misaligned.
X Have the spray nozzles adjusted at a qualified specialist work-
shop. 120
Windshield wipersLights and windshield wipers
Page 244 of 358
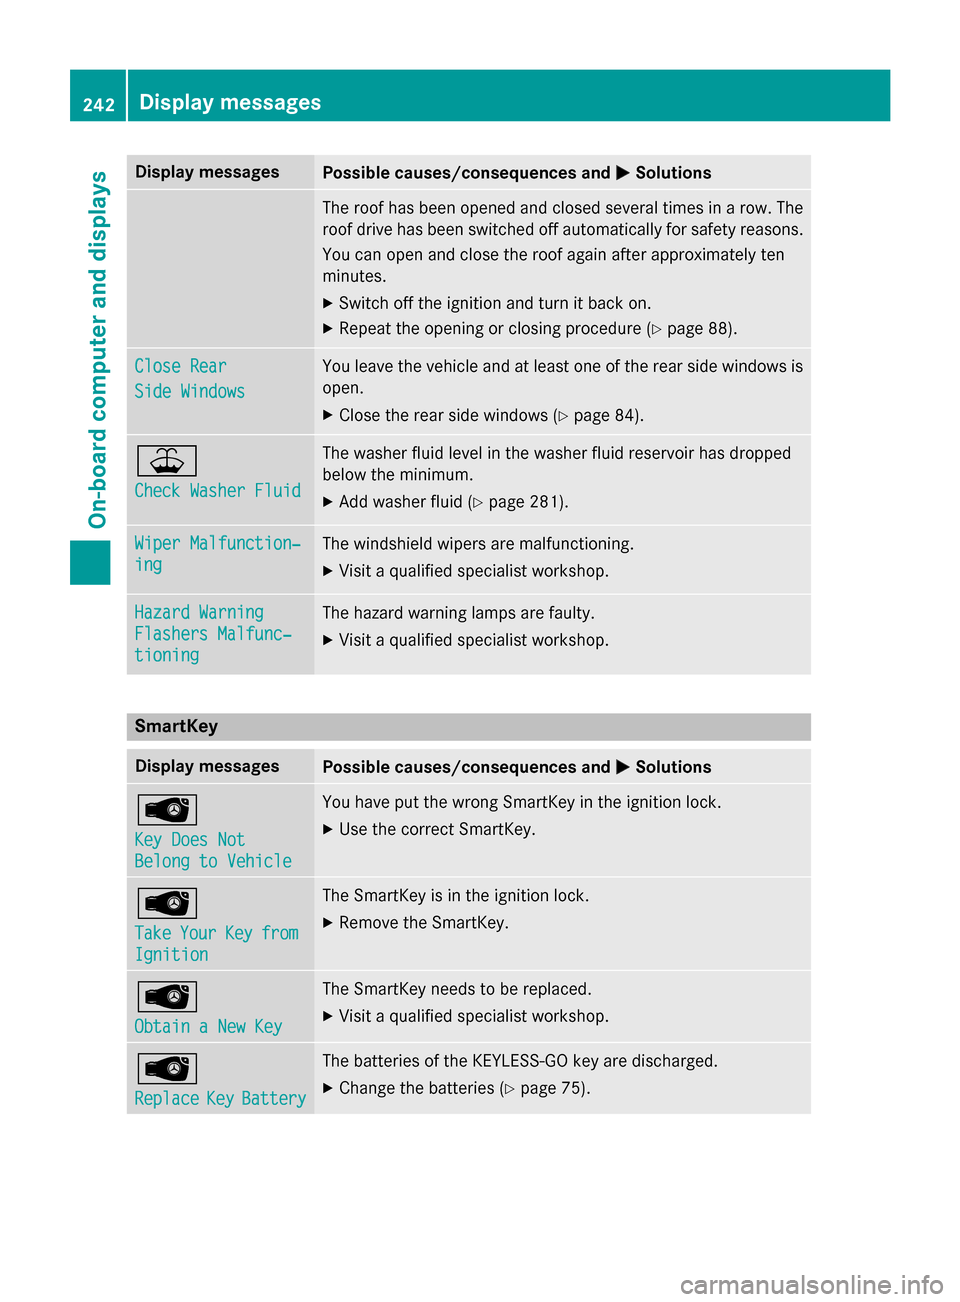
Display messages
Possible causes/consequences and
0050
0050Solutions The roof has been opened and closed several times in a row. The
roof drive has been switched off automatically for safety reasons.
You can open and close the roof again after approximately ten
minutes.
X Switch off the ignition and turn it back on.
X Repeat the opening or closing procedure (Y page 88).Close Rear
Close Rear
Side Windows Side Windows You leave the vehicle and at least one of the rear side windows is
open.
X Close the rear side windows (Y page 84).00B2
Check Washer Fluid Check Washer Fluid The washer fluid level in the washer fluid reservoir has dropped
below the minimum.
X Add washer fluid (Y page 281).Wiper Malfunction‐ Wiper Malfunction‐
ing ing The windshield wipers are malfunctioning.
X Visit a qualified specialist workshop. Hazard Warning
Hazard Warning
Flashers Malfunc‐ Flashers Malfunc‐
tioning tioning The hazard warning lamps are faulty.
X Visit a qualified specialist workshop. SmartKey
Display messages
Possible causes/consequences and
0050
0050Solutions 00AF
Key Does Not Key Does Not
Belong to Vehicle Belong to Vehicle You have put the wrong SmartKey in the ignition lock.
X Use the correct SmartKey. 00AF
Take Take
Your
YourKey
Keyfrom
from
Ignition
Ignition The SmartKey is in the ignition lock.
X Remove the SmartKey. 00AF
Obtain a New Key Obtain a New Key The SmartKey needs to be replaced.
X Visit a qualified specialist workshop. 00AF
Replace Replace
Key
KeyBattery
Battery The batteries of the KEYLESS-GO key are discharged.
X Change the batteries (Y page 75).242
Display
messagesOn-board computer and displays
Page 284 of 358

G
WARNING
Windshield washer concentrate could ignite if it comes into contact with hot engine compo-
nents or the exhaust system. There is a risk of
fire and injury.
Make sure that no windshield washer con-
centrate is spilled next to the filler neck. Example
X To open: pull cap0043upwards by the tab.
X Add the premixed washer fluid.
X To close: press cap 0043onto the filler neck
until it engages.
If the washer fluid level drops below the rec-
ommended minimum of 1 liter, a message
appears in the multifunction display prompt-
ing you to add washer fluid (Y page 242).
Further information on windshield washer
fluid/antifreeze (Y page 352).ASSYST PLUS
Service messages
The ASSYST PLUS service interval display
informs you of the next service due date.
Information on the type of service and service
intervals (see the separate Maintenance
Booklet).
You can obtain further information from an
authorized Mercedes-Benz Center or at
http://www.mbusa.com (USA only).
i The ASSYST PLUS service interval display
does not show any information on the engine oil level. Observe the notes on the
engine oil level (Y
page 279).
The multifunction display shows a service
message for several seconds, e.g.:
R Service A in .. Days Service A in .. Days
R Service A Due
Service A Due
R Service A Exceeded by .. Days
Service A Exceeded by .. Days
Depending on the operating conditions of the vehicle, the remaining time or distance until
the next service due date is displayed.
The letter A Aor B
B, possibly in connection with a
number or another letter, shows the type of
service. A Astands for a minor service and B
Bfor
a major service.
You can obtain further information from an
authorized Mercedes-Benz Center.
The ASSYST PLUS service interval display
does not take into account any periods of
time during which the battery is disconnec-
ted.
Maintaining the time-dependent service
schedule:
X Note down the service due date displayed
in the multifunction display before discon-
necting the battery.
or
X After reconnecting the battery, subtract
the battery disconnection periods from the
service date shown on the display. Hiding a service message
X Press the 0076or0038 button on the steer-
ing wheel. 282
ASSYST PLUSMaintenance and care