2015 MERCEDES-BENZ SLK-Class light
[x] Cancel search: lightPage 80 of 358

Problem
Possible causes/consequences and
0050
0050Solutions The engine can no lon-
ger be started using the SmartKey. The on-board voltage is too low.
X Switch off non-essential consumers, e.g. seat heating or interior
lighting, and try to start the engine again.
If this does not work:
X Check the starter battery and charge it if necessary
(Y page 299).
or
X Jump-start the vehicle (Y page 301).
or
X Consult a qualified specialist workshop. The engine can no lon-
ger be started using
KEYLESS-GO. The
SmartKey is in the vehi-
cle. The vehicle is locked.
X Unlock the vehicle and try to start the vehicle again. There is interference from a powerful source of radio waves.
X Start your vehicle with the SmartKey in the ignition lock. Doors
Important safety notes
G
WARNING
If children are left unsupervised in the vehicle, they could:
R open the doors, thus endangering other
people or road users.
R get out and disrupt traffic.
R operate the vehicle's equipment.
Additionally, children could set the vehicle in
motion if, for example, they:
R release the parking brake.
R shift the automatic transmission out of park
position P or shift manual transmission into
neutral.
R start the engine.
There is a risk of an accident and injury.
When leaving the vehicle, always take the
SmartKey with you and lock the vehicle. Never leave children or animals unattended in the
vehicle. Always keep the SmartKey out of
reach of children. Unlocking and opening doors from
the inside
! The side windows will not open/close if
the battery is discharged or if the side win- dows have iced up. It will then not be pos-
sible to close the door. Do not attempt to
force the door closed. You could otherwise
damage the door or the side window.
You can open a door from inside the vehicle
even if it has been locked.
If the vehicle was previously locked with the
SmartKey or with KEYLESS-GO, opening the
vehicle from the inside will activate the anti-
theft alarm system. Switch off the alarm
(Y page 69). 78
DoorsOpening and closing
Page 81 of 358

X
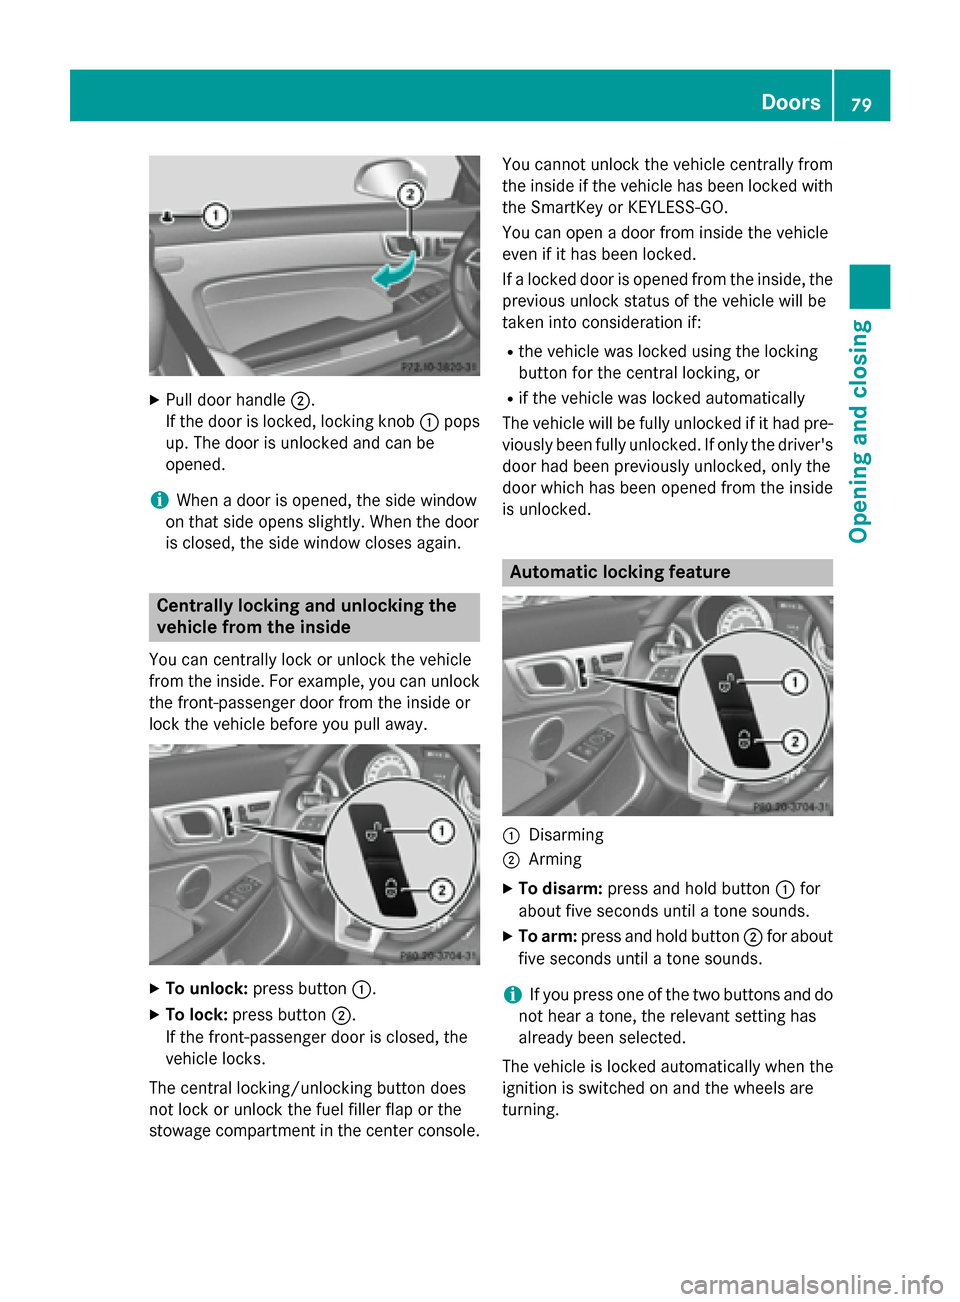
Pull door handle 0044.
If the door is locked, locking knob 0043pops
up. The door is unlocked and can be
opened.
i When a door is opened, the side window
on that side opens slightly. When the door
is closed, the side window closes again. Centrally locking and unlocking the
vehicle from the inside
You can centrally lock or unlock the vehicle
from the inside. For example, you can unlock
the front-passenger door from the inside or
lock the vehicle before you pull away. X
To unlock: press button 0043.
X To lock: press button 0044.
If the front-passenger door is closed, the
vehicle locks.
The central locking/unlocking button does
not lock or unlock the fuel filler flap or the
stowage compartment in the center console. You cannot unlock the vehicle centrally from
the inside if the vehicle has been locked with
the SmartKey or KEYLESS-GO.
You can open a door from inside the vehicle
even if it has been locked.
If a locked door is opened from the inside, the
previous unlock status of the vehicle will be
taken into consideration if:
R the vehicle was locked using the locking
button for the central locking, or
R if the vehicle was locked automatically
The vehicle will be fully unlocked if it had pre- viously been fully unlocked. If only the driver's
door had been previously unlocked, only the
door which has been opened from the inside
is unlocked. Automatic locking feature
0043
Disarming
0044 Arming
X To disarm: press and hold button 0043for
about five seconds until a tone sounds.
X To arm: press and hold button 0044for about
five seconds until a tone sounds.
i If you press one of the two buttons and do
not hear a tone, the relevant setting has
already been selected.
The vehicle is locked automatically when the
ignition is switched on and the wheels are
turning. Doors
79Opening and closing Z
Page 83 of 358

over or be flung around and thereby hit vehicle
occupants. There is a risk of injury, particu-
larly in the event of sudden braking or a sud-
den change in direction.
Always store objects so that they cannot be
flung around. Secure objects, luggage or
loads against slipping or tipping before the
journey.
! The trunk lid swings upwards when
opened. Therefore, make sure that there is sufficient clearance above the trunk lid.
! Only close the trunk once the roof is low-
ered completely. Otherwise, you could
damage the roof.
If you close the trunk lid before the roof is
lowered completely, the loading aid switch lights up and a warning tone sounds.
i Opening dimensions of the trunk lid
(Y page 353).
Do not leave the SmartKey in the trunk. You
could otherwise lock yourself out.
The trunk lid can be:
R opened/closed from outside
R opened automatically from outside
R locked separately
R unlocked with the mechanical key
R opened with the emergency release button Trunk lid reversing feature
The trunk lid is equipped with an automatic
reversing feature. It reacts if a solid object
obstructs or restricts the trunk lid during the
closing procedure. The trunk lid opens again
automatically. The automatic reversing func-
tion is only an aid and is not a substitute for
your attentiveness to the trunk lid while it is
closing. G
WARNING
The reversing feature does not react:
R to soft, light and thin objects, e.g. small fin-
gers
R over the last 1/3 in(8 mm) of the closing
movement
This means that the reversing feature cannot
prevent someone being trapped in these sit-
uations. There is a risk of injury.
Make sure that no body parts are in close
proximity during the closing procedure.
If somebody becomes trapped:
R press the 0054button on the SmartKey, or
R press the remote operating switch on the
driver's door, or
R press the closing or locking button on the
trunk lid, or
R pull on the trunk lid handle Opening/closing from outside
Opening X
Press the 0036button on the SmartKey.
X Pull handle 0043.
X Raise the trunk lid. Trunk
81Opening and closing Z
Page 85 of 358

0047
Basic position
0048 To unlock
X Turn the mechanical key counter-clockwise
as far as it will go from position 0047to posi-
tion 0048.
X Pull the trunk lid handle.
The trunk is unlocked.
X Turn the mechanical key back to position
0047 and remove it.
X Insert mechanical key into the SmartKey
(Y page 74).
i When you lock the vehicle (Y
page 80),
the trunk is also locked. Trunk emergency release
You can unlock the trunk lid from the inside
with the emergency release button. X
Press emergency release button 0043briefly.
The trunk lid unlocks and opens.
The trunk lid can be unlocked with the trunk
lid emergency release when the vehicle is
stationary or while driving. The trunk lid emergency release does not
unlock the trunk lid if the battery is discon-
nected or discharged.
Trunk lid emergency release light:
R emergency release button 0043flashes for
30 minutes after the trunk lid is opened
R emergency release button 0043flashes for
60 minutes after the trunk lid is closed Side windows
Important safety notes
G
WARNING
While opening the side windows, body parts
could become trapped between the side win- dow and the door frame as the side window
moves. There is a risk of injury.
Make sure that nobody touches the side win-
dow during the opening procedure. If some-
body becomes trapped, release the switch or pull the switch to close the side window again. G
WARNING
While closing the side windows, body parts in the closing area could become trapped. There is a risk of injury.
When closing make sure that no parts of the
body are in the closing area. If somebody
becomes trapped, release the switch or press
the switch to open the side window again. G
WARNING
If children operate the side windows they
could become trapped, particularly if they are left unsupervised. There is a risk of injury.
When leaving the vehicle, always take the
SmartKey with you and lock the vehicle. Never
leave children unsupervised in the vehicle. Side window reversing feature
The front side windows are equipped with an automatic reversing feature. If a solid object
blocks or restricts one of the front side win- Side windows
83Opening and closing Z
Page 86 of 358

dows from traveling upwards during the auto-
matic closing process, the side window opens again automatically. During the manual clos-
ing process, the side window only opens
again automatically after the corresponding
switch is released. However, the automatic
reversing feature is only an aid and does not
relieve you of the responsibility of paying
attention when closing a side window. G
WARNING
The reversing feature does not react:
R to soft, light and thin objects, e.g. small fin-
gers
R while resetting
This means that the reversing feature cannot
prevent someone being trapped in these sit-
uations. There is a risk of injury.
Make sure that no body parts are in close
proximity during the closing procedure. If
someone becomes trapped, press the switch
to open the side window again. Opening and closing the side win-
dows in the front
The switches for the front side windows are
located on the driver's door. There is also a
switch for the front-passenger side window
on the front-passenger door.
The switches on the driver's door take prec-
edence. 0043
Left
0044 Right X
Turn the SmartKey to position 1or 2in the
ignition lock.
X To open manually: press and hold the cor-
responding button.
X To open fully: press the button beyond the
point of resistance and release it.
Automatic closing is started.
X To close manually: pull the corresponding
button and hold it.
X To close fully: pull the button beyond the
point of resistance and release it.
Automatic closing is started.
X To interrupt automatic operation: press
or pull the corresponding switch again.
i You can continue to operate the side win-
dows after you switch off the engine. This
function is available for up to five minutes
or until the driver's or front-passenger door
is opened. Opening and closing all side windows
Using the switch on the center console You can use the switch on the center console
to close all side windows simultaneously.
X Open the cover in the lower center console.
The switch for all side windows is under the cover. 84
Side windowsOpening and closing
Page 88 of 358

X
Touch recessed sensor surface 0043on the
door handle until the side windows are fully
closed.
i Make sure you only touch recessed sen-
sor surface 0043.
X Make sure that all the side windows are
closed.
X To interrupt convenience closing:
release recessed sensor surface 0043on the
door handle. Resetting the side windows
If a side window can no longer be closed fully, you must reset it.
X Close all the doors.
X Turn the SmartKey to position 1or 2in the
ignition lock.
X Pull the corresponding switch on the door
control panel until the side window is com- pletely closed. (Y page 84)
X Hold the switch for an additional second.
If the side window opens again slightly: X Immediately pull the corresponding switch
on the door control panel until the side win-
dow is completely closed (Y page 84).
X Hold the switch for an additional second.
X If the corresponding side window remains
closed after the button has been released,
the side window has been reset correctly. If this is not the case, repeat the steps aboveagain. 86
Side windowsOpening and closing
Page 89 of 358

Problems with the side windows
G
WARNING
If you close a side window again immediately after it has been blocked or reset, the side window
closes with increased or maximum force. The reversing feature is then not active. Parts of the
body could be trapped in the closing area in the process. This poses an increased risk of injury or even fatal injury.
Make sure that no parts of the body are in the closing area. To stop the closing process, releasethe switch or push the switch again to reopen the side window. Problem
Possible causes/consequences and
0050 0050Solutions A side window cannot
be closed because it is
blocked by objects, e.g.
leaves in the window
guide. X
Remove the objects.
X Close the side window. A side window cannot
be closed and you can-
not see the cause. If a side window is obstructed during closing and reopens again
slightly:
X Immediately after the window blocks, pull the corresponding
switch again until the side window has closed.
The side window is closed with increased force.
If a side window is obstructed again during closing and reopens
again slightly: X Immediately after the window blocks, pull the corresponding
switch again until the side window has closed.
The side window is closed without the anti-entrapment feature. Roof
Important safety notes
G
WARNING
If you do not fully open/close the soft top, the soft-top hydraulics depressurize after a short
time. This causes the soft top to lower unex-
pectedly and may cause you or others to be
trapped. There is a risk of injury.
Always open or close the soft top completely. G
WARNING
Closing the roof manually is a complicated
and technically demanding procedure, which
requires a lot of strength. You or others can
become trapped. There is a risk of injury. Only have the soft top closed manually at a
qualified specialist workshop.
! Never sit on the rear shelf or store heavy
objects there. You will otherwise damage
the roof and the rear shelf of your vehicle.
! Do not forget that the weather can
change abruptly. Make certain that the roof
is closed when you leave the vehicle. The
vehicle electronics can be damaged if
water enters the vehicle interior.
! When opening and closing the roof, make
sure that: Roof
87Opening and closing Z
Page 98 of 358

Useful information
i This Operator's manual describes all
models and all standard and optional equip- ment of your vehicle available at the time of
publication of the Operator's manual.
Country-specific differences are possible.
Please note that your vehicle may not be
equipped with all features described. This
also applies to safety-related systems and
functions.
i Read the information on qualified special-
ist workshops (Y page 26). Correct driver's seat position
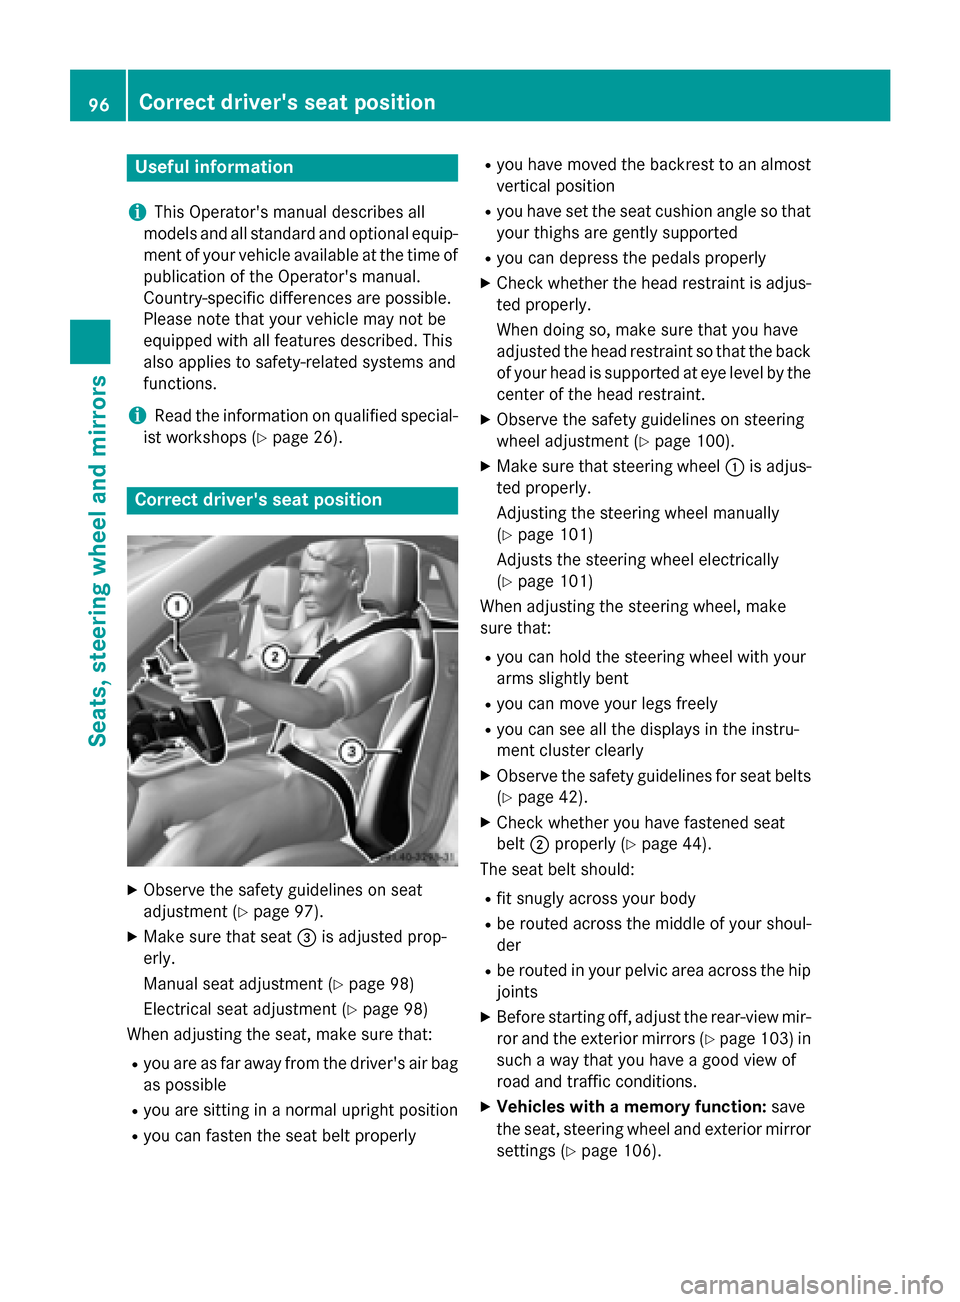
X
Observe the safety guidelines on seat
adjustment (Y page 97).
X Make sure that seat 0087is adjusted prop-
erly.
Manual seat adjustment (Y page 98)
Electrical seat adjustment (Y page 98)
When adjusting the seat, make sure that:
R you are as far away from the driver's air bag
as possible
R you are sitting in a normal upright position
R you can fasten the seat belt properly R
you have moved the backrest to an almost
vertical position
R you have set the seat cushion angle so that
your thighs are gently supported
R you can depress the pedals properly
X Check whether the head restraint is adjus-
ted properly.
When doing so, make sure that you have
adjusted the head restraint so that the back of your head is supported at eye level by the center of the head restraint.
X Observe the safety guidelines on steering
wheel adjustment (Y page 100).
X Make sure that steering wheel 0043is adjus-
ted properly.
Adjusting the steering wheel manually
(Y page 101)
Adjusts the steering wheel electrically
(Y page 101)
When adjusting the steering wheel, make
sure that:
R you can hold the steering wheel with your
arms slightly bent
R you can move your legs freely
R you can see all the displays in the instru-
ment cluster clearly
X Observe the safety guidelines for seat belts
(Y page 42).
X Check whether you have fastened seat
belt 0044properly (Y page 44).
The seat belt should:
R fit snugly across your body
R be routed across the middle of your shoul-
der
R be routed in your pelvic area across the hip
joints
X Before starting off, adjust the rear-view mir-
ror and the exterior mirrors (Y page 103) in
such a way that you have a good view of
road and traffic conditions.
X Vehicles with a memory function: save
the seat, steering wheel and exterior mirror settings (Y page 106). 96
Correct driver's seat positionSeats, steering wheel and mirrors