2015 MERCEDES-BENZ S-CLASS COUPE CD player
[x] Cancel search: CD playerPage 10 of 417

Care
360° camera ................................ .350
Automatic car wash ....................... 345
Carpets .......................................... 353
Display .......................................... .351
Exhaust pipe .................................. 351
Exterior lighting ............................ .349
Gear or selector lever .................... 352
High-pressure cleaner .................... 347
Interior .......................................... .351
Matt paintwork .............................. 348
Night View Assist Plus ................... 351
Notes ............................................. 345
Paint .............................................. 347
Plastic trim ................................... .352
Reversing camera .......................... 350
Roof lining ...................................... 353
Seat belt ........................................ 353
Seat cover ..................................... 352
Sensors ......................................... 349
Steering wheel ............................... 352
Trim pieces ................................... .352
Washing by hand ........................... 347
Wheels .......................................... .348
Windows ........................................ 348
Wiper blades .................................. 349
Wooden trim .................................. 352
CD player (on-board computer) ........254
Central locking
Locking/unlocking (key ).................. 85
Centre console
Overview .......................................... 36
Stowage space .............................. 317
Centre console in the rear com-
partment
Stowage compartment .................. 319
Changing the media source ............. 254
Child
Restraint system .............................. 61
Child seat
Forward-facing restraint system ...... 64
ISOFIX .............................................. 62
On the front-passenger sea t............ 63
Rearward-facing restraint system .... 64
Recommendations ........................... 68
Suitable positions ............................ 65
Top Tether ....................................... 62
Cigarette lighter ................................ 324 Cleaning
Mirror turn signal ........................... 349
Climate control
Automatic air conditioning ............. 139
Auxiliary heating/ventilation .......... 149
Controlling automaticall y............... 142
Convenience opening/closing
(air-recirculation mode) ................. 146
Cooling with air dehumidification .. 141
Demisting the windows .................. 144
Demisting the windscreen ............. 144
ECO start/stop function ................ 140
Indicator lamp ................................ 142
Ionisation ....................................... 149
Notes on using the automatic cli-
mate control .................................. 140
Overview of systems ...................... 138
Perfume atomizer .......................... 147
Problem with the rear window
heating .......................................... 146
Problems with cooling with air
dehumidification ............................ 142
Setting the air distribution ............. 143
Setting the air vents ...................... 155
Setting the airflow ......................... 144
Setting the climate mod e............... 143
Setting the temperature ................ 143
Switching air-recirculation mode
on/of f............................................ 146
Switching on/of f........................... 141
Switching residual heat on/off ...... 147
Switching the rear window heat-
ing on/of f...................................... 145
Switching the synchronisation
function on and off ........................ 144
Cockpit
Overview .......................................... 30
COLLISION PREVENTION ASSIST
PLUS
Activating/deactivating ................. 260
Display message ............................ 274
Operation/note s.............................. 72
COMAND display
Cleaning ......................................... 351
Combination switch .......................... 128
Consumption statistics (on-board
computer) .......................................... 250
Convenience closing feature ............ 101 Index
7
Page 257 of 417

X
Press :or9 to select the frequency
range or station memory.
X Press ato confirm the selection.
i Store the station in COMAND Online (see
the separate operating instructions).
i DAB radio mode (Digital
AudioBroadcast-
ing) is an optimised digital transmission
standard designed for the mobile reception of radio transmissions. Media menu
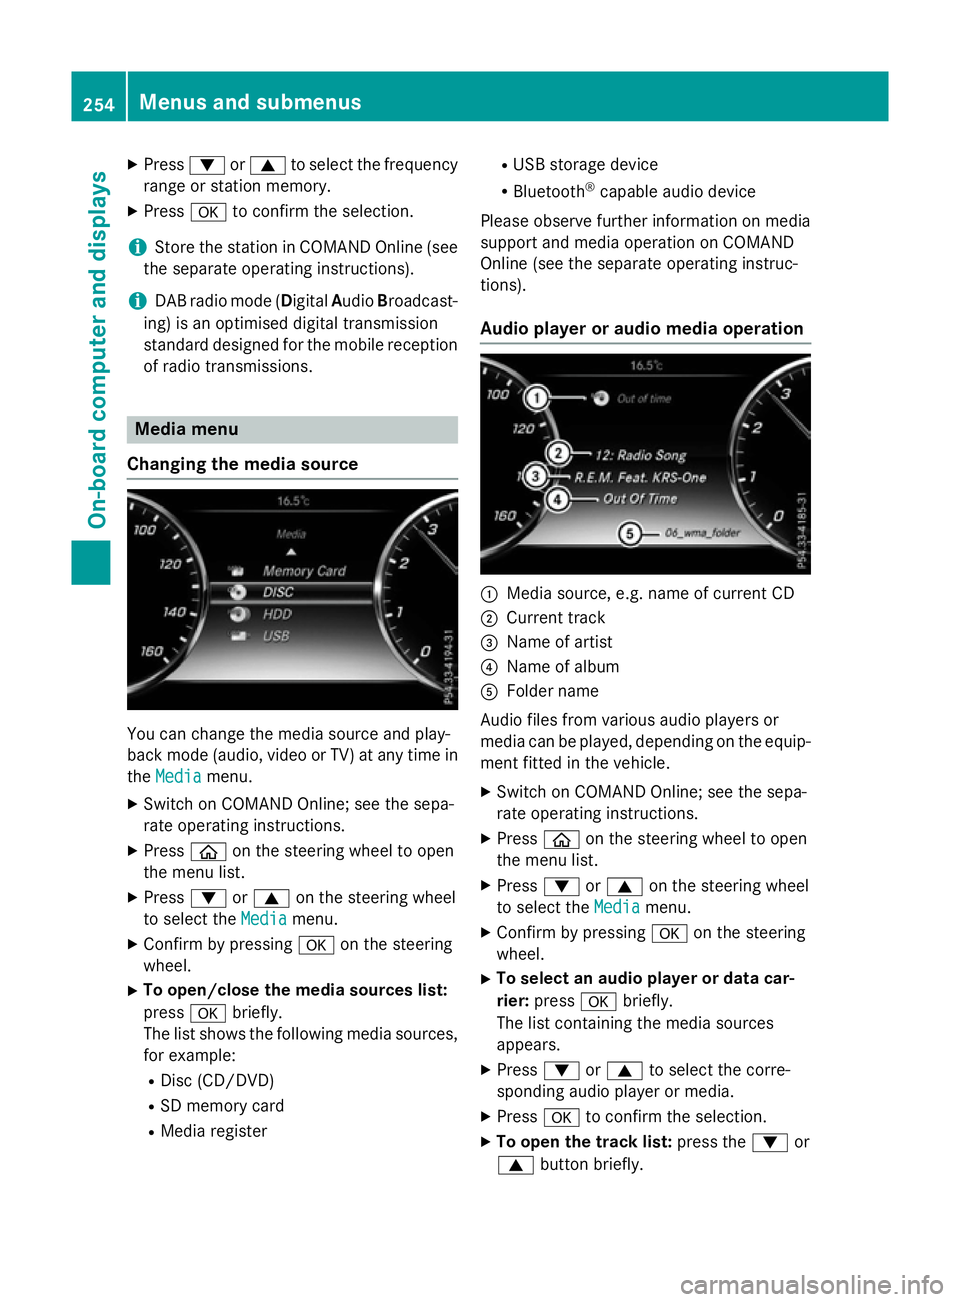
Changing the media source You can change the media source and play-
back mode (audio, video or TV) at any time in
the Media
Media menu.
X Switch on COMAND Online; see the sepa-
rate operating instructions.
X Press òon the steering wheel to open
the menu list.
X Press :or9 on the steering wheel
to select the Media
Mediamenu.
X Confirm by pressing aon the steering
wheel.
X To open/close the media sources list:
press abriefly.
The list shows the following media sources,
for example:
R Disc (CD/DVD)
R SD memory card
R Media register R
USB storage device
R Bluetooth ®
capable audio device
Please observe further information on media
support and media operation on COMAND
Online (see the separate operating instruc-
tions).
Audio player or audio media operation :
Media source, e.g. name of current CD
; Current track
= Name of artist
? Name of album
A Folder name
Audio files from various audio players or
media can be played, depending on the equip-
ment fitted in the vehicle.
X Switch on COMAND Online; see the sepa-
rate operating instructions.
X Press òon the steering wheel to open
the menu list.
X Press :or9 on the steering wheel
to select the Media Mediamenu.
X Confirm by pressing aon the steering
wheel.
X To select an audio player or data car-
rier: press abriefly.
The list containing the media sources
appears.
X Press :or9 to select the corre-
sponding audio player or media.
X Press ato confirm the selection.
X To open the track list: press the:or
9 button briefly. 254
Menus and submenusOn-board computer and displays
Page 258 of 417

X
To select the next or previous track in
the track list: press the:or9 but-
ton briefly.
X To select a track from the track list
using rapid scrolling: press and
hold : or9 until the desired track is
reached.
If you press and hold the button, the speed of rapid scroll increases after a short time.
Not all audio players or media support this function.
If the corresponding track information is
stored on the audio drive or audio media, the multifunction display may display the follow-
ing:
R track number
R track name
R artist
R album
The track information is not available in audio AUX mode (Aux iliary audio mode: external
audio source connected).
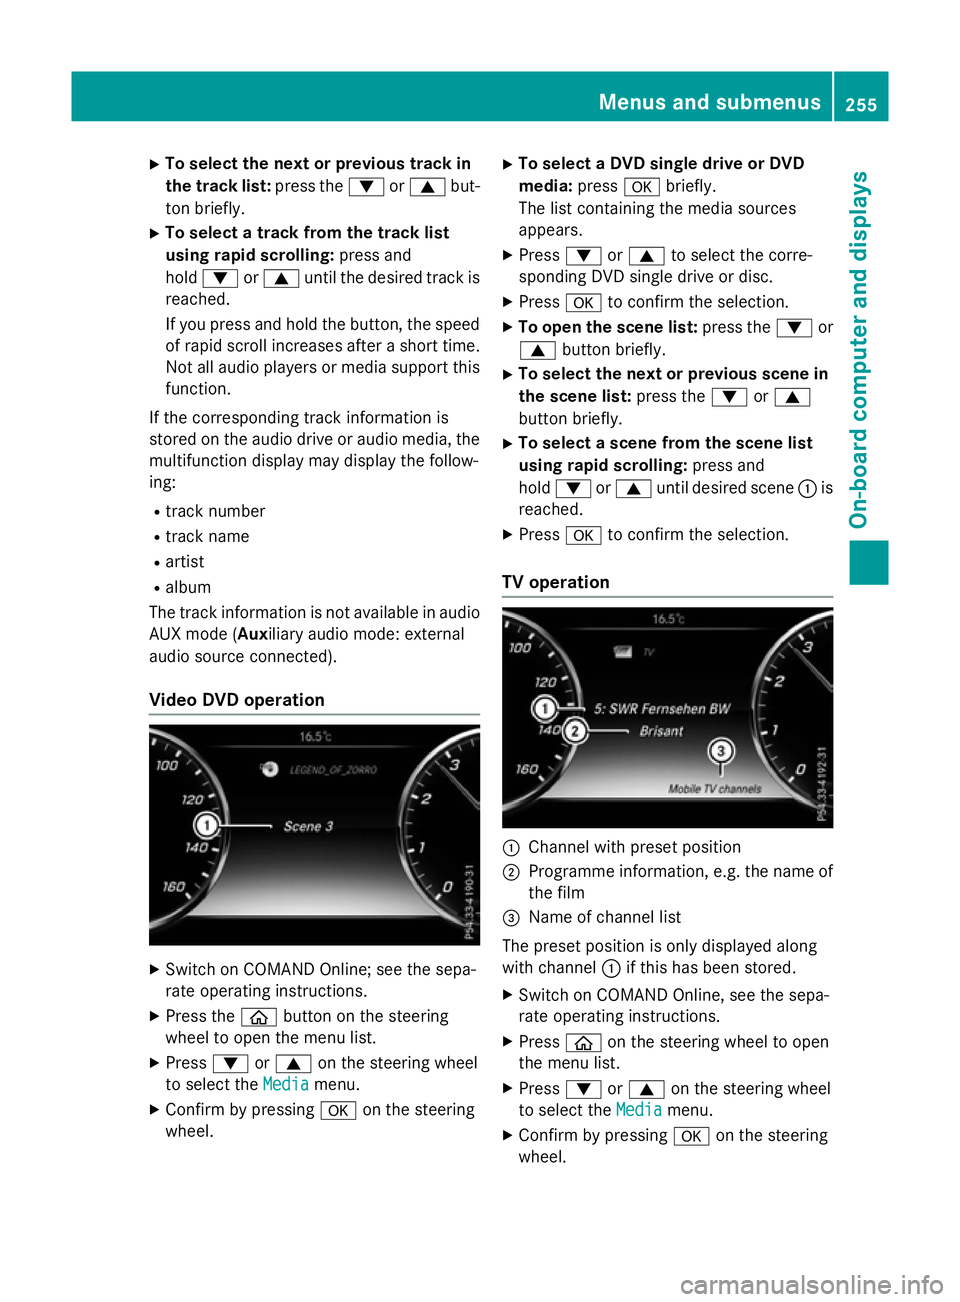
Video DVD operation X
Switch on COMAND Online; see the sepa-
rate operating instructions.
X Press the òbutton on the steering
wheel to open the menu list.
X Press :or9 on the steering wheel
to select the Media
Media menu.
X Confirm by pressing aon the steering
wheel. X
To select a DVD single drive or DVD
media: pressabriefly.
The list containing the media sources
appears.
X Press :or9 to select the corre-
sponding DVD single drive or disc.
X Press ato confirm the selection.
X To open the scene list: press the:or
9 button briefly.
X To select the next or previous scene in
the scene list: press the:or9
button briefly.
X To select a scene from the scene list
using rapid scrolling: press and
hold : or9 until desired scene :is
reached.
X Press ato confirm the selection.
TV operation :
Channel with preset position
; Programme information, e.g. the name of
the film
= Name of channel list
The preset position is only displayed along
with channel :if this has been stored.
X Switch on COMAND Online, see the sepa-
rate operating instructions.
X Press òon the steering wheel to open
the menu list.
X Press :or9 on the steering wheel
to select the Media
Media menu.
X Confirm by pressing aon the steering
wheel. Menus and submenus
255On-board computer and displays Z
Page 321 of 417

X
To open: briefly press marking ;.
X To close: push stowage compartment :
in the direction of the arrow until it
engages. X
To open: slide cover on chrome element :
backwards.
To close: briefly press the roughened sur-
face beneath chrome element :.
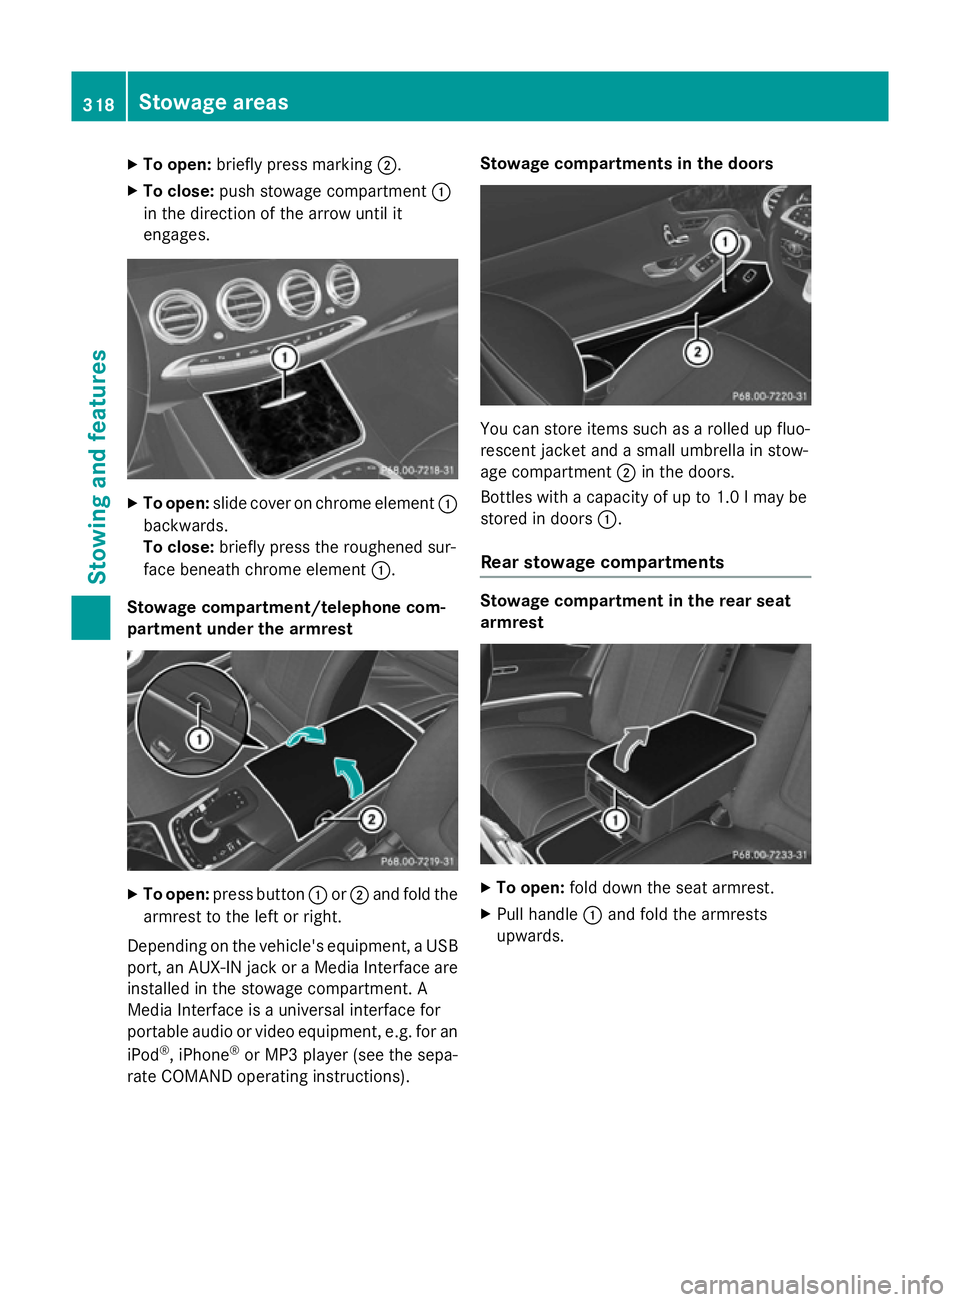
Stowage compartment/telephone com-
partment under the armrest X
To open: press button :or; and fold the
armrest to the left or right.
Depending on the vehicle's equipment, a USB port, an AUX-IN jack or a Media Interface areinstalled in the stowage compartment. A
Media Interface is a universal interface for
portable audio or video equipment, e.g. for an
iPod ®
, iPhone ®
or MP3 player (see the sepa-
rate COMAND operating instructions). Stowage compartments in the doors
You can store items such as a rolled up fluo-
rescent jacket and a small umbrella in stow-
age compartment ;in the doors.
Bottles with a capacity of up to 1.0 lmay be
stored in doors :.
Rear stowage compartments Stowage compartment in the rear seat
armrest
X
To open: fold down the seat armrest.
X Pull handle :and fold the armrests
upwards. 318
Stowage areasStowing and features
Page 322 of 417

Stowage compartment in the rear-com-
partment centre console X
To open: if required, fold up the rear seat
armrest.
X Slide cover :in the direction of the arrow.
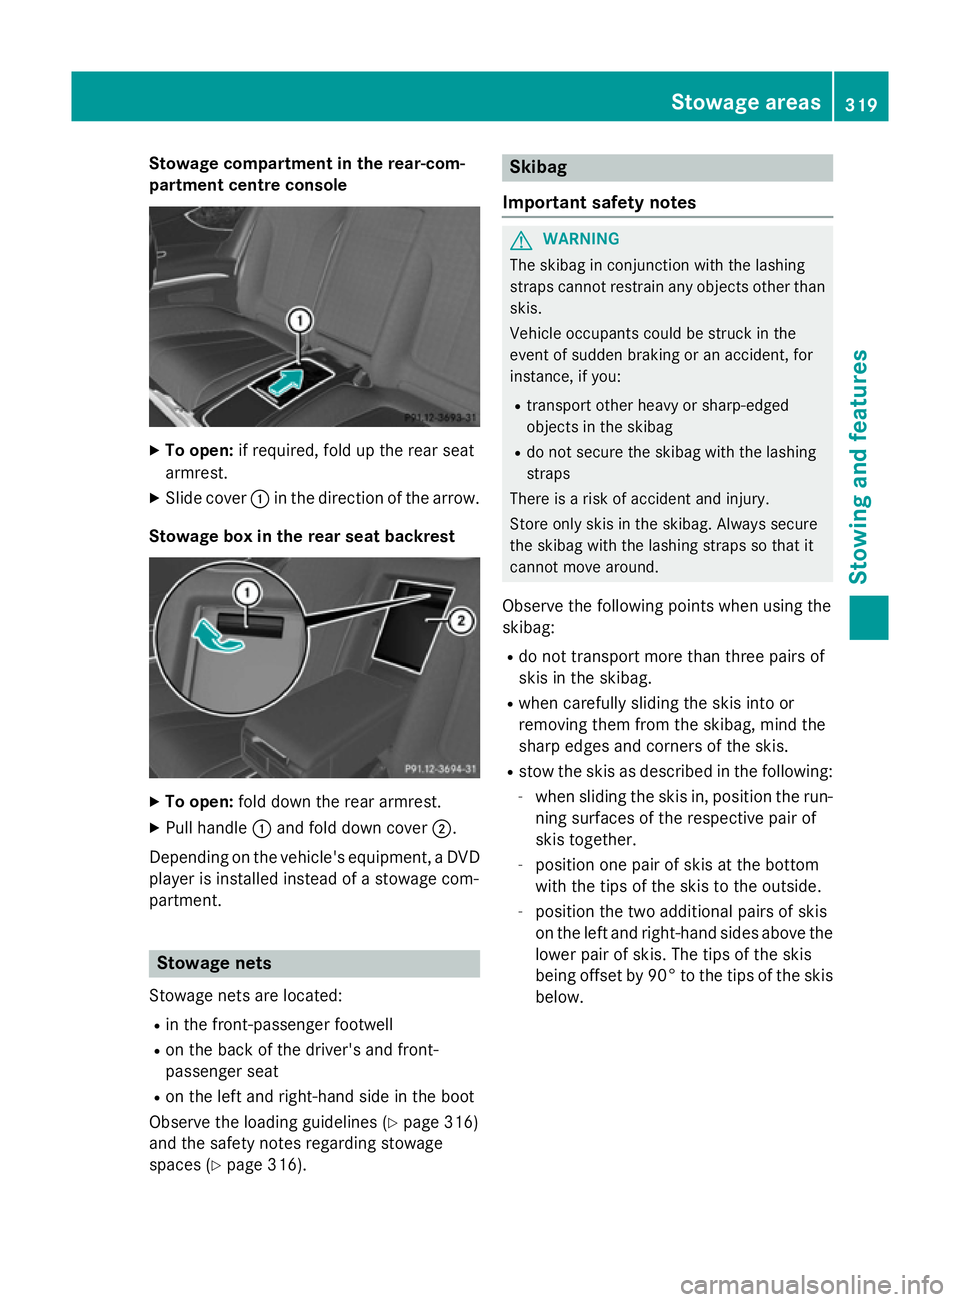
Stowage box in the rear seat backrest X
To open: fold down the rear armrest.
X Pull handle :and fold down cover ;.
Depending on the vehicle's equipment, a DVD
player is installed instead of a stowage com-
partment. Stowage nets
Stowage nets are located: R in the front-passenger footwell
R on the back of the driver's and front-
passenger seat
R on the left and right-hand side in the boot
Observe the loading guidelines (Y page 316)
and the safety notes regarding stowage
spaces (Y page 316). Skibag
Important safety notes G
WARNING
The skibag in conjunction with the lashing
straps cannot restrain any objects other than skis.
Vehicle occupants could be struck in the
event of sudden braking or an accident, for
instance, if you:
R transport other heavy or sharp-edged
objects in the skibag
R do not secure the skibag with the lashing
straps
There is a risk of accident and injury.
Store only skis in the skibag. Always secure
the skibag with the lashing straps so that it
cannot move around.
Observe the following points when using the
skibag:
R do not transport more than three pairs of
skis in the skibag.
R when carefully sliding the skis into or
removing them from the skibag, mind the
sharp edges and corners of the skis.
R stow the skis as described in the following:
- when sliding the skis in, position the run-
ning surfaces of the respective pair of
skis together.
- position one pair of skis at the bottom
with the tips of the skis to the outside.
- position the two additional pairs of skis
on the left and right-hand sides above the
lower pair of skis. The tips of the skis
being offset by 90° to the tips of the skis below. Stowage areas
319Stowing and features Z