2015 MERCEDES-BENZ S-CLASS COUPE fuel
[x] Cancel search: fuelPage 379 of 417
Useful information
i This Owner's Manual describes all mod-
els, series and optional equipment for your
vehicle that were available at the time of
going to press. National variations are pos- sible. Note that your vehicle may not be
equipped with all of the functions descri-
bed. This is also the case for systems and
functions relevant to safety.
i Read the information on qualified special-
ist workshops: (Y page 26). Important safety notes
G
WARNING
If wheels and tyres of the wrong size are used, the wheel brakes or suspension components
may be damaged. There is a risk of an acci-
dent.
Always replace wheels and tyres with those
that fulfil the specifications of the original
part.
When replacing wheels, make sure to fit the
correct:
R designation
R type
When replacing tyres, make sure to fit the
correct:
R designation
R manufacturer
R type G
WARNING
A flat tyre severely impairs the driving, steer-
ing and braking characteristics of the vehicle.
There is a risk of accident.
Tyres without run-flat characteristics:
R do not drive with a flat tyre.
R immediately replace the flat tyre with your
emergency spare wheel or spare wheel, or
consult a qualified specialist workshop. Tyres with run-flat characteristics:
R pay attention to the information and warn-
ing notices on MOExtended tyres (tyres
with run-flat characteristics).
Accessories that are not approved for your
vehicle by Mercedes-Benz or are not being
used correctly can impair the operating
safety.
Before purchasing and using non-approved
accessories, visit a qualified specialist work-
shop and enquire about:
R suitability
R legal stipulations
R factory recommendations
Information on the sizes and types of wheels
and tyres for your vehicle can be found under
"Wheel/tyre combinations" (Y page 391).
Information on tyre pressure can be found:
R on the tyre pressure label on the fuel filler
flap (Y page 179)
R under "Tyre pressure" (Y page 380)
Modification work on the brake system and
wheels is not permitted. The use of wheel
spacers or brake dust shields is not permit-
ted. This invalidates the general operating
permit for the vehicle.
i Further information on wheels and tyres
can be obtained at any qualified specialist
workshop. Operation
Information on driving
Check the tyre pressures when the vehicle is
heavily laden and adjust prior to a trip.
While driving, pay attention to vibrations,
noises and unusual handling characteristics,
e.g. pulling to one side. This may indicate that the wheels or tyres are damaged. If you sus-
pect that a tyre is defective, reduce your
speed immediately. Stop the vehicle as soon
as possible to check the wheels and tyres fordamage. Hidden tyre damage could also be 376
OperationWheels and tyres
Page 383 of 417
Tyre pressure
Tyre pressure specifications
G
WARNING
Tyres with insufficient or excessive tyre pres- sure harbour the following hazards:
R the tyres may burst, especially as the load
and vehicle speed increase.
R the tyres may wear excessively or unevenly
which can severely impair tyre traction.
R the handling as well as steering and braking
characteristics may be severely affected.
There is a risk of an accident.
Observe the recommended tyre pressures
and check the tyre pressure of all the tyres
including the spare wheel:
R every day before starting a journey
R when the load changes
R prior to long journey
R for changed operating conditions, e.g. off-
road driving
If necessary, correct the tyre pressure. G
WARNING
If you fit unsuitable accessories onto tyre
valves, the tyre valves may be overloaded and malfunction, which can cause tyre pressure
loss. Due to their design, retrofitted tyre pres-
sure monitors keep the tyre valve open. This
can also result in tyre pressure loss. There is a risk of accident.
Only screw standard valve caps or valve caps
specifically provided by Mercedes-Benz for
your vehicle onto the tyre valve. G
WARNING
If the tyre pressure drops repeatedly, the
wheel, valve or tyre may be damaged. Tyre
pressure that is too low may result in a tyre
blow-out. There is a risk of accident.
R Check the tyre for foreign objects.
R Check whether the wheel is losing air or the
valve is leaking. If you are unable to rectify the damage, con-
tact a qualified specialist workshop.
H
Environmental note
Check the tyre pressure regularly, at least
every 14 days.
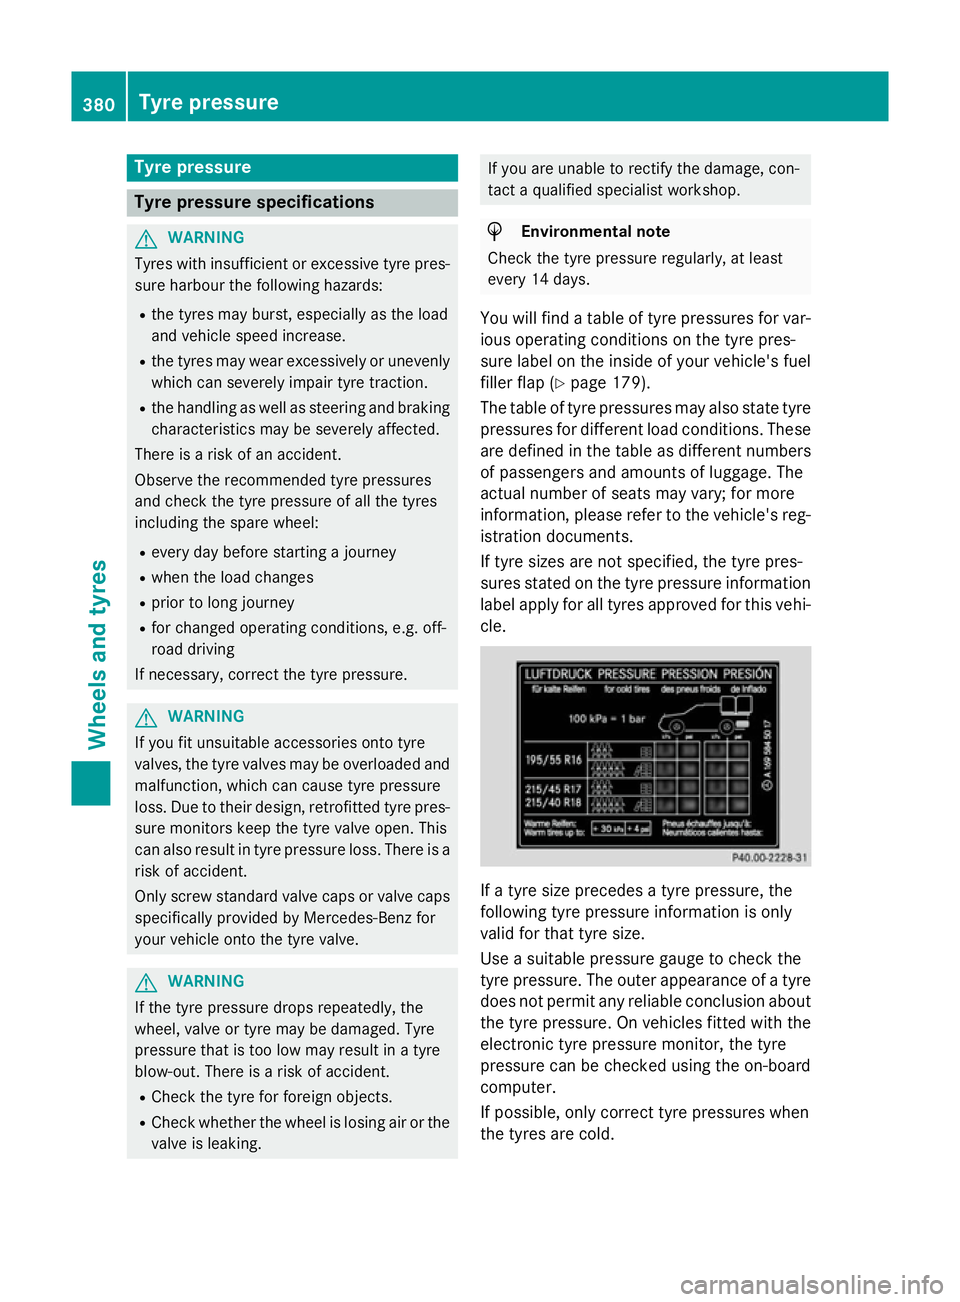
You will find a table of tyre pressures for var- ious operating conditions on the tyre pres-
sure label on the inside of your vehicle's fuel
filler flap (Y page 179).
The table of tyre pressures may also state tyre
pressures for different load conditions. These are defined in the table as different numbers
of passengers and amounts of luggage. The
actual number of seats may vary; for more
information, please refer to the vehicle's reg-istration documents.
If tyre sizes are not specified, the tyre pres-
sures stated on the tyre pressure information
label apply for all tyres approved for this vehi-
cle. If a tyre size precedes a tyre pressure, the
following tyre pressure information is only
valid for that tyre size.
Use a suitable pressure gauge to check the
tyre pressure. The outer appearance of a tyre
does not permit any reliable conclusion aboutthe tyre pressure. On vehicles fitted with the
electronic tyre pressure monitor, the tyre
pressure can be checked using the on-board
computer.
If possible, only correct tyre pressures when
the tyres are cold. 380
Tyre pressureWheels and tyres
Page 384 of 417

The tyres are cold:
R if the vehicle has been parked with the tyres
out of direct sunlight for at least three
hours and
R if the vehicle has not been driven further
than 1.6 km
Depending on the ambient temperature, the
vehicle speed and the load on the tyres, the
tyre temperature and thus the tyre pressure
changes by approximately 10 kPa (0.1 bar/
1.5 psi) per 10 †. Take this into account
when checking the pressure of warm tyres.
Only correct the tyre pressure if it is too low
for the current operating conditions.
Driving with tyre pressure that is too high or
too low can:
R shorten the service life of the tyres
R cause increased tyre damage
R have a negative effect on handling charac-
teristics and thus driving safety (e.g. aqua-
planing)
i The tyre pressure values given for low
loads are minimum values which offer you
good ride comfort characteristics.
However, you can also use the values given for higher loads. These are permissible andwill not adversely affect the running of the
vehicle.
The values on the tyre pressure information
label (fuel filler flap) for the vehicle in "parti-
ally laden" and "fully laden" conditions apply
when driving at maximum speed.
Despite the values stated on the tyre pressure
information label, for the vehicle with "parti-
ally laden up to 210 km/h" status, the val-
ues can be reduced as follows, without com-
promising safety:
R Ò20 kPa (Ò0.2 bar/Ò3 psi) for all models
This improves the ride comfort of your vehi-
cle; however, fuel consumption may increase slightly. Tyre pressure monitor
General notes If a tyre pressure monitor system is fitted, the
vehicle's wheels have sensors fitted that
monitor the tyre pressures in all four tyres.
The tyre pressure monitor warns you if the
pressure drops in one or more of the tyres.
The tyre pressure monitor only functions if
the corresponding sensors are fitted to all
wheels.
Information on tyre pressures is shown in the multifunction display. After a few minutes of
driving, the current tyre pressure of each tyre
is shown in the Service Servicemenu of the multi-
function display, see illustration (example). For information on the message display, refer
to the "Checking the tyre pressure electroni-
cally" section (Y page 382).
Important safety notes It is the driver's responsibility to set the tyre
pressure to the recommended cold tyre pres-
sure suitable for the operating situation
(Y page 380). Note that the correct tyre pres-
sure for the current operating situation must
first be taught-in to the tyre pressure monitor. If there is a substantial loss of pressure, the
warning threshold for the warning message isaligned to the reference values taught-in.
Restart the tyre pressure monitor after
adjusting to the cold tyre pressure
(Y page 383). The current pressures are
saved as new reference values. This will Tyre pressure
381Wheels and tyres Z
Page 386 of 417
Warning messages of the tyre pressure
monitor If the tyre pressure monitor detects a pres-
sure loss in one or more tyres, a warning mes-
sage is shown in the multifunction display and the yellow tyre pressure monitor warning
lamp comes on.
R If the Please correct tyre pressure
Please correct tyre pressure
message appears in the multifunction dis-
play, the tyre pressure in at least one tyre is too low and must be corrected at the next
opportunity.
R If the Check tyre(s)
Check tyre(s) message appears in
the multifunction display, the tyre pressure
in one or more tyres has dropped signifi-
cantly and the tyres must be checked.
R If the Warning tyre defect
Warning tyre defect message
appears in the multifunction display, the
tyre pressure in one or more tyres has drop-
ped suddenly and the tyres must be
checked.
Observe the instructions and safety notes in
the display messages in the "Tyres" section
(Y page 295).
If the wheel positions on the vehicle are inter-
changed, the tyre pressures may be displayed for the wrong positions for a short time. After
a few minutes of driving, this is rectified and
the tyre pressures are displayed for the cor-
rect positions.
Restarting the tyre pressure monitor When you restart the tyre pressure monitor,
all existing warning messages are deleted and
the warning lamps go out. The monitor uses
the currently set tyre pressures as the refer-
ence values for monitoring. In most cases, the tyre pressure monitor will automatically
detect the new reference values after you
have changed the tyre pressure. However,
you can also define reference values man-
ually as described here. The tyre pressure
monitor then monitors the new tyre pressure values. X
Use the table on the inside of the fuel filler
flap to ensure that the tyre pressure is set
correctly in all four tyres for the current
operating conditions.
Also observe the notes in the section on
tyre pressures (Y page 380).
X Make sure that the key is in position 2in the
ignition lock.
X Press the òbutton on the steering
wheel to call up the list of menus.
X Press 9or: on the steering wheel
to select the Service Servicemenu.
X Press the abutton.
X Press 9or: to select Tyre pres‐
Tyre pres‐
sure
sure .
X Press the abutton.
The current tyre pressure for each wheel or
the Tyre pressures will be dis‐ Tyre pressures will be dis‐
played
played after
aftera
afew
few minutes
minutes of
ofdriv‐
driv‐
ing
ing message will be displayed in the mul-
tifunction display.
X Press the :button.
The Use current pressures as new
Use current pressures as new
reference values
reference values message appears in
the multifunction display.
If you wish to confirm the restart:
X Press the abutton.
The Tyre press. monitor restarted
Tyre press. monitor restarted
message appears in the multifunction dis-
play.
After you have driven for a few minutes, the
system checks whether the current tyre
pressures are within the specified range.
The new tyre pressures are then accepted
as reference values and monitored.
If you wish to cancel the restart:
X Press the %button.
The tyre pressure values stored at the last
restart will continue to be monitored. Tyre pressure
383Wheels and tyres Z
Page 388 of 417
vehicle to a halt by braking carefully. Avoid
abrupt steering manoeuvres.
The function of the tyre pressure loss warning system is limited or delayed if:
R snow chains are fitted to your vehicle's
tyres.
R road conditions are wintry.
R you are driving on sand or gravel.
R you adopt a very sporty driving style (cor-
nering at high speeds or driving with high
rates of acceleration).
R you are driving with a heavy load (in the
vehicle or on the roof).
Restarting the tyre pressure loss warn-
ing system Restart the tyre pressure loss warning system
if you have:
R changed the tyre pressure
R changed the wheels or tyres
R fitted new wheels or tyres
X Before restarting, make sure that the tyre
pressures are set properly on all four tyres
for the respective operating conditions.
The recommended tyre pressures can be
found in the table on the fuel filler flap.
The tyre pressure loss warning system can only give reliable warnings if you have set
the correct tyre pressure. If an incorrect
tyre pressure is set, these incorrect values
will be monitored.
X Observe the notes in the section on tyre
pressures (Y page 380).
X Make sure that the key is in position 2in the
ignition lock (Y page 161) .
X Press the òbutton on the steering
wheel to call up the list of menus.
X Press 9or: on the steering wheel
to select the Service
Service menu.
X Press the abutton. X
Press 9or: to select Tyre pres‐ Tyre pres‐
sure
sure .
X Press the abutton.
The Run Flat Indicator active
Run Flat Indicator active
Restart
Restart with
withOK
OKmessage appears in the
multifunction display.
If you wish to confirm the restart: X Press the abutton.
The Tyre pressure now OK?
Tyre pressure now OK? message
appears in the multifunction display.
X Press 9or: to select Yes
Yes .
X Press the abutton.
The Run Flat Indicator restarted
Run Flat Indicator restarted
message appears in the multifunction dis-
play.
After a teach-in period, the tyre pressure
loss warning system will monitor the set
tyre pressures of all four tyres.
If you wish to cancel the restart:
X Press the %button.
or
X If the Tyre pressure now OK? Tyre pressure now OK? message
appears, press 9or: to select
Cancel
Cancel .
X Press the abutton.
The tyre pressure values stored at the last
restart will continue to be monitored. Changing a wheel
Flat tyre
You can find information on what to do in the event of a flat tyre in the "Breakdown assis-
tance" section (Y page 358). Information on
driving with MOExtended tyres in the event of a flat tyre can be found under "Breakdown
assistance" (Y page 358). Changing a wheel
385Wheels and tyres Z
Page 394 of 417

X
Place the ratchet ring spanner onto the
hexagon nut of the jack so that the letters
AB are visible.
X Turn the ratchet ring spanner until the vehi-
cle is once again standing firmly on the
ground.
X Place the jack to one side.
X Tighten the wheel bolts evenly in a cross-
wise pattern in the sequence indicated ( :
to A). The tightening torque must be
150 Nm.
X Turn the jack back to its initial position.
X Stow the jack and the rest of the tyre-
change tool kit in the boot again.
X Check the air pressure of the newly fitted
wheel and adjust accordingly.
Observe the recommended tyre pressure
(Y page 380).
i Vehicles with a tyre pressure control sys-
tem: all fitted wheels must be equipped
with functioning sensors for the tyre pres-
sure control system. Wheel and tyre combinations
General notes
! For safety reasons, Mercedes-Benz rec-
ommends that you only use tyres and
wheels which have been approved by
Mercedes-Benz specifically for your vehi-
cle. These are specially adapted to the control
systems, such as ABS or ESP
®
and are
marked as follows:
R MO = Mercedes-Benz Original
R MOE = Mercedes-Benz Original Extended
(tyres featuring run-flat characteristics)
R MO1 = Mercedes-Benz Original (only cer-
tain AMG tyres)
Mercedes-Benz Original Extended tyres
may only be used on wheels that have been
specifically approved by Mercedes-Benz.
Only use tyres, wheels or accessories tes-
ted and approved by Mercedes-Benz. Cer-
tain characteristics, e.g. handling, vehicle
noise emissions or fuel consumption, may
otherwise be adversely affected. In addi-
tion, when driving with a load, tyre dimen-
sion variations could cause the tyres to
come into contact with the bodywork and
axle components. This could result in dam- age to the tyres or the vehicle.
Mercedes-Benz accepts no liability for
damage resulting from the use of tyres,
wheels or accessories other than those tes- ted and approved.
Further information about wheels, tyres
and approved combinations can be
obtained from any qualified specialist
workshop.
! Retreaded tyres are neither tested nor
recommended by Mercedes-Benz, since
previous damage cannot always be detec-
ted on retreaded tyres. As a result,
Mercedes-Benz cannot guarantee vehicle
safety if retreaded tyres are fitted. Do not fit
used tyres if you have no information about their previous usage.
! Large wheels: the lower the section width
for a certain wheel size, the lower the ride
comfort is on poor road surfaces. Roll com-
fort and suspension comfort are reduced
and the risk of damage to the wheels and
tyres as a result of driving over obstacles
increases. Wheel and tyre combinations
391Wheels and tyres Z
Page 395 of 417
Overview of abbreviations used in the follow-
ing tyre tables:
R BA: both axles
R FA: front axle
R RA: rear axle
You will find a table with recommended tyre
pressures for various operating conditions on
the inside of your vehicle's fuel filler flap. Fur-
ther information on tyre pressure
(Y page 380). Check tyre pressures regularly
and only when the tyres are cold.
Notes on the vehicle equipment – always fit
the vehicle:
R with tyres of the same size across an axle
(left/right)
R with the same type of tyres at a given time
(summer tyres, winter tyres, MOExtended
tyres)
Exception: it is permissible to fit a different
type or make in the event of a flat tyre.
Observe the "MOExtended tyres (tyres with
run-flat characteristics)" section
(Y page 358).
Vehicles with MOExtended tyres are not
equipped with a TIREFIT kit at the factory. It is
therefore recommended that you additionally equip your vehicle with a TIREFIT kit if you fit tyres that do not feature run-flat characteris- tics, e.g. winter tyres. A TIREFIT kit can be
obtained from a qualified specialist work-
shop.
i Not all wheel/tyre combinations can be
fitted at the factory in all countries. 392
Wheel and tyre combinationsWheels and tyres
Page 407 of 417
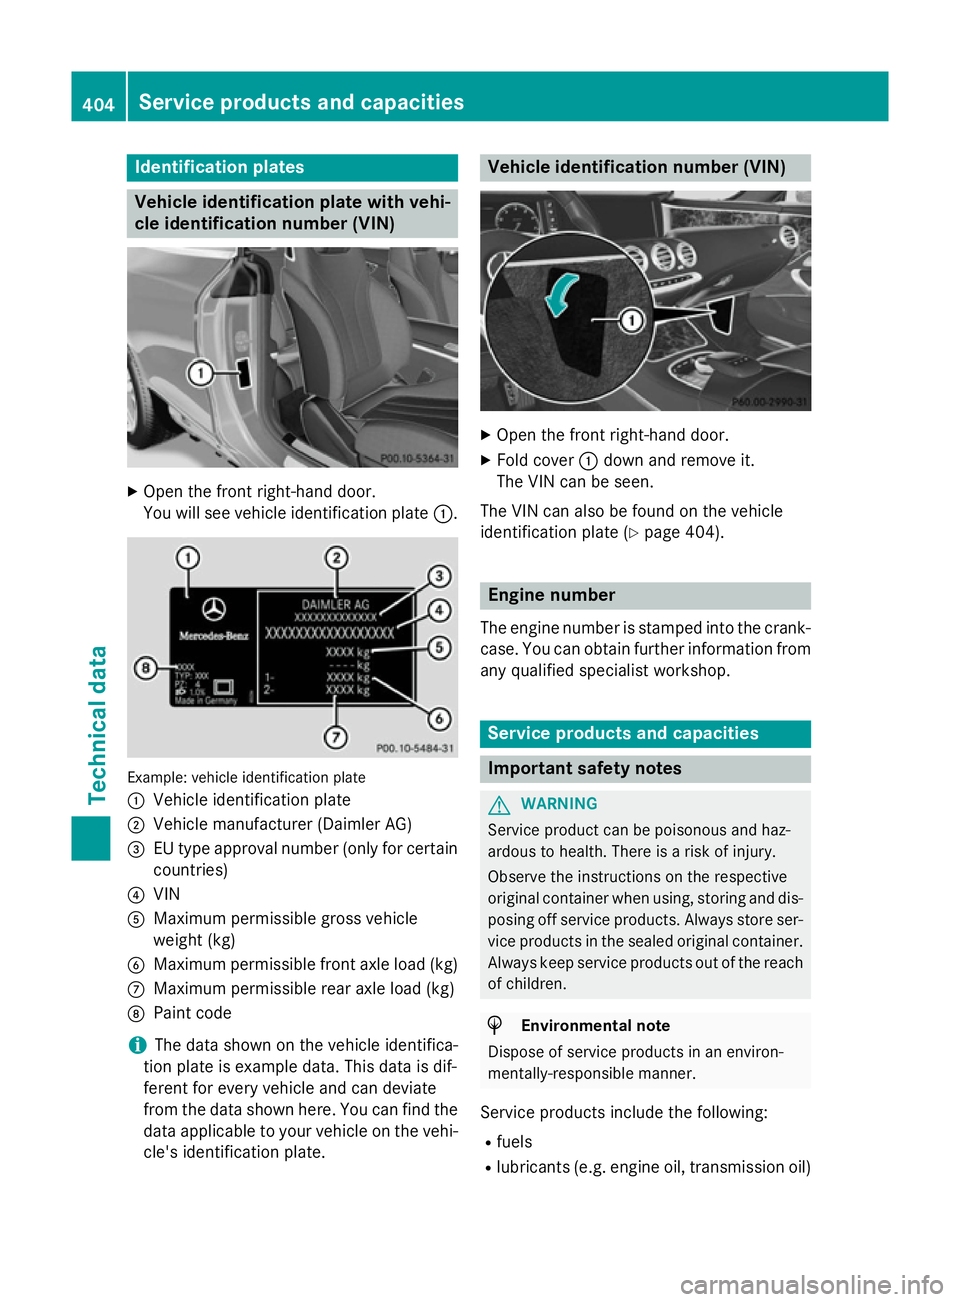
Identification plates
Vehicle identification plate with vehi-
cle identification number (VIN) X
Open the front right-hand door.
You will see vehicle identification plate :.Example: vehicle identification plate
:
Vehicle identification plate
; Vehicle manufacturer (Daimler AG)
= EU type approval number (only for certain
countries)
? VIN
A Maximum permissible gross vehicle
weight (kg)
B Maximum permissible front axle load (kg)
C Maximum permissible rear axle load (kg)
D Paint code
i The data shown on the vehicle identifica-
tion plate is example data. This data is dif-
ferent for every vehicle and can deviate
from the data shown here. You can find the
data applicable to your vehicle on the vehi- cle's identification plate. Vehicle identification number (VIN)
X
Open the front right-hand door.
X Fold cover :down and remove it.
The VIN can be seen.
The VIN can also be found on the vehicle
identification plate (Y page 404). Engine number
The engine number is stamped into the crank-
case. You can obtain further information from any qualified specialist workshop. Service products and capacities
Important safety notes
G
WARNING
Service product can be poisonous and haz-
ardous to health. There is a risk of injury.
Observe the instructions on the respective
original container when using, storing and dis- posing off service products. Always store ser-
vice products in the sealed original container. Always keep service products out of the reach
of children. H
Environmental note
Dispose of service products in an environ-
mentally-responsible manner.
Service products include the following: R fuels
R lubricants (e.g. engine oil, transmission oil) 404
Service products and capacitiesTechnical data