2015 MERCEDES-BENZ S-CLASS COUPE mirror
[x] Cancel search: mirrorPage 228 of 417
The 360° camera will not function or will
function only in a limited manner:
R if the doors are open
R if the exterior mirrors are folded in
R if the boot lid is open
R in heavy rain, snow or fog
R at night or in very dark places
R if the cameras are exposed to very bright
light
R if the area is lit by fluorescent bulbs or LED
lighting (the display may flicker)
R if the camera lenses mist up, e.g. when
driving into a heated garage in winter, caus-
ing a rapid change in temperature
R if the camera lenses are dirty or covered.
Observe the notes on cleaning
(Y page 350)
R if the vehicle components in which the
cameras are fitted are damaged. In this
event, have the camera position and setting
checked at a qualified specialist workshop.
Do not use the 360° under such circumstan-
ces. You could otherwise injure others or
damage objects when parking the vehicle.
The guide lines in the COMAND display show
the distances to your vehicle. The distances
only apply to road level.
i The camera in the rear area is protected
from raindrops and dust by means of a flap.
This flap opens when the 360° camera is
activated.
The flap closes again when:
R you have finished the manoeuvring proc-
ess
R you switch off the engine
R you open the boot
See the notes on cleaning (Y page 350).
For technical reasons, the flap may remain
open briefly after the 360° camera has
been deactivated. On vehicles with height-adjustable chassis,
depending on technical conditions, leaving
the standard height can result in:
R inaccuracies in the guide lines
R inaccuracies in the display of generated
images (top view)
Activation conditions The 360° camera image can be displayed if:
R COMAND Online is switched on (see the
separate operating instructions)
R the 360° camera 360° camera function is switched on
i If the 360° camera is activated at speeds
above approximately 30 km/h, a warning
message appears.
The warning message disappears if:
R the vehicle's speed falls below approx-
imately 30 km/h. The 360° camera is
then activated.
R the message is confirmed with the %
button.
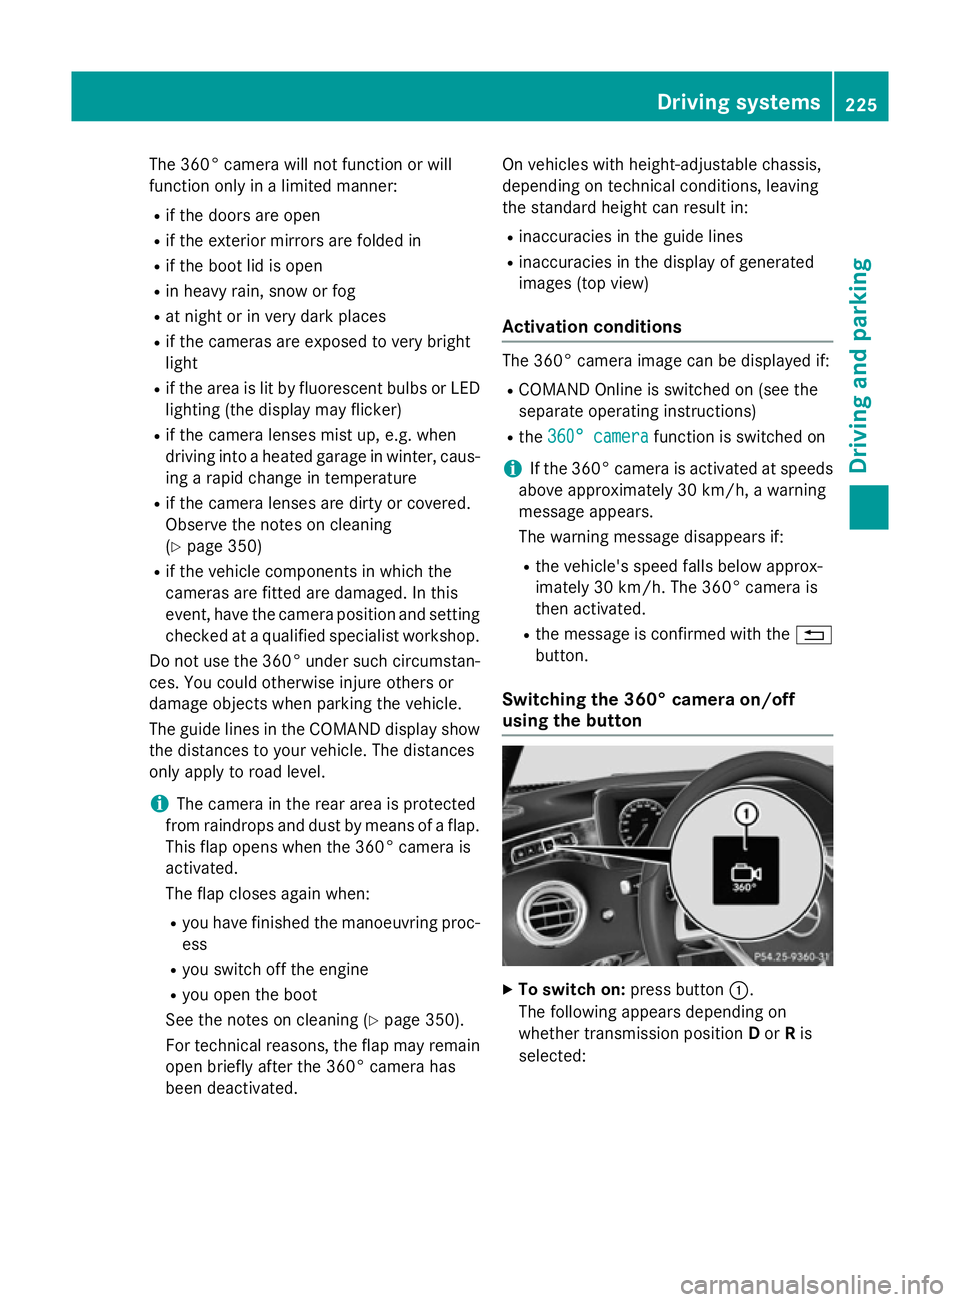
Switching the 360° camera on/off
using the button X
To switch on: press button:.
The following appears depending on
whether transmission position Dor Ris
selected: Driving systems
225Driving and parking Z
Page 229 of 417
R
full-screen view with image from the
front camera
R full-screen view with image from the
reversing camera.
X To switch off: press button:again.
Activating the 360° camera using
COMAND Online X
Press the Øbutton in the centre con-
sole.
The vehicle menu appears.
X To select the 360° camera: turn and press
the controller.
The following appears depending on
whether transmission position Dor Ris
selected:
R a split-screen with top view and the
image from the front camera or
R a split-screen with top view and the
image from the reversing camera.
Further information on the COMAND control-
ler can be found in the separate operating
instructions.
Activating the 360° camera using
reverse gear You can show images from the 360° camera
automatically by engaging reverse gear.
X Make sure that the key is in position 2in the
ignition lock.
X Make sure that the Activation by R Activation by R
gear
gear function is selected in COMAND
Online (see separate operating instruc-
tions).
X To show the 360° camera image: engage
reverse gear.
The area behind the vehicle is shown in the
COMAND display in split-screen mode. You see the top view of the vehicle and the
image from the reversing camera. Selecting the split-screen and full
screen displays Switching between split screen views:
X To switch to the line with the vehicle icons:
slide ZVthe controller.
X To select a vehicle icon: turn the controller.
Switching to full screen mode:
X Select 180° view
180° view by turning and pressing
the controller.
i The 180° option is only available in the
following views:
R Top view with image from the reversing
camera
R Top view with image from the front cam-
era
Displays in the COMAND display Important safety notes
The camera system may show a distorted
view of obstacles or show them incorrectly or
not at all. Obstacles are not shown by the
system in the following locations:
R under the front and rear bumpers
R very close to the front and rear bumpers
R in the area immediately above the handle
on the boot lid
R very close to the exterior mirrors
R in the transitional areas between the vari-
ous cameras in the virtual top view
! Objects not at ground level may appear to
be further away than they actually are, e.g.:
R the bumper of a parked vehicle
R the drawbar of a trailer
R the ball coupling of a trailer tow hitch
R the rear section of an HGV
R a slanted post
Use the guidelines only for orientation.
Approach objects no further than the bot-
tom-most guideline. 226
Driving systemsDriving an
d parking
Page 230 of 417
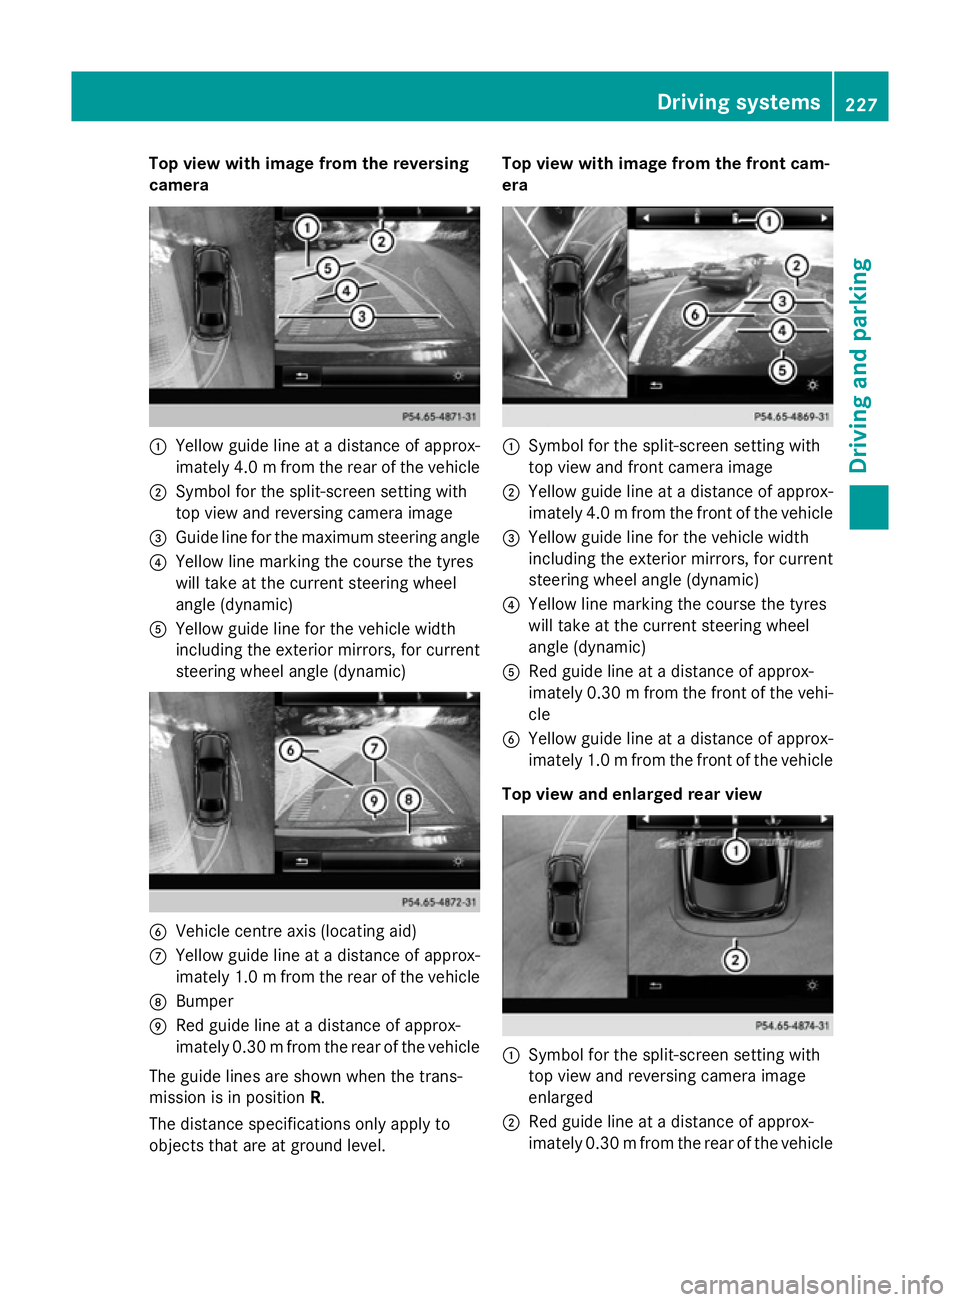
Top view with image from the reversing
camera :
Yellow guide line at a distance of approx-
imately 4.0 mfrom the rear of the vehicle
; Symbol for the split-screen setting with
top view and reversing camera image
= Guide line for the maximum steering angle
? Yellow line marking the course the tyres
will take at the current steering wheel
angle (dynamic)
A Yellow guide line for the vehicle width
including the exterior mirrors, for current
steering wheel angle (dynamic) B
Vehicle centre axis (locating aid)
C Yellow guide line at a distance of approx-
imately 1.0 mfrom the rear of the vehicle
D Bumper
E Red guide line at a distance of approx-
imately 0.30 mfrom the rear of the vehicle
The guide lines are shown when the trans-
mission is in position R.
The distance specifications only apply to
objects that are at ground level. Top view with image from the front cam-
era
:
Symbol for the split-screen setting with
top view and front camera image
; Yellow guide line at a distance of approx-
imately 4.0 mfrom the front of the vehicle
= Yellow guide line for the vehicle width
including the exterior mirrors, for current
steering wheel angle (dynamic)
? Yellow line marking the course the tyres
will take at the current steering wheel
angle (dynamic)
A Red guide line at a distance of approx-
imately 0.30 mfrom the front of the vehi-
cle
B Yellow guide line at a distance of approx-
imately 1.0 mfrom the front of the vehicle
Top view and enlarged rear view :
Symbol for the split-screen setting with
top view and reversing camera image
enlarged
; Red guide line at a distance of approx-
imately 0.30 mfrom the rear of the vehicle Driving systems
227Driving and parking Z
Page 231 of 417
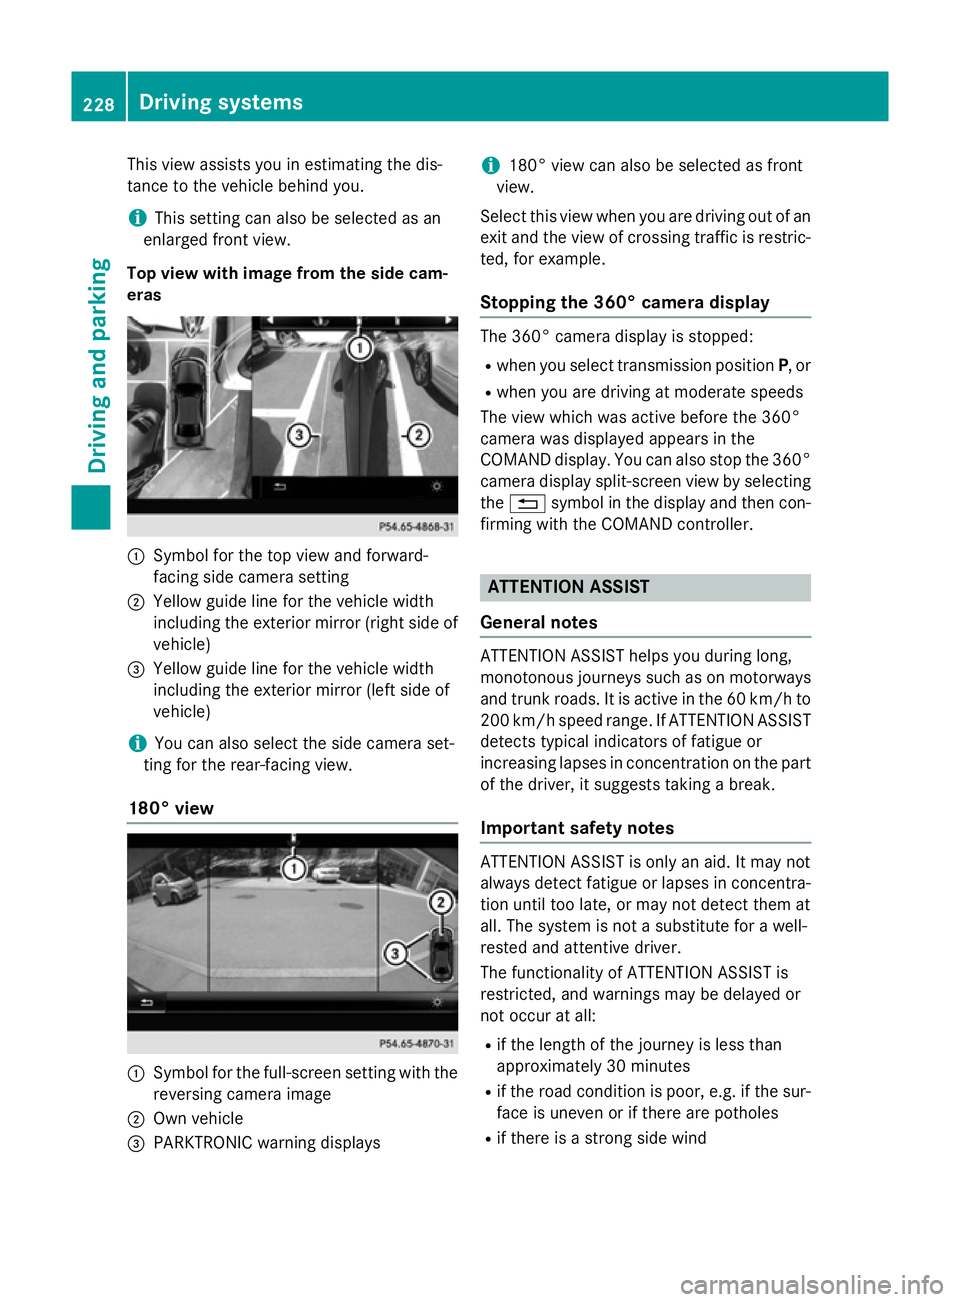
This view assists you in estimating the dis-
tance to the vehicle behind you.
i This setting can also be selected as an
enlarged front view.
Top view with image from the side cam-
eras :
Symbol for the top view and forward-
facing side camera setting
; Yellow guide line for the vehicle width
including the exterior mirror (right side of vehicle)
= Yellow guide line for the vehicle width
including the exterior mirror (left side of
vehicle)
i You can also select the side camera set-
ting for the rear-facing view.
180° view :
Symbol for the full-screen setting with the
reversing camera image
; Own vehicle
= PARKTRONIC warning displays i
180° view can also be selected as front
view.
Select this view when you are driving out of an
exit and the view of crossing traffic is restric- ted, for example.
Stopping the 360° camera display The 360° camera display is stopped:
R
when you select transmission position P, or
R when you are driving at moderate speeds
The view which was active before the 360°
camera was displayed appears in the
COMAND display. You can also stop the 360° camera display split-screen view by selecting
the % symbol in the display and then con-
firming with the COMAND controller. ATTENTION ASSIST
General notes ATTENTION ASSIST helps you during long,
monotonous journeys such as on motorways and trunk roads. It is active in the 60 km/hto
200 km/h speed range. If ATTENTION ASSIST
detects typical indicators of fatigue or
increasing lapses in concentration on the part of the driver, it suggests taking a break.
Important safety notes ATTENTION ASSIST is only an aid. It may not
always detect fatigue or lapses in concentra-
tion until too late, or may not detect them at
all. The system is not a substitute for a well-
rested and attentive driver.
The functionality of ATTENTION ASSIST is
restricted, and warnings may be delayed or
not occur at all:
R if the length of the journey is less than
approximately 30 minutes
R if the road condition is poor, e.g. if the sur-
face is uneven or if there are potholes
R if there is a strong side wind 228
Driving systemsDriving and parking
Page 239 of 417

Problems with Night View Assist Plus
Problem
Possible causes/consequences and
M
MSolutions The picture quality of
Night View Assist Plus
has deteriorated. The windscreen is misted up on the inside.
X Fold down the camera cover (Y page 351).
X Demist the windscreen (Y page 144). The windscreen is iced up.
X De-ice the windscreen (Y page 144). The windscreen wipers are smearing the windscreen.
X Replace the wiper blades (Y page 134). The windscreen is smeared after the vehicle has been cleaned in a
car wash.
X Clean the windscreen (Y page 348). The windscreen has been damaged by stone impact in the cam-
era's field of vision.
X Replace the windscreen. The pedestrian and ani-
mal recognition is not
available. The infrared camera in the radiator grille is dirty.
X Use a soft cloth and water to clean the infrared camera. Driving Assistance Plus package
General notes The Driving Assistance PLUS package con-
sists of DISTRONIC PLUS (Y
page 194), Active
Blind Spot Assist (Y page 236) and Active
Lane Keeping Assist (Y page 239).
Active Blind Spot Assist General notes
Active Blind Spot Assist monitors the areas
on either side of the vehicle that are not visi-
ble to the driver with two lateral, rear-facing
radar sensors. A warning display in the exte-
rior mirrors draws your attention to vehicles
detected in the monitored area. If you then
switch on the corresponding turn signal to
change lanes, you will also receive a visual
and audible collision warning. If a risk of side impact is detected, corrective braking may
help you avoid a collision. Active Blind Spot
Assist evaluates the free space in the direc-
tion of travel and to the side before making a
course-correcting brake application. For this,Active Blind Spot Assist uses the forward-
facing radar sensors.
Active Blind Spot Assist supports you from a
speed of approximately 30 km/h.
Important safety notes
Active Blind Spot Assist is only an aid and is
not a substitute for attentive driving. 236
Driving systemsDriving and parking
Page 241 of 417
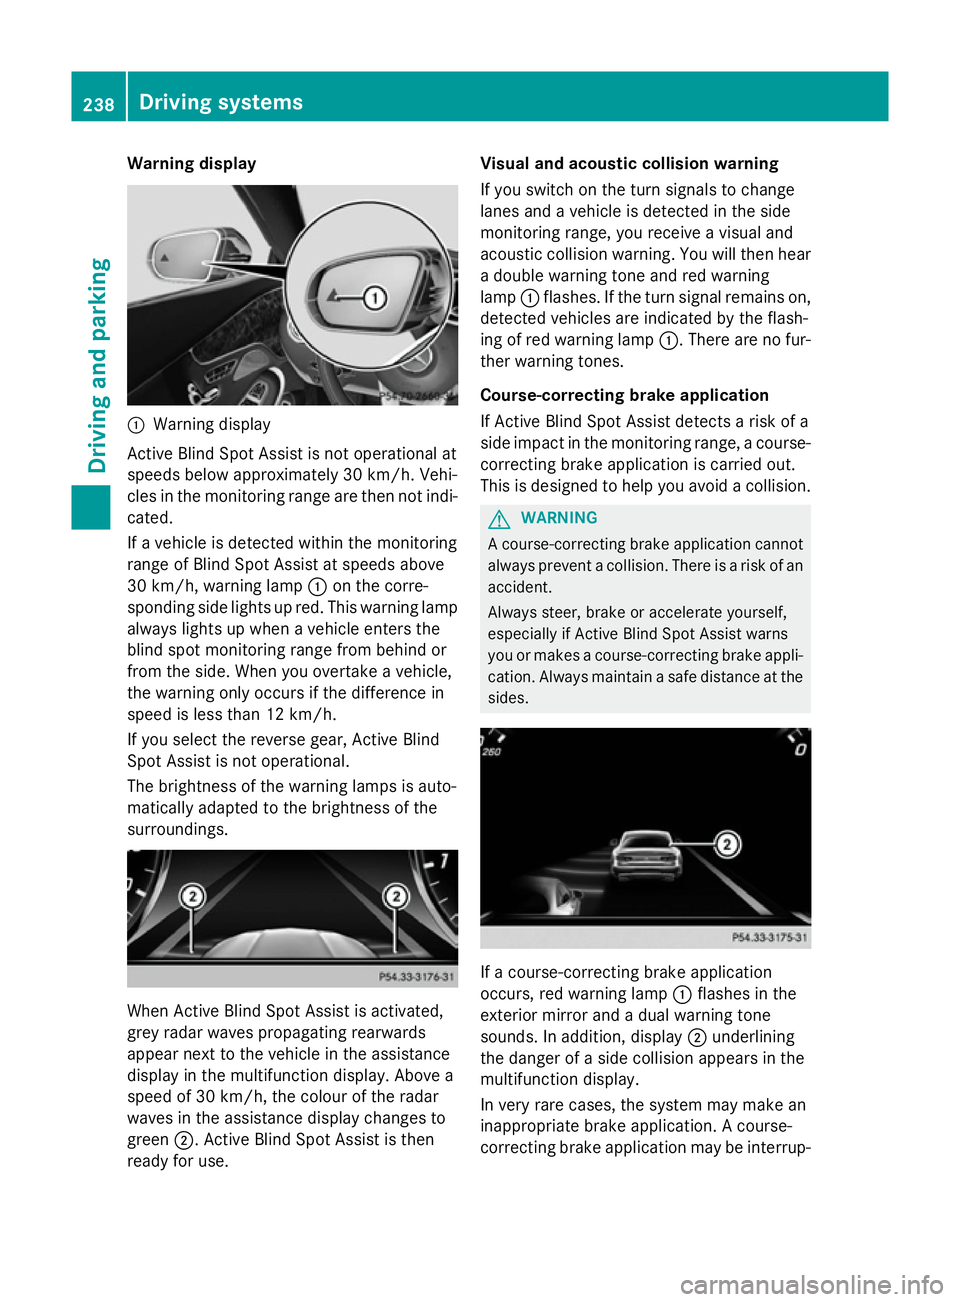
Warning display
:
Warning display
Active Blind Spot Assist is not operational at
speeds below approximately 30 km/h. Vehi-
cles in the monitoring range are then not indi-
cated.
If a vehicle is detected within the monitoring
range of Blind Spot Assist at speeds above
30 km/h, warning lamp :on the corre-
sponding side lights up red. This warning lamp
always lights up when a vehicle enters the
blind spot monitoring range from behind or
from the side. When you overtake a vehicle,
the warning only occurs if the difference in
speed is less than 12 km/h.
If you select the reverse gear, Active Blind
Spot Assist is not operational.
The brightness of the warning lamps is auto-
matically adapted to the brightness of the
surroundings. When Active Blind Spot Assist is activated,
grey radar waves propagating rearwards
appear next to the vehicle in the assistance
display in the multifunction display. Above a
speed of 30 km/h, the colour of the radar
waves in the assistance display changes to
green ;. Active Blind Spot Assist is then
ready for use. Visual and acoustic collision warning
If you switch on the turn signals to change
lanes and a vehicle is detected in the side
monitoring range, you receive a visual and
acoustic collision warning. You will then hear
a double warning tone and red warning
lamp :flashes. If the turn signal remains on,
detected vehicles are indicated by the flash-
ing of red warning lamp :. There are no fur-
ther warning tones.
Course-correcting brake application
If Active Blind Spot Assist detects a risk of a
side impact in the monitoring range, a course- correcting brake application is carried out.
This is designed to help you avoid a collision. G
WARNING
A course-correcting brake application cannot always prevent a collision. There is a risk of an
accident.
Always steer, brake or accelerate yourself,
especially if Active Blind Spot Assist warns
you or makes a course-correcting brake appli-
cation. Always maintain a safe distance at the sides. If a course-correcting brake application
occurs, red warning lamp :flashes in the
exterior mirror and a dual warning tone
sounds. In addition, display ;underlining
the danger of a side collision appears in the
multifunction display.
In very rare cases, the system may make an
inappropriate brake application. A course-
correcting brake application may be interrup- 238
Driving systemsDriving and parking
Page 242 of 417

ted at any time if you steer slightly in the
opposite direction or accelerate.
The course-correcting brake application is
available in the speed range between
30 km/h and 200 km/h.
Either a course-correcting brake application
appropriate to the driving situation, or none at all, may occur if:
R there are vehicles or obstacles, e.g. crash
barriers, on both sides of your vehicle
R a vehicle approaches too closely on the
side
R you have adopted a sporty driving style with
high cornering speeds
R you clearly brake or accelerate
R a driving safety system intervenes, such as
ESP ®
or PRE-SAFE ®
Brake
R ESP ®
is deactivated
R a loss of tyre pressure or a defective tyre is
detected
Activating Active Blind Spot Assist
X Make sure that Active Blind Spot Assist is
activated in the on-board computer
(Y page 260).
X Turn the key to position 2in the ignition
lock.
Warning lamps :in the exterior mirrors
light up red for approximately 1.5 second s.
Grey radar waves propagating backwards
appear next to the vehicle in the assistance
display in the multifunction display. Active Lane Keeping Assist General notes
Active Lane Keeping Assist monitors the area
in front of your vehicle by means of multi-
function camera :at the top of the wind-
screen. Various different areas to the front,
rear and side of your vehicle are also moni-
tored with the aid of the radar sensor system. Active Lane Keeping Assist detects lane
markings on the road and can warn you
before you leave your lane unintentionally. If
you do not react to the warning, a lane-cor-
recting application of the brakes can bring the
vehicle back into the original lane.
This function is available within a speed range between 60 km/h and 200 km/h.
Important safety notes
If you fail to adapt your driving style, Active
Lane Keeping Assist can neither reduce the
risk of an accident nor override the laws of
physics. Active Lane Keeping Assist cannot
take account of road and weather conditions. It may not detect traffic situations. Active
Lane Keeping Assist is only an aid. You are
responsible for the distance to the vehicle in
front, for vehicle speed, for braking in good
time and for staying in lane.
Active Lane Keeping Assist cannot continu-
ously keep your vehicle in its lane. G
WARNING
Active Lane Keeping Assist cannot always
clearly detect lane markings. Driving systems
239Driving and parking
Z
Page 284 of 417
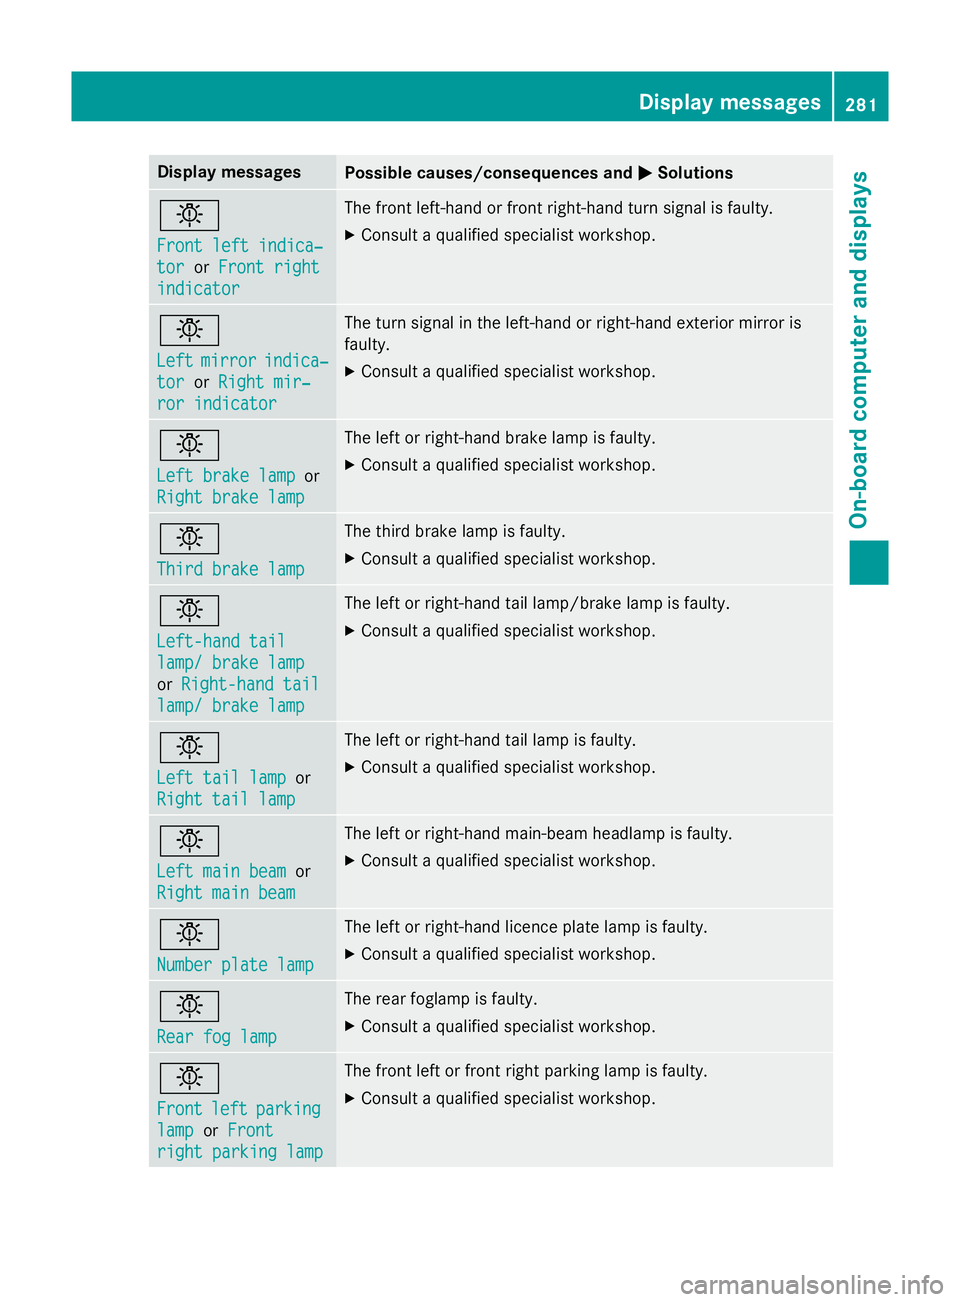
Display messages
Possible causes/consequences and
M
MSolutions b
Front left indica‐ Front left indica‐
tor tor
orFront right
Front right
indicator
indicator The front left-hand or front right-hand turn signal is faulty.
X Consult a qualified specialist workshop. b
Left Left
mirror
mirror indica‐
indica‐
tor
tor orRight mir‐
Right mir‐
ror indicator
ror indicator The turn signal in the left-hand or right-hand exterior mirror is
faulty.
X Consult a qualified specialist workshop. b
Left brake lamp Left brake lamp
or
Right brake lamp
Right brake lamp The left or right-hand brake lamp is faulty.
X Consult a qualified specialist workshop. b
Third brake lamp Third brake lamp The third brake lamp is faulty.
X Consult a qualified specialist workshop. b
Left-hand tail Left-hand tail
lamp/ brake lamp lamp/ brake lamp
or
Right-hand tail Right-hand tail
lamp/ brake lamp
lamp/ brake lamp The left or right-hand tail lamp/brake lamp is faulty.
X Consult a qualified specialist workshop. b
Left tail lamp Left tail lamp
or
Right tail lamp
Right tail lamp The left or right-hand tail lamp is faulty.
X Consult a qualified specialist workshop. b
Left main beam Left main beam
or
Right main beam
Right main beam The left or right-hand main-beam headlamp is faulty.
X Consult a qualified specialist workshop. b
Number plate lamp Number plate lamp The left or right-hand licence plate lamp is faulty.
X Consult a qualified specialist workshop. b
Rear fog lamp Rear fog lamp The rear foglamp is faulty.
X Consult a qualified specialist workshop. b
Front Front
left
leftparking
parking
lamp
lamp orFront
Front
right parking lamp
right parking lamp The front left or front right parking lamp is faulty.
X Consult a qualified specialist workshop. Display
messages
281On-board computer and displays Z