2015 MERCEDES-BENZ S-CLASS COUPE window
[x] Cancel search: windowPage 121 of 417
Problems with the steering wheel heating
Problem
Possible causes/consequences and
M
MSolutions The steering wheel
heating has switched
itself off prematurely or
cannot be switched on. The on-board voltage is too low because too many electrical con-
sumers are switched on.
X Switch off electrical consumers that you do not need, such as
the rear window heating or interior lighting. EASY-ENTRY/EXIT feature
Important safety notes G
WARNING
When the EASY-ENTRY/EXIT feature adjusts
the steering wheel and the driver's seat, you
and other vehicle occupants – particularly
children – could become trapped. There is a
risk of injury.
While the EASY-ENTRY/EXIT feature is mak-
ing adjustments, make sure that no one has
any body parts in the sweep of the seat and
the steering wheel.
If there is a risk of becoming trapped by
R the steering wheel: move the steering
wheel adjustment lever.
R the seat: press the switch for seat adjust-
ment.
The adjustment process is stopped.
Press one of the memory function position
switches. The adjustment process is stopped. G
WARNING
If children activate the EASY-ENTRY/EXIT fea- ture, they can become trapped, particularly
when unattended. There is a risk of injury.
When leaving the vehicle, always take the key with you and lock the vehicle. Never leave
children unattended in the vehicle. G
WARNING
If you drive off while the EASY-ENTRY/EXIT
feature is making adjustments, you could lose
control of the vehicle. There is a risk of an
accident. Always wait until the adjustment process is
complete before driving off.
The EASY-ENTRY/EXIT feature makes getting in and out of your vehicle easier.
You can activate and deactivate the EASY-
ENTRY/EXIT feature using COMAND Online
(see the separate operating instructions).
Position of the steering wheel and the
driver's seat when the EASY-ENTRY/
EXIT feature is active The steering wheel tilts upwards and the driv-
er's seat moves backwards if you:
R remove the key from the ignition lock
R with KEYLESS-GO: open the driver's door;
KEYLESS-GO must be in position 1
R with the key: open the driver's door; the
key must be in position 0or 1in the ignition
lock (Y page 161)
R open the driver's door when the ignition is
switched off
i The steering wheel only tilts upwards and
the driver's seat only moves backwards if
the driving position is stored after seat or
steering wheel adjustment.
The last position of the steering wheel or seat is stored if:
R the ignition is switched off
R the setting is stored using the memory
function (Y page 123)
i The steering wheel only moves upwards if
it has not already reached the upper stop. 118
Steering wheelSeats, steering wheel and mirrors
Page 123 of 417
Adjusting the exterior mirrors
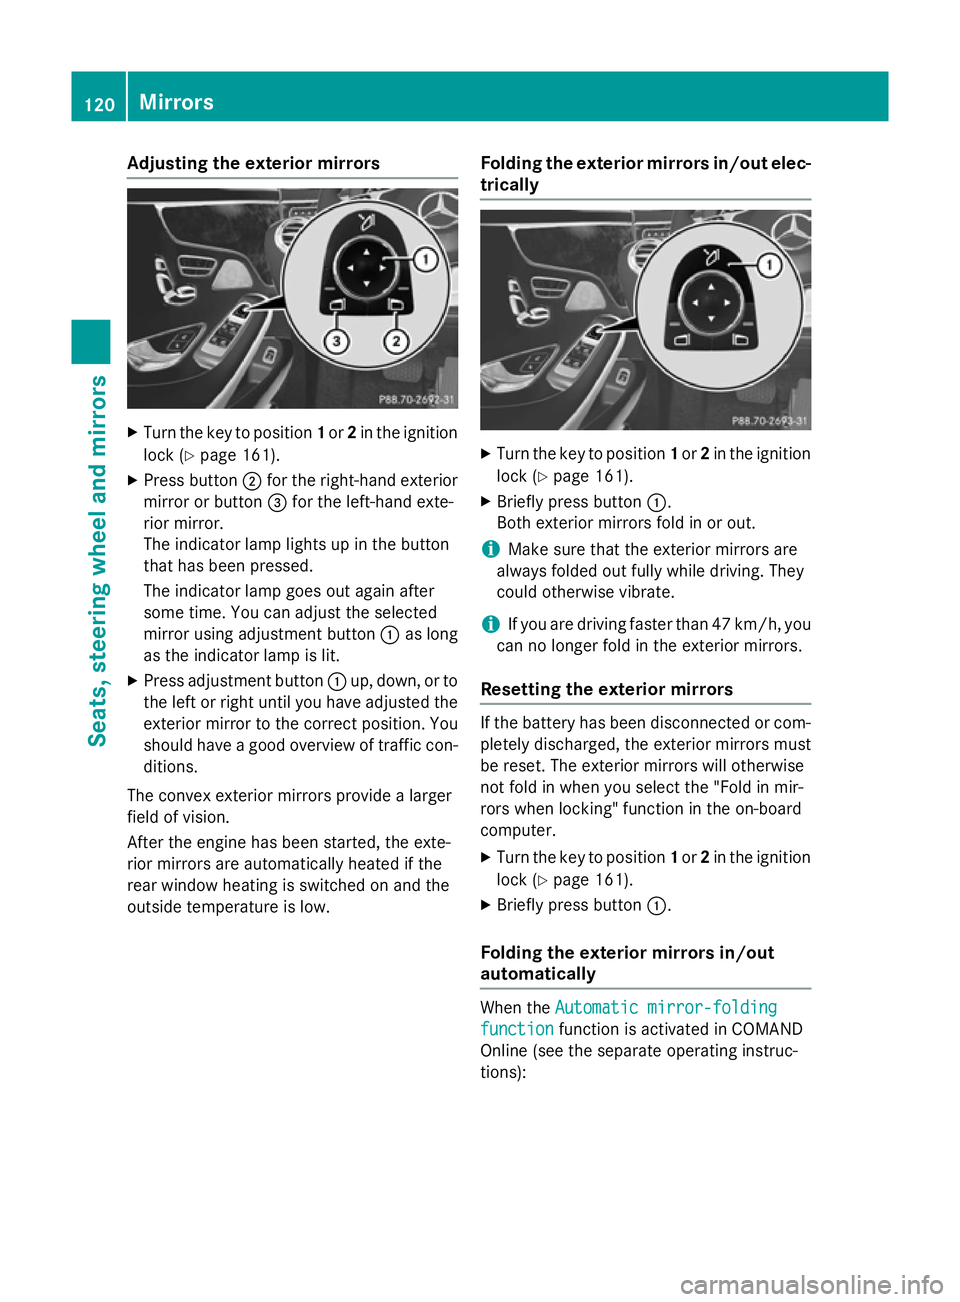
X
Turn the key to position 1or 2in the ignition
lock (Y page 161).
X Press button ;for the right-hand exterior
mirror or button =for the left-hand exte-
rior mirror.
The indicator lamp lights up in the button
that has been pressed.
The indicator lamp goes out again after
some time. You can adjust the selected
mirror using adjustment button :as long
as the indicator lamp is lit.
X Press adjustment button :up, down, or to
the left or right until you have adjusted the
exterior mirror to the correct position. You
should have a good overview of traffic con- ditions.
The convex exterior mirrors provide a larger
field of vision.
After the engine has been started, the exte-
rior mirrors are automatically heated if the
rear window heating is switched on and the
outside temperature is low. Folding the exterior mirrors in/out elec-
trically X
Turn the key to position 1or 2in the ignition
lock (Y page 161).
X Briefly press button :.
Both exterior mirrors fold in or out.
i Make sure that the exterior mirrors are
always folded out fully while driving. They
could otherwise vibrate.
i If you are driving faster than 47 km/h, you
can no longer fold in the exterior mirrors.
Resetting the exterior mirrors If the battery has been disconnected or com-
pletely discharged, the exterior mirrors must
be reset. The exterior mirrors will otherwise
not fold in when you select the "Fold in mir-
rors when locking" function in the on-board
computer.
X Turn the key to position 1or 2in the ignition
lock (Y page 161).
X Briefly press button :.
Folding the exterior mirrors in/out
automatically When the
Automatic mirror-folding Automatic mirror-folding
function
function function is activated in COMAND
Online (see the separate operating instruc-
tions): 120
MirrorsSeats
, steering wheel and mirrors
Page 141 of 417
Useful information
i This Owner's Manual describes all mod-
els, series and optional equipment for your
vehicle that were available at the time of
going to press. National variations are pos- sible. Note that your vehicle may not be
equipped with all of the functions descri-
bed. This is also the case for systems and
functions relevant to safety.
i Read the information on qualified special-
ist workshops: (Y page 26). Overview of climate control systems
General notes
Observe the settings recommended on the
following pages. The windows could other-
wise mist up.
To prevent the windows from misting up:
R switch off climate control only briefly
R activate air-recirculation mode only briefly
R activate the "Cooling with air dehumidifica-
tion" function
R activate the windscreen demisting function
briefly, if required
Climate control regulates the temperature
and air humidity in the vehicle interior. The air
filter cleans the air, thus improving the inte-
rior climate.
The "Cooling with air dehumidification" func-
tion is only available when the engine is run-
ning. Optimum climate control is only ach-
ieved with the side windows and roof closed.
The residual heat function can only be acti-
vated or deactivated with the ignition
switched off (Y page 147).
i Ventilate the vehicle for a brief period
during warm weather, e.g. using the con-
venience opening feature (Y page 100).
This will speed up the cooling process and
the desired interior temperature will be
reached more quickly. i
The integrated filter filters out most par-
ticles of dust and soot and completely fil-
ters out pollen. It also reduces gaseous pol-
lutants and odours. A clogged filter reduces the amount of air supplied to the vehicle
interior. For this reason, you should alwaysobserve the interval for replacing the filter,
which is specified in the Service Booklet. As this depends on environmental conditions,
e.g. heavy air pollution, the interval may be shorter than stated in the Service Booklet.
i It is possible that the blower may be acti-
vated automatically 60 minutes after the
key has been removed depending on vari-
ous factors, e.g. the outside temperature.
The vehicle is then ventilated for
30 minutes to dry the automatic climate
control. 138
Overview of climate control systemsClimate control
Page 142 of 417
Automatic climate control panel
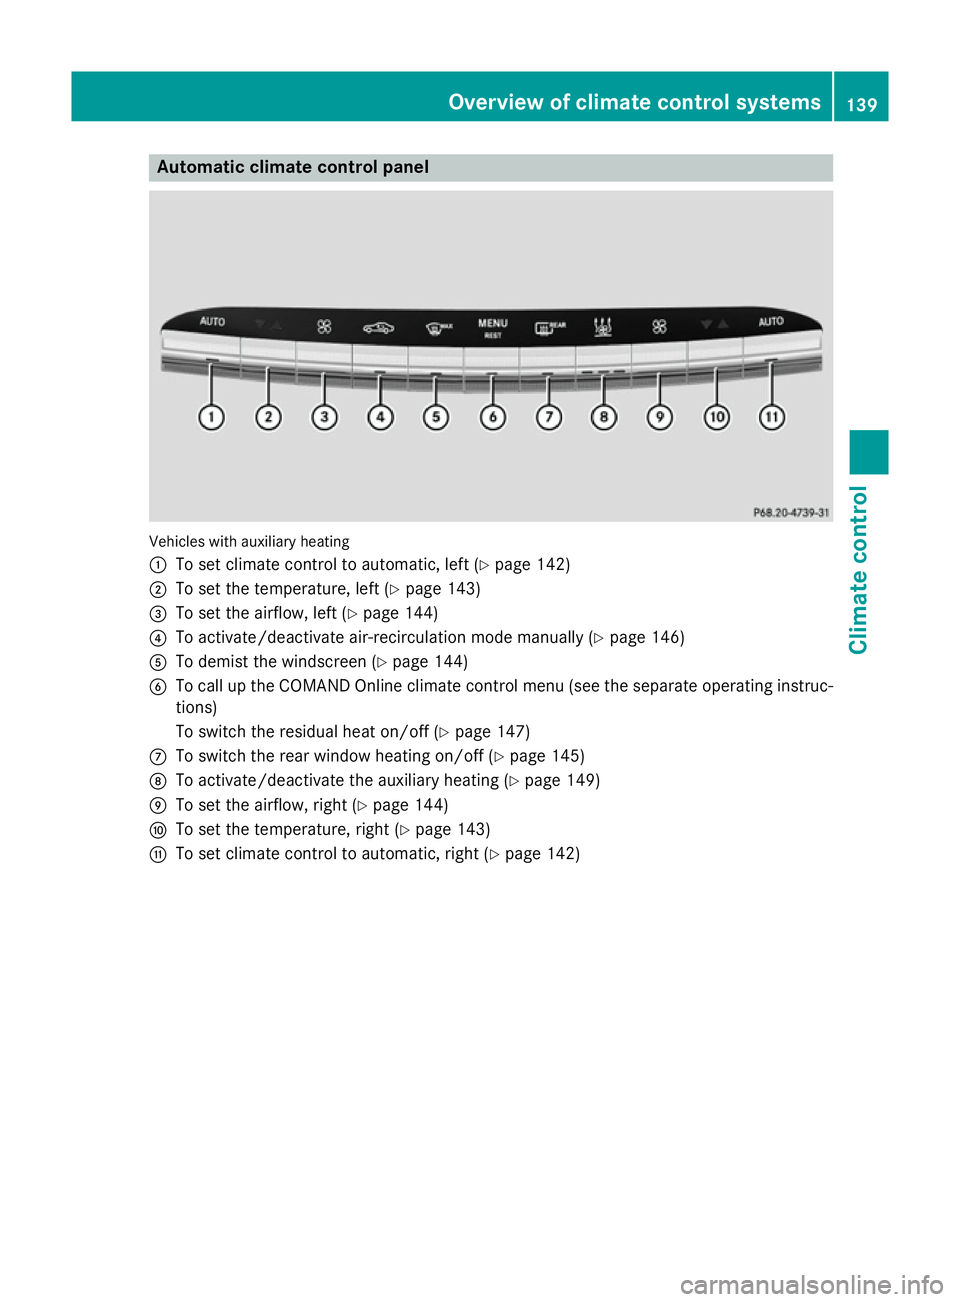
Vehicles with auxiliary heating
:
To set climate control to automatic, left (Y page 142)
; To set the temperature, left (Y page 143)
= To set the airflow, left (Y page 144)
? To activate/deactivate air-recirculation mode manually (Y page 146)
A To demist the windscreen (Y page 144)
B To call up the COMAND Online climate control menu (see the separate operating instruc-
tions)
To switch the residual heat on/off (Y page 147)
C To switch the rear window heating on/off (Y page 145)
D To activate/deactivate the auxiliary heating (Y page 149)
E To set the airflow, right (Y page 144)
F To set the temperature, right (Y page 143)
G To set climate control to automatic, right (Y page 142) Overview of climate control systems
139Climate control
Page 143 of 417
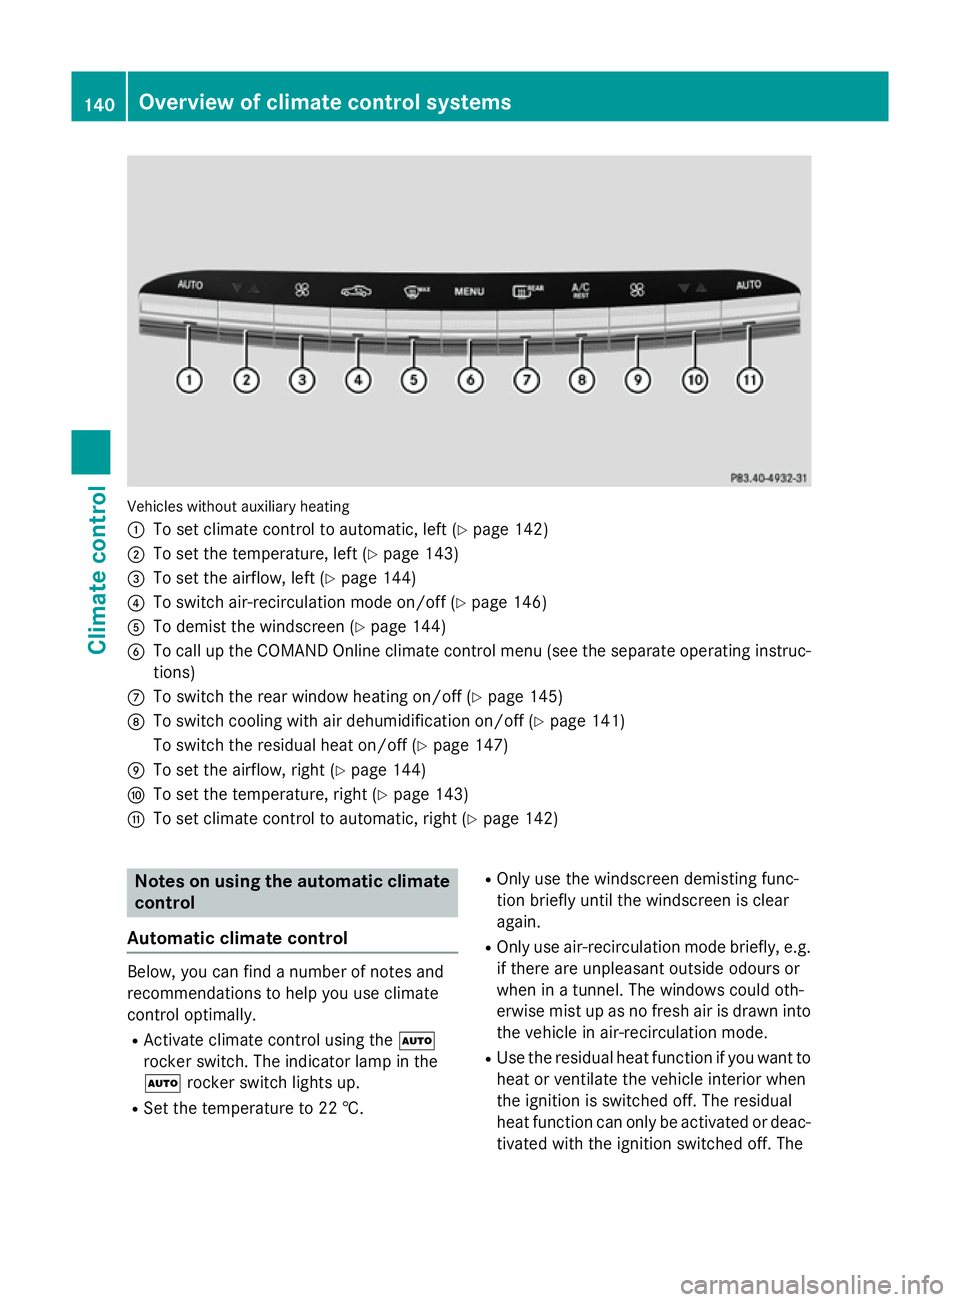
Vehicles without auxiliary heating
:
To set climate control to automatic, left (Y page 142)
; To set the temperature, left (Y page 143)
= To set the airflow, left (Y page 144)
? To switch air-recirculation mode on/off (Y page 146)
A To demist the windscreen (Y page 144)
B To call up the COMAND Online climate control menu (see the separate operating instruc-
tions)
C To switch the rear window heating on/off (Y page 145)
D To switch cooling with air dehumidification on/off (Y page 141)
To switch the residual heat on/off (Y page 147)
E To set the airflow, right (Y page 144)
F To set the temperature, right (Y page 143)
G To set climate control to automatic, right (Y page 142)Notes on using the automatic climate
control
Automatic climate control Below, you can find a number of notes and
recommendations to help you use climate
control optimally.
R Activate climate control using the Ã
rocker switch. The indicator lamp in the
à rocker switch lights up.
R Set the temperature to 22 †. R
Only use the windscreen demisting func-
tion briefly until the windscreen is clear
again.
R Only use air-recirculation mode briefly, e.g.
if there are unpleasant outside odours or
when in a tunnel. The windows could oth-
erwise mist up as no fresh air is drawn into
the vehicle in air-recirculation mode.
R Use the residual heat function if you want to
heat or ventilate the vehicle interior when
the ignition is switched off. The residual
heat function can only be activated or deac-
tivated with the ignition switched off. The 140
Overview of climate control systemsClimate control
Page 144 of 417
residual heat function is deactivated when
the ignition is switched on.
ECO start/stop function During automatic engine switch-off, the cli-
mate control only operates at a reduced capa- city. If you require the full climate control out-
put, you can switch off the ECO start/stop
function by pressing the ECO button
(Y page 166). Operating the climate control system
Switching the climate control on/off
General notes When the climate control is switched off, the
air supply and air circulation are also
switched off. The windows could mist up.
Therefore, only switch off climate control
briefly.
Switch on climate control primarily using theà rocker switch (Y page 142).
Activating/deactivating X
Turn the key to position 2in the ignition
lock (Y page 161).
X To activate: press thetor! rocker
switch up or down.
The COMAND Online climate control menu
opens.
X Activate climate control via the air-condi-
tioning setting bar in COMAND Online (see
the separate operating instructions).
X To deactivate: press thetor!
rocker switch up or down.
The COMAND Online climate control menu
opens.
X Deactivate climate control via the air-con-
ditioning setting bar in COMAND Online
(see the separate operating instructions). Switching cooling with air dehumidi-
fication on/off
General notes If you deactivate the "Cooling with air-dehu-
midification" function, the air inside the vehi- cle will not be cooled. The air inside the vehi-
cle will also not be dehumidified. The win-
dows can mist up more quickly. Therefore,
deactivate the "Cooling with air dehumidifi-
cation" function only briefly.
The "Cooling with air dehumidification" func-
tion is only available when the engine is run-
ning. The air inside the vehicle is cooled and
dehumidified according to the temperature
selected.
Condensation may drip from the underside of the vehicle when cooling mode is active. Thisis normal and not a sign that there is a mal-
function.
Activating/deactivating Vehicles with auxiliary heating
X Activate/deactivate the cooling with air
dehumidification function via COMAND
Online (see the separate operating instruc-
tions).
Vehicles without auxiliary heating X To activate: press theÁrocker switch
up or down.
The indicator lamp above the rocker switch lights up.
or
X Activate the "Cooling with air dehumidifi-
cation" function via COMAND Online (see
the separate operating instructions).
X To deactivate: press theÁrocker
switch up or down.
The indicator lamp above the rocker switch
goes out.
or X Deactivate the "Cooling with air dehumidi-
fication" function via COMAND Online (see
the separate operating instructions). Operating the climate control system
141Climate control
Page 147 of 417
b
Directs the airflow through the centre
and side air vents as well as the demis-
ter vents
W Sets the air distribution to automatic
Setting the air distribution using
COMAND Online The air distribution for the left and right sides
of the driver and front passenger area can be adjusted using COMAND Online (see the sep-
arate operating instructions). Setting the airflow
General notes You can select different airflow settings for
the driver's and front-passenger sides.
Setting the airflow X
Turn the key to position 2in the ignition
lock (Y page 161).
X To increase or reduce: press theK
rocker switch up or down.
or X Set the airflow using COMAND Online (see
the separate operating instructions). Activating/deactivating the synchro-
nisation function
Climate control can be set centrally using the synchronisation function. The settings for
temperature, air distribution and airflow on
the driver's side are adopted for the front-
passenger side.
X To activate/deactivate: activate or deac-
tivate the synchronisation function using
COMAND Online (see the separate operat- ing instructions).
The synchronisation function switches off, if
the settings for the front-passenger side are
changed. Demisting the windscreen
You can use this function to defrost the wind-
screen or to demist the inside of the wind-
screen and the front side windows.
Switch off the windscreen demisting function
as soon as the windscreen is clear again.
X Turn the key to position 2in the ignition
lock (Y page 161).
X To switch on: press the¬rocker
switch on the front control unit up or down.
The indicator lamp in the ¬rocker
switch lights up.
The climate control system switches to the
following functions:
R high airflow
R high temperature
R air distribution to the windscreen and
front side windows
R air-recirculation mode off
R windscreen heating on
X To deactivate: press the¬rocker
switch up or down.
The indicator lamp in the ¬rocker
switch goes out. The previous settings are
reactivated. Air-recirculation mode
remains deactivated.
or X Press the Ãrocker switch up or down.
or
X Use the tor! rocker switch to call
up the COMAND Online climate control
menu. Demisting the windows
Windows misted up on the inside X
Vehicles with auxiliary heating: activate
the "Cooling with air dehumidification" 144
Operating the climate control systemClimate control
Page 148 of 417
function via COMAND Online (see the sep-
arate operating instructions).
X Vehicles without auxiliary heating: acti-
vate the "Cooling with air dehumidification" function with the Árocker switch.
or
X Activate the "Cooling with air dehumidifi-
cation" function via COMAND Online (see
the separate operating instructions).
X Switch on automatic mode using the Ã
rocker switch.
X If the windows continue to mist up, activate
the windscreen demisting function using
the ¬ rocker switch. The windscreen
heating is switched on.
i You should only select this setting until
the windscreen is clear again.
Windows misted up on the outside X
Activate the windscreen wipers.
X Switch on automatic mode using the Ã
rocker switch.
i If you clean the windows regularly, they
do not mist up so quickly. Rear window heating
General notes The rear window heating has a high current
draw. You should therefore switch it off as
soon as the window is clear. It otherwise
switches off automatically after several
minutes.
If the battery voltage is too low, the rear win-
dow heating may switch off.
Activating/deactivating X
Turn the key to position 2in the ignition
lock (Y page 161).
X Press the ¤rocker switch up or down.
The indicator lamp in the ¤rocker
switch lights up or goes out. Operating the climate control system
145Climate control