2015 MERCEDES-BENZ S-CLASS COUPE wiper blades
[x] Cancel search: wiper bladesPage 10 of 417

Care
360° camera ................................ .350
Automatic car wash ....................... 345
Carpets .......................................... 353
Display .......................................... .351
Exhaust pipe .................................. 351
Exterior lighting ............................ .349
Gear or selector lever .................... 352
High-pressure cleaner .................... 347
Interior .......................................... .351
Matt paintwork .............................. 348
Night View Assist Plus ................... 351
Notes ............................................. 345
Paint .............................................. 347
Plastic trim ................................... .352
Reversing camera .......................... 350
Roof lining ...................................... 353
Seat belt ........................................ 353
Seat cover ..................................... 352
Sensors ......................................... 349
Steering wheel ............................... 352
Trim pieces ................................... .352
Washing by hand ........................... 347
Wheels .......................................... .348
Windows ........................................ 348
Wiper blades .................................. 349
Wooden trim .................................. 352
CD player (on-board computer) ........254
Central locking
Locking/unlocking (key ).................. 85
Centre console
Overview .......................................... 36
Stowage space .............................. 317
Centre console in the rear com-
partment
Stowage compartment .................. 319
Changing the media source ............. 254
Child
Restraint system .............................. 61
Child seat
Forward-facing restraint system ...... 64
ISOFIX .............................................. 62
On the front-passenger sea t............ 63
Rearward-facing restraint system .... 64
Recommendations ........................... 68
Suitable positions ............................ 65
Top Tether ....................................... 62
Cigarette lighter ................................ 324 Cleaning
Mirror turn signal ........................... 349
Climate control
Automatic air conditioning ............. 139
Auxiliary heating/ventilation .......... 149
Controlling automaticall y............... 142
Convenience opening/closing
(air-recirculation mode) ................. 146
Cooling with air dehumidification .. 141
Demisting the windows .................. 144
Demisting the windscreen ............. 144
ECO start/stop function ................ 140
Indicator lamp ................................ 142
Ionisation ....................................... 149
Notes on using the automatic cli-
mate control .................................. 140
Overview of systems ...................... 138
Perfume atomizer .......................... 147
Problem with the rear window
heating .......................................... 146
Problems with cooling with air
dehumidification ............................ 142
Setting the air distribution ............. 143
Setting the air vents ...................... 155
Setting the airflow ......................... 144
Setting the climate mod e............... 143
Setting the temperature ................ 143
Switching air-recirculation mode
on/of f............................................ 146
Switching on/of f........................... 141
Switching residual heat on/off ...... 147
Switching the rear window heat-
ing on/of f...................................... 145
Switching the synchronisation
function on and off ........................ 144
Cockpit
Overview .......................................... 30
COLLISION PREVENTION ASSIST
PLUS
Activating/deactivating ................. 260
Display message ............................ 274
Operation/note s.............................. 72
COMAND display
Cleaning ......................................... 351
Combination switch .......................... 128
Consumption statistics (on-board
computer) .......................................... 250
Convenience closing feature ............ 101 Index
7
Page 25 of 417
Windscreen
Demisting ...................................... 144
Infrared reflective .......................... 336
Windscreen washer fluid
see Windscreen washer system
Windscreen washer system
Notes ............................................. 409
Topping up .................................... .343
Windscreen wipers
Problem (malfunction) ................... 136
Replacing the wiper blades ............ 134
Switching on/off ........................... 133
Winter operation
Important safety notes .................. 378
Radiator cover ............................... 340
Slippery road surfaces ................... 188
Snow chains .................................. 379
Summer tyres ................................ 378
Winter tyres
Limiting the speed (on-board com-
puter) ............................................. 264
M+S tyres ...................................... 378
Wiper blades
Cleaning ......................................... 349
Important safety notes .................. 134
Replacing ....................................... 134
Wooden trim (cleaning instruc-
tions) ................................................. .352
Workshop
see Qualified specialist workshop 22
Index
Page 136 of 417
X
To switch on/off: press the|button.
When the automatic interior lighting con-
trol is activated, the button is flush with the overhead control panel.
The interior lighting automatically switches
on if you:
R unlock the vehicle
R open a door
R remove the key from the ignition lock
The interior lighting is activated for a short
time when the key is removed from the igni-
tion lock. This delayed switch-off can be
adjusted using COMAND Online (see the sep- arate COMAND Online operating instruc-
tions).
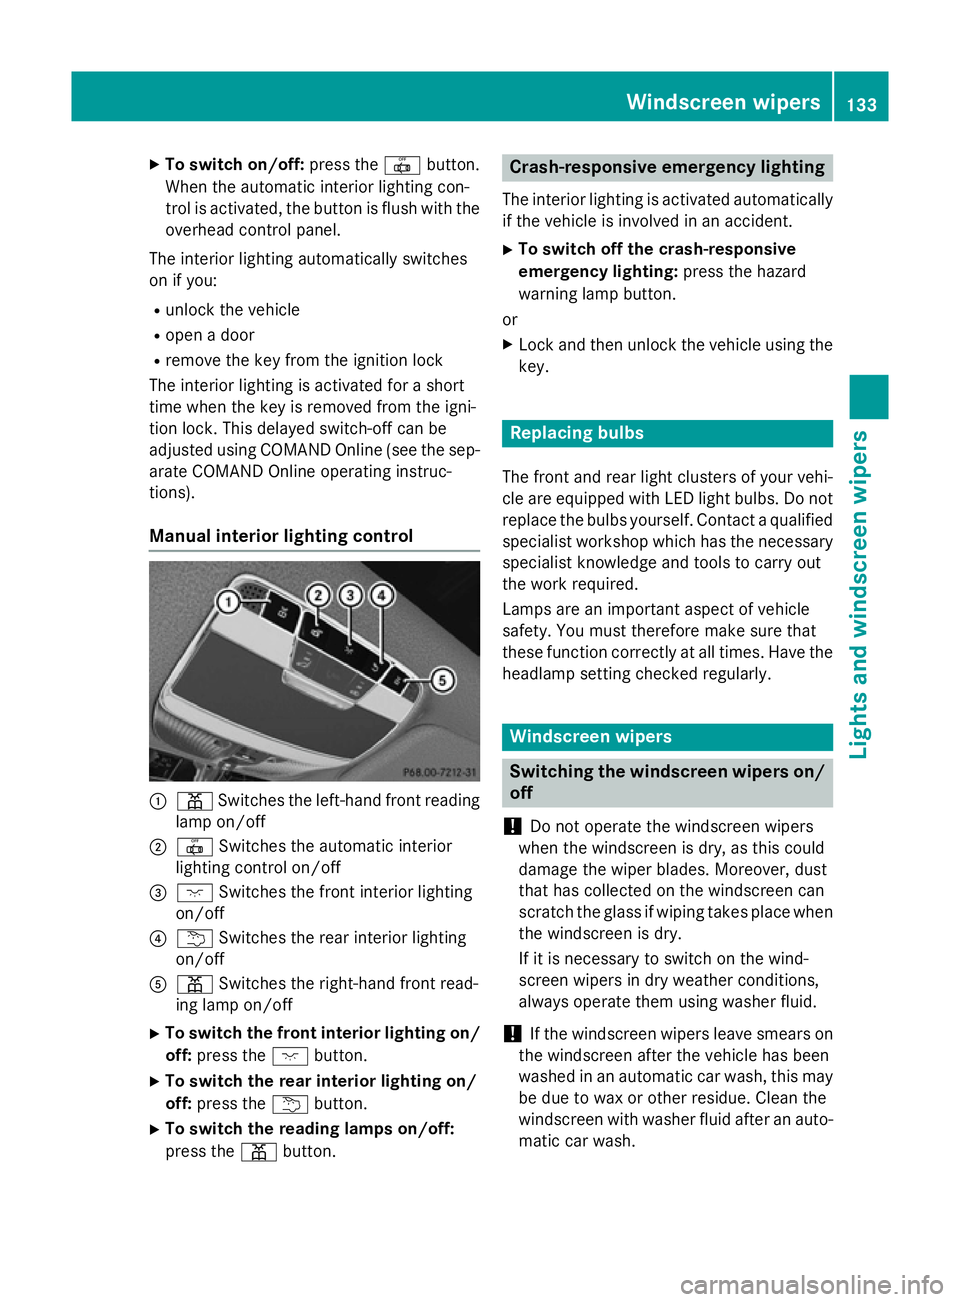
Manual interior lighting control :
p Switches the left-hand front reading
lamp on/off
; | Switches the automatic interior
lighting control on/off
= c Switches the front interior lighting
on/off
? u Switches the rear interior lighting
on/off
A p Switches the right-hand front read-
ing lamp on/off
X To switch the front interior lighting on/
off: press the cbutton.
X To switch the rear interior lighting on/
off: press the ubutton.
X To switch the reading lamps on/off:
press the pbutton. Crash-responsive emergency lighting
The interior lighting is activated automatically
if the vehicle is involved in an accident.
X To switch off the crash-responsive
emergency lighting: press the hazard
warning lamp button.
or X Lock and then unlock the vehicle using the
key. Replacing bulbs
The front and rear light clusters of your vehi-
cle are equipped with LED light bulbs. Do not replace the bulbs yourself. Contact a qualifiedspecialist workshop which has the necessaryspecialist knowledge and tools to carry out
the work required.
Lamps are an important aspect of vehicle
safety. You must therefore make sure that
these function correctly at all times. Have the
headlamp setting checked regularly. Windscreen wipers
Switching the windscreen wipers on/
off
! Do not operate the windscreen wipers
when the windscreen is dry, as this could
damage the wiper blades. Moreover, dust
that has collected on the windscreen can
scratch the glass if wiping takes place when the windscreen is dry.
If it is necessary to switch on the wind-
screen wipers in dry weather conditions,
always operate them using washer fluid.
! If the windscreen wipers leave smears on
the windscreen after the vehicle has been
washed in an automatic car wash, this may
be due to wax or other residue. Clean the
windscreen with washer fluid after an auto-
matic car wash. Windscreen wipers
133Lights andwindscreen wipers Z
Page 137 of 417

!
Vehicles with a rain sensor: if the wind-
screen becomes dirty in dry weather con-
ditions, the windscreen wipers may be acti- vated inadvertently. This could damage the
windscreen wiper blades or scratch the
windscreen.
For this reason, you should always switch
off the windscreen wipers in dry weather. 1
$ Windscreen wipers off
2 Ä Intermittent wipe, low (rain sensor
set to low sensitivity)
3 Å Intermittent wipe, high (rain sensor
set to high sensitivity)
4 ° Continuous wipe, slow
5 ¯ Continuous wipe, fast
B í Single wipe/î to wipe the wind-
screen using washer fluid
X Switch on the power supply with the Start/
Stop button or the key (Y page 161).
X Turn the combination switch to the corre-
sponding position.
In the ÄorÅ position, the appropriate
wiping frequency is set automatically accord- ing to the intensity of the rain. In the Å
position, the rain sensor is more sensitive
than in the Äposition, causing the wind-
screen wipers to wipe more frequently.
The washer fluid is fed through the wiper
blades; when the screen is wiped with washer
fluid î, the water is emitted directly from
the blades.
If you push the combination switch beyond
the point of resistance in the direction of
arrow Band hold it in this position, the man- ual wash programme is activated. If you
briefly push the combination switch beyond
the point of resistance in the direction of
arrow B, the automatic wash programme is
activated.
If the wiper blades are worn, the windscreen
will no longer be wiped properly. This could
prevent you from observing the traffic condi-
tions. Replacing the wiper blades
Important safety notes G
WARNING
If the windscreen wipers begin to move while
you are changing the wiper blades, you can be trapped by the wiper arm. There is a risk of
injury.
Always switch off the windscreen wipers and
ignition before changing the wiper blades.
! To avoid damaging the windscreen wiper
blades, make sure that you touch only the
wiper arm of the windscreen wiper.
! Never open the bonnet if a windscreen
wiper arm has been folded away from the
windscreen.
Hold the windscreen wiper arm firmly when you change the wiper blade. If you release
the windscreen wiper arm without a wiper
blade and it falls onto the windscreen, the
windscreen may be damaged by the force
of the impact.
Mercedes-Benz recommends that you have
the wiper blades changed at a qualified
specialist workshop.
! Always position the windscreen wiper
arms vertically before folding them away
from the windscreen. By doing so, you will
avoid damage to the bonnet. 134
Windscreen wipersLights and windscreen wipers
Page 138 of 417
Replacing the wiper blades
Moving the wiper blades to a vertical posi-
tion
On vehicles without KEYLESS-GO:
X Turn the key to position 0in the ignition
lock (Y page 161).
X Set the windscreen wipers to the °
position.
X Turn the key to position 1in the ignition
lock (Y page 161).
X As soon as the wiper arms are vertical to
the bonnet, turn the key to position 0in the
ignition lock (Y page 161).
X Remove the key.
X Fold the wiper arms away from the wind-
screen until you feel them snap into place.
On vehicles with KEYLESS-GO: X Switch off the engine.
X Remove your foot from the brake pedal.
X Set the windscreen wipers to position
°.
X Press the Start/Stop button repeatedly
until the windscreen wipers start.
X When the wiper arms have reached the ver-
tical position, press the Start/Stop button
repeatedly until the windscreen wipers
stop.
X Fold the wiper arms away from the wind-
screen until you feel them snap into place.
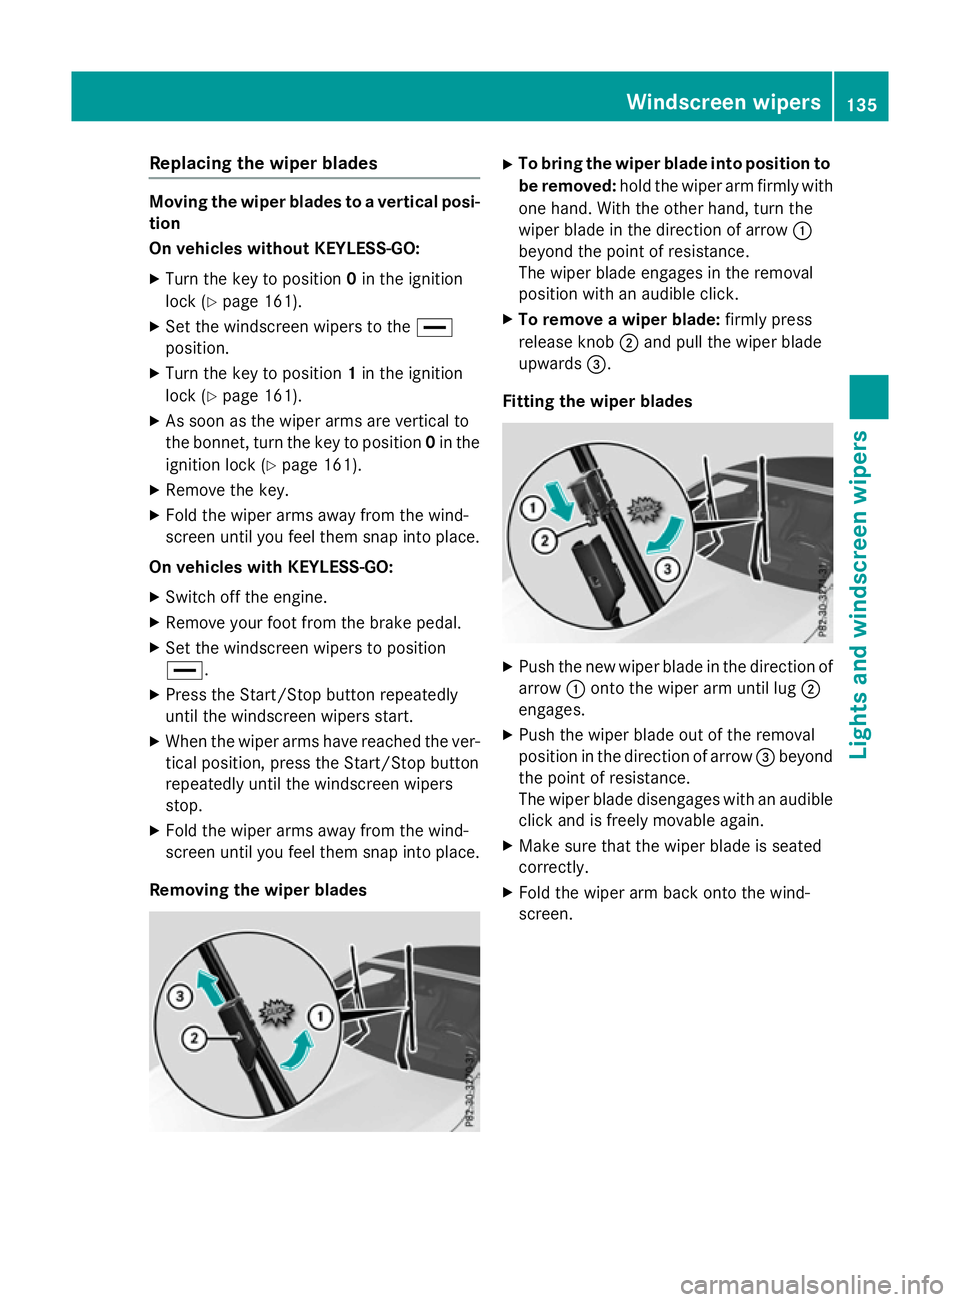
Removing the wiper blades X
To bring the wiper blade into position to
be removed: hold the wiper arm firmly with
one hand. With the other hand, turn the
wiper blade in the direction of arrow :
beyond the point of resistance.
The wiper blade engages in the removal
position with an audible click.
X To remove a wiper blade: firmly press
release knob ;and pull the wiper blade
upwards =.
Fitting the wiper blades X
Push the new wiper blade in the direction of
arrow :onto the wiper arm until lug ;
engages.
X Push the wiper blade out of the removal
position in the direction of arrow =beyond
the point of resistance.
The wiper blade disengages with an audible
click and is freely movable again.
X Make sure that the wiper blade is seated
correctly.
X Fold the wiper arm back onto the wind-
screen. Windscreen wipers
135Lights and windscreen wipers Z
Page 239 of 417

Problems with Night View Assist Plus
Problem
Possible causes/consequences and
M
MSolutions The picture quality of
Night View Assist Plus
has deteriorated. The windscreen is misted up on the inside.
X Fold down the camera cover (Y page 351).
X Demist the windscreen (Y page 144). The windscreen is iced up.
X De-ice the windscreen (Y page 144). The windscreen wipers are smearing the windscreen.
X Replace the wiper blades (Y page 134). The windscreen is smeared after the vehicle has been cleaned in a
car wash.
X Clean the windscreen (Y page 348). The windscreen has been damaged by stone impact in the cam-
era's field of vision.
X Replace the windscreen. The pedestrian and ani-
mal recognition is not
available. The infrared camera in the radiator grille is dirty.
X Use a soft cloth and water to clean the infrared camera. Driving Assistance Plus package
General notes The Driving Assistance PLUS package con-
sists of DISTRONIC PLUS (Y
page 194), Active
Blind Spot Assist (Y page 236) and Active
Lane Keeping Assist (Y page 239).
Active Blind Spot Assist General notes
Active Blind Spot Assist monitors the areas
on either side of the vehicle that are not visi-
ble to the driver with two lateral, rear-facing
radar sensors. A warning display in the exte-
rior mirrors draws your attention to vehicles
detected in the monitored area. If you then
switch on the corresponding turn signal to
change lanes, you will also receive a visual
and audible collision warning. If a risk of side impact is detected, corrective braking may
help you avoid a collision. Active Blind Spot
Assist evaluates the free space in the direc-
tion of travel and to the side before making a
course-correcting brake application. For this,Active Blind Spot Assist uses the forward-
facing radar sensors.
Active Blind Spot Assist supports you from a
speed of approximately 30 km/h.
Important safety notes
Active Blind Spot Assist is only an aid and is
not a substitute for attentive driving. 236
Driving systemsDriving and parking
Page 350 of 417
Wash off excess dirt before cleaning the vehi-
cle in an automatic car wash.
After using an automatic car wash, wipe off
wax from the windscreen and the wiper
blades. This will prevent smears and reduce
wiping noises caused by residue on the wind- screen.
Washing by hand In some countries, washing by hand is only
allowed at specially equipped washing bays.
Observe the legal requirements for each indi- vidual country.
X Do not use hot water and do not wash the
vehicle in direct sunlight.
X Use a soft sponge to clean.
X Use a mild cleaning agent, such as a car
shampoo approved by Mercedes-Benz.
X Thoroughly hose down the vehicle with a
gentle jet of water.
X Do not point the water jet directly towards
the air inlet.
X Use plenty of water and rinse out the
sponge frequently.
X Rinse the vehicle with clean water and dry
thoroughly with a chamois.
X Do not let the cleaning agent dry on the
paintwork.
When using the vehicle in winter, remove all
traces of road salt deposits carefully and as
soon as possible.
High-pressure cleaning equipment G
WARNING
The water jet of circular-jet nozzles (dirt grind- ers) can cause damage not visible from the
outside to tyres or chassis components. Com-
ponents damaged in this way can unexpect-
edly fail. There is a risk of an accident.
Do not use high-pressure cleaners with circu-
lar-jet nozzles to clean the vehicle. Have dam- aged tyres or chassis components replaced
immediately. !
Always maintain a distance of at least
30 cm between the vehicle and the high-
pressure cleaner nozzle. Information about
the correct distance is available from the
equipment manufacturer.
Move the high-pressure cleaner nozzle
around when cleaning your vehicle.
Do not aim directly at any of the following:
R tyres
R door gaps, roof gaps, joints etc.
R electrical components
R battery
R connectors
R lights
R seals
R trim elements
R ventilation slots
Damaged seals or electrical components
can lead to leaks or failures.
! If the key is within the rear detection
range of KEYLESS-GO, the following situa-
tions, for example, could lead to the boot lid opening unintentionally:
R using a car wash
R using a high-pressure cleaner
Make sure that the key is at least 3 m away
from the vehicle.
Cleaning the paintwork !
Do not affix:
R stickers
R films
R magnetic plates or similar items
to painted surfaces. You could otherwise
damage the paintwork.
Scratches, corrosive deposits, areas affected by corrosion and damage caused by inade-
quate care cannot always be completely
repaired. In such cases, visit a qualified spe-
cialist workshop. Care
347Maintenance and care Z
Page 351 of 417
X
Remove impurities immediately, where
possible, whilst avoiding rubbing too hard.
X Soak insect remains with insect remover
and rinse off the treated areas afterwards.
X Soak bird droppings with water and rinse
off the treated areas afterwards.
X Remove coolant, brake fluid, tree resin,
oils, fuels and greases by rubbing gently
with a cloth soaked in petroleum ether or
lighter fluid.
X Use tar remover to remove tar stains.
X Use silicone remover to remove wax.
Care and treatment of matt paintwork !
Never polish the vehicle or the light alloy
wheels. Polishing makes the paintwork
shiny.
! The following may cause the paint to
become shiny and thus reduce the matt
effect:
R vigorous rubbing with unsuitable materi-
als
R frequent use of car washes
R washing the vehicle in direct sunlight
! Never use paint cleaner, buffing or pol-
ishing products, or gloss preserver, e.g.
wax. These products are only suitable for
high-gloss surfaces. Their use on vehicles
with matt finish leads to considerable sur-
face damage (shiny, spotted areas).
Always have paintwork repairs carried out
at a qualified specialist workshop.
! Do not use wash programs with a hot wax
treatment under any circumstances.
Observe these notes if your vehicle has a
clear matt finish. This will help you to avoid
damage to the paintwork due to incorrect
treatment.
These notes also apply to light-alloy wheels
with a clear matt finish.
The vehicle should preferably be washed by
hand using a soft sponge, car shampoo and
plenty of water. Use only insect remover and car shampoo
from the range of approved Mercedes-Benz
care products. Cleaning vehicle parts
Cleaning the wheels G
WARNING
The water jet of circular-jet nozzles (dirt grind- ers) can cause damage not visible from the
outside to tyres or chassis components. Com-
ponents damaged in this way can unexpect-
edly fail. There is a risk of an accident.
Do not use high-pressure cleaners with circu-
lar-jet nozzles to clean the vehicle. Have dam- aged tyres or chassis components replaced
immediately.
! Do not use acidic wheel cleaning products
to remove brake dust. This could damage
wheel bolts and brake components.
! Do not park up the vehicle for an extended
period straight after cleaning it, particularly after having cleaned the wheels with wheel cleaner. Wheel cleaners could cause
increased corrosion of the brake discs and
brake pads/linings. For this reason, you
should drive for a few minutes after clean-
ing. Braking heats the brake discs and the
brake pads/linings, thus drying them. The
vehicle can then be parked up.
Cleaning the windows G
WARNING
If the windscreen wipers are set in motion
when cleaning the windscreen or wiper
blades, you could become trapped. There is a danger of injury.
Always switch off the windscreen wipers and
the ignition before cleaning the windscreen orwiper blades.
! Do not use dry cloths, abrasive products,
solvents or cleaning agents containing sol- vents to clean the inside of the windows. Do 348
CareMaintenance and care