2015 MERCEDES-BENZ S-CLASS COUPE towing
[x] Cancel search: towingPage 198 of 417

Important safety notes
G
WARNING
DISTRONIC PLUS does not react to:
R people or animals
R stationary obstacles on the road, e.g. stop-
ped or parked vehicles
R oncoming and crossing traffic
As a result, DISTRONIC PLUS may neither give
warnings nor intervene in such situations.
There is a risk of an accident.
Always pay careful attention to the traffic sit- uation and be ready to brake. G
WARNING
DISTRONIC PLUS cannot always clearly rec-
ognise other road users and complex traffic
conditions.
In such cases, DISTRONIC PLUS may:
R give an unnecessary warning and then
brake the vehicle
R neither give a warning nor intervene
R accelerate or brake unexpectedly
There is a risk of an accident.
Continue to drive carefully and be prepared to
brake, particularly if DISTRONIC PLUS warns
you. G
WARNING
DISTRONIC PLUS brakes your vehicle with up to 50 %of the maximum possible deceleration.
If this deceleration is not sufficient,
DISTRONIC PLUS alerts you with a visual and
acoustic warning. There is a risk of an acci-
dent.
Apply the brakes yourself in these situations
and try to take evasive action.
! When DISTRONIC PLUS or the HOLD
function is activated, the vehicle brakes
automatically in certain situations. To avoid damage to the vehicle, deactivate
DISTRONIC PLUS and the HOLD function in
the following or similar situations:
R when towing away
R in a car wash
If you fail to adapt your driving style,
DISTRONIC PLUS can neither reduce the risk
of an accident nor override the laws of phys-
ics. DISTRONIC PLUS cannot take road and
weather conditions or traffic conditions into
account. DISTRONIC PLUS is only an aid. You are responsible for the distance to the vehicle
in front, for vehicle speed, for braking in good time and for staying in lane.
Do not use DISTRONIC PLUS:
R in road and traffic conditions which do not
allow you to maintain a constant speed, e.g.
in heavy traffic or on winding roads
R on smooth or slippery roads. Braking or
accelerating can cause the drive wheels to lose traction and the vehicle could then
skid
R when there is poor visibility, e.g. due to fog,
heavy rain or snow
DISTRONIC PLUS may not detect narrow
vehicles driving in front, e.g. motorcycles, or
vehicles driving on a different line.
In particular, the detection of obstacles can
be impaired in the case of:
R dirt on the sensors or obscured sensors
R snow or heavy rain
R interference by other radar sources
R the possibility of strong radar reflections,
for example, in multi-storey car parks
If DISTRONIC PLUS no longer detects a vehi-
cle in front, it may unexpectedly accelerate to the speed stored. Driving systems
195Driving and parking Z
Page 209 of 417
Important safety notes
G
WARNING
When leaving the vehicle, it can still roll away despite being braked by the HOLD function if:
R there is a malfunction in the system or in
the voltage supply
R the HOLD function is deactivated by the
accelerator pedal being depressed, e.g. by
a vehicle occupant
R the electrical system in the engine com-
partment, the battery or the fuses are tam-
pered with
R the battery is disconnected
There is a risk of an accident.
Before leaving the vehicle, always deactivate
the HOLD function and secure the vehicle
from rolling away.
Further information on deactivating the HOLD function (Y page 206).
! When DISTRONIC PLUS or the HOLD
function is activated, the vehicle brakes
automatically in certain situations.
To avoid damage to the vehicle, deactivate DISTRONIC PLUS and the HOLD function in the following or similar situations:
R when towing away
R in a car wash
Activation conditions You can activate the HOLD function if all of
the following conditions are fulfilled:
R the vehicle is stationary
R the engine is running or if it has been auto-
matically switched off by the ECO start/
stop function
R the driver's door is closed or your seat belt
is fastened
R the electric parking brake is released
R the transmission is in position D,Ror N
R DISTRONIC PLUS is deactivated Activating the HOLD function
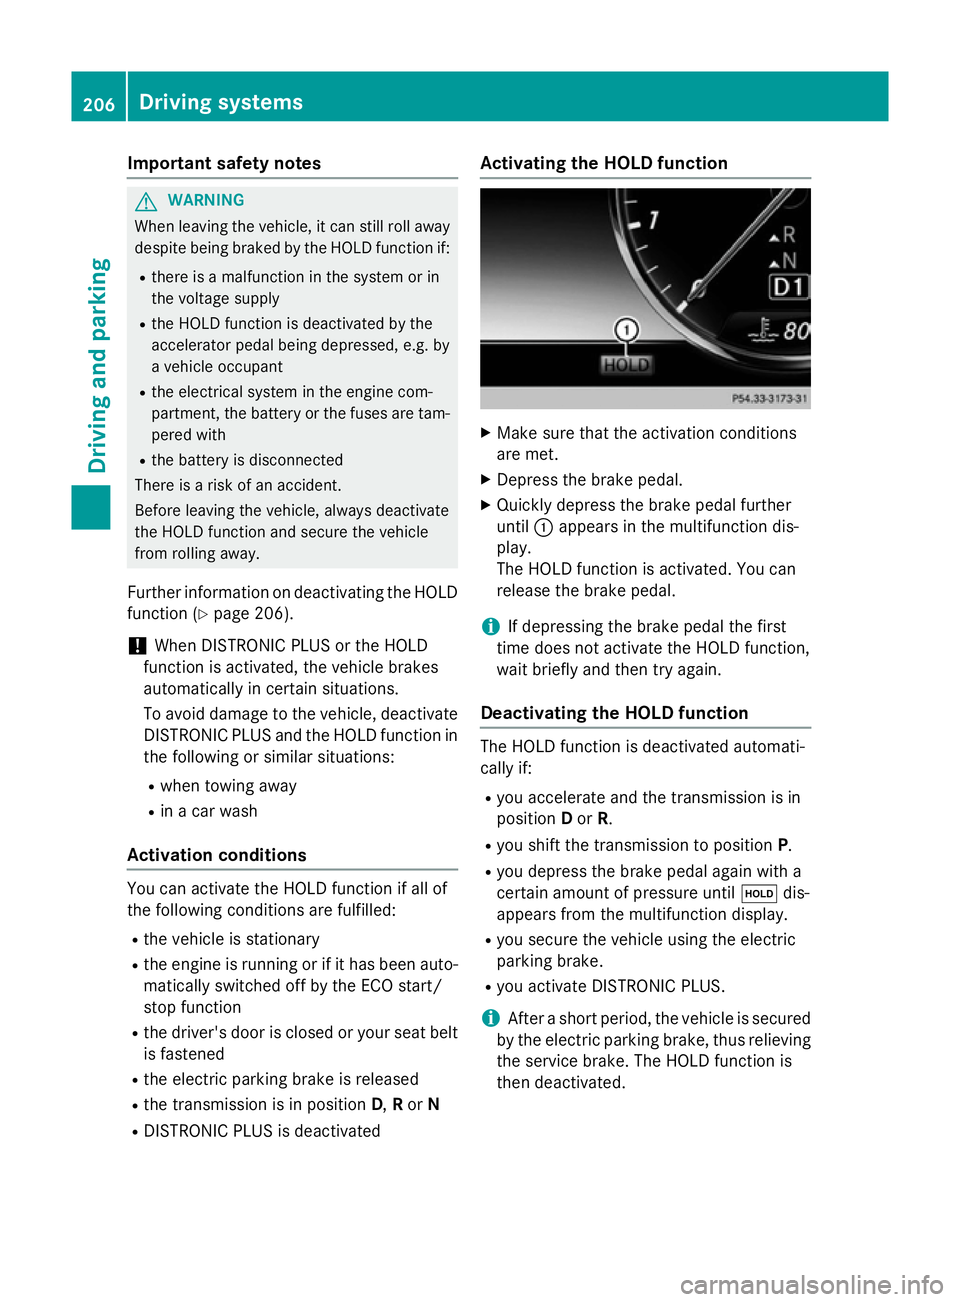
X
Make sure that the activation conditions
are met.
X Depress the brake pedal.
X Quickly depress the brake pedal further
until :appears in the multifunction dis-
play.
The HOLD function is activated. You can
release the brake pedal.
i If depressing the brake pedal the first
time does not activate the HOLD function,
wait briefly and then try again.
Deactivating the HOLD function The HOLD function is deactivated automati-
cally if:
R you accelerate and the transmission is in
position Dor R.
R you shift the transmission to position P.
R you depress the brake pedal again with a
certain amount of pressure until ëdis-
appears from the multifunction display.
R you secure the vehicle using the electric
parking brake.
R you activate DISTRONIC PLUS.
i After a short period, the vehicle is secured
by the electric parking brake, thus relieving
the service brake. The HOLD function is
then deactivated. 206
Driving systemsDriving and pa
rking
Page 215 of 417

X
If indicator lamp ;
;is not lit: press but-
ton :.
Indicator lamp ;lights up. You have selec-
ted "Comfort mode".
All vehicles except AMG vehicles: the
AIRMATIC COMFORT AIRMATIC COMFORT message appears in
the multifunction display.
AMG vehicles: theAMG Ride Control AMG Ride Control
COMFORT
COMFORT message appears in the multi-
function display.
All vehicles except AMG vehicles: if the
driving speed is higher than 160 km/h, the
vehicle is automatically lowered by 10 mm.
Load compensation The vehicle can compensate differences in
the vehicle level by raising or lowering the
axles. 4MATIC (permanent all-wheel drive)
4MATIC ensures that all four wheels are per-
manently driven. Together with ESP ®
, it
improves the traction of your vehicle when-
ever a drive wheel spins due to insufficient
grip.
If you fail to adapt your driving style, 4MATIC
can neither reduce the risk of accident nor
override the laws of physics. 4MATIC cannot
take account of road, weather and traffic con- ditions. 4MATIC is only an aid. You are
responsible for the distance to the vehicle in
front, for vehicle speed, for braking in good
time, and for staying in the lane.
If a drive wheel spins due to insufficient grip:
R when pulling away, only depress the accel-
erator pedal as far as is necessary.
R accelerate less when driving
! Never tow the vehicle with one axle
raised. This may damage the transfer case.
Damage of this sort is not covered by the
Mercedes-Benz implied warranty. All
wheels must remain either on the ground or be fully raised. Observe the instructions for towing the vehicle with all wheels in full
contact with the ground.
i In wintry driving conditions, the maximum
effect of 4MATIC can only be achieved if
you use winter tyres (M+S tyres),with snow
chains if necessary. PARKTRONIC
Important safety notes PARKTRONIC is an electronic parking aid with
ultrasonic sensors. It monitors the area
around your vehicle using six sensors in the
front bumper and six sensors in the rear
bumper. PARKTRONIC indicates visually and
audibly the distance between your vehicle
and an object.
PARKTRONIC is only an aid. It is not a substi-
tute for your attention to the immediate sur-
roundings. The responsibility for safe
manoeuvring and parking remains with you.
Make sure that there are no persons, animals
or objects in range while manoeuvring and
parking.
! When parking, pay particular attention to
objects above or below the sensors, such
as flower pots or trailer drawbars.
PARKTRONIC does not detect such objects
when they are in the immediate vicinity of
the vehicle. You could damage the vehicle
or the objects.
The sensors may not detect snow and
objects which absorb ultrasonic sources.
Ultrasonic sources, such as an automatic
car wash, a lorry's compressed-air brakes
or a pneumatic drill, could cause
PARKTRONIC to malfunction.
PARKTRONIC may not function correctly on uneven terrain.
PARKTRONIC is activated automatically when you:
R switch on the ignition
R shift the transmission to position D,Ror N 212
Driving systemsDriving and parking
Page 318 of 417
Useful information
............................316
Stowage areas ................................... 316
Features ............................................. 322 315Stowing and features
Page 319 of 417
Useful information
i This Owner's Manual describes all mod-
els, series and optional equipment for your
vehicle that were available at the time of
going to press. National variations are pos- sible. Note that your vehicle may not be
equipped with all of the functions descri-
bed. This is also the case for systems and
functions relevant to safety.
i Read the information on qualified special-
ist workshops: (Y page 26). Stowage areas
Loading guidelines
G
WARNING
Combustion engines emit poisonous exhaust
gases such as carbon monoxide. Exhaust
gases can enter the vehicle interior if the boot
lid is open when the engine is running, espe-
cially if the vehicle is in motion. There is a risk of poisoning.
Always switch off the engine before opening
the boot lid. Never drive with the boot lid
open. G
WARNING
If objects, luggage or loads are not secured or not secured sufficiently, they could slip, tip
over or be flung around and thereby hit vehicle
occupants. There is a risk of injury, especially when braking or abruptly changing directions.
Always store objects so that they cannot be
flung around. Secure objects, luggage or
loads against slipping or tipping before the
journey. G
WARNING
The exhaust tail pipe and tail pipe trim can
become very hot. If you come into contact
with these parts of the vehicle, you could burn
yourself. There is a risk of injury. Always be particularly careful around the
exhaust tail pipe and the tail pipe trim. Allow
these components to cool down before touch-
ing them.
The handling characteristics of a laden vehi-
cle are dependent on the distribution of the
load within the vehicle. For this reason, you
should observe the following notes when
transporting a load:
R never exceed the maximum permissible
gross vehicle weight or the permissible axle
loads for the vehicle (including occupants).
R the boot is the preferred place to carry
objects.
R position heavy loads as far forwards as pos-
sible and as low down in the boot as pos-
sible.
R the load must not protrude above the upper
edge of the seat backrests.
R always place the load behind unoccupied
seats if possible.
R secure the load with sufficiently strong and
wear-resistant lashing material. Pad sharp
edges for protection.
i Load restraints are available at any quali-
fied specialist workshop, e.g. a Mercedes-
Benz Service Centre. Stowage compartments
Important safety notes G
WARNING
If you do not correctly store objects in the
vehicle interior, they can slip or be flung
around, thus striking vehicle occupants.
There is a risk of injury, especially when brak- ing or abruptly changing directions.
R Always store objects so that they cannot be
flung around in these or in similar situa-
tions.
R Always make sure that objects do not pro-
trude from stowage compartments, lug-
gage nets or stowage nets. 316
Stowage areasStowing and features
Page 320 of 417
R
Close lockable stowage compartments
while driving.
R Stow and secure objects that are heavy,
hard, pointy, sharp-edged, fragile or too
large in the boot.
Observe the loading guidelines (Y page 316).
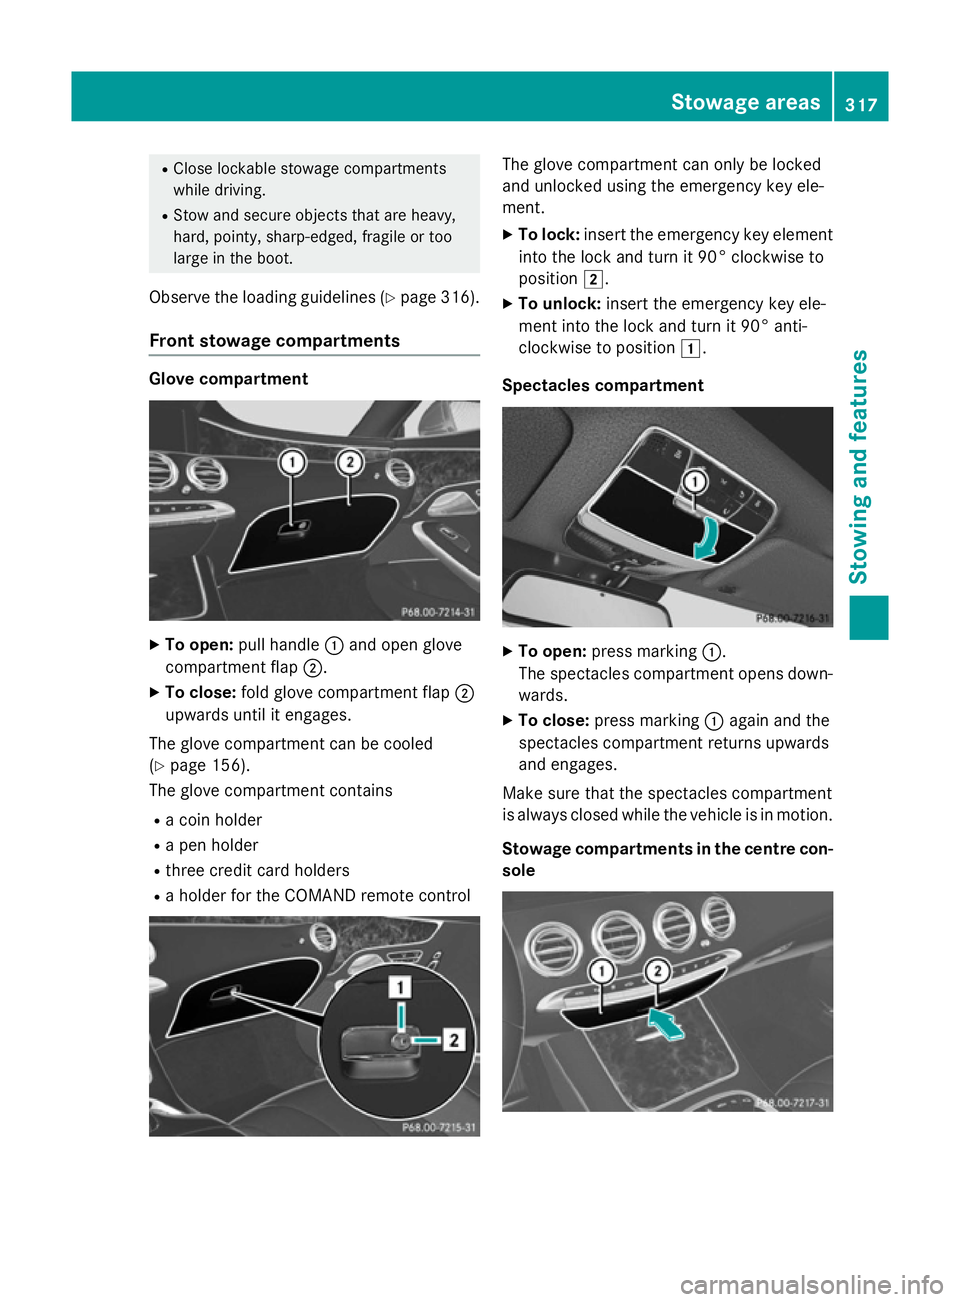
Front stowage compartments Glove compartment
X
To open: pull handle :and open glove
compartment flap ;.
X To close: fold glove compartment flap ;
upwards until it engages.
The glove compartment can be cooled
(Y page 156).
The glove compartment contains
R a coin holder
R a pen holder
R three credit card holders
R a holder for the COMAND remote control The glove compartment can only be locked
and unlocked using the emergency key ele-
ment.
X To lock: insert the emergency key element
into the lock and turn it 90° clockwise to
position 2.
X To unlock: insert the emergency key ele-
ment into the lock and turn it 90° anti-
clockwise to position 1.
Spectacles compartment X
To open: press marking :.
The spectacles compartment opens down- wards.
X To close: press marking :again and the
spectacles compartment returns upwards
and engages.
Make sure that the spectacles compartment
is always closed while the vehicle is in motion.
Stowage compartments in the centre con-
sole Stowage areas
317Stowing and features Z
Page 321 of 417
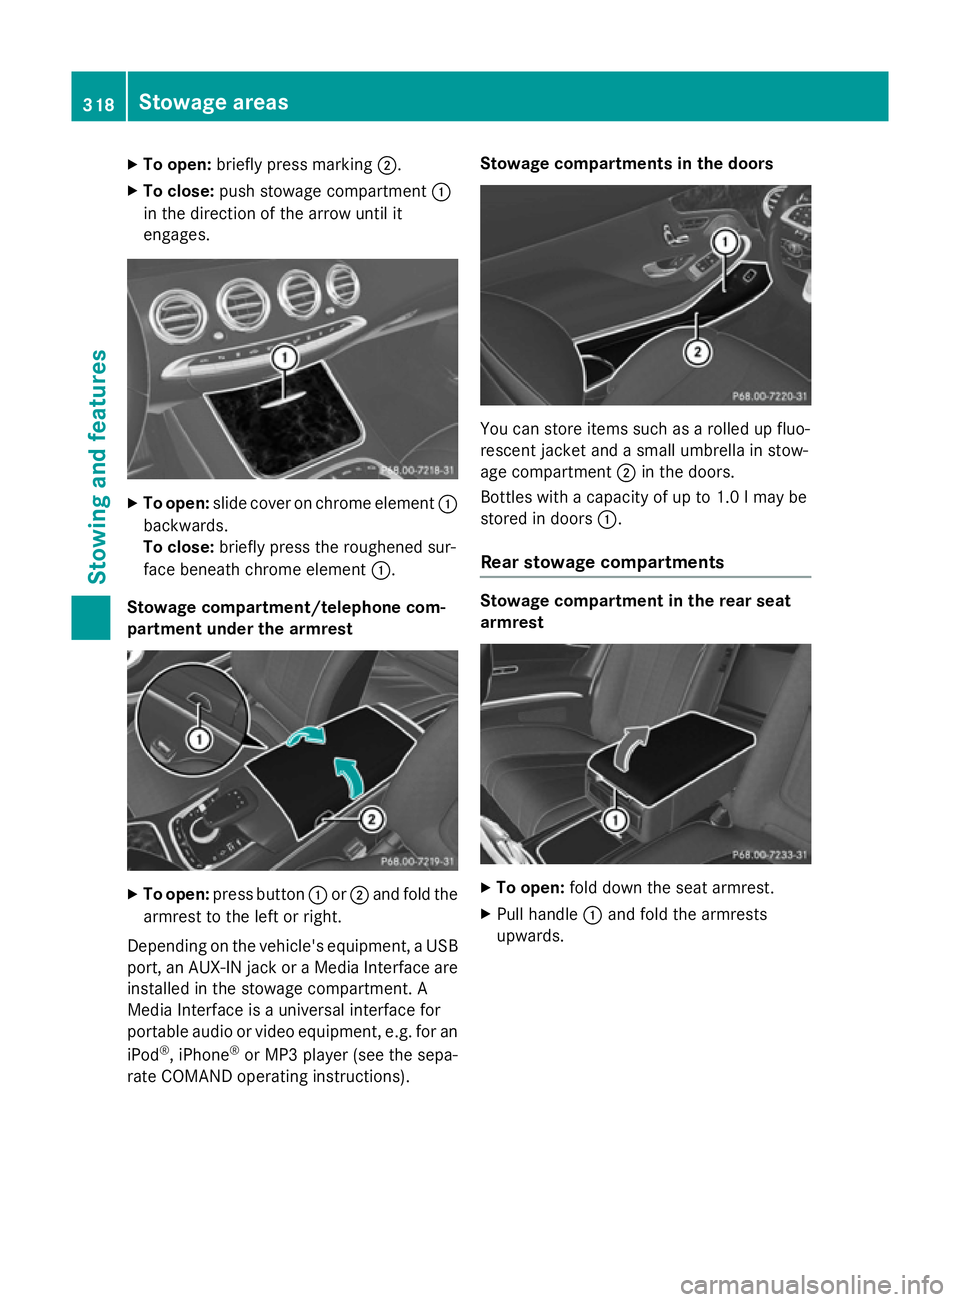
X
To open: briefly press marking ;.
X To close: push stowage compartment :
in the direction of the arrow until it
engages. X
To open: slide cover on chrome element :
backwards.
To close: briefly press the roughened sur-
face beneath chrome element :.
Stowage compartment/telephone com-
partment under the armrest X
To open: press button :or; and fold the
armrest to the left or right.
Depending on the vehicle's equipment, a USB port, an AUX-IN jack or a Media Interface areinstalled in the stowage compartment. A
Media Interface is a universal interface for
portable audio or video equipment, e.g. for an
iPod ®
, iPhone ®
or MP3 player (see the sepa-
rate COMAND operating instructions). Stowage compartments in the doors
You can store items such as a rolled up fluo-
rescent jacket and a small umbrella in stow-
age compartment ;in the doors.
Bottles with a capacity of up to 1.0 lmay be
stored in doors :.
Rear stowage compartments Stowage compartment in the rear seat
armrest
X
To open: fold down the seat armrest.
X Pull handle :and fold the armrests
upwards. 318
Stowage areasStowing and features
Page 322 of 417
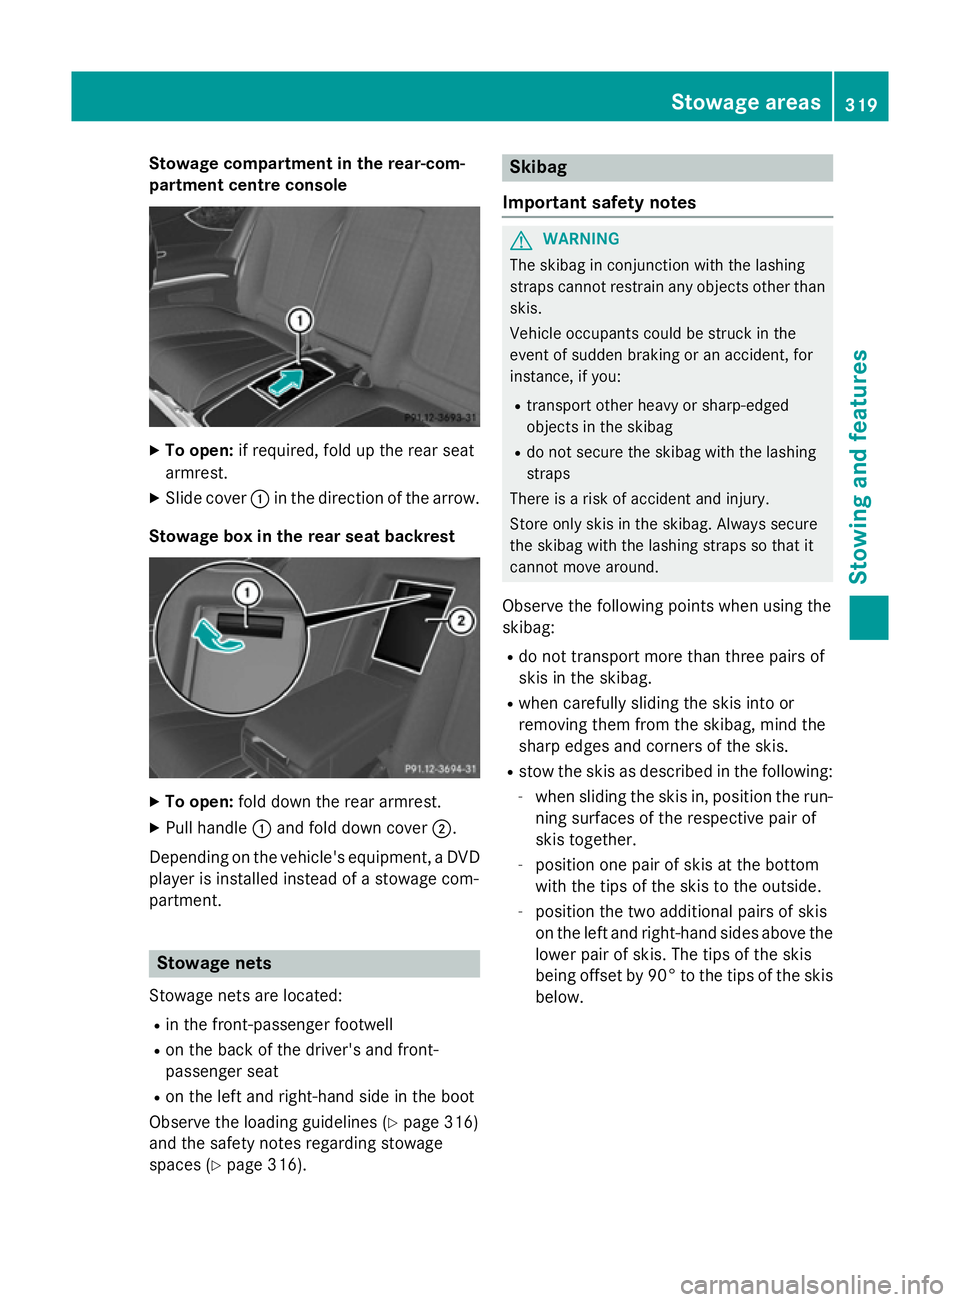
Stowage compartment in the rear-com-
partment centre console X
To open: if required, fold up the rear seat
armrest.
X Slide cover :in the direction of the arrow.
Stowage box in the rear seat backrest X
To open: fold down the rear armrest.
X Pull handle :and fold down cover ;.
Depending on the vehicle's equipment, a DVD
player is installed instead of a stowage com-
partment. Stowage nets
Stowage nets are located: R in the front-passenger footwell
R on the back of the driver's and front-
passenger seat
R on the left and right-hand side in the boot
Observe the loading guidelines (Y page 316)
and the safety notes regarding stowage
spaces (Y page 316). Skibag
Important safety notes G
WARNING
The skibag in conjunction with the lashing
straps cannot restrain any objects other than skis.
Vehicle occupants could be struck in the
event of sudden braking or an accident, for
instance, if you:
R transport other heavy or sharp-edged
objects in the skibag
R do not secure the skibag with the lashing
straps
There is a risk of accident and injury.
Store only skis in the skibag. Always secure
the skibag with the lashing straps so that it
cannot move around.
Observe the following points when using the
skibag:
R do not transport more than three pairs of
skis in the skibag.
R when carefully sliding the skis into or
removing them from the skibag, mind the
sharp edges and corners of the skis.
R stow the skis as described in the following:
- when sliding the skis in, position the run-
ning surfaces of the respective pair of
skis together.
- position one pair of skis at the bottom
with the tips of the skis to the outside.
- position the two additional pairs of skis
on the left and right-hand sides above the
lower pair of skis. The tips of the skis
being offset by 90° to the tips of the skis below. Stowage areas
319Stowing and features Z