2015 MERCEDES-BENZ S-CLASS COUPE key
[x] Cancel search: keyPage 21 of 417

Calling up a stored setting (mem-
ory function) .................................. 123
Cleaning the cover ........................ .352
Correct driver's seat position ....... .108
EASY-ENTRY/EXIT system ............. 118
Folding the backrests forward/
back ............................................... 112
Important safety notes .................. 109
Seat heating .................................. 113
Seat heating problem .................... 115
Seat ventilation .............................. 115
Seat ventilation problem ................ 116
Storing settings (memory func-
tion) ............................................... 123
Switching seat heating on/off ....... 113
Switching the seat ventilation on/
off ................................................. .115
Section
Wheels and tyres ........................... 376
Securing a load
see Stowage space
Securing luggage ............................... 321
Selector lever
Cleaning ......................................... 352
see Automatic transmission
Sensors (cleaning instructions) ....... 349
Service
see ASSYST PLUS
Service Centre
see Qualified specialist workshop
Service menu (on-board com-
puter) ................................................. .258
Service message
see ASSYST PLUS
Service products
Brake fluid ..................................... 408
Coolant (engine) ............................ 409
Engine oil ....................................... 407
Fuel ................................................ 405
Important safety notes .................. 404
Washer fluid ................................... 409
Settings
Factory (on-board computer) ......... 264
On-board computer ....................... 258
SETUP (on-board computer) ............. 265
Side lamps
Switching on/off ........................... 127 Side windows
Convenience closing ..................... .101
Convenience opening .................... 100
Important safety notes .................... 99
Opening/closing ............................ 100
Problem (malfunction) ................... 103
Resetting ....................................... 101
Reversing feature ............................ .99
Sidebag ................................................ 50
Skibag ................................................ 319
Snow chains ...................................... 379
Sockets
Centre console .............................. 325
General notes ................................ 325
Rear compartment .........................3 25
Specialist workshop ............................ 26
Spectacles compartment ................. 317
Speed, controlling
see Cruise control
Speedometer
Activating/deactivating the addi-
tional speedometer ........................ 264
Digital ............................................ 251
In the Instrument cluster ................. 32
Selecting a display unit .................. 263
see Instrument cluster
SPEEDTRONIC
Deactivating variable ..................... 194
Display message ............................ 293
Function/notes ............................ .191
General notes ................................ 191
Important safety notes .................. 192
LIM indicator lamp ......................... 192
Permanent ..................................... 194
Selecting ........................................ 192
Setting the spee d.......................... 193
Storing the current speed .............. 193
Storing the current speed or call-
ing up the last stored speed .......... 193
Switching to passive ...................... 193
Variable ......................................... 192
Start/Stop button
General notes ................................ 161
Key positions ................................. 162
Removing ....................................... 163
Starting the engine ........................ 164 18
Index
Page 24 of 417
From inside the vehicle (central
unlocking button) ............................. 91
Upshift indicator (on-board com-
puter, Mercedes-AMG vehicles) ....... 265V
Vanity mirror (in sun visor) .............. 323
Variable SPEEDTRONIC
see SPEEDTRONIC
Vehicle
Correct use ...................................... 26
Data acquisition ............................... 27
Display messag e............................ 297
Electronics ..................................... 402
Equipment ....................................... 24
Implied warranty .............................. 26
Individual settings .......................... 258
Leaving parked up ......................... 184
Locking (in an emergency) ............... 93
Locking (key) ................................... 85
Lowering ........................................ 390
Operating safety .............................. 24
Parking .......................................... 181
Pulling away ................................... 164
Raising ........................................... 387
Registration ..................................... 26
Securing from rolling away ............ 387
Towing away .................................. 369
Transporting .................................. 371
Unlocking (in an emergency) ........... 93
Unlocking (key) ................................ 85
Vehicle data ................................... 410
Vehicle dimensions ........................... 410
Vehicle emergency locking ................ 93
Vehicle identification number
see VIN
Vehicle identification plate .............. 404
Vehicle level
Active Body Control ABC ............... 207
AIRMATIC ...................................... 210
Display message ............................ 287
Vehicle tool kit .................................. 357
Video
Operating the DVD ......................... 255
VIN ...................................................... 404 W
Warning and indicator lamps ABS ................................................ 305
Brakes ........................................... 304
Distance warning signal ................. 312
ESP ®
.............................................. 307
ESP ®
OFF ....................................... 308
Fuel tank ........................................ 310
General notes ................................ 302
LIM (cruise control) ........................ 189
LIM (DISTRONIC PLUS) .................. 196
LIM (variable SPEEDTRONIC) ......... 192
Overview .......................................... 33
Parking brake ................................ 309
PASSENGER AIR BAG ...................... 43
Reserve fuel ................................... 310
Seat belt ........................................ 302
Steering ......................................... 314
Tyre pressure monitor ................... 313
Warning triangle ................................ 356
Washer fluid
Display message ............................ 300
Wheel and tyre combinations
Tyres .............................................. 393
Wheel bolt tightening torque ........... 390
Wheel chock ...................................... 387
Wheels
Changing a whee l.......................... 385
Changing/replacing ....................... 386
Checking ........................................ 377
Cleaning ......................................... 348
Fitting a new wheel ........................ 390
Fitting a wheel ............................... 386
General notes ................................ 391
Important safety notes .................. 376
Information on driving .................... 376
Removing a whee l.......................... 389
Snow chains .................................. 379
Storing ........................................... 386
Tightening torque ........................... 390
Wheel size/tyre size ...................... 391
Windowbag
Operation ......................................... 51
Windows
Cleaning ......................................... 348
see Side windows Index
21
Page 39 of 417

Centre console
Function Page
:
Switches COMAND Online
on/off (see the separate
operating instructions)
;
Adjusts/mutes the volume
(see the separate operating
instructions) =
è
ECO start/stop func-
tion 166
?
Touchpad (see the separate
operating instructions) Telephone keypad (see the
separate operating instruc-
tions)
A
É
Sets the vehicle level 207,
210 B
Adjusts the suspension set-
tings 208,
210 C
Û
Selects the drive pro-
gram/program selector
button 173
Ñ
Selects the drive pro-
gram/program selector
button (Mercedes-AMG
vehicles) 173 Function Page
D
Back button (see the sepa-
rate operating instructions)
E
Seat adjustment button
(see the separate operating
instructions) F
Navigation button (see the
separate operating instruc-
tions)
G
Radio button (see the sep-
arate operating instruc-
tions)
H
£
Hazard warning
lamps 128
I
Media button (see the sep-
arate operating instruc-
tions)
J
Telephone, address book
and Internet button (see
separate operating instruc-
tions)36
Centre consoleAt a glance
Page 45 of 417
Useful information
i This Owner's Manual describes all mod-
els, series and optional equipment for your
vehicle that were available at the time of
going to press. National variations are pos- sible. Note that your vehicle may not be
equipped with all of the functions descri-
bed. This is also the case for systems and
functions relevant to safety.
i Read the information on qualified special-
ist workshops: (Y page 26). Panic alarm
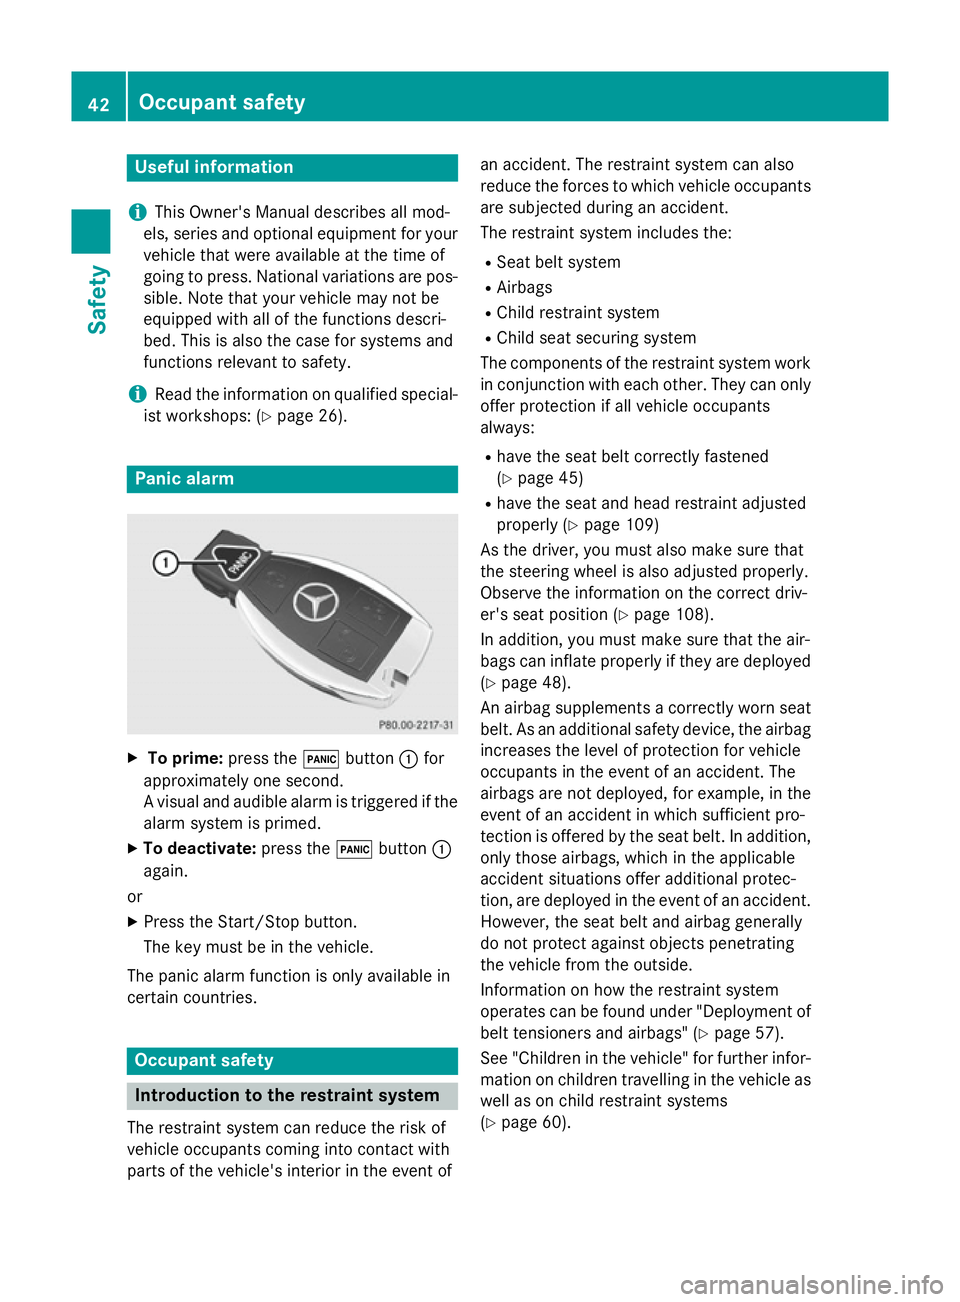
X
To prime: press the!button :for
approximately one second.
A visual and audible alarm is triggered if the alarm system is primed.
X To deactivate: press the!button :
again.
or
X Press the Start/Stop button.
The key must be in the vehicle.
The panic alarm function is only available in
certain countries. Occupant safety
Introduction to the restraint system
The restraint system can reduce the risk of
vehicle occupants coming into contact with
parts of the vehicle's interior in the event of an accident. The restraint system can also
reduce the forces to which vehicle occupants
are subjected during an accident.
The restraint system includes the:
R Seat belt system
R Airbags
R Child restraint system
R Child seat securing system
The components of the restraint system work
in conjunction with each other. They can only
offer protection if all vehicle occupants
always:
R have the seat belt correctly fastened
(Y page 45)
R have the seat and head restraint adjusted
properly (Y page 109)
As the driver, you must also make sure that
the steering wheel is also adjusted properly.
Observe the information on the correct driv-
er's seat position (Y page 108).
In addition, you must make sure that the air-
bags can inflate properly if they are deployed (Y page 48).
An airbag supplements a correctly worn seat
belt. As an additional safety device, the airbag
increases the level of protection for vehicle
occupants in the event of an accident. The
airbags are not deployed, for example, in the event of an accident in which sufficient pro-
tection is offered by the seat belt. In addition,
only those airbags, which in the applicable
accident situations offer additional protec-
tion, are deployed in the event of an accident.
However, the seat belt and airbag generally
do not protect against objects penetrating
the vehicle from the outside.
Information on how the restraint system
operates can be found under "Deployment of
belt tensioners and airbags" (Y page 57).
See "Children in the vehicle" for further infor-
mation on children travelling in the vehicle as well as on child restraint systems
(Y page 60). 42
Occupant safetySafety
Page 49 of 417
R
the seat belt is not twisted.
Only then can the forces produced during
an accident be distributed across the sur-
face of the seat belt.
R the shoulder section of the belt is routed
across the centre of your shoulder.
The shoulder section of the belt should not
touch the neck nor be routed under your
arm.
R the lap belt is fastened closely and routed
as low as possible across your lap, i.e.
across your hips.
The lap belt must always be routed across
the hip joints and never across your stom-
ach or abdomen. This is of particular impor-
tance for pregnant women. If necessary,
push the lap belt downwards into your pel-
vic area and pull it tight using the shoulder section of the belt.
R the seat belt is not routed across sharp-
edged, pointed or breakable objects.
Should you have such objects on or in your
clothing, e.g. pens, keys or spectacles,
stow these in a suitable place.
R only one person uses each seat belt at any
one time.
Infants and children must never travel sit-
ting on the lap of another vehicle occupant. In the event of an accident, they could be
crushed between vehicle occupant and
seat belt.
R never to secure objects with a seat belt if
the seat belt is also being used by a vehicle
occupant
Also make sure that there are never any
objects between a person and the seat, e.g. pillows.
Seat belts are solely intended to secure and
restrain vehicle occupants. When securing
objects, luggage or loads, always observe the instructions and safety notes in "Loading
guidelines" (Y page 316). Fastening seat belts Observe the safety notes on the seat belt
(Y
page 44) and the notes on correct use of
seat belts (Y page 45). G
WARNING
If the seat-belt extender extends during the
journey, the seat belt is not sitting correctly
across your body. The seat belt then cannot
perform its intended protective function.
There is an increased risk of injury, possibly
even fatal.
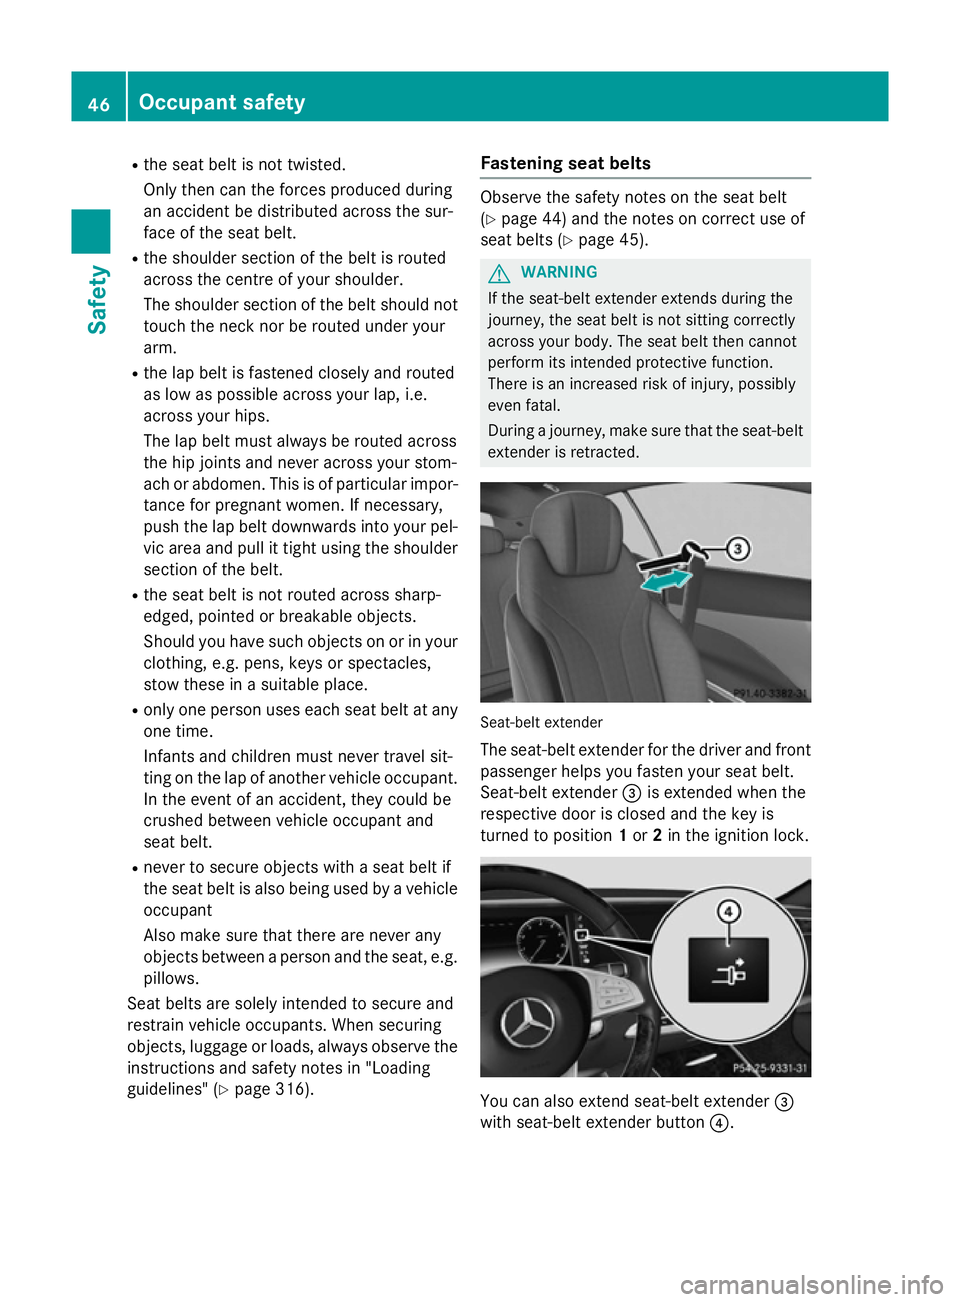
During a journey, make sure that the seat-belt extender is retracted. Seat-belt extender
The seat-belt extender for the driver and front passenger helps you fasten your seat belt.
Seat-belt extender =is extended when the
respective door is closed and the key is
turned to position 1or 2in the ignition lock. You can also extend seat-belt extender
=
with seat-belt extender button ?.46
Occupant safetySafety
Page 50 of 417
X
Press seat-belt extender button ?.
Seat-belt extender =extends.
Seat-belt extender =is retracted again if:
R the belt tongue is engaged in the seat belt
buckle
R the belt tongue is not engaged in the seat
belt buckle within 60 seconds
In this case, you can extend seat-belt
extender =again. Press seat-belt
extender button ?again.
R the respective door is opened
R the key is turned to position 0in the ignition
lock
R you release the seat backrest and fold it
forwards
R the front-passenger seat remains unoccu-
pied after approximately five seconds
If you press seat-belt extender button ?
after this, seat-belt extender =will not
extend. Basic illustration
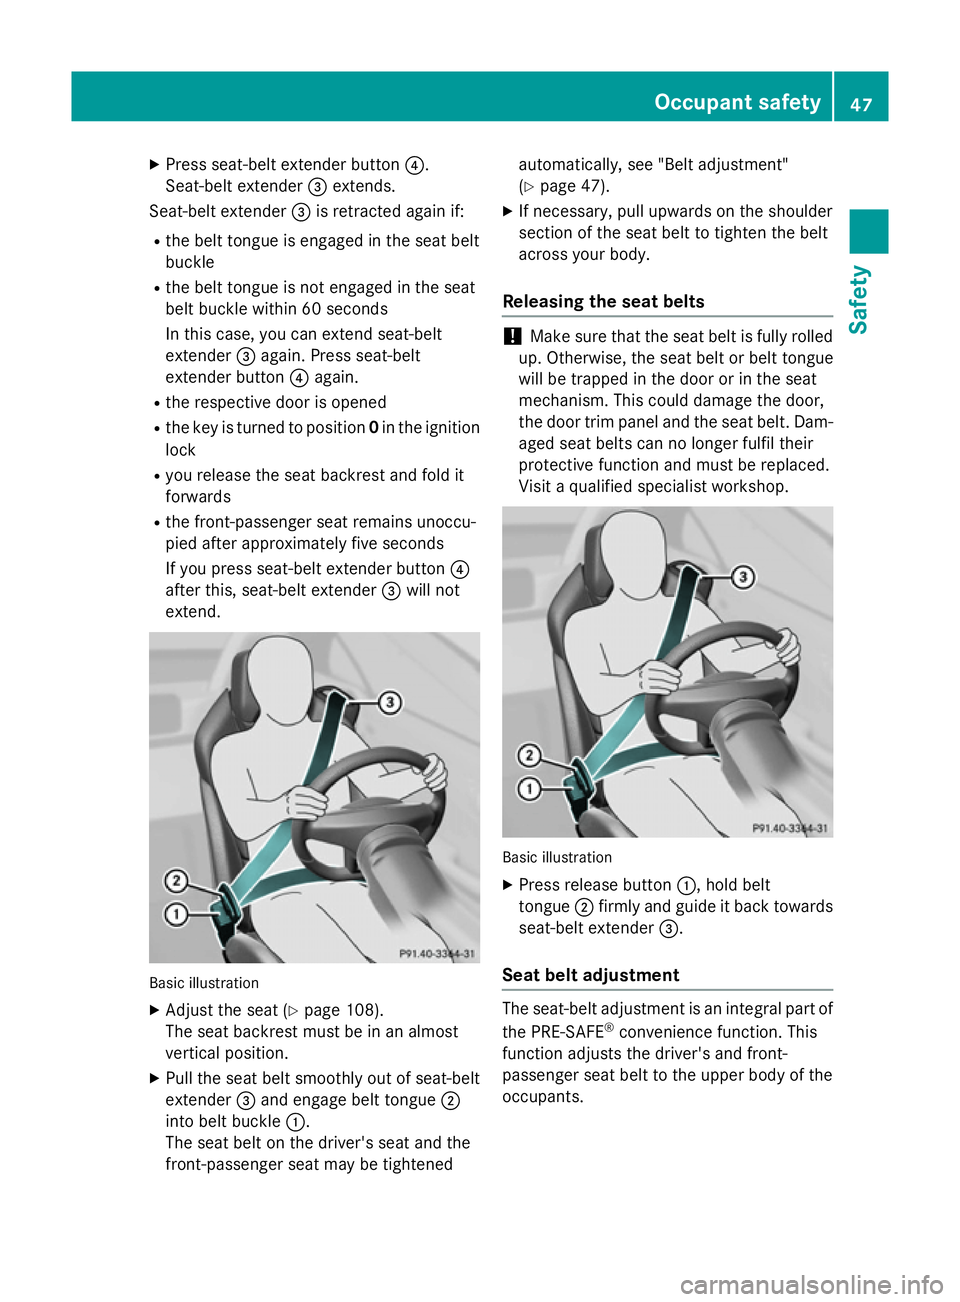
X Adjust the seat (Y page 108).
The seat backrest must be in an almost
vertical position.
X Pull the seat belt smoothly out of seat-belt
extender =and engage belt tongue ;
into belt buckle :.
The seat belt on the driver's seat and the
front-passenger seat may be tightened automatically, see "Belt adjustment"
(Y
page 47).
X If necessary, pull upwards on the shoulder
section of the seat belt to tighten the belt
across your body.
Releasing the seat belts !
Make sure that the seat belt is fully rolled
up. Otherwise, the seat belt or belt tongue
will be trapped in the door or in the seat
mechanism. This could damage the door,
the door trim panel and the seat belt. Dam- aged seat belts can no longer fulfil their
protective function and must be replaced.
Visit a qualified specialist workshop. Basic illustration
X Press release button :, hold belt
tongue ;firmly and guide it back towards
seat-belt extender =.
Seat belt adjustment The seat-belt adjustment is an integral part of
the PRE-SAFE ®
convenience function. This
function adjusts the driver's and front-
passenger seat belt to the upper body of the
occupants. Occupant safety
47Safety Z
Page 55 of 417
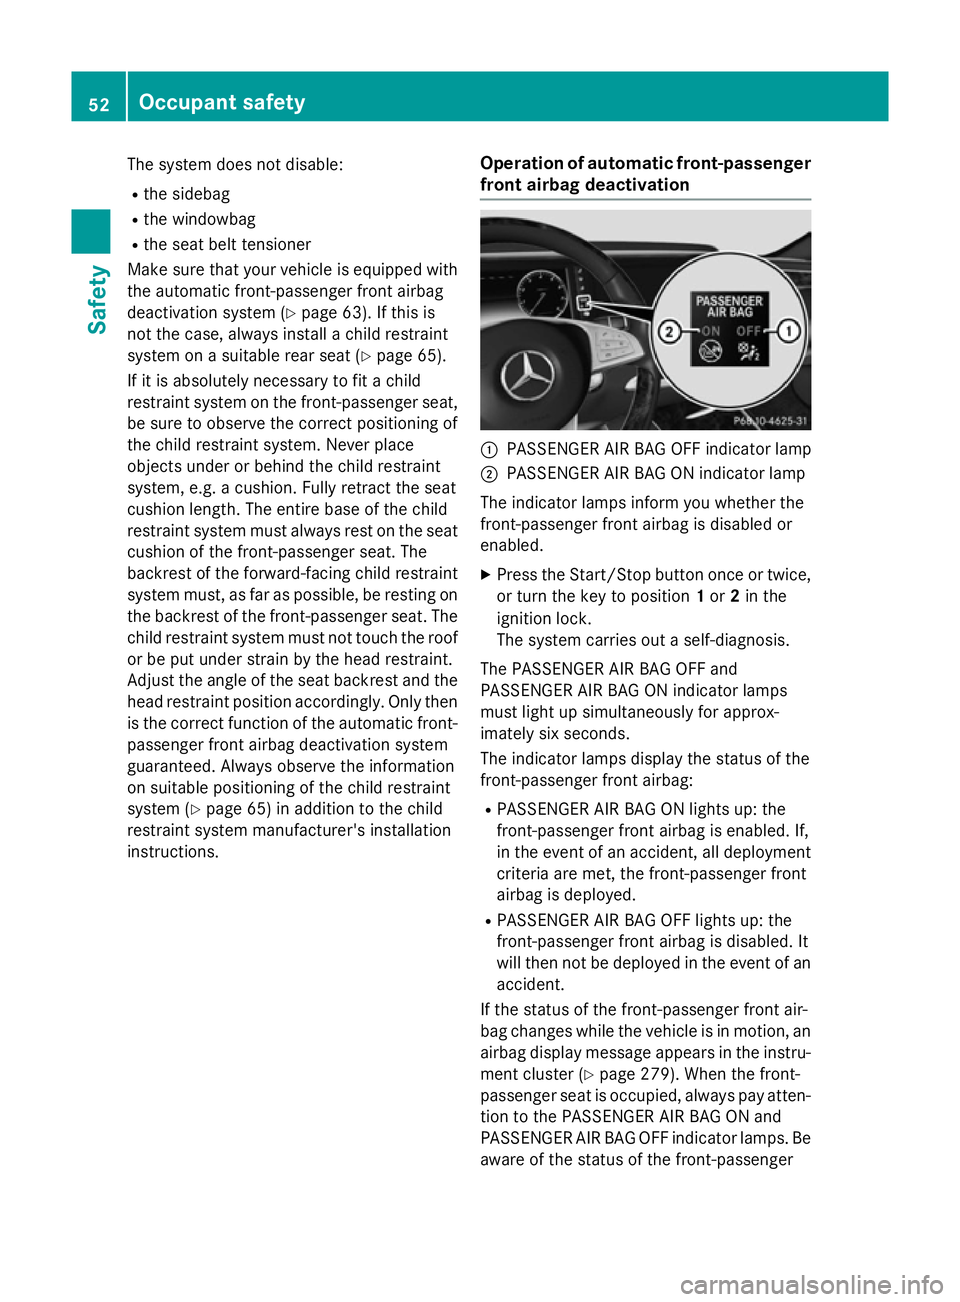
The system does not disable:
R the sidebag
R the windowbag
R the seat belt tensioner
Make sure that your vehicle is equipped with
the automatic front-passenger front airbag
deactivation system (Y page 63). If this is
not the case, always install a child restraint
system on a suitable rear seat (Y page 65).
If it is absolutely necessary to fit a child
restraint system on the front-passenger seat,
be sure to observe the correct positioning of
the child restraint system. Never place
objects under or behind the child restraint
system, e.g. a cushion. Fully retract the seat
cushion length. The entire base of the child
restraint system must always rest on the seat cushion of the front-passenger seat. The
backrest of the forward-facing child restraint
system must, as far as possible, be resting on the backrest of the front-passenger seat. The
child restraint system must not touch the roof or be put under strain by the head restraint.
Adjust the angle of the seat backrest and the
head restraint position accordingly. Only then is the correct function of the automatic front- passenger front airbag deactivation system
guaranteed. Always observe the information
on suitable positioning of the child restraint
system (Y page 65) in addition to the child
restraint system manufacturer's installation
instructions. Operation of automatic front-passenger
front airbag deactivation :
PASSENGER AIR BAG OFF indicator lamp
; PASSENGER AIR BAG ON indicator lamp
The indicator lamps inform you whether the
front-passenger front airbag is disabled or
enabled. X Press the Start/Stop button once or twice,
or turn the key to position 1or 2in the
ignition lock.
The system carries out a self-diagnosis.
The PASSENGER AIR BAG OFF and
PASSENGER AIR BAG ON indicator lamps
must light up simultaneously for approx-
imately six seconds.
The indicator lamps display the status of the
front-passenger front airbag:
R PASSENGER AIR BAG ON lights up: the
front-passenger front airbag is enabled. If,
in the event of an accident, all deployment
criteria are met, the front-passenger front
airbag is deployed.
R PASSENGER AIR BAG OFF lights up: the
front-passenger front airbag is disabled. It
will then not be deployed in the event of an accident.
If the status of the front-passenger front air-
bag changes while the vehicle is in motion, an
airbag display message appears in the instru-
ment cluster (Y page 279). When the front-
passenger seat is occupied, always pay atten-
tion to the PASSENGER AIR BAG ON and
PASSENGER AIR BAG OFF indicator lamps. Be aware of the status of the front-passenger 52
Occupant safetySafety
Page 63 of 417

PRE-SAFE
®
PLUS takes the following meas-
ures depending on the hazardous situation
detected:
R if the radar sensor system detects that a
head-on collision is imminent, the seat
belts are pre-tensioned
R if the radar sensor system detects that a
rear-end collision is imminent:
- the rear hazard warning lamps are acti-
vated and flash at a higher frequency
- the brake pressure is increased if the
driver applies the brakes when the vehi-
cle is stationary
- the seat belts are pre-tensioned
The PRE-SAFE ®
PLUS braking application is
cancelled:
R if the accelerator pedal is depressed when
a gear is engaged
R if the risk of a collision passes or is no lon-
ger detected
R if DISTRONIC PLUS indicates an intention
to pull away
If the hazardous situation passes without
resulting in an accident, the original settings
are restored. Automatic measures after an acci-
dent
Immediately after an accident, the following
measures are implemented, depending on
the type and severity of the impact:
R the hazard warning lamps are activated
R the emergency lighting is activated
R the vehicle doors are unlocked
R the front side windows are lowered
R the electrically adjustable steering wheel is
raised
R the engine is switched off and the fuel sup-
ply is cut off
R vehicles with the Mercedes-Benz emer-
gency call system: automatic emergency
call Children in the vehicle
Important safety notes
Accident statistics show that children
secured in the rear seats are safer than chil-
dren secured in the front-passenger seat. For this reason, Mercedes-Benz strongly advises
that you install a child restraint system on a
rear seat. Children are generally better pro-
tected there.
If a child younger than twelve years old and
under 1.50 m in height is travelling in the
vehicle:
R always secure the child in a child restraint
system suitable for Mercedes-Benz vehi-
cles. The child restraint system must be
appropriate to the age, weight and size of
the child.
R be sure to observe the instructions and
safety notes in this section in addition to
the child restraint system manufacturer's
installation instructions.
R always pay attention to the instructions
and safety notes on the automatic front-
passenger front airbag deactivation system (Y page 51). G
WARNING
If you leave children unattended in the vehi-
cle, they may be able to set the vehicle in
motion if, for example, they:
R release the parking brake
R shift the automatic transmission out of park
position P
R start the engine
In addition, they may operate vehicle equip-
ment and become trapped. There is a risk of
an accident and injury.
When leaving the vehicle, always take the key
with you and lock the vehicle. Never leave
children unattended in the vehicle. G
WARNING
If persons (particularly children) are exposed
to heat or cold for a prolonged period, there is 60
Children in the vehicleSafety