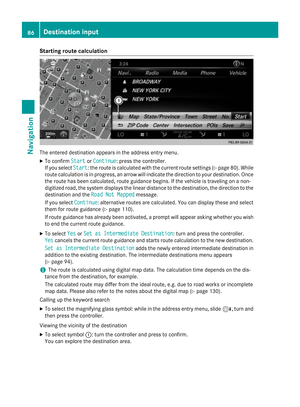
Page 177 of 298

If the data is not correct, you can edit the
settings (Y
page 177).
If the mobile phone network provider pro-
vides multiple access data options, the rele-
vant access data still has to be selected. This
depends on the data package used, for exam- ple.
The access data for the mobile phone net-
work provider is selected once for the mobile
phone connected and is loaded again each
time the mobile phone is connected. Estab-
lishing a connection (Y page 178).
You must set the access data of the mobile
phone network provider who provides the
SIM card and the associated data package
(access settings) for the connected mobile
phone. The access data remains the same
when you are in a different country (roaming). The access data of another network is not
selected.
Manually setting the access data of the
mobile phone network provider X
To select Manual Settings Manual Settings: turn and
press the controller.
An overview of the provider settings
appears.
X Set access data (Y page 175).
X To confirm settings: select Confirm Set‐
Confirm Set‐
tings tings by turning and pressing the control-
ler.
The access data for the mobile phone net-
work provider is selected once for the mobile
phone connected and is loaded again each time the mobile phone is connected. Estab-
lishing a connection (Y
page 178).
You must set the access data of the mobile
phone network provider who provides the
SIM card and the associated data package
(access settings) for the connected mobile
phone. The access data remains the same
when you are in a different country (roaming). The access data of another network is not
selected.
Setting access data Set the access data in accordance with your
data package. You can contact your mobile
phone network provider to obtain the precise
access data.
Selecting PDP Type
X To select PDP Type: PDP Type: from the list of pro-
vider settings: turn and press the control-
ler.
X To select the desired setting: turn and
press the controller.
Searching by phone number
X Select Phone Number: Phone Number: in the list of pro-
vider settings.
An input menu appears.
X Enter the telephone number.
X To confirm the entry: select OK
OK. Setting up an Internet connection
175Online and Internet functions Z
Page 178 of 298

Entering the user ID
X Select User ID:
User ID: in the list of provider set-
tings.
An input menu appears.
X Enter the user ID.
X To confirm the entry: select OK OK.
Entering a password X Select Password:
Password: in the list of provider
settings.
An input menu appears.
X Enter the password.
X To confirm the entry: select OK OK.
Explanation of the access data Input field Meaning
Phone Num‐
Phone Num‐
ber: ber: Access number for estab-
lishing the connection
The access number
depends on the mobile
phone used. For GSM/
UMTS mobile phones,
*99***1# *99***1#
is used as a
standard. Access
Access
Point Name: Point Name: APN network access point
( Access PointName)
You can obtain this infor-
mation from your mobile
phone network provider.
Entry is not necessary for
all mobile phone network
providers and mobile
phones. PDP Type: PDP Type: Internet protocol used.
You can obtain this infor-
mation from your mobile
phone network provider. Input field Meaning
User ID: User ID: The user identification
can be obtained from your
mobile phone network
provider.
Entry is not necessary for
all mobile phone network
providers. Password: Password: The password can be
obtained from your
mobile phone network
provider.
Entry is not necessary for
all mobile phone network
providers.
Auto DNS: Auto DNS: Automatic allocation of
DNS servers is activated.
If the function is deacti-
vated, the DNS server
addresses must be
entered manually.
DNS (Domain
Name
Service) DNS1: DNS1:
DNS2: DNS2: Fields for entering the
DNS server addresses
manually. The address
can be obtained from your
mobile phone network
provider. Managing existing access data
Calling up the device list 176
Setting up an Internet connectionOnline and Internet functions
Page 179 of 298

X
To call up the telephone menu: press the
002B button.
X To switch to the main function bar: slide
5 the controller.
X To select TEL/
TEL/00A7: press the controller.
X To select Internet
Internet: turn and press the
controller.
The menu with the Internet functions is dis-
played.
X To switch to the menu bar: slide 6the
controller.
X To select Settings Settings: turn and press the
controller.
X To select Configure Internet Set‐
Configure Internet Set‐
tings
tings: turn and press the controller.
The device list is displayed.
Editing the access data The mobile phone must be connected with
the system for the access data to be changed.
When the Internet connection is active, you
cannot edit or delete the access data of the
currently set mobile phone network provider.
X Call up the device list (Y page 176).
X To highlight the desired mobile phone in the
device list: turn the controller.
X To select G: slide 9the controller.
X To select Change Configuration
Change Configuration: turn
and press the controller.
X Select Predefined Settings Predefined Settings orManual
Manual
Settings
Settings.
The provider settings are displayed. In order to edit the access data of the mobile
phone network provider you have two
options:
R Option 1: select the predefined access data
of the mobile phone network provider
(Y page 174).
R Option 2: manually set the access data of
the mobile phone network provider
(Y page 175).
Canceling Internet access permissions
for a mobile phone X
Call up the device list (Y page 176).
X To highlight the desired mobile phone in the
device list: turn the controller.
X To select G: slide 9the controller.
X To select Delete Configuration Delete Configuration: turn
and press the controller.
A prompt appears asking whether you wish to delete the Internet configuration.
X To select Yes Yes: turn and press the controller.
The Internet access permission for the
mobile phone is now canceled. The mobile phone can now no longer be used by the
system for Internet functions.
or
X To select No No: turn and press the controller.
The process is canceled.
Changing the device name of the mobile phone X
Call up the device list (Y page 176).
X To highlight the desired mobile phone in the
device list: turn the controller.
X To select G: slide 9the controller.
X Select Change Internet Device Name
Change Internet Device Name.
A character entry appears.
X Enter name and confirm with 0054.
The device name is changed. Setting up an Internet connection
177Online and Internet functions Z
Page 180 of 298

Setting automatic disconnection of
the Internet connection
If a preset time has elapsed during which the Internet functions have not been used, the
Internet automatically disconnects.
X Call up the device list (Y page 176).
X To highlight the desired mobile phone in the
device list: turn the controller.
X To select G: slide 9the controller.
X To select Disconnect When Inactive
Disconnect When Inactive:
turn and press the controller.
X To select 5 Minutes 5 Minutes, 10 Minutes
10 Minutes, 20
20
Minutes
Minutes orNever
Never: turn and press the con-
troller. Establishing/ending the connection
Establishing the connection
Read the conditions for establishing a con-
nection (Y page 173).
A connection can be established by:
R entering a web address (Y page 190)
R calling up the Mercedes-Benz mobile web-
site. (Y page 187)
R calling up a Mercedes-Benz app.
(Y page 187)
R calling up a favorite.
R calling up the Internet radio (Y page 189)
R establishing an Internet connection via a
wireless networking device. The "Allow
shared WiFi usage" option must be acti-
vated on COMAND for this (Y page 49).
Ending the connection
X Press Cancel Cancel in the connections window. Connection status
0043
Display of existing connection and signal
strength of the mobile phone network
In most cases, the current connection status
is then shown in the status bar when you
switch to another main function. Detailed connection status
X To call up the telephone menu: press the
002B button.
X To switch to the main function bar: slide
5 the controller.
X To select TEL/
TEL/00A7: press the controller.
X To select Internet
Internet: turn and press the
controller.
The menu with the Internet functions is dis-
played.
X To switch to the menu bar: slide 6the
controller.
X To select Settings Settings: turn and press the
controller.
X To select Connection Status
Connection Status: turn and
press the controller.
The following information is displayed:
R the volume of transferred data
R connection status
R the device name of the mobile phone Ending the connection
USA: you cannot cancel the connection your-
self. The Internet connection is automatically
terminated if the system does not recognize 178
Establishing/ending the connectionOnline and Internet functions
Page 181 of 298

any user input within a five-minute time
period.
Canada:
X To call up the telephone menu: press the
002B button.
X To switch to the main function bar: slide
5 the controller.
X To select TEL/ TEL/00A7: press the controller.
X To select Internet
Internet: turn and press the
controller.
The menu with the Internet functions is dis-
played.
X To switch to the menu bar: slide 6the
controller.
X To select the scissors symbol: turn and
press the controller.
If the mobile phone Internet connection is
canceled, COMAND tries to reconnect. You
should therefore always close the connection on COMAND. Google™ local search
Calling up Local Search
You do not need a Google™ account to use
Local Search.
X To call up the telephone menu: press the
002B button.
X To switch to the main function bar: slide
5 the controller.
X To select TEL/
TEL/00A7: press the controller. X
To select Internet Internet: turn and press the
controller.
The menu with the Internet functions is dis-
played.
X To select Mercedes-Benz Apps Mercedes-Benz Apps: turn and
press the controller.
X To select Google
GoogleLocal
LocalSearch
Search : turn and
press the controller.
Further information on how to enter the
search position and search term
(Y page 179).
i You will first need to register COMAND
before you can use the Internet functions.
To do so, you have to enter your name and postal address once in the vehicle and con-
firm the general terms and conditions. Entering a search position and search
term It is only possible for the driver to enter a
search term when the vehicle is stationary.
The following options are available for
Local Search:
R At the current location At the current location
Searches for destinations near the current
vehicle position
R In In the
the Vicinity
Vicinity of
ofthe
the Destination
Destination
You can search for destinations in the vicin-
ity of the destination if route guidance is
active.
R At another location At another location
Searches for destinations near the location Google™ local search
179Online and Internet functions Z
Page 182 of 298

i
You can also select a destination from the
general search history.
X To select the required option: turn and
press the controller.
X To select Enter search term Enter search term : turn and
press the controller.
The input menu for the search term is dis-
played.
X To complete the entry and start the search,
select 0076: turn and press the controller.
The search results are displayed.
i Google™ determines how the search
results are sorted; this is not necessarily
based on the shortest distance.
Further information on how to make use of a
search result (Y page 180). Using search results
X To select a search result: turn and press the
controller.
A menu appears.
Displaying details X Select Details Details.
The address of the selected entry is dis-
played.
Using a search result as a destination X Select Set as Destination
Set as Destination.
The navigation is called up. You can use the
search result as the destination for route
calculation.
i At the same time the search result is
stored in the "Last destinations" memory.
You can take the destination from this
memory and save it permanently in the
contacts.
Calling a destination
X Select Call
Call .
The telephone menu is called up and a call
is activated.
i If there is no phone number available, the
menu item cannot be selected. Calling up Google™ Street View
X Select Google Street View Google Street View .
The Google™ Street View view is called up.
i If no Google™ Street View information is
available, a corresponding message
appears.
Calling up Panoramio by Google™
X Select Panoramio by Google Panoramio by Google.
Panoramio by Google™ is called up. You
see pictures of places worth seeing in the
vicinity of the search result. Popular searches
You can use this function if search queries
have already been carried out.
If the vehicle is stationary, the search results
can be supplemented manually, e.g. "Hotel
Adler".
X Call up Local Search (Y page 179).
X To select the search position, e.g. At
At cur‐ cur‐
rent location
rent location : turn and press the con-
troller.
X To select Popular searches
Popular searches : turn and
press the controller.
The most frequent search queries are dis-
played. Search history
You can use this function if search queries
have already been carried out. 180
Google™ local searchOnline and Internet functions
Page 183 of 298

If the vehicle is stationary, the search results
can be supplemented manually, e.g. "Hotel
Adler".
X Call up Local Search (Y page 179).
X To select a search position, e.g. At cur‐
At cur‐
rent location
rent location: turn and press the con-
troller.
X To select Search history Search history : turn and press
the controller.
The most recent search queries are dis-
played. Local Search settings
Calling up settings X
To call up the telephone menu: press the
002B button.
X To switch to the main function bar: slide
5 the controller.
X To select TEL/
TEL/00A7: press the controller.
X To select Internet Internet: turn and press the
controller.
The menu with the Internet functions is dis-
played.
X To select Mercedes-Benz Apps Mercedes-Benz Apps: turn and
press the controller.
X To select Google
GoogleLocal
LocalSearch
Search: turn and
press the controller.
X To select G: slide 9the controller.
The current settings are displayed. Setting the search radius X
Call up Local Search settings (Y page 181).
X To select Search radius
Search radius: turn and press
the controller.
A menu appears.
X To select the desired entry: turn and press
the controller.
The selected setting is accepted.
Exiting a menu
X Select 0039.
Resetting last location searches X
Call up Local Search settings (Y page 181).
X To select Reset last location Reset last location
searches
searches: turn the controller and press to confirm.
A prompt appears asking whether the last
location searches should be deleted.
X To select Yes Yes: turn and press the controller.
The search queries are deleted.
or
X To select No
No: turn and press the controller.
The process is canceled.
Deleting search queries X
Call up Local Search settings (Y page 181).
X To select Delete all searches Delete all searches : turn the
controller and press to confirm.
A prompt appears asking whether you
really wish to delete the last search quer-
ies.
X To select Yes Yes: turn and press the controller.
The last search queries are deleted.
or
X To select No
No: turn and press the controller.
The process is canceled. Destination/route download
Prerequisites
To download navigation locations you need a Google™ account and your vehicle identifica- Destination/route download
181Online and Internet functions Z
Page 184 of 298

tion number. Further information about the
vehicle identification number (VIN)
(Y page 184).
To download navigation locations, the
mbrace system must be:
R activated
R operational
R activated for the services of the system and
for Internet access
For information on the mbrace system, see
the separate vehicle Operator's Manual. Procedure and general information
Sign into your Google™ account on the Inter- net. Use the Google™ Maps website to send
the destination to a server (Y page 182).
Using the Download Download POI
POIApp, the destination
is displayed in the vehicle (Y page 182).
The destination can be:
R imported (Y page 183)
R used for route guidance (Y page 183)
R called up (Y page 183)
R deleted from the server (Y page 184)Sending destinations to the server
X Sign into your Google™ account.
X Call up the Google™ Maps website.
X Enter a destination.
X Click "More" at the destination.
X Click "Send".
X Enter the corresponding information in the
boxes shown.
X Select "Send to car".
X Select Mercedes-Benz as the vehicle
brand.
X Enter the mbrace e-mail address or the
vehicle identification number.
Further information about the vehicle iden- tification number (Y page 184).
X Click "Send".
The destination is sent to the server. The availability of the destination/route
download function is country-dependent. Displaying destinations in the vehicle
X
To call up the telephone menu: press the
002B button.
X To switch to the main function bar: slide
5 the controller.
X To select TEL/ TEL/00A7: press the controller.
X To select Internet
Internet: turn and press the
controller.
The menu with the Internet functions is dis-
played.
X To select Mercedes-Benz Apps Mercedes-Benz Apps: turn and
press the controller.
X To select Download POI
Download POI : turn and press
the controller.
Available destinations are shown in the list.
X To select and download a destination: turn
and press the controller.
X To exit destination download: select Close Close.
Further information on how to use the desti-
nation for route guidance (Y page 183).
Further information on importing the desti-
nation (Y page 183).
Further information on deleting the destina-
tion (Y page 184).
You can save up to 50 destinations for your
vehicle on the server and display these in the list. If you send further destinations to the
server, the oldest entries are deleted from the
list. 182
Destina
tion/route do wnloadOnline and Internet functions