2015 MERCEDES-BENZ GLE SUV towing capacity
[x] Cancel search: towing capacityPage 6 of 453
1, 2, 3 ...
4ETS (Electronic Traction System) see ETS/4ETS (Electronic Trac-
tion System)
4MATIC (permanent four-wheel
drive) .................................................. 252
12 V socket
see Sockets
360° camera
Cleaning .........................................3 83
Display in the multimedia system .. 238
Function/notes ............................ .236 A
ABS (Anti-lock Braking System) Display message ............................ 301
Function/notes ................................ 70
Important safety notes .................... 70
Warning lamp ................................. 341
Accident
Automatic measures after an acci-
dent ................................................. 58
Activating/deactivating air-recir-
culation mode ................................... .145
Activating/deactivating cooling
with air dehumidification ................. 139
Active Blind Spot Assist
Activating/deactivating (on-
board computer) ............................ 291
Display message ............................ 326
Function/notes ............................ .247
Towing a trailer .............................. 249
Active Curve System
Display message ............................ 323
Function/notes ............................ .222
Active Driving Assistance package .. 247
Active Lane Keeping Assist
Activating/deactivating (on-
board computer) ............................ 291
Display message ............................ 325
Function/notes ............................ .250
Towing a trailer .............................. 252
Active light function ......................... 124
Active Parking Assist
Display message ............................ 326
Exiting a parking space .................. 231 Function/notes ............................
.228
Important safety notes .................. 228
Parking .......................................... 230
ADAPTIVE BRAKE ................................. 78
Adaptive Brake Assist
Function/notes ................................ 74
Adaptive brake lights .......................... 75
Adaptive Damping System
Function/notes ............................ .224
Adaptive Highbeam Assist Plus
Display message ............................ 315
Function/notes ............................ .126
Switching on/off ........................... 126
AdBlue ®
Display message ............................ 318
Filling capacity ............................... 439
Important safety notes .................. 439
Topping up ..................................... 180
Additives (engine oil) ........................ 440
Adjusting the headlamp range ......... 123
ADS (Adaptive Damping System)
Function/notes ............................ .221
Air conditioning
General notes ................................ 135
Air filter (white display message) .... 318
AIR FLOW .......................................... .141
Air pressure
see Tyre pressure
Air vents
Glove compartment ....................... 155
Important safety notes .................. 154
Rear ............................................... 155
Setting .......................................... .154
Setting the centre air vents ........... 155
Setting the side air vents .............. .155
Air-conditioning system
see Climate control
Airbag
Automatic front-passenger front
airbag deactivatio n .......................... 51
Introduction ..................................... 48
PASSENGER AIR BAG indicator
lamps ............................................... 44
Airbags
Display message ............................ 311
Front airbag (driver, front
passenger) ....................................... 49 Index
3
Page 13 of 453
EASY-EXIT feature
Crash-responsive .......................... .117
Function/notes ............................ .116
Switching on/off ........................... 296
EASY-PACK luggage compartment
management system ........................ 358
EBD (electronic brake force distri-
bution)
Display message ............................ 303
Function/notes ................................ 78
ECO display
Function/notes ............................ .194
On-board computer ....................... 285
ECO start/stop function
Automatic engine start .................. 162
Automatic engine switch-off .......... 162
Deactivating/activating ................. 163
General information ....................... 162
Important safety notes .................. 162
Introduction ................................... 161
PLUG-IN HYBRID operation ............ 269
Electromagnetic compatibility
Declaration of conformity ................ 27
Electronic Stability Program
see ESP ®
(Electronic Stability Program)
Emergency
Automatic measures after an acci-
dent ................................................. 58
Emergency key
Unlocking the driver's door .............. 92
Emergency key element
Function/notes ................................ 86
General notes .................................. 86
Inserting .......................................... 87
Locking vehicle ................................ 93
Removing ......................................... 87
Emergency release
Driver's door ................................... .92
Emergency spare wheel
General notes ................................ 428
Important safety notes .................. 428
Inflating the collapsible spare
wheel ............................................ .431
Removing ....................................... 429
Storage location ............................ 429
Stowing .......................................... 429
Technical data ............................... 432 Emergency unlocking
Tailgate ............................................ 97
Vehicle ............................................. 92
Engine
Display message ............................ 316
ECO start/stop function ................ 161
Engine numbe r............................... 435
Jump-starting ................................. 397
Running irregularly ......................... 165
Starting (important safety notes )... 160
Starting problems .......................... 165
Starting the engine with the key .... 160
Starting with KEYLESS GO ............. 160
Stopping ........................................ 191
Tow-starting (vehicle) ..................... 402
Warning lamp (engine diagnos-
tics) ............................................... 347
Engine electronics
Notes ............................................. 433
Problem (fault) ............................... 165
Engine jump starting
see Jump starting (engine)
Engine oil
Additives ........................................ 440
Checking the oil level ..................... 375
Checking the oil level using the
dipstick .......................................... 375
Display message ............................ 317
Filling capacity ............................... 440
Notes about oil grade s................... 439
Notes on oil level/consumption .... 375
Temperature (on-board computer, Mercedes-AMG vehicles) ............... 297
Topping up ..................................... 375
Viscosity ........................................ 440
Environmental protection
Returning an end-of-life vehicle ....... 25
ESP ®
(Electronic Stability Pro-
gram)
AMG menu (on-board computer) ... 298
Characteristics ................................. 76
Deactivating/activating ................... 77
Display message ............................ 301
Function/note s................................ 75
General notes .................................. 75
Important safety guidelines ............. 76
Trailer stabilisation .......................... 77
Warning lamp ................................. 343 10
Index
Page 357 of 453
Through-loading facility in the rear
compartment
If objects or loads are not secured when being
transported in the through-loading facility, they
could slip or be thrown around and thereby hit
vehicle occupants.
Observe the loading guidelines (Y page 351)
and the safety notes regarding stowage spaces
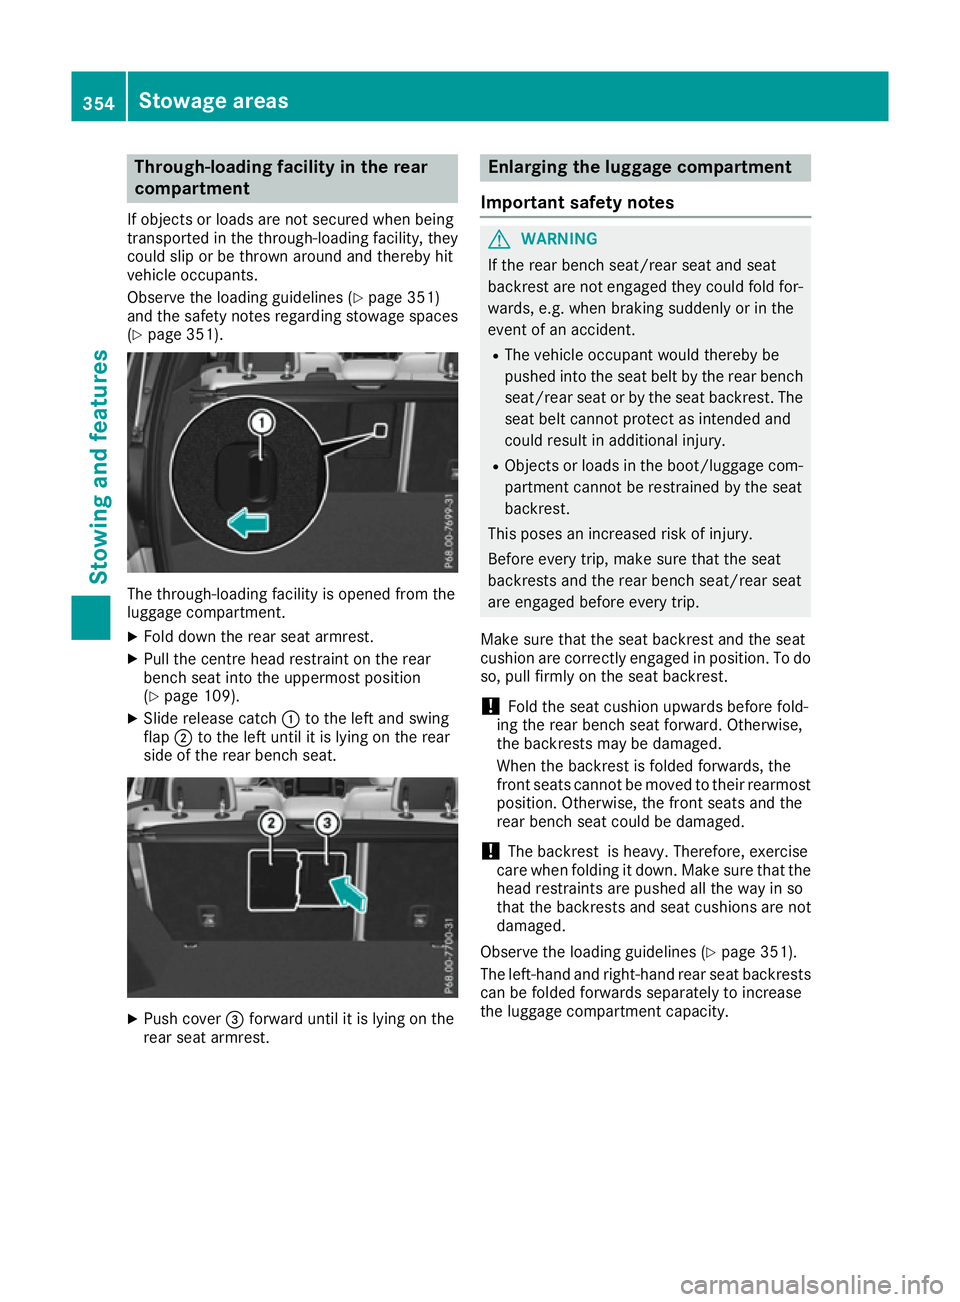
(Y page 351). The through-loading facility is opened from the
luggage compartment.
X Fold down the rear seat armrest.
X Pull the centre head restraint on the rear
bench seat into the uppermost position
(Y page 109).
X Slide release catch :to the left and swing
flap ;to the left until it is lying on the rear
side of the rear bench seat. X
Push cover =forward until it is lying on the
rear seat armrest. Enlarging the luggage compartment
Important safety notes G
WARNING
If the rear bench seat/rear seat and seat
backrest are not engaged they could fold for- wards, e.g. when braking suddenly or in the
event of an accident.
R The vehicle occupant would thereby be
pushed into the seat belt by the rear bench
seat/rear seat or by the seat backrest. The
seat belt cannot protect as intended and
could result in additional injury.
R Objects or loads in the boot/luggage com-
partment cannot be restrained by the seat
backrest.
This poses an increased risk of injury.
Before every trip, make sure that the seat
backrests and the rear bench seat/rear seat
are engaged before every trip.
Make sure that the seat backrest and the seat
cushion are correctly engaged in position. To do
so, pull firmly on the seat backrest.
! Fold the seat cushion upwards before fold-
ing the rear bench seat forward. Otherwise,
the backrests may be damaged.
When the backrest is folded forwards, the
front seats cannot be moved to their rearmost
position. Otherwise, the front seats and the
rear bench seat could be damaged.
! The backrest is heavy. Therefore, exercise
care when folding it down. Make sure that the
head restraints are pushed all the way in so
that the backrests and seat cushions are not
damaged.
Observe the loading guidelines (Y page 351).
The left-hand and right-hand rear seat backrests can be folded forwards separately to increase
the luggage compartment capacity. 354
Sto
wage areasStowing an d features
Page 364 of 453
An incorrectly secured roof carrier or roof load
may become detached from the vehicle. You
must therefore ensure that you observe the roof
carrier manufacturer's installation instructions.
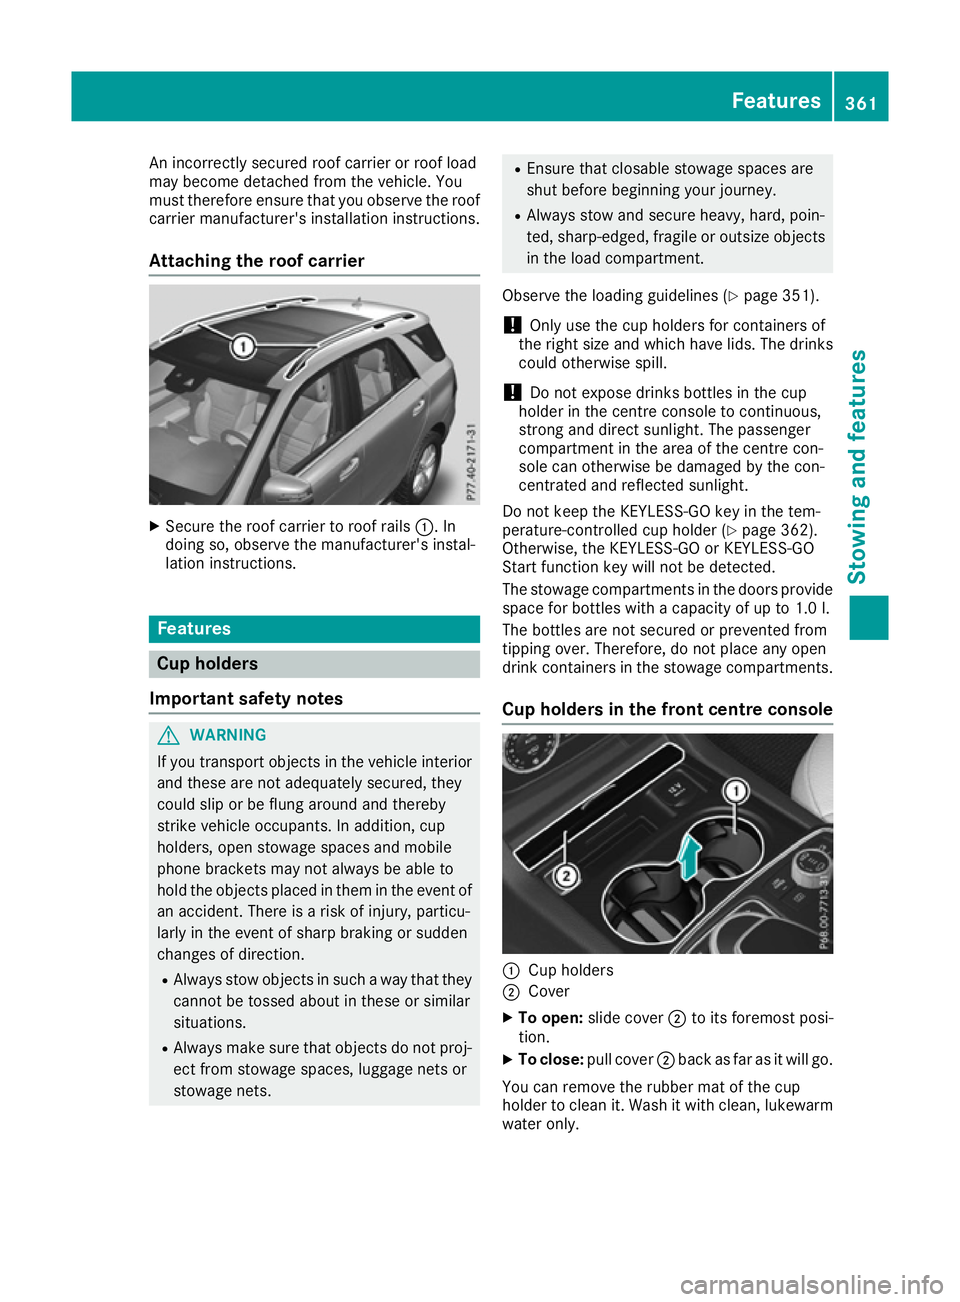
Attaching the roof carrier X
Secure the roof carrier to roof rails :. In
doing so, observe the manufacturer's instal-
lation instructions. Features
Cup holders
Important safety notes G
WARNING
If you transport objects in the vehicle interior and these are not adequately secured, they
could slip or be flung around and thereby
strike vehicle occupants. In addition, cup
holders, open stowage spaces and mobile
phone brackets may not always be able to
hold the objects placed in them in the event of an accident. There is a risk of injury, particu-
larly in the event of sharp braking or sudden
changes of direction.
R Always stow objects in such a way that they
cannot be tossed about in these or similar
situations.
R Always make sure that objects do not proj-
ect from stowage spaces, luggage nets or
stowage nets. R
Ensure that closable stowage spaces are
shut before beginning your journey.
R Always stow and secure heavy, hard, poin-
ted, sharp-edged, fragile or outsize objects
in the load compartment.
Observe the loading guidelines (Y page 351).
! Only use the cup holders for containers of
the right size and which have lids. The drinks
could otherwise spill.
! Do not expose drinks bottles in the cup
holder in the centre console to continuous,
strong and direct sunlight. The passenger
compartment in the area of the centre con-
sole can otherwise be damaged by the con-
centrated and reflected sunlight.
Do not keep the KEYLESS-GO key in the tem-
perature-controlled cup holder (Y page 362).
Otherwise, the KEYLESS-GO or KEYLESS-GO
Start function key will not be detected.
The stowage compartments in the doors provide
space for bottles with a capacity of up to 1.0 l.
The bottles are not secured or prevented from
tipping over. Therefore, do not place any open
drink containers in the stowage compartments.
Cup holders in the front centre console :
Cup holders
; Cover
X To open: slide cover ;to its foremost posi-
tion.
X To close: pull cover ;back as far as it will go.
You can remove the rubber mat of the cup
holder to clean it. Wash it with clean, lukewarm water only. Features
361Stowing and features Z
Page 390 of 453
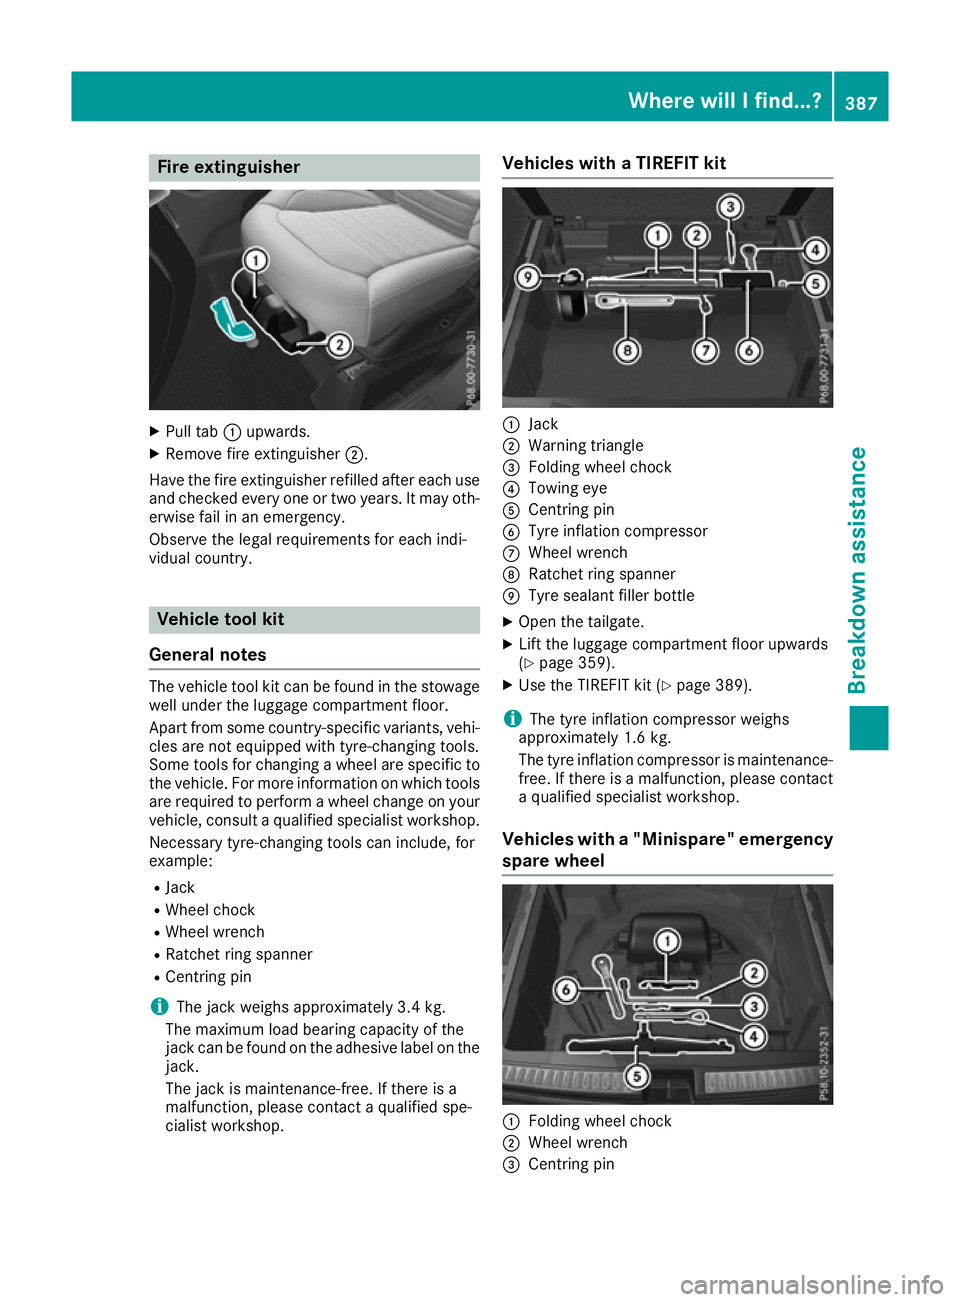
Fire extinguisher
X
Pull tab :upwards.
X Remove fire extinguisher ;.
Have the fire extinguisher refilled after each use and checked every one or two years. It may oth-
erwise fail in an emergency.
Observe the legal requirements for each indi-
vidual country. Vehicle tool kit
General notes The vehicle tool kit can be found in the stowage
well under the luggage compartment floor.
Apart from some country-specific variants, vehi-
cles are not equipped with tyre-changing tools.
Some tools for changing a wheel are specific to the vehicle. For more information on which tools
are required to perform a wheel change on your
vehicle, consult a qualified specialist workshop.
Necessary tyre-changing tools can include, for
example:
R Jack
R Wheel chock
R Wheel wrench
R Ratchet ring spanner
R Centring pin
i The jack weighs approximately 3.4 kg.
The maximum load bearing capacity of the
jack can be found on the adhesive label on the jack.
The jack is maintenance-free. If there is a
malfunction, please contact a qualified spe-
cialist workshop. Vehicles with a TIREFIT kit
:
Jack
; Warning triangle
= Folding wheel chock
? Towing eye
A Centring pin
B Tyre inflation compressor
C Wheel wrench
D Ratchet ring spanner
E Tyre sealant filler bottle
X Open the tailgate.
X Lift the luggage compartment floor upwards
(Y page 359).
X Use the TIREFIT kit (Y page 389).
i The tyre inflation compressor weighs
approximately 1.6 kg.
The tyre inflation compressor is maintenance-
free. If there is a malfunction, please contact a qualified specialist workshop.
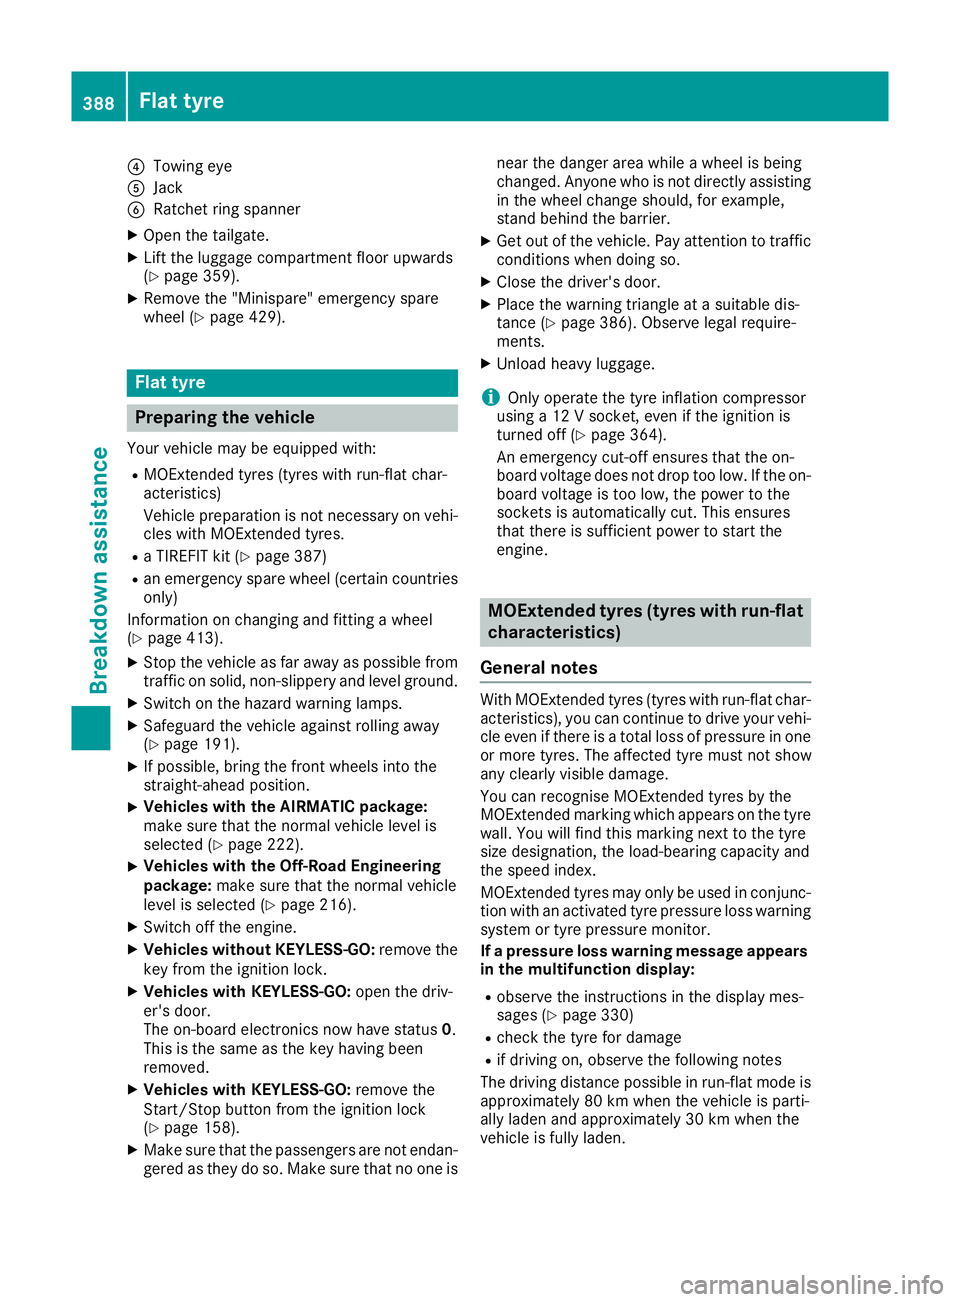
Vehicles with a "Minispare" emergency
spare wheel :
Folding wheel chock
; Wheel wrench
= Centring pin Where will I find...?
387Breakdown assistance
Page 391 of 453
?
Towing eye
A Jack
B Ratchet ring spanner
X Open the tailgate.
X Lift the luggage compartment floor upwards
(Y page 359).
X Remove the "Minispare" emergency spare
wheel (Y page 429). Flat tyre
Preparing the vehicle
Your vehicle may be equipped with: R MOExtended tyres (tyres with run-flat char-
acteristics)
Vehicle preparation is not necessary on vehi-
cles with MOExtended tyres.
R a TIREFIT kit (Y page 387)
R an emergency spare wheel (certain countries
only)
Information on changing and fitting a wheel
(Y page 413).
X Stop the vehicle as far away as possible from
traffic on solid, non-slippery and level ground.
X Switch on the hazard warning lamps.
X Safeguard the vehicle against rolling away
(Y page 191).
X If possible, bring the front wheels into the
straight-ahead position.
X Vehicles with the AIRMATIC package:
make sure that the normal vehicle level is
selected (Y page 222).
X Vehicles with the Off-Road Engineering
package:
make sure that the normal vehicle
level is selected (Y page 216).
X Switch off the engine.
X Vehicles without KEYLESS-GO: remove the
key from the ignition lock.
X Vehicles with KEYLESS-GO: open the driv-
er's door.
The on-board electronics now have status 0.
This is the same as the key having been
removed.
X Vehicles with KEYLESS-GO: remove the
Start/Stop button from the ignition lock
(Y page 158).
X Make sure that the passengers are not endan-
gered as they do so. Make sure that no one is near the danger area while a wheel is being
changed. Anyone who is not directly assisting
in the wheel change should, for example,
stand behind the barrier.
X Get out of the vehicle. Pay attention to traffic
conditions when doing so.
X Close the driver's door.
X Place the warning triangle at a suitable dis-
tance (Y page 386). Observe legal require-
ments.
X Unload heavy luggage.
i Only operate the tyre inflation compressor
using a 12 V socket, even if the ignition is
turned off (Y page 364).
An emergency cut-off ensures that the on-
board voltage does not drop too low. If the on-
board voltage is too low, the power to the
sockets is automatically cut. This ensures
that there is sufficient power to start the
engine. MOExtended tyres (tyres with run-flat
characteristics)
General notes With MOExtended tyres (tyres with run-flat char-
acteristics), you can continue to drive your vehi-
cle even if there is a total loss of pressure in one or more tyres. The affected tyre must not show
any clearly visible damage.
You can recognise MOExtended tyres by the
MOExtended marking which appears on the tyre
wall. You will find this marking next to the tyre
size designation, the load-bearing capacity and
the speed index.
MOExtended tyres may only be used in conjunc- tion with an activated tyre pressure loss warning
system or tyre pressure monitor.
If a pressure loss warning message appears in the multifunction display:
R observe the instructions in the display mes-
sages (Y page 330)
R check the tyre for damage
R if driving on, observe the following notes
The driving distance possible in run-flat mode is approximately 80 km when the vehicle is parti-
ally laden and approximately 30 km when the
vehicle is fully laden. 388
Flat tyreBreakdown assistance