2015 MERCEDES-BENZ GLE SUV fuel type
[x] Cancel search: fuel typePage 21 of 453
Pulling away
General notes ................................ 161
Trailer ............................................ 161
Pulling away (automatic transmis-
sion) ....................................................1 61Q
QR code Mercedes-Benz Guide App ................. 1
Rescue card ..................................... 28
Qualified specialist workshop ........... 28R
RACETIMER (on-board computer) .... 298
Radiator cover ................................... 374
Radio
Selecting a station ......................... 287
see separate operating instructions
Radio-based vehicle components
Declaration of conformity ................ 27
Rain closing feature
Sliding sunroof ............................... 102
Rain closing feature (panorama
sliding sunroof) ................................. 103
RBS (Recuperative Brake System)
Warning lamp ................................. 340
Reading lamp ..................................... 127
Rear bench seat
Folding the bench seat forwards/back ............................................... 355
Rear compartment
Setting the air vents ..................... .155
Setting the temperature ................ 141
Rear foglamp
Display message ............................ 314
Switching on/off ........................... 122
Rear seat
Adjusting ....................................... 111
Rear window heating
Problem (fault) ............................... 145
Switching on/off ........................... 144
Rear window wiper
Replacing the wiper blade .............. 133
Switching on/off ........................... 131
Rear-compartment seat belt sta-
tus indicator ........................................ 48 Rear-view mirror
Anti-dazzle mode (automatic) ....... .118
Dipping (manual) ........................... 117
Recuperative Brake System
Driving safety systems ..................... 43
Important safety notes .................... 43
Refuelling
Fuel gauge ....................................... 32
Important safety notes .................. 175
Notes for Mercedes‑ AMG vehi-
cles ................................................ 437
Refuelling (PLUG-IN HYBRID vehi-
cles) ............................................... 176
Refuelling process ......................... 176
see Fuel
Remote control
Auxiliary heating/ventilation .......... 151
Changing the batteries (auxiliary
heating) ......................................... 152
Garage door opener ....................... 367
Programming (garage door
opener) .......................................... 367
Replacing bulbs
General notes ................................ 128
Important safety notes .................. 128
Overview of bulb type s.................. 128
Removing/replacing the cover
(front wheel arch) .......................... 129
Replacing the battery (auxiliary
heating remote control) .................... 152
Rescue card ......................................... 28
Reserve (fuel tank)
see Fuel
Reserve fuel
Display message ............................ 318
Warning lamp ................................. 347
Residual heat (climate control) ........ 146
Restraint system
Display message ............................ 309
Introduction ..................................... 43
Warning lamp ................................. 346
Warning lamp (function) ................... 44
Rev counter ........................................ 281
Reversing camera
Cleaning instructions ..................... 383
Display in the multimedia system .. 233
Function/note s............................. 232 18
Index
Page 26 of 453
see Flat tyre
U
Unlocking Emergency unlocking ....................... 92
From inside the vehicle (central
unlocking button) ............................. 91
Upshift indicator (on-board com-
puter, Mercedes-AMG vehicles) .......297 V
Vanity mirror (in sun visor) .............. 362
Variable SPEEDTRONIC
see SPEEDTRONIC
Vehicle
Correct use ...................................... 28
Data acquisition ............................... 28
Display message ............................ 332
Electronics ..................................... 433
Equipment ....................................... 26
Implied warranty .............................. 28
Individual settings .......................... 292
Leaving parked up ......................... 194
Locking (in an emergency) .............. .93
Locking (key) ................................... 85
Lowering ........................................ 417
Pulling away ................................... 161
Raising ........................................... 415
Registration ..................................... 28
Securing from rolling away ............ 414
Towing away .................................. 399
Transporting .................................. 401
Unlocking (in an emergency) ........... 92
Unlocking (key) ................................ 85
Vehicle data ................................... 442
Vehicle battery
see Battery (vehicle)
Vehicle data ....................................... 442
Vehicle data (off-road driving)
Approach/departure angle ............ 445
Fording depth ................................ 444
Maximum gradient climbing abil-
ity .................................................. 445
Vehicle dimensions ........................... 442
Vehicle emergency locking ................ 93Vehicle identification number
see VIN
Vehicle identification plate .............. 434
Vehicle level
AIRMATIC ...................................... 222
Vehicle level (display message) ....... 322
Vehicle tool kit .................................. 387
Video
Operating the DVD ......................... 288
VIN ...................................................... 434
Seat ............................................... 435
Type plate ...................................... 434 W
Warning and indicator lamps ABS ................................................ 341
Brakes ........................................... 339
Distance warning signal ................. 349
ESP ®
.............................................. 343
ESP ®
OFF ....................................... 344
Fuel tank ........................................ 347
Hybrid drive system ....................... 340
LIM (cruise control )........................ 203
LIM (DISTRONIC PLUS) .................. 208
LIM (variable SPEEDTRONIC) ......... 205
Overview .......................................... 34
Parking brake ................................ 346
PASSENGER AIR BAG ...................... 44
RBS (Recuperative Brake Sys-
tem) ............................................... 340
Reserve fuel ................................... 347
Seat belt ........................................ 337
Tyre pressure monitor ................... 350
Warning triangle ................................ 386
Warnings
Stickers ........................................... 41
Washer fluid
Display message ............................ 336
Wheel and tyre combinations
Tyres .............................................. 419
Wheel bolt tightening torque ........... 417
Wheel chock ...................................... 414
Wheels
Changing a whee l.......................... 413
Changing/replacing ....................... 413
Checking ........................................ 406
Cleaning ......................................... 381 Index
23
Page 61 of 453
Using the radar sensor system, PRE-SAFE
®
PLUS is able to detect that a head-on or rear-end
collision is imminent. In certain hazardous sit-
uations, PRE-SAFE ®
PLUS takes pre-emptive
measures to protect the vehicle occupants.
Important safety notes The intervention of PRE-SAFE
®
PLUS cannot
prevent an imminent collision.
The driver is not warned before the intervention
of PRE-SAFE ®
PLUS.
PRE-SAFE ®
PLUS does not intervene:
R if the vehicle is reversing
R when the vehicle is towing a trailer and there
is a risk of a rear-end collision
When driving, or when parking or exiting a park- ing space with assistance from Active Parking
Assist, PRE-SAFE ®
PLUS will not apply the
brakes.
Function PRE-SAFE
®
PLUS intervenes in certain situa-
tions if the radar sensor system detects an
imminent head-on or rear-end collision.
PRE-SAFE ®
PLUS takes the following measures
depending on the hazardous situation detected:
R if the radar sensor system detects that a
head-on collision is imminent, the seat belts
are pre-tensioned
R if the radar sensor system detects that a rear-
end collision is imminent:
- the rear hazard warning lamps are activa-
ted and flash at a higher frequency
- the brake pressure is increased if the driver
applies the brakes when the vehicle is sta-
tionary
- the seat belts are pre-tensioned.
The PRE-SAFE ®
PLUS braking application is can-
celled:
R if the accelerator pedal is depressed when a
gear is engaged
R if the risk of a collision passes or is no longer
detected
R if DISTRONIC PLUS indicates an intention to
pull away
If the hazardous situation passes without result- ing in an accident, the original settings are
restored. Automatic measures after an acci-
dent
Immediately after an accident, the following
measures may be implemented, depending on
the type and severity of the impact:
R the hazard warning lamps are activated
R the emergency lighting is activated
R the vehicle doors are unlocked
R the front side windows are lowered
R vehicles with a memory function: the electri-
cally adjustable steering wheel is raised
R the engine is switched off and the fuel supply
is cut off
R vehicles with the Mercedes-Benz emergency
call system: automatic emergency call
R vehicles with the hybrid drive system: the
hybrid system and the high-voltage electrical
system are deactivated Children in the vehicle
Important safety notes
Accident statistics show that children secured
in the rear seats are safer than children secured in the front-passenger seat. For this reason,
Mercedes-Benz strongly advises that you install
a child restraint system on a rear seat. Children
are generally better protected there.
If a child younger than twelve years old and
under 1.50 m in height is travelling in the vehi-
cle:
R always secure the child in a child restraint
system suitable for Mercedes-Benz vehicles.
The child restraint system must be appropri-
ate to the age, weight and size of the child.
R be sure to observe the instructions and safety
notes in this section in addition to the child
restraint system manufacturer's installation
instructions.
R always pay attention to the instructions and
safety notes on the automatic front-
passenger front airbag deactivation system
(Y page 51). 58
Children in the vehicleSafety
Page 174 of 453
R
the type of road is suitable, e.g. no steep gra-
dients
R you are no longer depressing the accelerator
pedal
Gliding mode is deactivated under the following
conditions:
R you depress the accelerator pedal
R you depress the brake pedal
R you use the DIRECT SELECT lever to switch
the transmission position (Y page 168)
R you use the DYNAMIC SELECT controller to
change the drive program (Y page 166)
R you activate manual gearshifting
(Y page 172)
R you leave the suitable speed range
Mercedes-AMG vehicles Gliding mode is characterised by the following:
R the combustion engine is disconnected from
the drive train
R the engine speed is equal to the engine idling
speed
R in the multifunction display, the gliding sym-
bol appears in the drive program display
Gliding mode can be activated under the follow-
ing conditions:
R the Comfort drive program is activated or you
select the "Comfort" setting for the drive sys-
tem within the Individualdrive program. You
can find information about this in the Digital
Owner's Manual
R the ECO start/stop function is activated
R you are driving carefully with low acceleration
of the vehicle
R the engine is at normal operating temperature
R the speed is within a suitable range
R the type of road is suitable, e.g. no steep gra-
dients
R you are no longer depressing the accelerator
pedal
Gliding mode is deactivated under the following conditions:
R you have deactivated the ECO start/stop
function
R you depress the accelerator pedal
R you depress the brake pedal
R you use the DIRECT SELECT lever to switch
the transmission position (Y page 168)R
you use the DYNAMIC SELECT controller to
change the drive program (Y page 166)
R you activate manual gearshifting
(Y page 172)
R you leave the suitable speed range
Towing a trailer X
Drive in the middle of the engine speed range
on uphill gradients.
X Depending on the uphill or downhill gradient,
use left-hand steering wheel gearshift paddle
(Y page 172) to select a lower gear, even if
cruise control, DISTRONIC PLUS, or SPEED-
TRONIC are activated. Drive programs
Slippery drive program The
Slippery drive program has the following
characteristics:
R reduced engine and transmission settings for
optimum propulsion on slippery or snow-cov-
ered roads.
R optimised ESP ®
stability control on slippery
or snow-covered roads.
R the vehicle has improved driving stability on
slippery or snow-covered roads, for example.
Comfort drive program The
Comfort drive program has the following
characteristics:
R comfort-orientated engine and transmission
settings.
R optimal fuel consumption resulting from the
automatic transmission shifting up sooner.
R the vehicle pulling away more gently in
forward and reverse gears unless the accel-
erator pedal is depressed fully.
R the automatic transmission shifting up
sooner. This results in the vehicle being driven
at lower engine speeds and the wheels being less likely to spin. Automatic transmission
171Driving and parking Z
Page 180 of 453
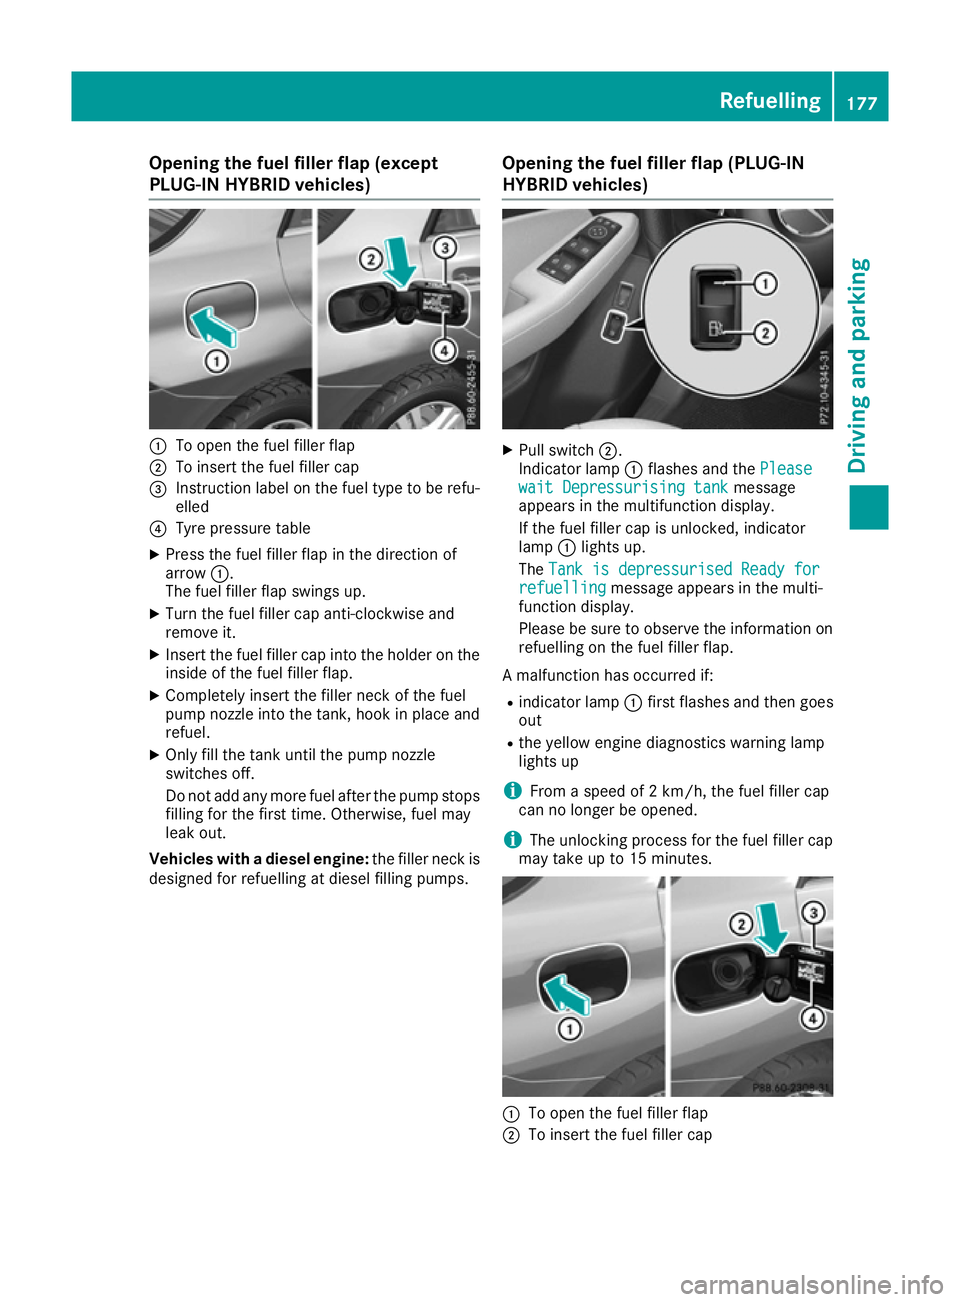
Opening the fuel filler flap (except
PLUG-IN HYBRID vehicles)
:
To open the fuel filler flap
; To insert the fuel filler cap
= Instruction label on the fuel type to be refu-
elled
? Tyre pressure table
X Press the fuel filler flap in the direction of
arrow :.
The fuel filler flap swings up.
X Turn the fuel filler cap anti-clockwise and
remove it.
X Insert the fuel filler cap into the holder on the
inside of the fuel filler flap.
X Completely insert the filler neck of the fuel
pump nozzle into the tank, hook in place and
refuel.
X Only fill the tank until the pump nozzle
switches off.
Do not add any more fuel after the pump stops filling for the first time. Otherwise, fuel may
leak out.
Vehicles with a diesel engine: the filler neck is
designed for refuelling at diesel filling pumps. Opening the fuel filler flap (PLUG-IN
HYBRID vehicles) X
Pull switch ;.
Indicator lamp :flashes and the Please Please
wait Depressurising tank
wait Depressurising tank message
appears in the multifunction display.
If the fuel filler cap is unlocked, indicator
lamp :lights up.
The Tank is depressurised Ready for Tank is depressurised Ready for
refuelling
refuelling message appears in the multi-
function display.
Please be sure to observe the information on refuelling on the fuel filler flap.
A malfunction has occurred if:
R indicator lamp :first flashes and then goes
out
R the yellow engine diagnostics warning lamp
lights up
i From a speed of 2 km/h, the fuel filler cap
can no longer be opened.
i The unlocking process for the fuel filler cap
may take up to 15 minutes. :
To open the fuel filler flap
; To insert the fuel filler cap Refuelling
177Driving and parking Z
Page 181 of 453
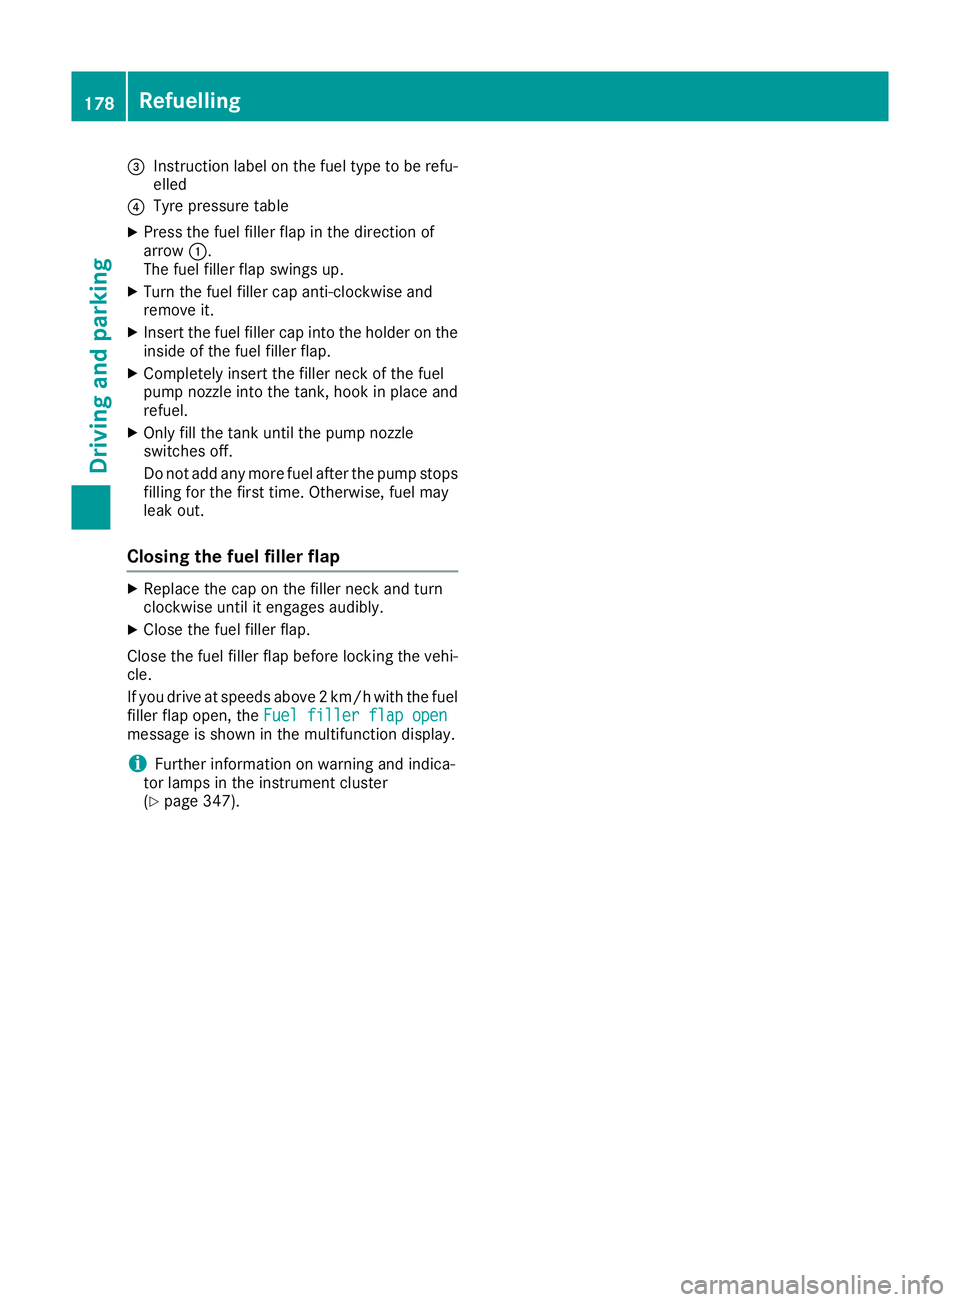
=
Instruction label on the fuel type to be refu-
elled
? Tyre pressure table
X Press the fuel filler flap in the direction of
arrow :.
The fuel filler flap swings up.
X Turn the fuel filler cap anti-clockwise and
remove it.
X Insert the fuel filler cap into the holder on the
inside of the fuel filler flap.
X Completely insert the filler neck of the fuel
pump nozzle into the tank, hook in place and
refuel.
X Only fill the tank until the pump nozzle
switches off.
Do not add any more fuel after the pump stops
filling for the first time. Otherwise, fuel may
leak out.
Closing the fuel filler flap X
Replace the cap on the filler neck and turn
clockwise until it engages audibly.
X Close the fuel filler flap.
Close the fuel filler flap before locking the vehi-
cle.
If you drive at speeds above 2 km/h with the fuel
filler flap open, the Fuel filler flap open
Fuel filler flap open
message is shown in the multifunction display.
i Further information on warning and indica-
tor lamps in the instrument cluster
(Y page 347). 178
RefuellingDriving and parking
Page 276 of 453
To avoid hazardous situations:
R make sure to check the noseweight before
each journey
R use a drawbar noseweight as close as possi-
ble to the maximum noseweight
R do not exceed the maximum permissible
noseweight
R do not use a noseweight lower than the min-
imum noseweight
When reversing the vehicle towards the trailer,
make sure there is nobody between the trailer
and the vehicle.
Couple and uncouple the trailer carefully. If you do not couple the trailer to the towing vehicle
correctly, the trailer could become detached.
Make sure that the following values are not
exceeded:
R the permissible trailer drawbar noseweight
R the permissible trailer load
R the permissible rear axle load of the towing
vehicle
R the maximum permissible gross vehicle
weight of both the towing vehicle and the
trailer
The applicable permissible values, which must
not be exceeded, can be found:
R in your vehicle documents
R on the identification plates of the trailer tow
hitch and the trailer
R on the vehicle identification plate
If the values differ, the lowest value applies.
You will find the values approved by the manu-
facturer on the vehicle identification plates and
those for the towing vehicle under "Technical
data" (Y page 447).
When towing a trailer, your vehicle's handling
characteristics will be different in comparison to
when driving without a trailer.
The vehicle/trailer combination:
R is heavier
R is restricted in its acceleration and gradient-
climbing capability
R has an increased braking distance
R is affected more by strong crosswinds
R demands more sensitive steering
R has a larger turning circle
This can impair the vehicle's handling charac-
teristics. Adapt your driving style accordingly.
Maintain a safe distance. Drive carefully. When towing a trailer, always adjust your speed
to the current road and weather conditions. Do
not exceed the maximum permissible speed for
your vehicle/trailer combination. Notes on towing a trailer
General notes Check the tyre pressures when towing a trailer.
You will find the values in the tyre pressure table in the vehicle fuel filler flap (Y page 408).
Please note that when towing a trailer, the fol-
lowing driving systems have limited availability
or are not available at all.
R PARKTRONIC (Y page 225)
R Blind Spot Assist (Y page 244)
R Active Lane Keeping Assist (Y page 250)
R Active Parking Assist (Y page 228)
On vehicles without level control, the height of
the ball coupling will alter according to the load
placed on the vehicle. If necessary, use a trailer with a height-adjustable drawbar.
You will find fitting dimensions and loads under
"Technical data" (Y page 446).
Driving tips Observe the information on ESP
®
trailer stabili-
sation (Y page 77) and on pulling away with a
trailer (Y page 161).
Select the Comfortdrive program using the
DYNAMIC SELECT controller (Y page 166).
The maximum permissible speed for vehicle/
trailer combinations depends on the type of
trailer. Before beginning the journey, check the
trailer's documents to see what the maximum
permitted speed is. Observe the legally prescri-
bed maximum speed in the relevant country.
For certain Mercedes-Benz vehicles, the maxi-
mum permissible rear axle load is increased
when towing a trailer. See the "Technical data"
section to find out whether this applies to your
vehicle (Y page 447). If you utilise any of the
added maximum rear axle load when towing a
trailer, the vehicle/trailer combination may not
exceed a maximum speed of 100 km/hf or rea-
sons concerning the operating permit. This also
applies in countries in which the permissible
maximum speed for vehicle/trailer combina-
tions is above 100 km/h. Towing a trailer
273Driving and parking Z
Page 350 of 453
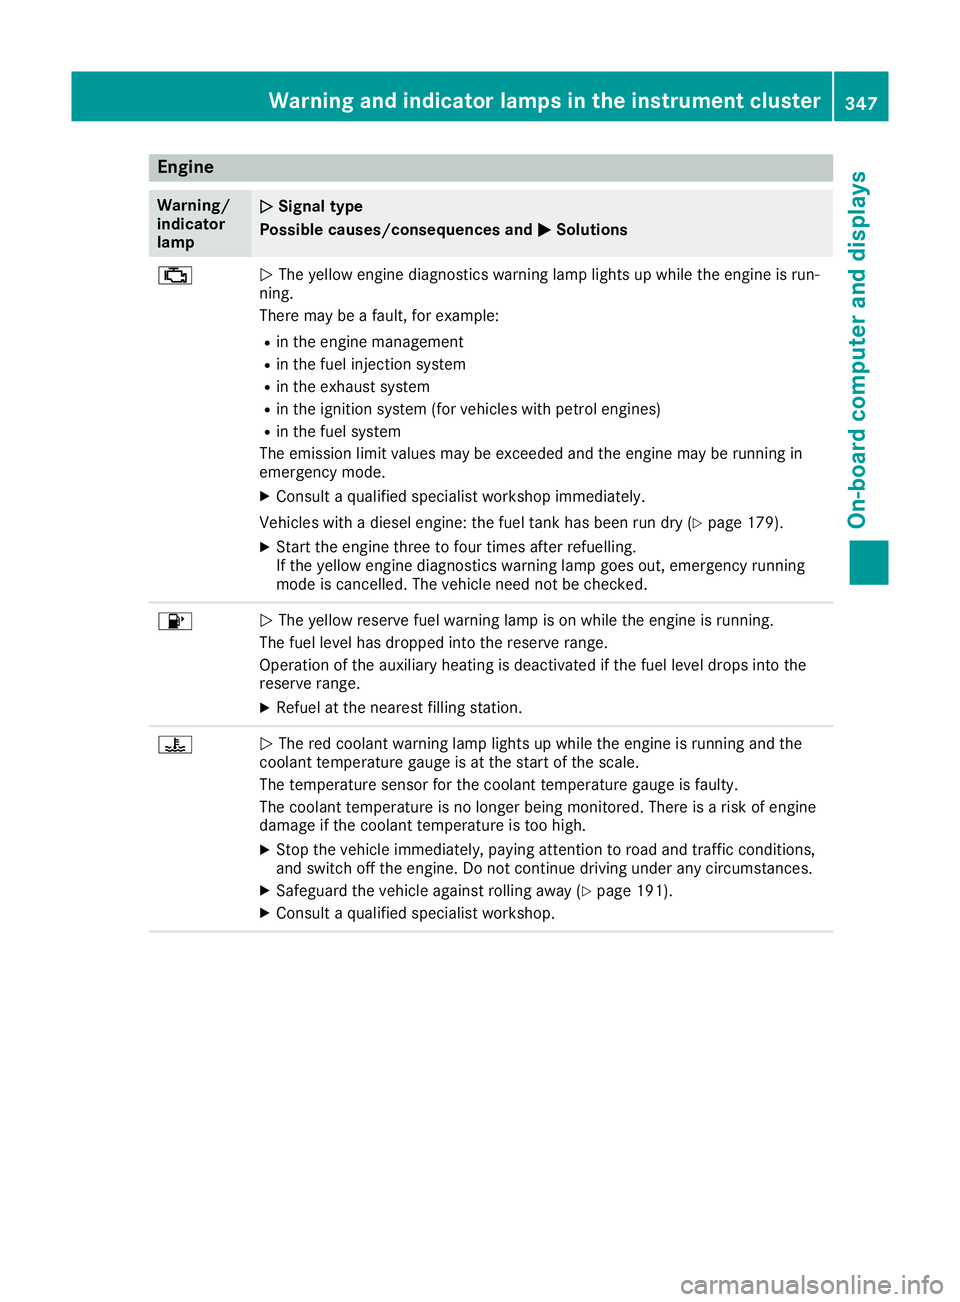
Engine
Warning/
indicator
lamp
N N
Signal type
Possible causes/consequences and M
MSolutions ;
N
The yellow engine diagnostics warning lamp lights up while the engine is run-
ning.
There may be a fault, for example:
R in the engine management
R in the fuel injection system
R in the exhaust system
R in the ignition system (for vehicles with petrol engines)
R in the fuel system
The emission limit values may be exceeded and the engine may be running in
emergency mode.
X Consult a qualified specialist workshop immediately.
Vehicles with a diesel engine: the fuel tank has been run dry (Y page 179).
X Start the engine three to four times after refuelling.
If the yellow engine diagnostics warning lamp goes out, emergency running
mode is cancelled. The vehicle need not be checked. 8
N
The yellow reserve fuel warning lamp is on while the engine is running.
The fuel level has dropped into the reserve range.
Operation of the auxiliary heating is deactivated if the fuel level drops into the
reserve range.
X Refuel at the nearest filling station. ?
N
The red coolant warning lamp lights up while the engine is running and the
coolant temperature gauge is at the start of the scale.
The temperature sensor for the coolant temperature gauge is faulty.
The coolant temperature is no longer being monitored. There is a risk of engine
damage if the coolant temperature is too high.
X Stop the vehicle immediately, paying attention to road and traffic conditions,
and switch off the engine. Do not continue driving under any circumstances.
X Safeguard the vehicle against rolling away (Y page 191).
X Consult a qualified specialist workshop. Warning and indicator lamps in the instrument cluster
347On-board computer and displays Z