2015 MERCEDES-BENZ GLE SUV warning lights
[x] Cancel search: warning lightsPage 189 of 453
When displays
:and ;on the charging cable
light up, this means the following: Display
:
: Lights up
green The on-board voltage is con-
nected. The high-voltage bat-
tery can be charged.
Flashes red The power supply from the
building is faulty.
Display
; ; Lights up
green There are no faults. The high-
voltage battery can be
charged.
Lights up red The protective and indicator
system has detected a fault
due to an internal malfunc-
tion. The high-voltage battery
cannot be charged. If the control detects residual current or a mal-
function, the charging process is halted. Once
the malfunction has been rectified the charging process is resumed automatically.
Information on problems relating to the charg-
ing process (Y page 190).
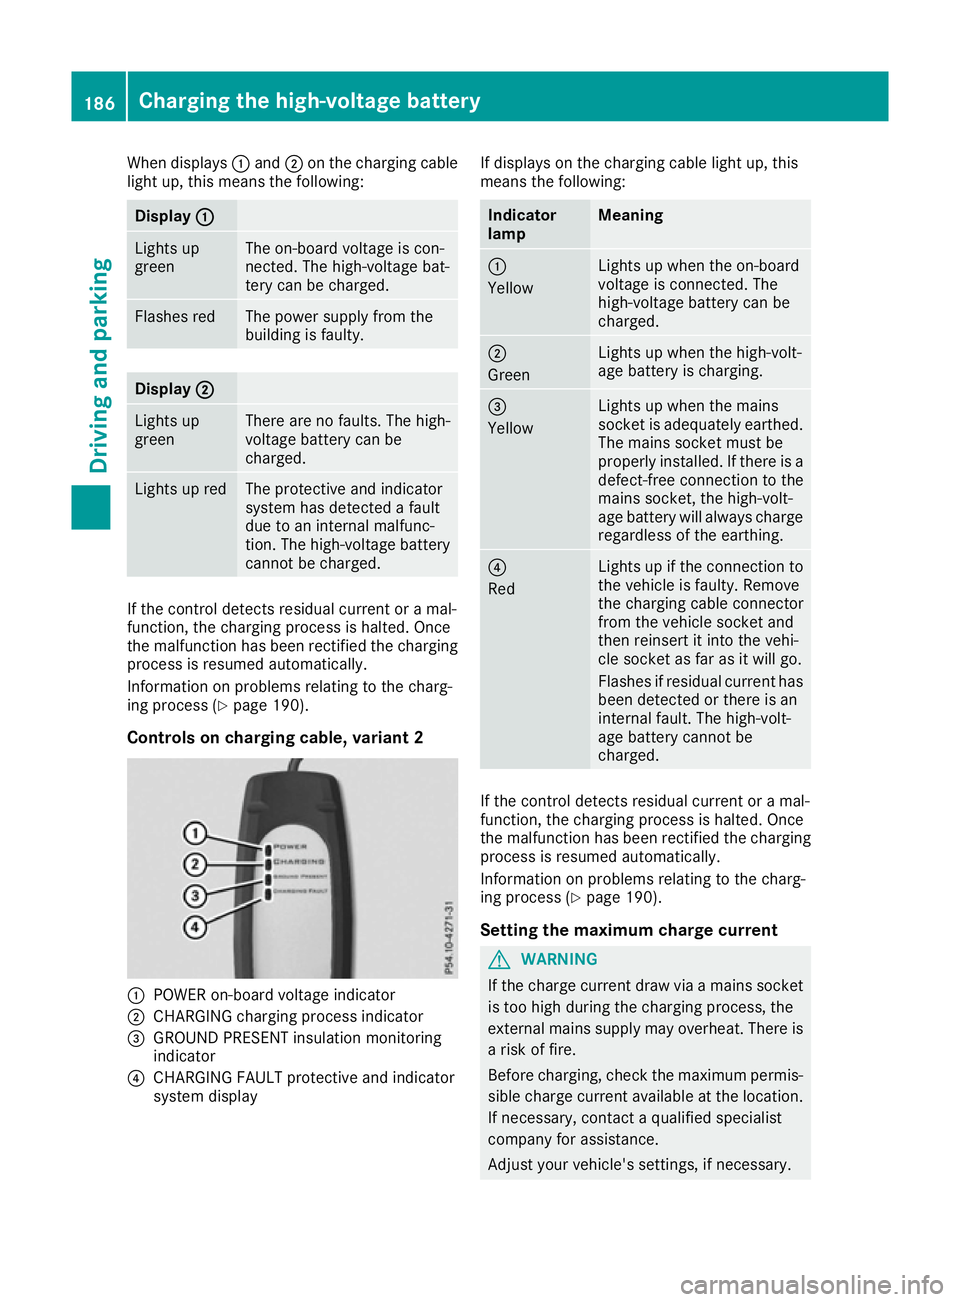
Controls on charging cable, variant 2 :
POWER on-board voltage indicator
; CHARGING charging process indicator
= GROUND PRESENT insulation monitoring
indicator
? CHARGING FAULT protective and indicator
system display If displays on the charging cable light up, this
means the following: Indicator
lamp Meaning
:
Yellow
Lights up when the on-board
voltage is connected. The
high-voltage battery can be
charged.
;
Green
Lights up when the high-volt-
age battery is charging.
=
Yellow
Lights up when the mains
socket is adequately earthed.
The mains socket must be
properly installed. If there is a defect-free connection to the
mains socket, the high-volt-
age battery will always charge
regardless of the earthing. ?
Red
Lights up if the connection to
the vehicle is faulty. Remove
the charging cable connector
from the vehicle socket and
then reinsert it into the vehi-
cle socket as far as it will go.
Flashes if residual current has been detected or there is an
internal fault. The high-volt-
age battery cannot be
charged. If the control detects residual current or a mal-
function, the charging process is halted. Once
the malfunction has been rectified the charging process is resumed automatically.
Information on problems relating to the charg-
ing process (Y page 190).
Setting the maximum charge current G
WARNING
If the charge current draw via a mains socket is too high during the charging process, the
external mains supply may overheat. There isa risk of fire.
Before charging, check the maximum permis-
sible charge current available at the location.
If necessary, contact a qualified specialist
company for assistance.
Adjust your vehicle's settings, if necessary. 186
Charging the high-voltage batteryDriving and parking
Page 194 of 453
Problem
Possible causes/consequences and
M
MSolutions The charging cable con-
nector cannot be
removed from the vehi-
cle socket. The charging cable connector has not been unlocked.
X Press the %button on the key.
The Ì indicator lamp on the vehicle socket lights up. The charg-
ing cable connector is unlocked.
X Remove the charging cable connector from the vehicle socket. The charging cable connector is blocked.
X Pull the charging cable close enough to the charging cable connec-
tor so that the charging cable connector is not under strain.
X Lock the vehicle and unlock it again.
X Remove the charging cable connector from the vehicle socket.
X If the charging cable connector continues to be blocked, consult a
qualified specialist workshop. Parking
Important safety notes
G
WARNING
Flammable material such as leaves, grass or
twigs may ignite if they come into contact with hot parts of the exhaust system or exhaust
gas flow. There is a risk of fire.
Park the vehicle so that no flammable mate-
rial can come into contact with hot vehicle
components. In particular, do not park on dry grassland or harvested grain fields. G
WARNING
If you leave children unattended in the vehi-
cle, they may be able to set the vehicle in
motion if, for example, they:
R release the parking brake
R shift the automatic transmission out of park
position P
R start the engine
In addition, they may operate vehicle equip-
ment and become trapped. There is a risk of
an accident and injury.
When leaving the vehicle, always take the key
with you and lock the vehicle. Never leave
children unattended in the vehicle. !
Always secure the vehicle correctly against
rolling away. Otherwise, the vehicle or its driv-
etrain could be damaged.
To ensure that the vehicle is safeguarded
against rolling away unintentionally:
R the electric parking brake must be applied.
R the transmission must be in position Pand the
key must be removed from the ignition lock
R the front wheels must be turned towards the
kerb on steep uphill or downhill gradients
R the empty vehicle must be secured at the
front axle with a wheel chock or similar
object, for example, on uphill or downhill gra-
dients
R a laden vehicle must also be secured at the
rear axle with a wheel chock or similar object,
for example, on uphill or downhill gradients Switching off the engine
Important safety notes G
WARNING
The automatic transmission switches to neu-
tral position Nwhen you switch off the engine.
The vehicle may roll away. There is a risk of an
accident.
After switching off the engine, always switch
to parking position P. Prevent the parked vehi-
cle from rolling away by applying the parking
brake. Parking
191Driving and parking Z
Page 198 of 453
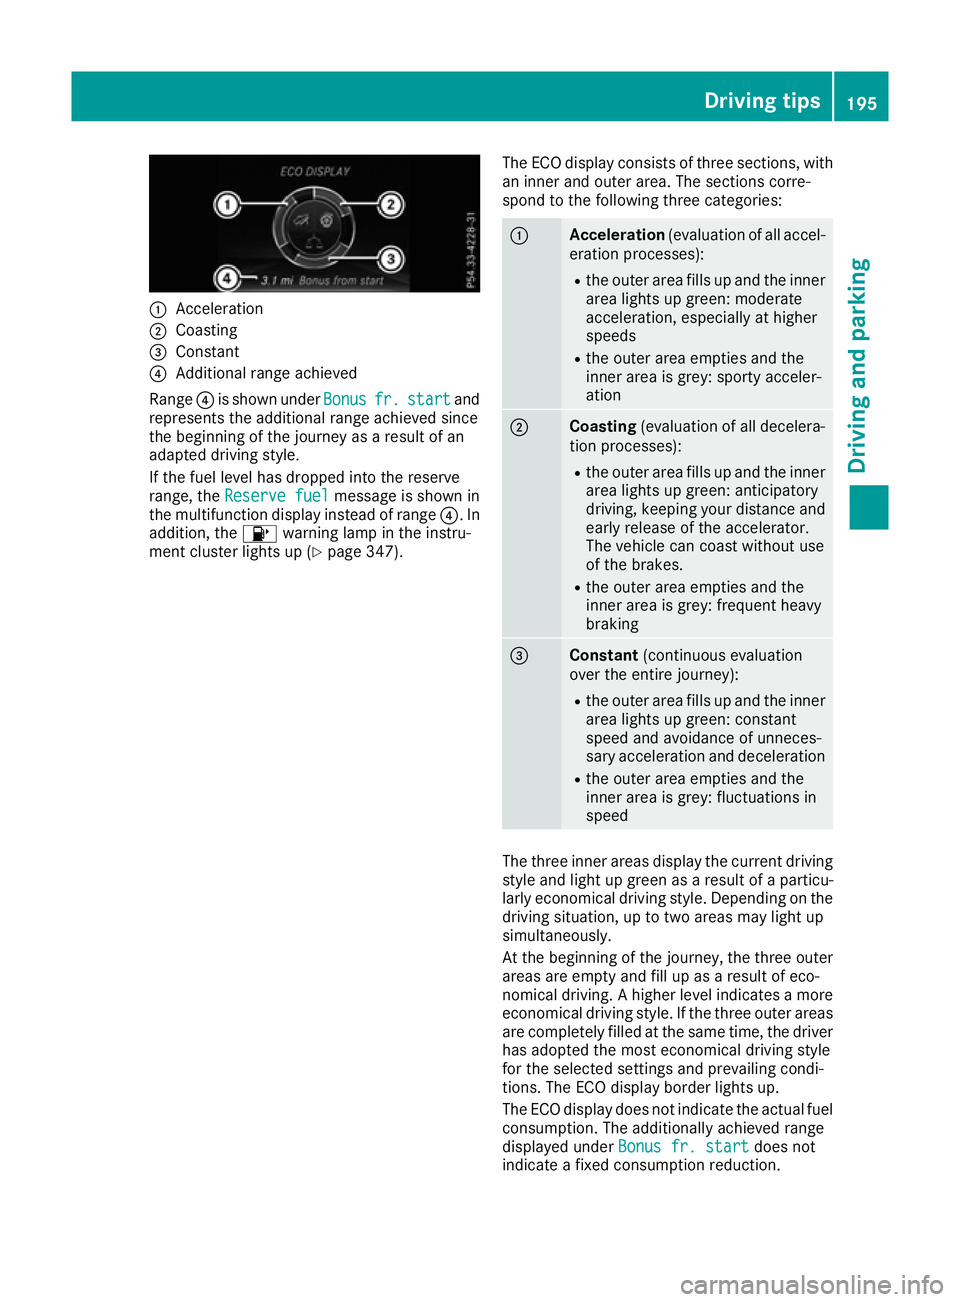
:
Acceleration
; Coasting
= Constant
? Additional range achieved
Range ?is shown under Bonus
Bonusfr.
fr.start
start and
represents the additional range achieved since
the beginning of the journey as a result of an
adapted driving style.
If the fuel level has dropped into the reserve
range, the Reserve fuel Reserve fuel message is shown in
the multifunction display instead of range ?. In
addition, the 8warning lamp in the instru-
ment cluster lights up (Y page 347).The ECO display consists of three sections, with
an inner and outer area. The sections corre-
spond to the following three categories: :
Acceleration
(evaluation of all accel-
eration processes):
R the outer area fills up and the inner
area lights up green: moderate
acceleration, especially at higher
speeds
R the outer area empties and the
inner area is grey: sporty acceler-
ation ;
Coasting
(evaluation of all decelera-
tion processes):
R the outer area fills up and the inner
area lights up green: anticipatory
driving, keeping your distance and
early release of the accelerator.
The vehicle can coast without use
of the brakes.
R the outer area empties and the
inner area is grey: frequent heavy
braking =
Constant
(continuous evaluation
over the entire journey):
R the outer area fills up and the inner
area lights up green: constant
speed and avoidance of unneces-
sary acceleration and deceleration
R the outer area empties and the
inner area is grey: fluctuations in
speed The three inner areas display the current driving
style and light up green as a result of a particu-
larly economical driving style. Depending on the driving situation, up to two areas may light up
simultaneously.
At the beginning of the journey, the three outer
areas are empty and fill up as a result of eco-
nomical driving. A higher level indicates a more
economical driving style. If the three outer areas
are completely filled at the same time, the driver
has adopted the most economical driving style
for the selected settings and prevailing condi-
tions. The ECO display border lights up.
The ECO display does not indicate the actual fuel consumption. The additionally achieved range
displayed under Bonus fr. start
Bonus fr. start does not
indicate a fixed consumption reduction. Driving tips
195Driving and parking Z
Page 208 of 453
i
Cruise control is not deactivated if you
depress the accelerator pedal. For example, if
you accelerate briefly to overtake, cruise con-
trol adjusts the vehicle's speed to the speed
stored after you have finished overtaking.
Deactivating cruise control There are several ways to deactivate cruise con-
trol:
X Briefly press the cruise control lever forwards
=.
or
X Brake.
or
X Briefly press the cruise control lever in the
direction of arrow ;.
Variable SPEEDTRONIC is selected. LIM indi-
cator lamp :in the cruise control lever lights
up.
Cruise control is automatically deactivated if:
R you apply the electric parking brake
R you are driving at less than 30 km/h
R ESP ®
intervenes or you deactivate ESP ®
R you activate DSR
R you activate the Offroad Plus program (vehi-
cles with the Off-Road Engineering package)
R you shift the transmission to position Nwhile
driving
If cruise control is deactivated, you will hear a
warning tone. You will see the Cruise con‐
Cruise con‐
trol off
trol off message in the multifunction display
for approximately five seconds.
i The last speed stored is cleared when you
switch off the engine. SPEEDTRONIC
General notes SPEEDTRONIC brakes automatically so that you
do not exceed the set speed. You must select a lower gear in good time on long and steep down-
hill gradients, especially if the vehicle is laden or towing a trailer. By doing so, you will make use of
the braking effect of the engine. This relieves the
load on the brake system and prevents the
brakes from overheating and wearing too
quickly.
You can set a variable or permanent limit speed:
R variable for speed limits, e.g. in built-up areas
R permanent for long-term speed restrictions,
e.g. when driving with winter tyres fitted
(Y page 207)
i The speed indicated in the speedometer
may differ slightly from the limit speed stored.
Important safety notes If you fail to adapt your driving style, SPEED-
TRONIC can neither reduce the risk of an acci-
dent nor override the laws of physics. SPEED-
TRONIC cannot take into account road, weather or traffic conditions. SPEEDTRONIC is only an
aid. You are responsible for the distance to the
vehicle in front, for vehicle speed, for braking in
good time, and for staying in lane.
If there is a change of drivers, advise the new
driver of the speed stored.
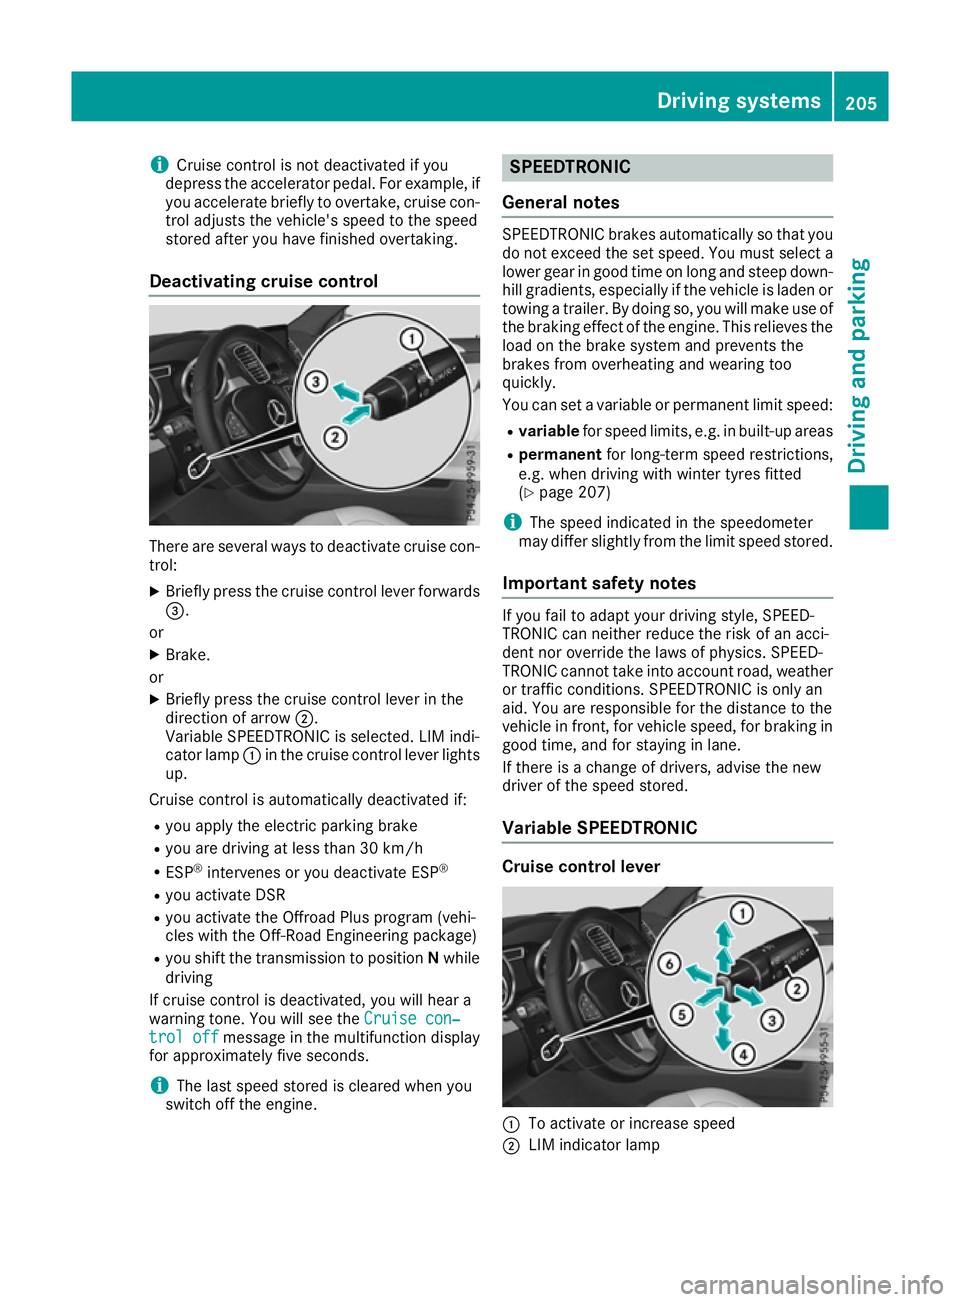
Variable SPEEDTRONIC Cruise control lever
:
To activate or increase speed
; LIM indicator lamp Driving systems
205Driving and parking Z
Page 215 of 453
Deactivating DISTRONIC PLUS
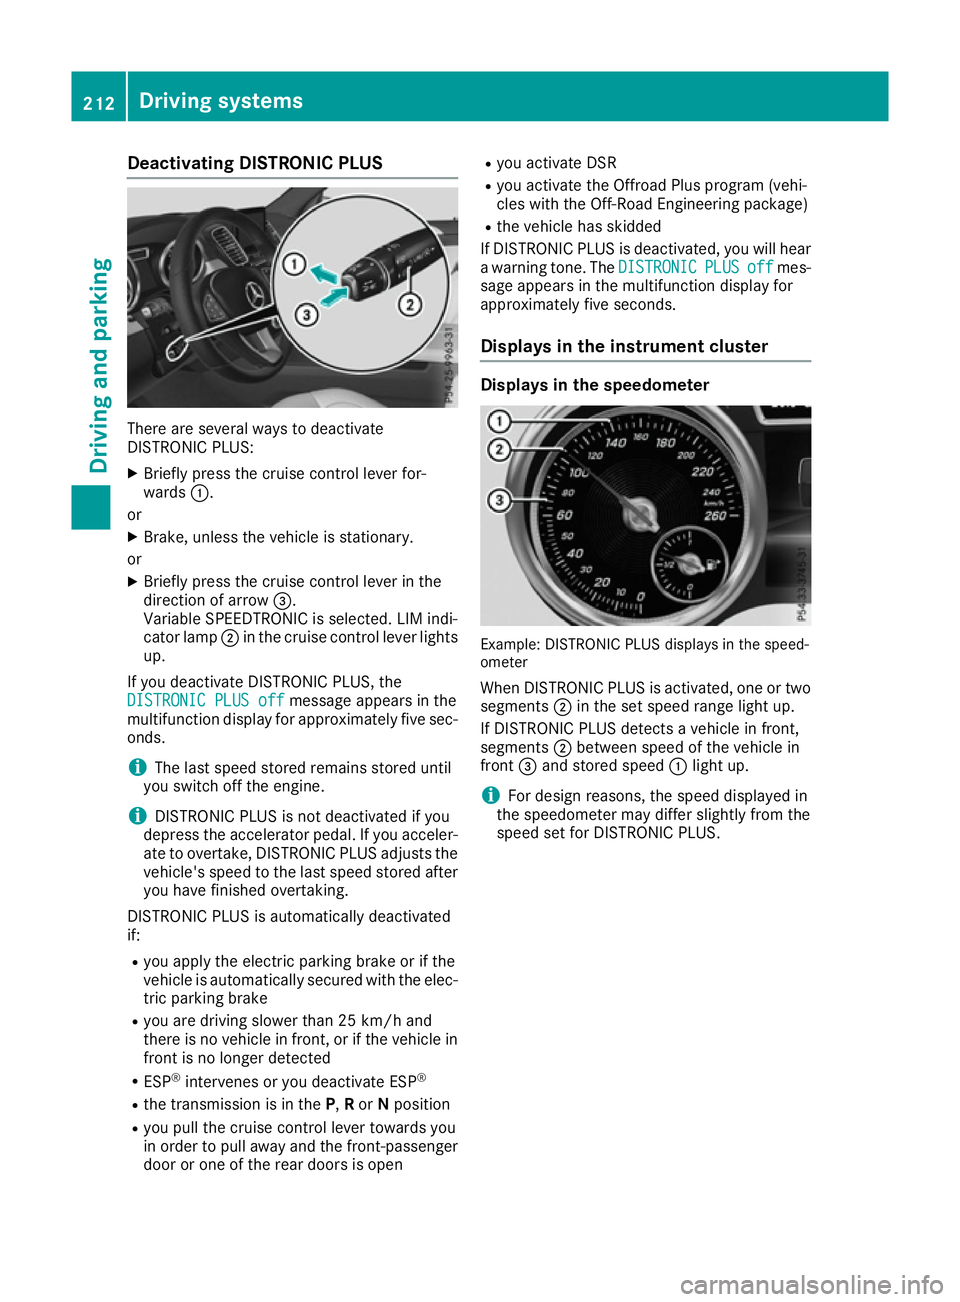
There are several ways to deactivate
DISTRONIC PLUS:
X Briefly press the cruise control lever for-
wards :.
or X Brake, unless the vehicle is stationary.
or X Briefly press the cruise control lever in the
direction of arrow =.
Variable SPEEDTRONIC is selected. LIM indi-
cator lamp ;in the cruise control lever lights
up.
If you deactivate DISTRONIC PLUS, the DISTRONIC PLUS off
DISTRONIC PLUS off message appears in the
multifunction display for approximately five sec-
onds.
i The last speed stored remains stored until
you switch off the engine.
i DISTRONIC PLUS is not deactivated if you
depress the accelerator pedal. If you acceler- ate to overtake, DISTRONIC PLUS adjusts the
vehicle's speed to the last speed stored after
you have finished overtaking.
DISTRONIC PLUS is automatically deactivated
if: R you apply the electric parking brake or if the
vehicle is automatically secured with the elec-
tric parking brake
R you are driving slower than 25 km/h and
there is no vehicle in front, or if the vehicle in
front is no longer detected
R ESP ®
intervenes or you deactivate ESP ®
R the transmission is in the P,Ror Nposition
R you pull the cruise control lever towards you
in order to pull away and the front-passenger door or one of the rear doors is open R
you activate DSR
R you activate the Offroad Plus program (vehi-
cles with the Off-Road Engineering package)
R the vehicle has skidded
If DISTRONIC PLUS is deactivated, you will hear a warning tone. The DISTRONIC
DISTRONIC PLUS PLUSoff
offmes-
sage appears in the multifunction display for
approximately five seconds.
Displays in the instrument cluster Displays in the speedometer
Example: DISTRONIC PLUS displays in the speed-
ometer
When DISTRONIC PLUS is activated, one or two segments ;in the set speed range light up.
If DISTRONIC PLUS detects a vehicle in front,
segments ;between speed of the vehicle in
front =and stored speed :light up.
i For design reasons, the speed displayed in
the speedometer may differ slightly from the
speed set for DISTRONIC PLUS. 212
Driving syste
msDriving and parking
Page 231 of 453
Problems with PARKTRONIC
Problem
Possible causes/consequences and
M
MSolutions Only the red segments in
the PARKTRONIC warn-
ing displays are lit. You
also hear a warning tone
for approximately two
seconds.
PARKTRONIC is deacti-
vated after approx-
imately five seconds,
and the indicator lamp in
the PARKTRONIC button
lights up. PARKTRONIC has malfunctioned and has switched off.
X If problems persist, have PARKTRONIC checked at a qualified spe-
cialist workshop. Only the red segments in
the PARKTRONIC warn-
ing displays are lit.
PARKTRONIC is deacti-
vated after approx-
imately five seconds. The PARKTRONIC sensors are dirty or there is interference.
X
Clean the PARKTRONIC sensors (Y page 382).
X Switch the ignition back on. The problem may be caused by an external source of radio or ultra-
sound waves.
X See if PARKTRONIC functions in a different location. Active Parking Assist
General notes Active Parking Assist is an electronic parking aid
with ultrasound. It measures the road on both
sides of the vehicle. A parking symbol indicates a suitable parking space. Active steering inter-
vention and brake application can assist you
during parking. You may also use PARKTRONIC
(Y page 225).
Important safety notes Active Parking Assist is only an aid. It is not a
substitute for your attention to the immediate
surroundings. The responsibility for safe
manoeuvring and parking remains with you.
Make sure that no persons, animals or objects
are in the manoeuvring range.
When PARKTRONIC is switched off, Active Park-
ing Assist is also unavailable. G
WARNING
While parking or pulling out of a parking
space, the vehicle swings out and can drive
onto areas of the oncoming lane. This could cause you to collide with other road users.
There is a risk of an accident.
Pay attention to other road users. Stop the
vehicle if necessary or cancel the Active Park- ing Assist parking procedure.
! If unavoidable, you should drive over obsta-
cles such as kerbs slowly and not at a sharp
angle. Otherwise, you may damage the
wheels or tyres.
Active Parking Assist may also display spaces
not suitable for parking, e.g.: R parking or stopping restrictions
R in front of driveways or entrances and exits
R unsuitable surfaces
Parking tips:
R on narrow roads, drive as closely as possible
past the parking space
R parking spaces that are littered or overgrown
might be identified or measured incorrectly
R parking spaces that are partially occupied by
trailer drawbars might not be identified as
such or be measured incorrectly 228
Driving systemsDriving and parking
Page 235 of 453
Cancelling Active Parking Assist
X
Stop the movement of the multifunction
steering wheel or steer yourself.
Active Parking Assist will be cancelled at
once. The Park Assist cancelled
Park Assist cancelled mes-
sage appears in the multifunction display.
or X Press the PARKTRONIC button (Y page 227).
PARKTRONIC is switched off and Active Park-
ing Assist is immediately cancelled. The
Park Assist cancelled Park Assist cancelled message appears
in the multifunction display.
Active Parking Assist is cancelled automatically if:
R the electric parking brake is applied
R transmission position Pis selected
R parking using Active Parking Assist is no lon-
ger possible
R you are driving faster than 10 km/h
R a wheel spins and ESP ®
intervenes or fails.
The ÷ warning lamp lights up in the instru-
ment cluster.
A warning tone sounds. The parking symbol dis-
appears and the multifunction display shows the
Park Assist cancelled
Park Assist cancelled message.
When Active Parking Assist is cancelled, you
must steer and brake again yourself.
If a system malfunction occurs, the vehicle is
braked to a standstill. To drive on, depress the
accelerator pedal again. Reversing camera
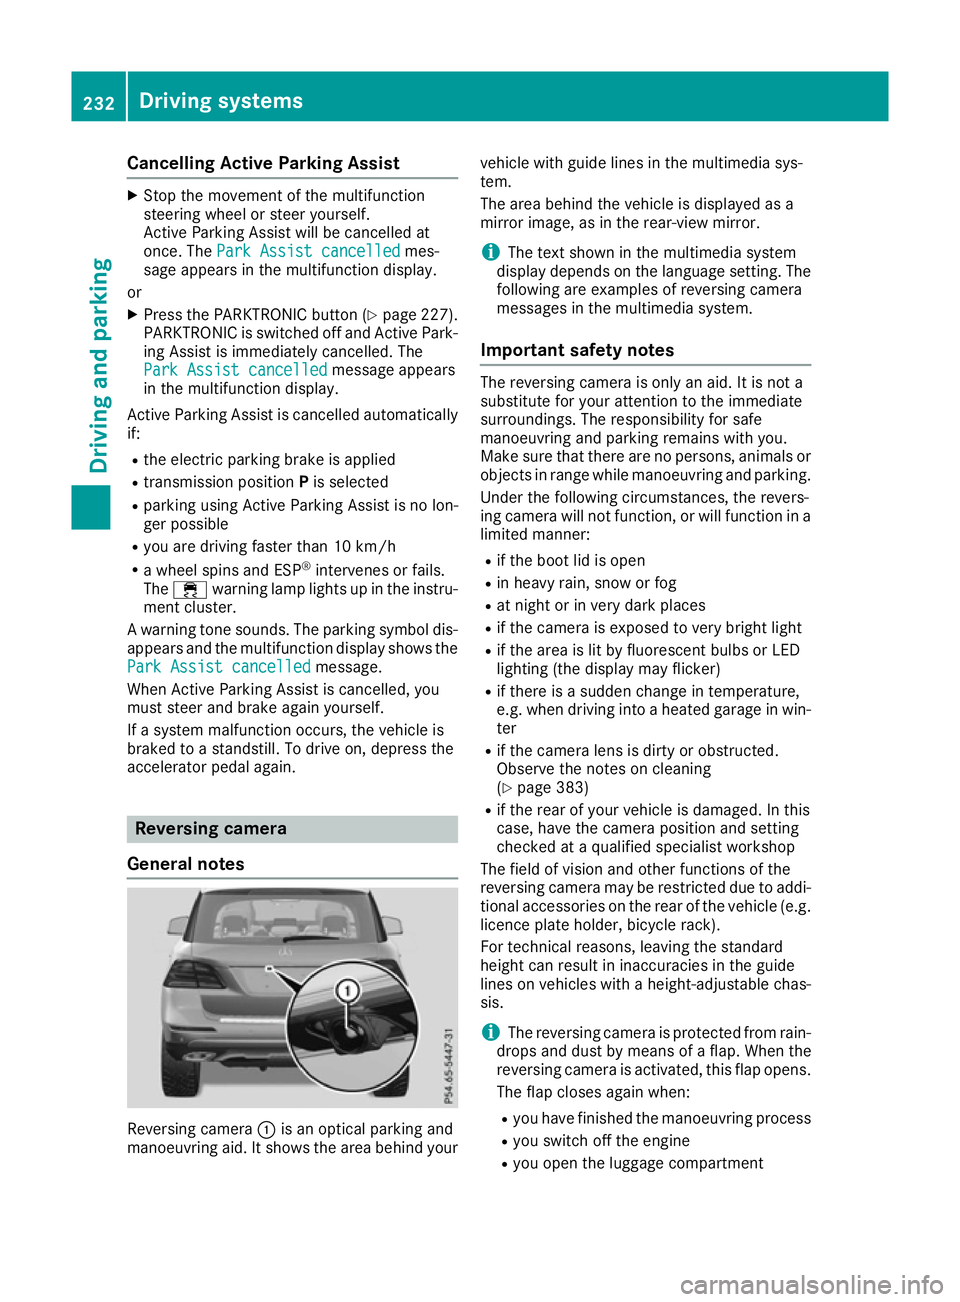
General notes Reversing camera
:is an optical parking and
manoeuvring aid. It shows the area behind your vehicle with guide lines in the multimedia sys-
tem.
The area behind the vehicle is displayed as a
mirror image, as in the rear-view mirror.
i The text shown in the multimedia system
display depends on the language setting. The
following are examples of reversing camera
messages in the multimedia system.
Important safety notes The reversing camera is only an aid. It is not a
substitute for your attention to the immediate
surroundings. The responsibility for safe
manoeuvring and parking remains with you.
Make sure that there are no persons, animals or
objects in range while manoeuvring and parking.
Under the following circumstances, the revers-
ing camera will not function, or will function in a limited manner:
R if the boot lid is open
R in heavy rain, snow or fog
R at night or in very dark places
R if the camera is exposed to very bright light
R if the area is lit by fluorescent bulbs or LED
lighting (the display may flicker)
R if there is a sudden change in temperature,
e.g. when driving into a heated garage in win-
ter
R if the camera lens is dirty or obstructed.
Observe the notes on cleaning
(Y page 383)
R if the rear of your vehicle is damaged. In this
case, have the camera position and setting
checked at a qualified specialist workshop
The field of vision and other functions of the
reversing camera may be restricted due to addi-
tional accessories on the rear of the vehicle (e.g. licence plate holder, bicycle rack).
For technical reasons, leaving the standard
height can result in inaccuracies in the guide
lines on vehicles with a height-adjustable chas-
sis.
i The reversing camera is protected from rain-
drops and dust by means of a flap. When the
reversing camera is activated, this flap opens.
The flap closes again when:
R you have finished the manoeuvring process
R you switch off the engine
R you open the luggage compartment 232
Driving systemsDriving and parking
Page 248 of 453

Radar sensors
The radar sensors for Blind Spot Assist are inte-
grated into the rear bumper. Make sure that the
bumpers are free from dirt, ice or slush. The
sensors must not be covered, for example by
cycle racks or overhanging loads. Following a
severe impact or in the event of damage to the
bumpers, have the function of the radar sensors
checked at a qualified specialist workshop.
Blind Spot Assist may no longer work properly.
Monitoring range of the sensors
In particular, the detection of obstacles can be
impaired in the case of:
R dirt on the sensors or obscured sensors
R poor visibility, e.g. due to fog, heavy rain or
snow
R narrow vehicles, e.g. motorcycles or bicycles
Vehicles in the monitoring range are then not
indicated. Blind Spot Assist monitors the area up to 3.0 m
behind your vehicle and directly next to your
vehicle, as shown in the picture.
If the lanes are narrow, vehicles driving in the
lane beyond the lane next to your vehicle may be
indicated, especially if the vehicles are not driv-
ing in the middle of their lane. This may be the
case if there are vehicles at the edge of their lane nearest your vehicle.
On very wide lanes, vehicles in the lane next to
your vehicle may not be displayed if the vehicles
are too far away. Due to the nature of the system:
R warnings may be issued in error when driving
close to crash barriers or similar solid lane
borders
R warnings may be interrupted when driving
alongside long vehicles, for example lorries,
for a prolonged time
Warning display Blind Spot Assist is not active at speeds below
approximately 30 km/h. Vehicles in the moni-
toring range are then not indicated. :
Yellow indicator lamp/red warning lamp
If Blind Spot Assist is activated, indicator
lamp :in the exterior mirrors lights up yellow
up to a speed of 30 km/h. At speeds above
30 km/h, the indicator lamp goes out and Blind
Spot Assist is operational.
If a vehicle is detected within the monitoring
range of Blind Spot Assist at speeds above
30 km/h, warning lamp :on the correspond-
ing side lights up red. This warning always
occurs when a vehicle enters the blind spot
monitoring range from behind or from the side.
When you overtake a vehicle, the warning only
occurs if the difference in speed is less than
12 km/h.
The yellow indicator lamp goes out if reverse
gear is engaged. Blind Spot Assist is then deac- tivated.
The brightness of the indicator/warning lamps
is adjusted automatically according to the ambi-
ent light.
Collision warning
If a vehicle is detected in the monitoring range of
Blind Spot Assist and you switch on the corre-
sponding turn signal, a double warning tone
sounds. Red warning lamp :flashes. If the turn
signal remains on, detected vehicles are indica- Driving systems
245Driving and parking Z