2015 MERCEDES-BENZ GLE SUV warning lights
[x] Cancel search: warning lightsPage 77 of 453
G
WARNING
The distance warning function does not react:
R to people or animals
R to oncoming vehicles
R to crossing traffic
R when cornering
Thus, the distance warning function cannot
provide a warning in all critical situations.
There is a risk of an accident.
Always pay careful attention to the traffic sit-
uation and be ready to brake. G
WARNING
The distance warning function cannot always
clearly identify objects and complex traffic
situations.
In such cases, the distance warning function
may:
R give an unnecessary warning
R not give a warning
There is a risk of an accident.
Always pay careful attention to the traffic sit-
uation; do not rely on the distance warning
function alone.
Function The distance warning function issues a warning at speeds:
R of approximately 30 km/h or more, if, over
several seconds, the distance maintained to
the vehicle travelling in front is insufficient.
The · distance warning lamp then lights
up in the instrument cluster.
R of approximately 7 km/h or more, if you rap-
idly approach a vehicle in front. An intermit-
tent warning tone will then sound and the
· distance warning lamp will light up in the
instrument cluster.
X Brake immediately in order to increase the
distance from the vehicle in front.
or
X Take evasive action provided it is safe to do
so.
Due to the nature of the system, particularly
complicated but non-critical driving conditions
may also cause the system to display a warning. With the help of the radar sensor system, the
distance warning function can detect obstacles
that are in the path of your vehicle for an exten-
ded period of time.
Up to a speed of approximately 70 km/h, the
distance warning function can also react to sta-
tionary obstacles, such as stopped or parked
vehicles.
Autonomous braking function If the driver does not react to the distance warn-
ing signal in a critical situation, COLLISION PRE- VENTION ASSIST PLUS can assist with the
autonomous braking function.
The autonomous braking function:
R gives the driver more time to react to critical
driving situations
R can help the driver to avoid an accident or
R reduces the effects of an accident
Vehicles without DISTRONIC PLUS: the
autonomous braking function is available in the
following speed ranges:
R 7 - 105 km/h for moving objects
R 7 - 50 km/h for stationary objects
Vehicles with DISTRONIC PLUS: the autono-
mous braking function is available in the follow-
ing speed ranges:
R 7 - 200 km/h for moving objects
R 7 - 50 km/h for stationary objects
Due to the nature of the system, complicated
but non-critical driving situations may also
cause the autonomous braking function to inter- vene.
If the autonomous braking function demands
particularly high braking force, preventative
passenger protection measures (PRE-SAFE ®
)
are activated simultaneously (Y page 57).
Adaptive Brake Assist General notes
i Observe the "Important safety notes" sec-
tion (Y page 70).
With the help of Adaptive Brake Assist, the dis-
tance warning signal can detect obstacles that
are in the path of your vehicle for an extended
period of time.
If Adaptive Brake Assist detects a risk of a col-
lision with the vehicle in front, it calculates the 74
Driving safety systemsSafety
Page 78 of 453
braking force necessary to avoid a collision. If
you apply the brakes forcefully, Adaptive Brake
Assist will automatically increase the braking
force to a level suitable for the traffic conditions.
Adaptive Brake Assist provides braking assis-
tance in hazardous situations at speeds above
7 km/h. It uses radar sensor technology to
assess the traffic situation.
Up to a speed of approximately 250 km/h,
Adaptive Brake Assist is capable of reacting to
moving objects that have already been detected
as such at least once over the period of obser-
vation.
Up to a speed of approximately 70 km/h, Adap-
tive Brake Assist reacts to stationary obstacles.
If Adaptive Brake Assist demands particularly
high braking force, preventative passenger pro-
tection measures (PRE-SAFE ®
) are activated
simultaneously (Y page 57).
X Keep the brake pedal depressed until the
emergency braking situation is over.
ABS prevents the wheels from locking.
The brakes will work normally again if: R you release the brake pedal
R there is no longer any danger of a collision
R no obstacle is detected in front of your vehicle
Adaptive Brake Assist is then deactivated.
Important safety notes i Observe the "Important safety notes" sec-
tion for driving safety systems (Y page 70).G
WARNING
Adaptive Brake Assist cannot always clearly
identify objects and complex traffic situa-
tions.
In such cases, Adaptive Brake Assist can:
R intervene unnecessarily
R not intervene
There is a risk of an accident.
Always pay careful attention to the traffic sit- uation and be ready to brake. Terminate the
intervention in a non-critical driving situation. G
WARNING
Adaptive Brake Assist does not react:
R to people or animals
R to oncoming vehicles
R to crossing traffic
R when cornering
As a result, the Adaptive Brake Assist may not intervene in all critical conditions. There is a
risk of an accident.
Always pay careful attention to the traffic sit- uation and be ready to brake.
Due to the nature of the system, complicated
but non-critical driving situations may also
cause Adaptive Brake Assist to intervene.
If Adaptive Brake Assist is not available due to a malfunction in the radar sensor system, the
brake system remains available with full brake
boosting effect and BAS. Adaptive brake lights
The adaptive brake lights warn following traffic
in an emergency braking situation:
R by flashing brake lamps
R the hazard warning lamps are activated
If you brake sharply from a speed of more than
50 km/ hor if braking is assisted by BAS or BAS
PLUS, the brake lamps flash rapidly. In this way,
traffic travelling behind you is warned in an even more noticeable manner.
If you brake sharply from a speed of more than
70 km/h to a standstill, the hazard warning
lamps are activated automatically. If the brakes
are applied again, the brake lamps light up con- tinuously. The hazard warning lamps switch off
automatically if you travel faster than 10 km/h.You can also switch off the hazard warning
lamps using the hazard warning button
(Y page 124). ESP
®
(Electronic Stability Program)
General notes i
Observe the "Important safety notes" sec-
tion (Y page 70). Driving safety systems
75Safety Z
Page 79 of 453
ESP
®
monitors driving stability and traction, i.e.
power transmission between the tyres and the
road surface.
If ESP ®
detects that the vehicle is deviating from
the direction desired by the driver, one or more
wheels are braked to stabilise the vehicle. The
engine output is also modified to keep the vehi- cle on the desired course within physical limits.
ESP ®
assists the driver when pulling away on
wet or slippery roads. ESP ®
can also stabilise
the vehicle during braking.
ETS/4ETS (Electronic Traction System) ETS traction control is part of ESP
®
. On vehicles
with 4MATIC, 4ETS is a component of ESP ®
.
Traction control brakes the drive wheels indi-
vidually if they spin. This enables you to pull
away and accelerate on slippery surfaces, for
example if the road surface is slippery on one
side. In addition, more drive torque is transfer-
red to the wheel or wheels with traction.
Traction control remains active if you deactivate
ESP ®
.
In appropriate driving situations, activate the
off-road programs:
X Vehicles without the Off-Road Engineering
package (Y page 254)
X Vehicles with the Off-Road Engineering pack-
age (Y page 254)
Off-road 4ETS (Electronic Traction Sys-
tem) An ETS system specifically suited to off-road
terrain is activated automatically once an off-
road program is activated:
R Vehicles without the Off-Road Engineering
package (Y page 254)
R Vehicles with the Off-Road Engineering pack-
age (Y page 254)
Important safety notes G
WARNING
If ESP ®
is malfunctioning, ESP ®
is unable to
stabilise the vehicle. In addition, other driving
safety systems are switched off. This increa-
ses the risk of skidding and an accident. Drive on carefully. Have ESP
®
checked at a
qualified specialist workshop.
! Only operate the vehicle for a maximum of
ten seconds on a brake dynamometer. Switch
off the ignition.
Application of the brakes by ESP ®
may oth-
erwise destroy the brake system.
! A function or performance test should only
be carried out on a twin-axle dynamometer.
Before you operate the vehicle on such a
dynamometer, please consult a qualified
workshop. You could otherwise damage the
drive train or the brake system.
When ESP ®
is deactivated, the åESP®
OFF
warning lamp lights up continuously.
If the ÷ warning lamp and the åwarning
lamp are lit continuously, ESP ®
is not available
due to a malfunction.
Observe the information on warning lamps
(Y page 343) and display messages which may
be shown in the instrument cluster
(Y page 301).
i Only use wheels with the recommended tyre
sizes. Only then will ESP ®
function properly.
Characteristics of ESP ® General notes
If the ÷ ESP warning lamp goes out before
beginning the journey, ESP ®
is automatically
active.
If ESP ®
intervenes, the ÷ESP®
warning lamp
flashes in the instrument cluster.
If ESP ®
intervenes:
X Do not deactivate ESP ®
under any circum-
stances.
X When pulling away, only depress the acceler-
ator pedal as far as is necessary.
X Adapt your driving style to suit the prevailing
road and weather conditions.
ECO start/stop function
The ECO start/stop function switches the
engine off automatically if the vehicle stops
moving. When pulling away again, the engine
starts automatically. ESP ®
remains in its previ-
ously selected status. Example:if ESP®
was
deactivated before the engine was switched off, 76
Driving safety systemsSafety
Page 80 of 453
ESP
®
remains deactivated when the engine is
switched on again.
Deactivating/activating ESP ®Important safety notes
i Observe the "Important safety notes" sec-
tion (Y page 70).
You can select between the following statuses
of ESP ®
:
R ESP ®
is activated
R ESP ®
is deactivated G
WARNING
If you deactivate ESP ®
, ESP ®
no longer sta-
bilises the vehicle. There is an increased risk
of skidding and an accident.
Only deactivate ESP ®
in the situations descri-
bed in the following.
It may be best to deactivate ESP ®
in the follow-
ing situations:
R when using snow chains
R in deep snow
R on sand or gravel
i Activate ESP ®
as soon as the situations
described above no longer apply. ESP ®
will
otherwise not be able to stabilise the vehicle
if the vehicle starts to skid or a wheel starts to
spin.
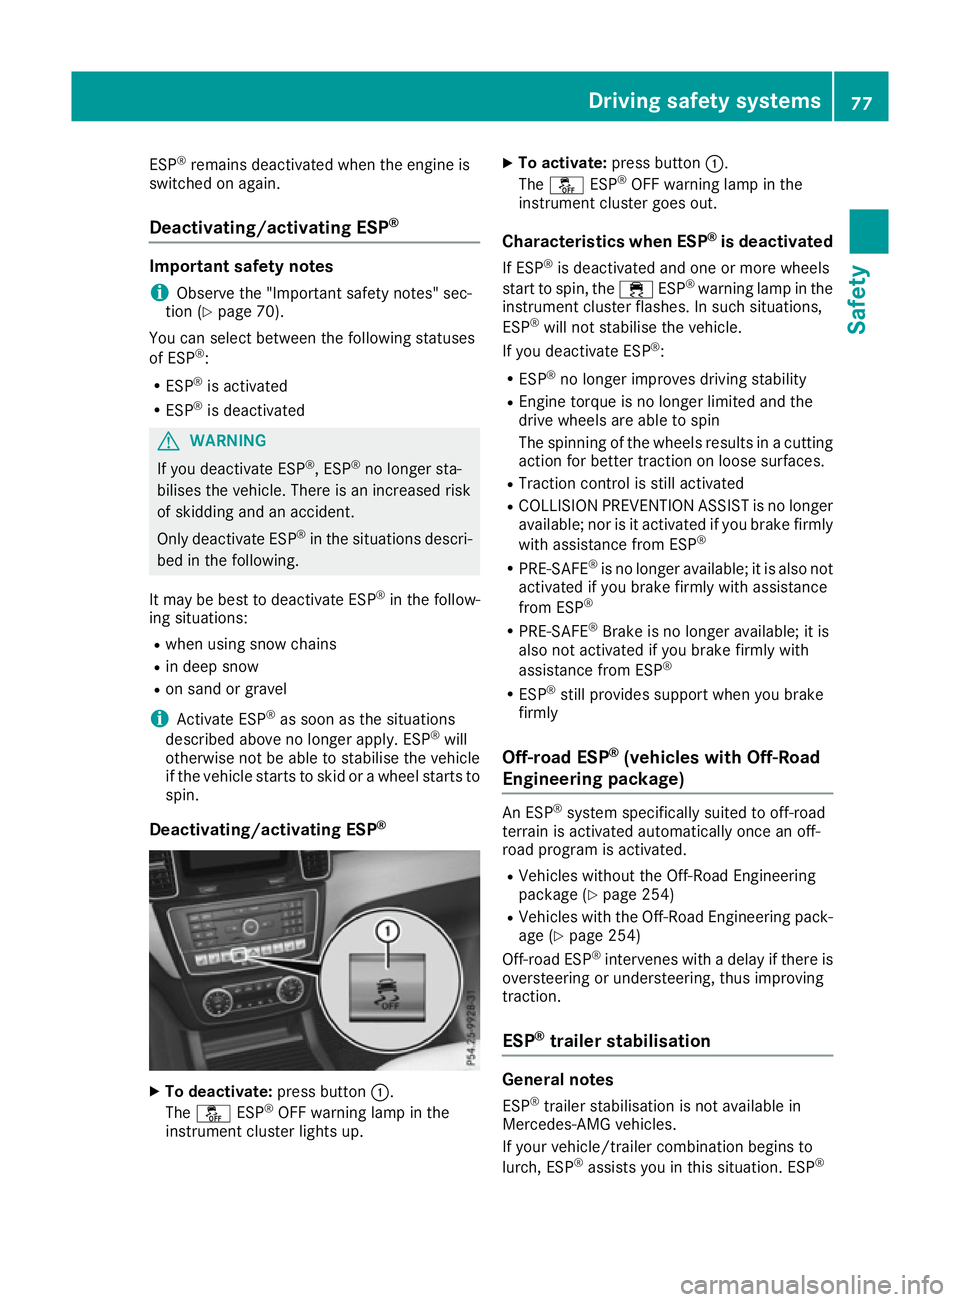
Deactivating/activating ESP ®X
To deactivate: press button:.
The å ESP®
OFF warning lamp in the
instrument cluster lights up. X
To activate: press button :.
The å ESP®
OFF warning lamp in the
instrument cluster goes out.
Characteristics when ESP ®
is deactivated
If ESP ®
is deactivated and one or more wheels
start to spin, the ÷ESP®
warning lamp in the
instrument cluster flashes. In such situations,
ESP ®
will not stabilise the vehicle.
If you deactivate ESP ®
:
R ESP ®
no longer improves driving stability
R Engine torque is no longer limited and the
drive wheels are able to spin
The spinning of the wheels results in a cutting
action for better traction on loose surfaces.
R Traction control is still activated
R COLLISION PREVENTION ASSIST is no longer
available; nor is it activated if you brake firmly
with assistance from ESP ®
R PRE-SAFE ®
is no longer available; it is also not
activated if you brake firmly with assistance
from ESP ®
R PRE-SAFE ®
Brake is no longer available; it is
also not activated if you brake firmly with
assistance from ESP ®
R ESP ®
still provides support when you brake
firmly
Off-road ESP ®
(vehicles with Off-Road
Engineering package) An ESP
®
system specifically suited to off-road
terrain is activated automatically once an off-
road program is activated.
R Vehicles without the Off-Road Engineering
package (Y page 254)
R Vehicles with the Off-Road Engineering pack-
age (Y page 254)
Off-road ESP ®
intervenes with a delay if there is
oversteering or understeering, thus improving
traction.
ESP ®
trailer stabilisation General notes
ESP ®
trailer stabilisation is not available in
Mercedes-AMG vehicles.
If your vehicle/trailer combination begins to
lurch, ESP ®
assists you in this situation. ESP ® Driving safety systems
77Safety Z
Page 83 of 453
R
darkness
R if:
- pedestrians move quickly, e.g. into the path
of the vehicle
- the camera system no longer detects a
pedestrian as a person due to special cloth- ing or other objects
- a pedestrian is concealed by other objects
- the typical outline of a person is not distin-
guishable from the background
Following damage to the front end of the vehicle,
have the radar sensor settings and operation
checked at a qualified specialist workshop. This also applies to collisions at slow speeds where
there is no visible damage to the front of the
vehicle.
Following damage to the windscreen, have the
configuration and operation of the camera sys-
tem checked at a qualified specialist workshop.
Function X
To activate/deactivate: activate or deacti-
vate PRE-SAFE ®
Brake in the on-board com-
puter (Y page 290).
If the PRE-SAFE ®
Brake is not activated, the
æ symbol appears in the multifunction dis-
play.
If you have activated DSR (Y page 252), PRE-
SAFE ®
Brake is also deactivated.
This function will issue a warning if:
R at a speed of approximately 30 km/h or
higher, the distance maintained to the vehicle
travelling in front is insufficient for several
seconds.
The · distance warning lamp then lights
up in the instrument cluster.
R at a speed of around 7 km/ hor more, you
rapidly approach a vehicle in front or a pedes-
trian
An intermittent warning tone will then sound
and the ·distance warning lamp lights up
in the instrument cluster.
X Brake immediately to defuse the situation.
or X Take evasive action provided it is safe to do
so. The PRE-SAFE
®
Brake function can also brake
the vehicle automatically under the following
conditions:
R the driver and front passenger have their seat
belts fastened
and
R the vehicle speed is between approximately
7 km/h and 200 km/h
At a speed of up to approximately 70 km/h,
PRE-SAFE ®
Brake can also detect:
R stationary objects in the path of your vehicle,
e.g. stopped or parked vehicles
R pedestrians in the path of your vehicle
i If there is an increased risk of a collision,
preventive passenger protection measures
(PRE-SAFE ®
) are triggered (Y page 57).
If the risk of a collision with the vehicle in front
remains and you do not brake, take evasive
action or accelerate significantly, the vehicle
may perform automatic emergency braking, up
to the point of full brake application. Automatic
emergency braking is not performed until imme- diately prior to an imminent accident.
You can prevent the intervention of PRE-SAFE ®
Brake at any time by:
R depressing the accelerator pedal further
R activating kickdown
R releasing the brake pedal
The braking action of PRE-SAFE ®
Brake is ended
automatically if:
R you manoeuvre to avoid the obstacle
R there is no longer any danger of a collision
R there is no longer an obstacle detected in
front of your vehicle STEER CONTROL
General notes STEER CONTROL helps you by transmitting a
noticeable steering force to the steering wheel
in the direction required for vehicle stabilisation.
This steering support is provided in particular if:
R both right wheels or both left wheels are on a
wet or slippery road surface when you brake
R the vehicle starts to skid 80
Driving safety systemsSafety
Page 90 of 453
Removing the emergency key element
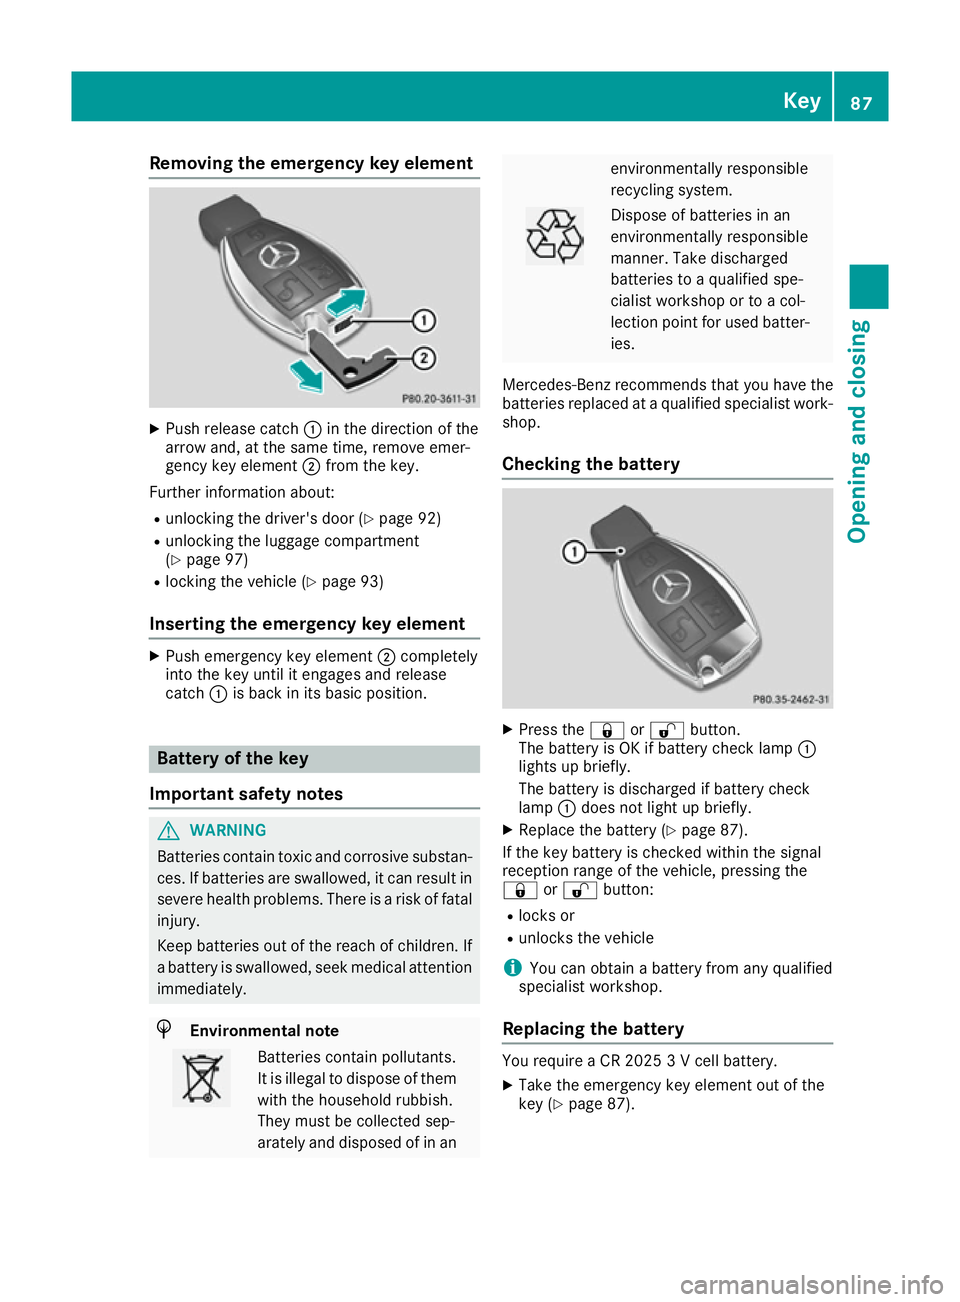
X
Push release catch :in the direction of the
arrow and, at the same time, remove emer-
gency key element ;from the key.
Further information about:
R unlocking the driver's door (Y page 92)
R unlocking the luggage compartment
(Y page 97)
R locking the vehicle (Y page 93)
Inserting the emergency key element X
Push emergency key element ;completely
into the key until it engages and release
catch :is back in its basic position. Battery of the key
Important safety notes G
WARNING
Batteries contain toxic and corrosive substan- ces. If batteries are swallowed, it can result in
severe health problems. There is a risk of fatal injury.
Keep batteries out of the reach of children. If
a battery is swallowed, seek medical attention immediately. H
Environmental note Batteries contain pollutants.
It is illegal to dispose of them with the household rubbish.
They must be collected sep-
arately and disposed of in an environmentally responsible
recycling system.
Dispose of batteries in an
environmentally responsible
manner. Take discharged
batteries to a qualified spe-
cialist workshop or to a col-
lection point for used batter-
ies.
Mercedes-Benz recommends that you have the
batteries replaced at a qualified specialist work- shop.
Checking the battery X
Press the &or% button.
The battery is OK if battery check lamp :
lights up briefly.
The battery is discharged if battery check
lamp :does not light up briefly.
X Replace the battery (Y page 87).
If the key battery is checked within the signal
reception range of the vehicle, pressing the
& or% button:
R locks or
R unlocks the vehicle
i You can obtain a battery from any qualified
specialist workshop.
Replacing the battery You require a CR 2025 3 V cell battery.
X Take the emergency key element out of the
key (Y page 87). Key
87Opening and closing Z
Page 120 of 453
Crash-responsive EASY-EXIT feature
If the crash-responsive EASY-EXIT feature is trig-
gered in an accident, the steering column will
move upwards when the driver's door is opened.
This occurs irrespective of the position of the
key in the ignition lock. This makes it easier to
exit the vehicle and rescue the occupants.
The crash-responsive EASY-EXIT feature is only
operational if the EASY-EXIT/ENTRY feature is
activated in the on-board computer
(Y page 296). Mirrors
Rear-view mirror
X
Anti-dazzle mode: pivot anti-dazzle
switch :forwards or back. Exterior mirrors
Adjusting the exterior mirrors G
WARNING
You could lose control of the vehicle while
driving if you:
R adjust the driver's seat, steering wheel or
mirrors
R fasten the seat belt
There is a risk of an accident.
Adjust the driver's seat, head restraint, steer-
ing wheel and mirrors and fasten your seat
belt before starting the engine. G
WARNING
The exterior mirrors reduce the size of the
image. Objects visible in the mirrors are
closer than they appear. You could misjudge
the distance from road users driving behind
you when changing lanes, for instance. There is a risk of an accident.
You should therefore always look over your
shoulder to determine the actual distance
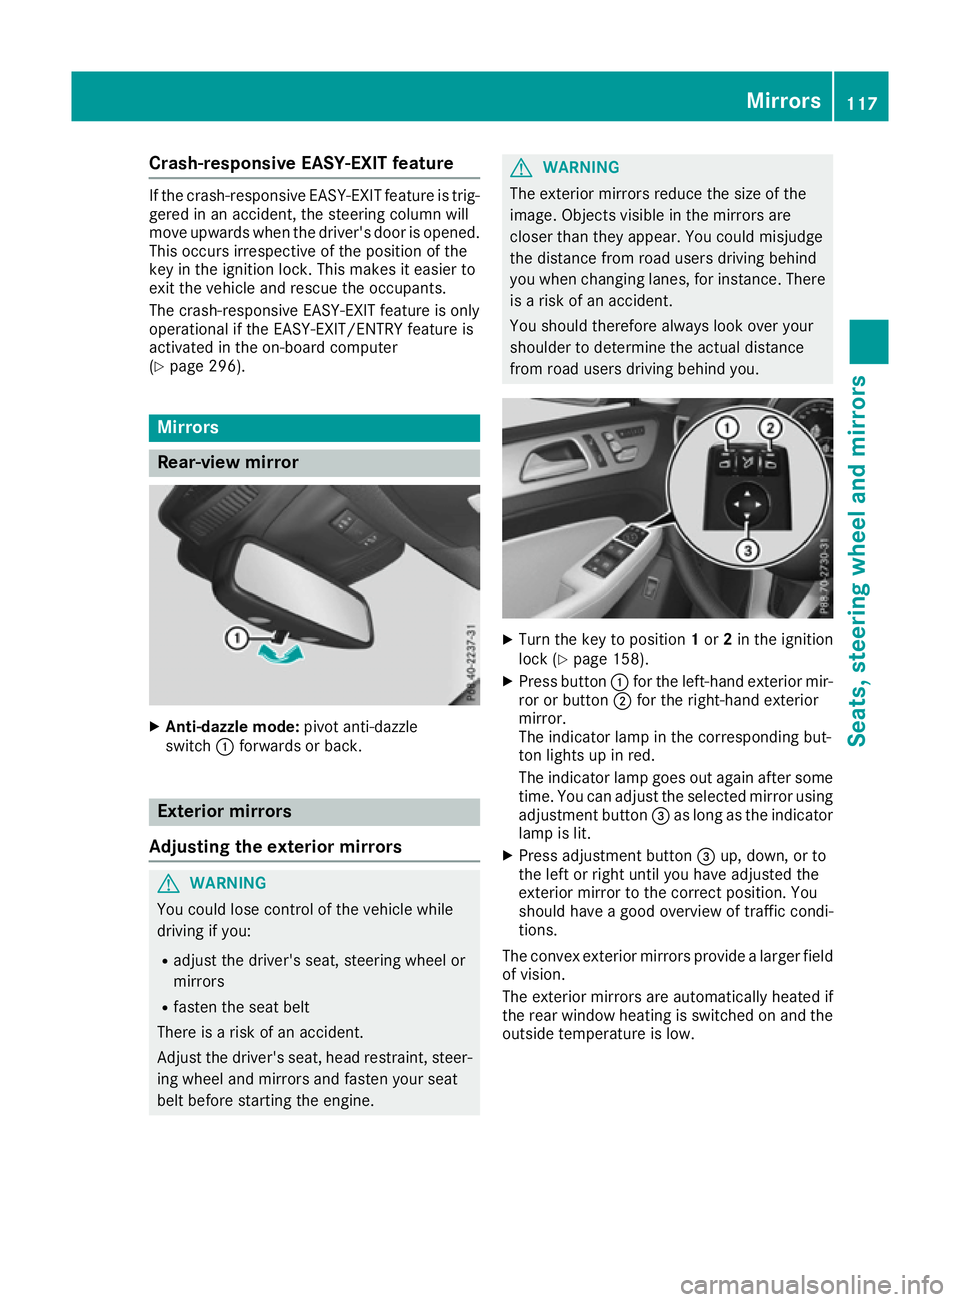
from road users driving behind you. X
Turn the key to position 1or 2in the ignition
lock (Y page 158).
X Press button :for the left-hand exterior mir-
ror or button ;for the right-hand exterior
mirror.
The indicator lamp in the corresponding but-
ton lights up in red.
The indicator lamp goes out again after some
time. You can adjust the selected mirror using
adjustment button =as long as the indicator
lamp is lit.
X Press adjustment button =up, down, or to
the left or right until you have adjusted the
exterior mirror to the correct position. You
should have a good overview of traffic condi-
tions.
The convex exterior mirrors provide a larger field
of vision.
The exterior mirrors are automatically heated if
the rear window heating is switched on and the outside temperature is low. Mirrors
117Seats, steering wheel and mirrors Z
Page 125 of 453
4
Ã
Automatic headlamp mode, controlled
by the light sensor
5 L
Dipped-beam/main-beam headlamps
B R
Rear fog lamp
If you hear a warning tone when you leave the
vehicle, the lights may still be switched on.
X Turn the light switch to Ã.
The exterior lighting (except the side lamps/
parking lamps) switches off automatically if you: R remove the key from the ignition lock
R open the driver's door with the key in posi-
tion 0in the ignition lock
Automatic headlamp mode
à is the preferred light switch setting. The
light setting is automatically selected according to the brightness of the ambient light (excep-
tion: poor visibility due to weather conditions
such as fog, snow or spray):
R Key in position 1in the ignition lock: the side
lamps are switched on or off automatically
depending on the brightness of the ambient
light
R With the engine running: depending on the
ambient light conditions, the daytime driving
lights or the side lamps and dipped-beam
headlamps are switched on or off automati-
cally
X To switch on automatic headlamp mode:
turn the light switch to Ã.G
WARNING
When the light switch is set to Ã, the
dipped-beam headlamps may not be switched on automatically if there is fog, snow or othercauses of poor visibility due to the weather
conditions such as spray. There is a risk of an
accident.
In such situations, turn the light switch to
L.
The automatic headlamp feature is only an aid.
The driver is responsible for the vehicle lighting at all times.
The daytime driving lights improve the detecta-
bility of your vehicle during the day.
When the side lamps and dipped-beam head-
lamps are switched on, the green T(side
lamps) and L(dipped-beam headlamps) indicator lamps in the instrument cluster light
up.
Dipped-beam headlamps When the ignition is switched on and the light
switch is in the Lposition, the side lamps
and dipped-beam headlamps are switched on
even if the light sensor does not sense dark
ambient light conditions. This is advantageous
when there is fog or rain.
X To switch on the dipped-beam headlamps:
turn the key in the ignition lock to position 2
or start the engine.
X Turn the light switch to L.
The green Lindicator lamp in the instru-
ment cluster lights up.
Rear fog lamp The rear foglamp improves the visibility of your
vehicle in heavy fog for the following traffic.
Please observe the country-specific laws on the
use of rear foglamps.
X To switch on the rear foglamp: turn the key
in the ignition lock to position 2or start the
engine.
X Turn the light switch to LorÃ.
X Press the Rbutton.
The yellow Rindicator lamp in the instru-
ment cluster lights up.
X To switch off the rear foglamp: press the
R button.
The yellow Rindicator lamp in the instru-
ment cluster goes out.
Side lamps ! If the battery has been excessively dis-
charged, the side lamps or parking lamps are
automatically switched off to enable the next engine start. Always park your vehicle safely
and sufficiently lit according to legal stand-
ards. Avoid the continuous use of the T
side lamps for several hours. If possible,
switch on the Xright or the Wleft
parking lamp.
X To switch on: turn the light switch to T.
The green Tindicator lamp in the instru-
ment cluster lights up.
Parking lamps Switches on the parking lamps ensures that the
corresponding side of the vehicle is illuminated. 122
Exterior lightingLights and
windscreen wipers