2015 MERCEDES-BENZ GLC SUV remove seats
[x] Cancel search: remove seatsPage 28 of 497
Protection of the environment
General notes
H
Environmental note
Daimler's declared policy is one of compre-
hensive environmental protection.
Our objectives are to use the natural resour-
ces which form the basis of our existence on
this planet sparingly and in a manner which
takes the requirements of both nature and
humanity into consideration.
You too can help to protect the environment
by operating your vehicle in an environmen-
tally-responsible manner.
Fuel consumption and the rate of engine,
transmission, brake and tyre wear depend on
the following factors:
R operating conditions of your vehicle
R your personal driving style
You can influence both factors. Therefore,
please bear the following in mind:
Operating conditions:
R avoid short trips, as these increase fuel
consumption.
R observe the correct tyre pressure.
R do not carry any unnecessary weight in the
vehicle.
R remove the roof rack once you no longer
need it.
R a regularly serviced vehicle will contribute
to environmental protection. You should
therefore adhere to the service intervals.
R all maintenance work should be carried out
at a qualified specialist workshop.
Personal driving style:
R do not depress the accelerator pedal when
starting the engine.
R do not warm up the engine when the vehicle
is stationary.
R drive carefully and maintain a safe distance
from the vehicle in front.
R avoid frequent, sudden acceleration and
braking. R
change gear in good time and use each gear
only up to Ôof its maximum engine speed.
R switch off the engine in stationary traffic.
R monitor the vehicle's fuel consumption. Returning an end-of-life vehicle
EU countries only:
Mercedes-Benz will take back your old vehicle to dispose of it in an environmentally-respon-sible manner in accordance with the Euro-
pean Union (EU) End of Life Vehicles Direc-
tive.
There is a network of return points and dis-
assembly plants available. You can return
your vehicle to these plants free of charge.
This makes a valuable contribution to the
recycling process and the conservation of
resources.
For further information on recycling old vehi- cles, recovery and the terms of the policy,
visit the Mercedes-Benz homepage. Genuine Mercedes-Benz parts
H
Environmental note
Daimler AG also supplies reconditioned
assemblies and parts which are of the same
quality as new parts. For these, the same war-
ranty applies as for new parts.
! Airbags and seat belt tensioners, as well
as control units and sensors for these
restraint systems, may be installed in the
following areas of your vehicle:
R doors
R door pillars
R door sills
R seats
R dashboard
R instrument cluster
R centre console Introduction
25 Z
Page 76 of 497
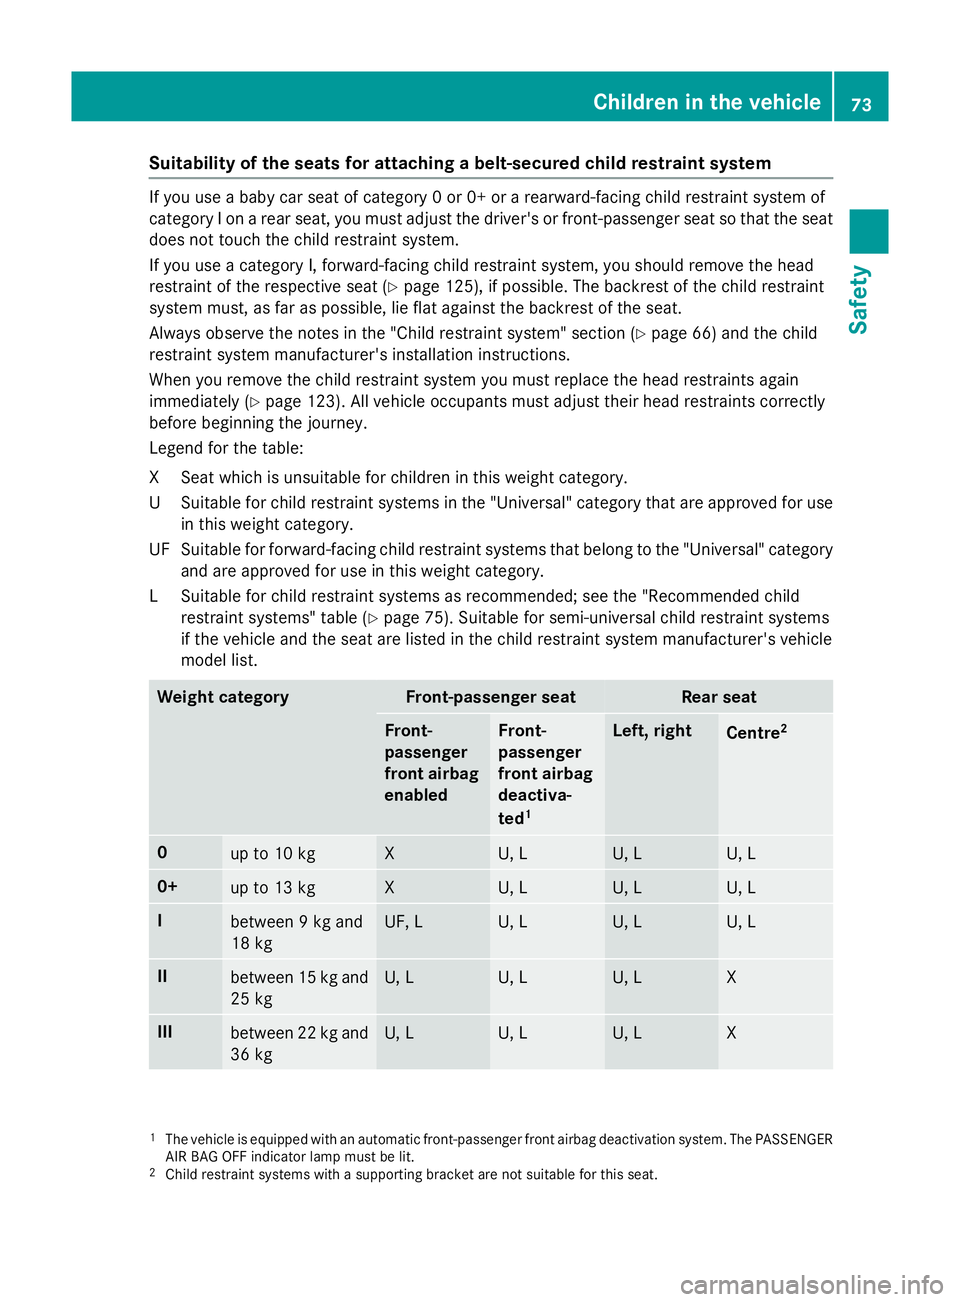
Suitability of the seats for attaching a belt-secured child restraint system
If you use a baby car seat of category 0 or 0+ or a rearward-facing child restraint system of
category I on a rear seat, you must adjust the driver's or front-passenger seat so that the seat
does not touch the child restraint system.
If you use a category I, forward-facing child restraint system, you should remove the head
restraint of the respective seat (Y page 125), if possible. The backrest of the child restraint
system must, as far as possible, lie flat against the backrest of the seat.
Always observe the notes in the "Child restraint system" section (Y page 66) and the child
restraint system manufacturer's installation instructions.
When you remove the child restraint system you must replace the head restraints again
immediately (Y page 123). All vehicle occupants must adjust their head restraints correctly
before beginning the journey.
Legend for the table:
XS eat which is unsuitable for children in this weight category.
US uitable for child restraint systems in the "Universal" category that are approved for use
in this weight category.
UF Suitable for forward-facing child restraint systems that belong to the "Universal" category and are approved for use in this weight category.
LS uitable for child restraint systems as recommended; see the "Recommended child
restraint systems" table (Y page 75). Suitable for semi-universal child restraint systems
if the vehicle and the seat are listed in the child restraint system manufacturer's vehicle
model list. Weight category Front-passenger seat Rear seat
Front-
passenger
front airbag
enabled Front-
passenger
front airbag
deactiva-
ted 1 Left, right
Centre
2 0
up to 10 kg X U, L U, L U, L
0+
up to 13 kg X U, L U, L U, L
I
between 9 kg and
18 kg UF, L U, L U, L U, L
II
between 15 kg and
25 kg U, L U, L U, L X
III
between 22 kg and
36 kg U, L U, L U, L X
1
The vehicle is equipped with an automatic front-passenger front airbag deactivation system. The PASSENGER
AIR BAG OFF indicator lamp must be lit.
2 Child restraint systems with a supporting bracket are not suitable for this seat. Children in the vehicle
73Safety Z
Page 77 of 497
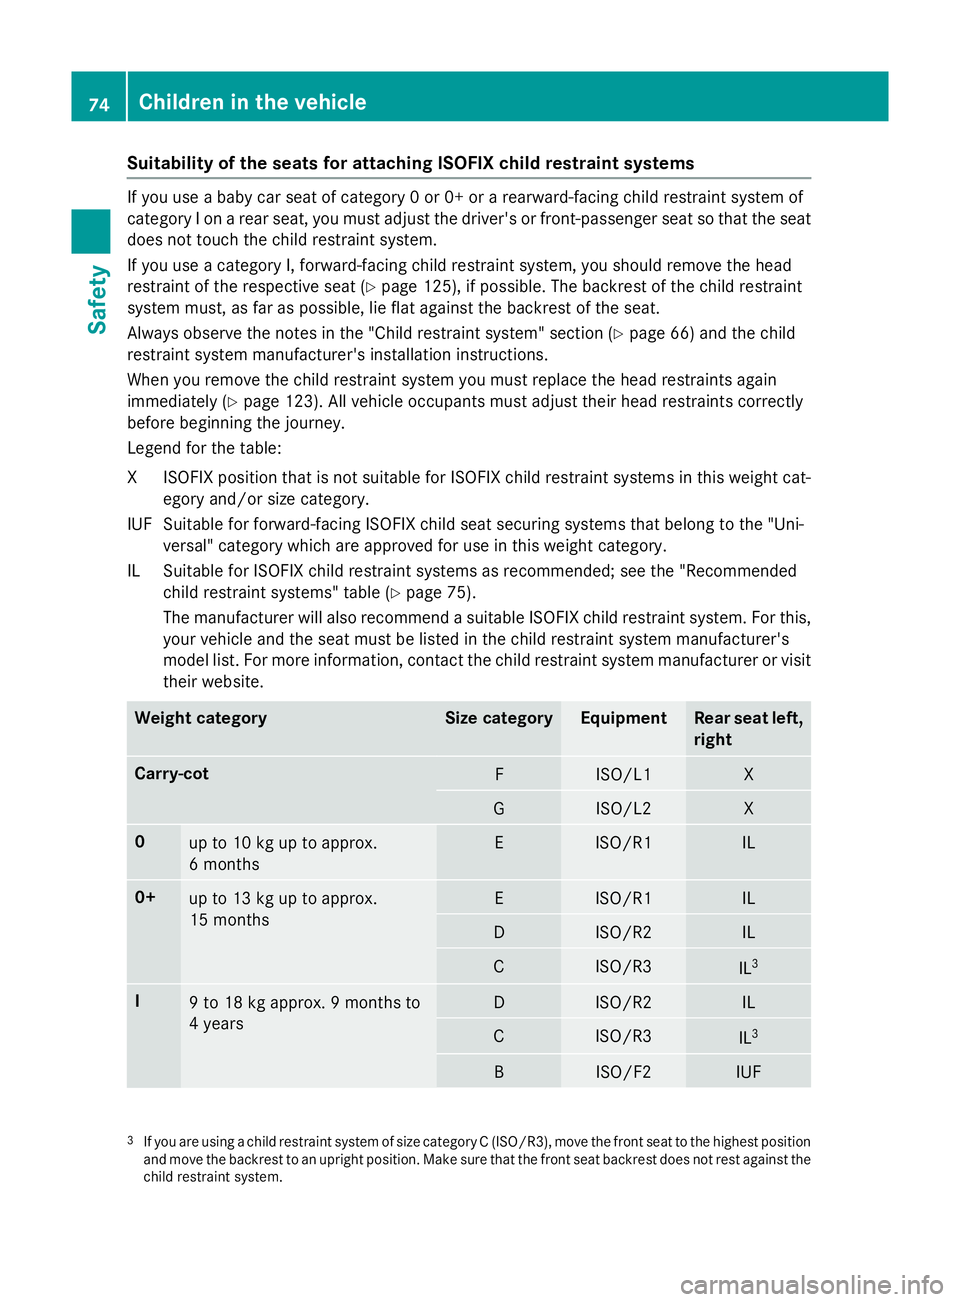
Suitability of the seats for attaching ISOFIX child restraint systems
If you use a baby car seat of category 0 or 0+ or a rearward-facing child restraint system of
category I on a rear seat, you must adjust the driver's or front-passenger seat so that the seat
does not touch the child restraint system.
If you use a category I, forward-facing child restraint system, you should remove the head
restraint of the respective seat (Y page 125), if possible. The backrest of the child restraint
system must, as far as possible, lie flat against the backrest of the seat.
Always observe the notes in the "Child restraint system" section (Y page 66) and the child
restraint system manufacturer's installation instructions.
When you remove the child restraint system you must replace the head restraints again
immediately (Y page 123). All vehicle occupants must adjust their head restraints correctly
before beginning the journey.
Legend for the table:
XI SOFIX position that is not suitable for ISOFIX child restraint systems in this weight cat-
egory and/or size category.
IUF Suitable for forward-facing ISOFIX child seat securing systems that belong to the "Uni- versal" category which are approved for use in this weight category.
IL Suitable for ISOFIX child restraint systems as recommended; see the "Recommended child restraint systems" table (Y page 75).
The manufacturer will also recommend a suitable ISOFIX child restraint system. For this,
your vehicle and the seat must be listed in the child restraint system manufacturer's
model list. For more information, contact the child restraint system manufacturer or visit
their website. Weight category Size category Equipment Rear seat left,
right Carry-cot
F ISO/L1 X
G ISO/L2 X
0
up to 10 kg up to approx.
6 months E ISO/R1 IL
0+
up to 13 kg up to approx.
15 months E ISO/R1 IL
D ISO/R2 IL
C ISO/R3
IL
3 I
9 to 18 kg approx. 9 months to
4 years D ISO/R2 IL
C ISO/R3
IL
3 B ISO/F2 IUF
3
If you are using a child restraint system of size category C (ISO/R3), move the front seat to the highest position
and move the backrest to an upright position. Make sure that the front seat backrest does not rest against the
child restraint system. 74
Children in the vehicleSafety
Page 78 of 497
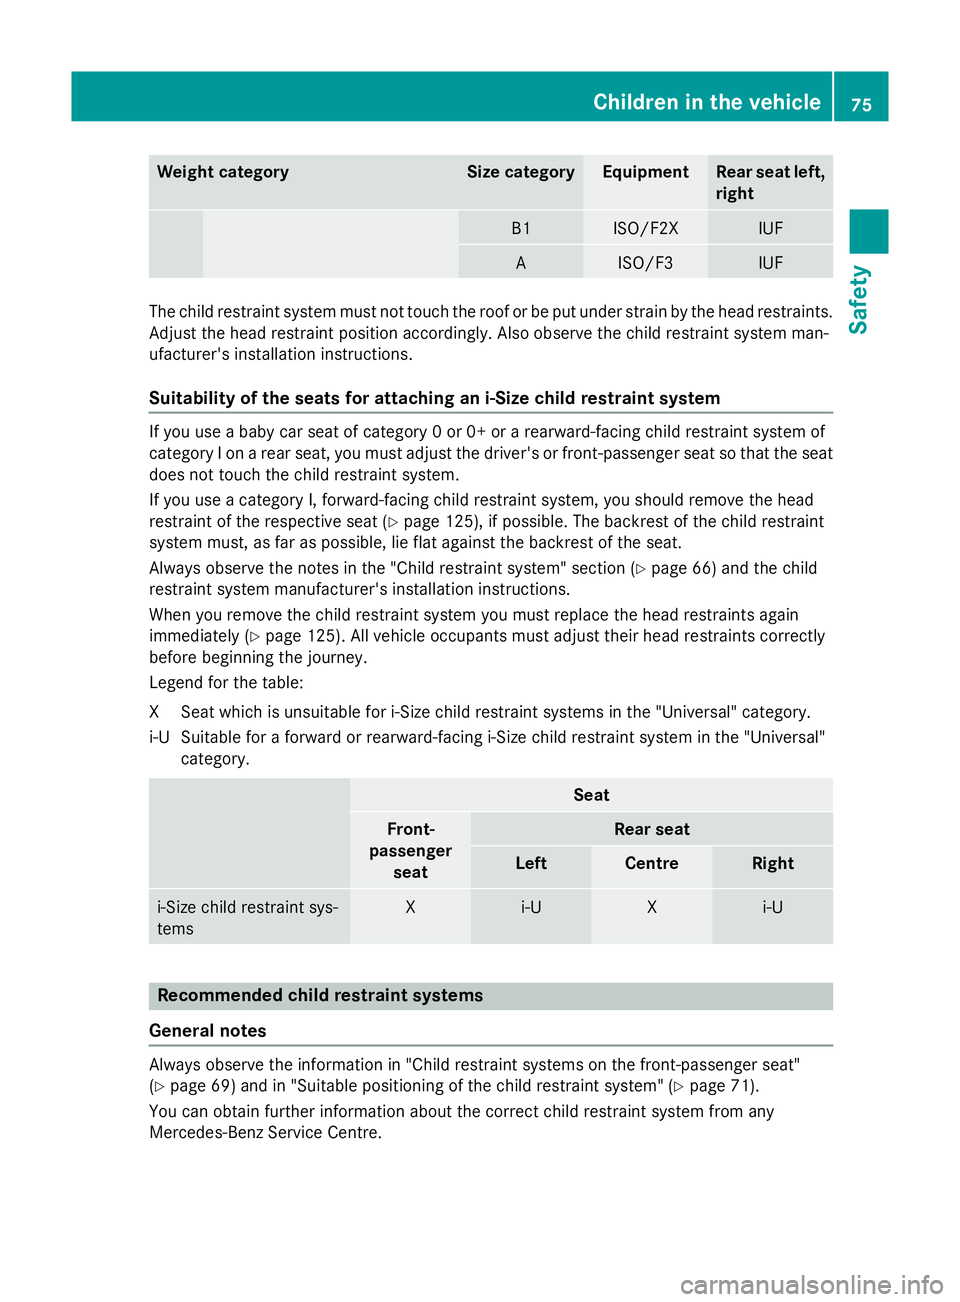
Weight category Size category Equipment Rear seat left,
right B1 ISO/F2X IUF
A ISO/F3 IUF
The child restraint system must not touch the roof or be put under strain by the head restraints.
Adjust the head restraint position accordingly. Also observe the child restraint system man-
ufacturer's installation instructions.
Suitability of the seats for attaching an i-Size child restraint system If you use a baby car seat of category 0 or 0+ or a rearward-facing child restraint system of
category I on a rear seat, you must adjust the driver's or front-passenger seat so that the seat
does not touch the child restraint system.
If you use a category I, forward-facing child restraint system, you should remove the head
restraint of the respective seat (Y page 125), if possible. The backrest of the child restraint
system must, as far as possible, lie flat against the backrest of the seat.
Always observe the notes in the "Child restraint system" section (Y page 66) and the child
restraint system manufacturer's installation instructions.
When you remove the child restraint system you must replace the head restraints again
immediately (Y page 125). All vehicle occupants must adjust their head restraints correctly
before beginning the journey.
Legend for the table:
XS eat which is unsuitable for i-Size child restraint systems in the "Universal" category.
i‑US uitable for a forward or rearward-facing i-Size child restraint system in the "Universal"
category. Seat
Front-
passenger seat Rear seat
Left Centre Right
i‑Size child restraint sys-
tems X i
‑U X i
‑U Recommended child restraint systems
General notes Always observe the information in "Child restraint systems on the front-passenger seat"
(Y page 69) and in "Suitable positioning of the child restraint system" (Y page 71).
You can obtain further information about the correct child restraint system from any
Mercedes-Benz Service Centre. Children in the vehicle
75Safety Z
Page 125 of 497
abdomen or neck injuries, for example. This
poses an increased risk of injury or even fatal injury.
Adjust the seat properly before beginning
your journey. Always ensure that the backrest is in an almost vertical position and that the
shoulder section of your seatbelt is routed
across the centre of your shoulder.
! To avoid damage to the seats and the seat
heating, observe the following information:
R do not spill any liquids on the seats. If
liquid is spilled on the seats, dry them as
soon as possible.
R if the seat covers are damp or wet, do not
switch on the seat heating. The seat
heating should also not be used to dry
the seats.
R clean the seat covers as recommended;
see "Interior care".
R do not transport heavy loads on the
seats. Do not place sharp objects on the
seat cushions, e.g. knives, nails or tools. The seats should only be occupied by
passengers, if possible.
R when the seat heating is in operation, do
not cover the seats with insulating mate- rials, e.g. blankets, coats, bags, seat cov-
ers, child seats or booster seats.
! Make sure that there are no objects in the
footwell under or behind the seats when
moving the seats back. There is a risk that
the seats and/or the objects could be dam-
aged.
i The rear-compartment head restraints
can be removed (Y page 125).
Vehicles without the through-loading fea-
ture: the head restraints cannot be
removed from the rear-compartment
seats.
For more information, contact a qualified
specialist workshop. i
Further related subjects:
R EASY-PACK quickfold rear bench seat
(Y page 393) Adjusting the seats manually and
electrically
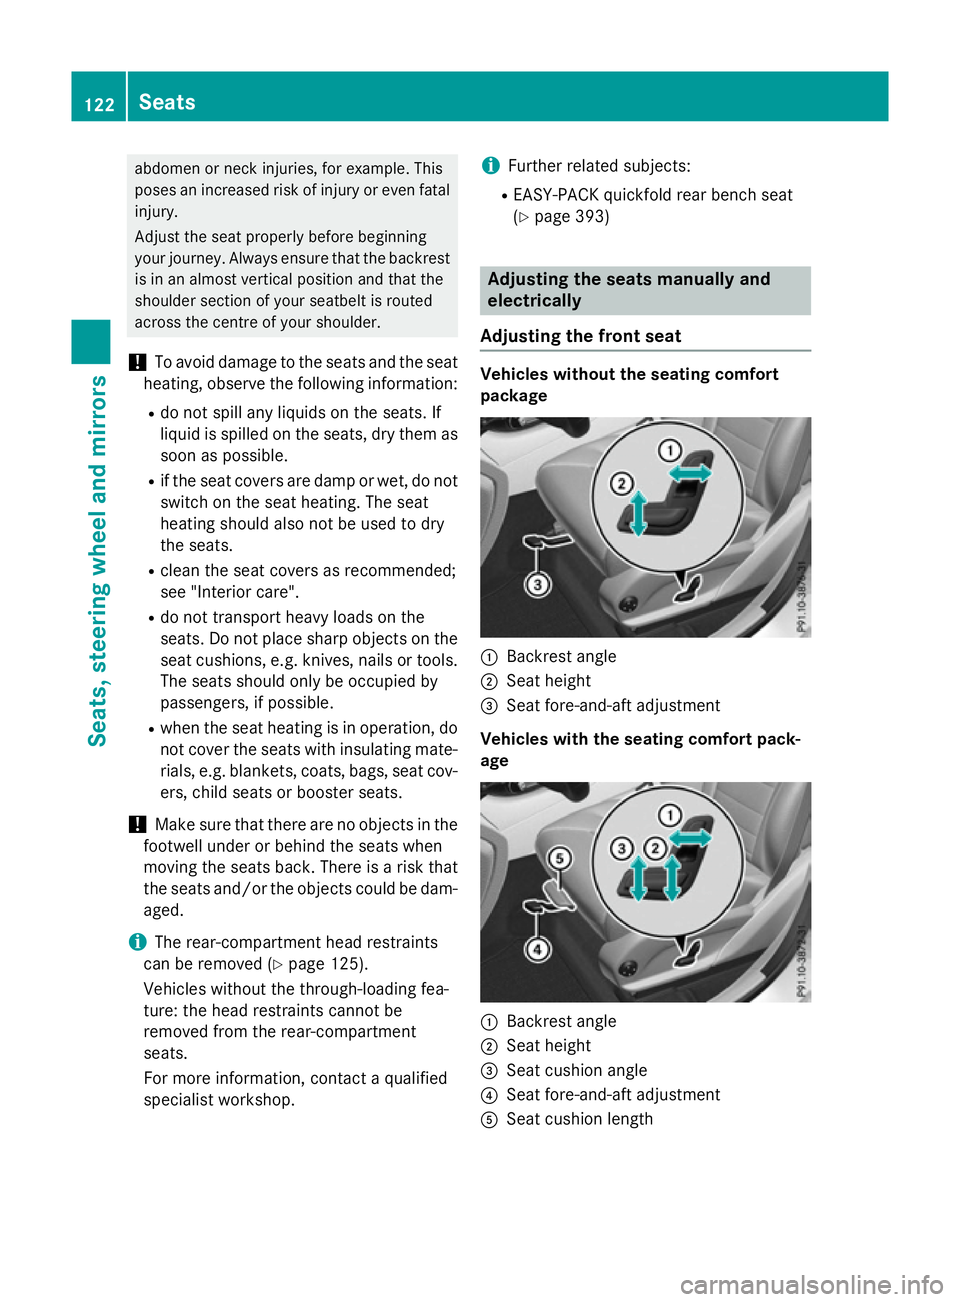
Adjusting the front seat Vehicles without the seating comfort
package
:
Backrest angle
; Seat height
= Seat fore-and-aft adjustment
Vehicles with the seating comfort pack-
age :
Backrest angle
; Seat height
= Seat cushion angle
? Seat fore-and-aft adjustment
A Seat cushion length 122
SeatsSeats, steering wheel and mirrors
Page 128 of 497
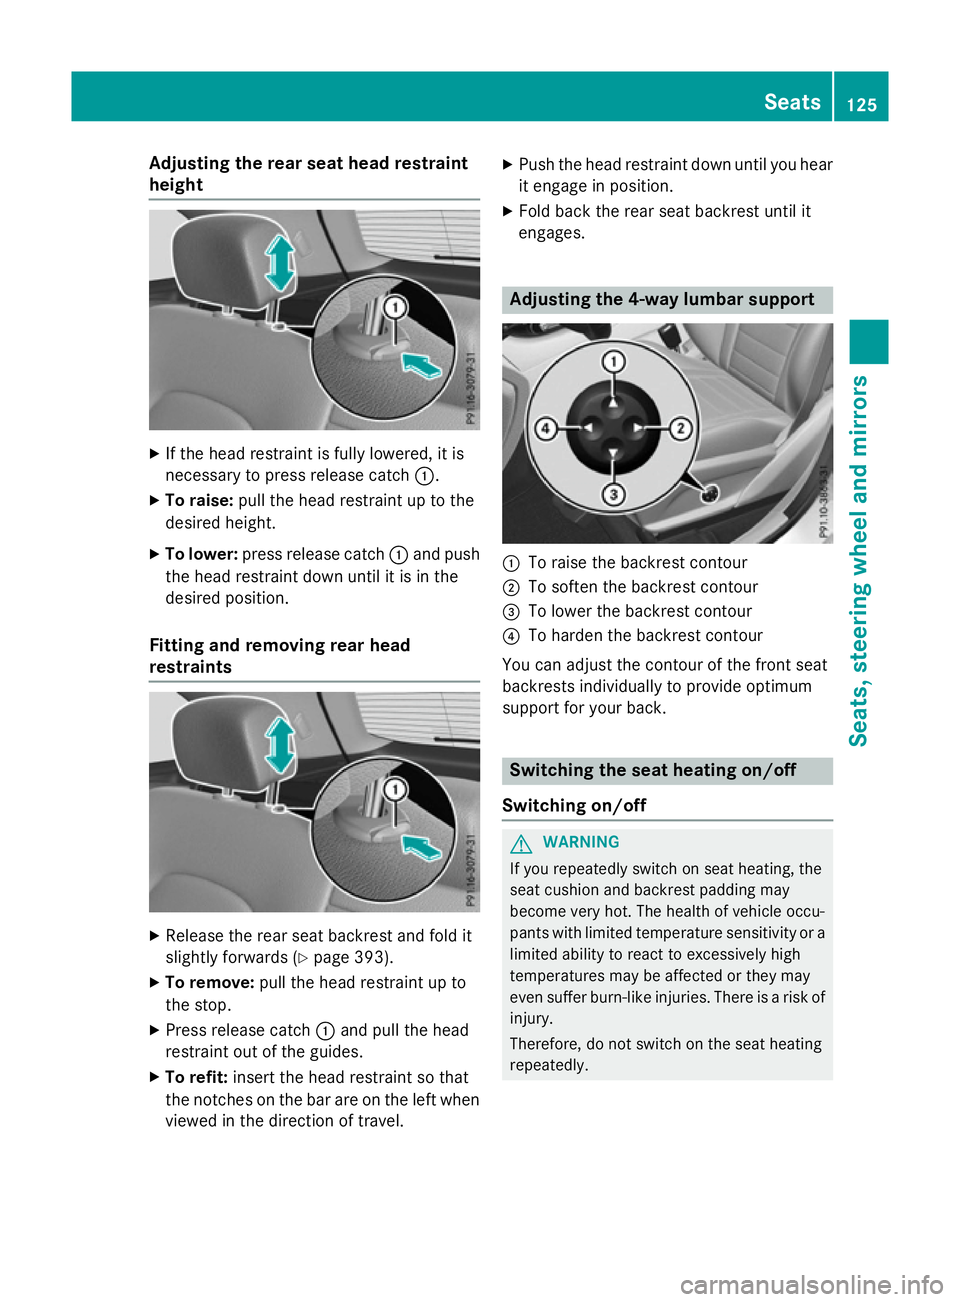
Adjusting the rear seat head restraint
height X
If the head restraint is fully lowered, it is
necessary to press release catch :.
X To raise: pull the head restraint up to the
desired height.
X To lower: press release catch :and push
the head restraint down until it is in the
desired position.
Fitting and removing rear head
restraints X
Release the rear seat backrest and fold it
slightly forwards (Y page 393).
X To remove: pull the head restraint up to
the stop.
X Press release catch :and pull the head
restraint out of the guides.
X To refit: insert the head restraint so that
the notches on the bar are on the left when viewed in the direction of travel. X
Push the head restraint down until you hear
it engage in position.
X Fold back the rear seat backrest until it
engages. Adjusting the 4-way lumbar support
:
To raise the backrest contour
; To soften the backrest contour
= To lower the backrest contour
? To harden the backrest contour
You can adjust the contour of the front seat
backrests individually to provide optimum
support for your back. Switching the seat heating on/off
Switching on/off G
WARNING
If you repeatedly switch on seat heating, the
seat cushion and backrest padding may
become very hot. The health of vehicle occu-
pants with limited temperature sensitivity or a limited ability to react to excessively high
temperatures may be affected or they may
even suffer burn-like injuries. There is a risk of
injury.
Therefore, do not switch on the seat heating
repeatedly. Seats
125Seats, steering wheel and mirrors Z
Page 132 of 497
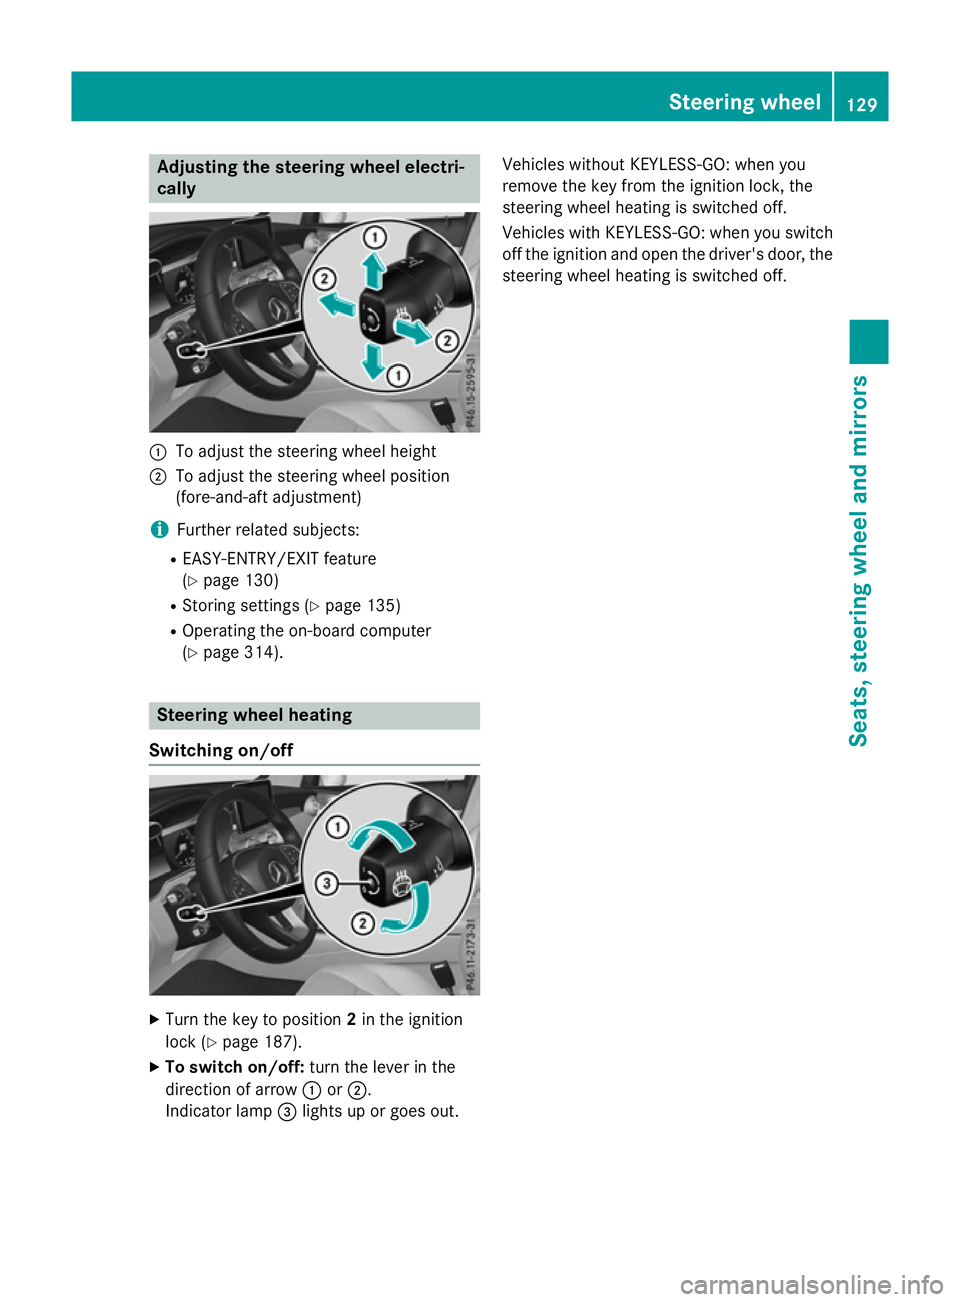
Adjusting the steering wheel electri-
cally :
To adjust the steering wheel height
; To adjust the steering wheel position
(fore-and-aft adjustment)
i Further related subjects:
R EASY-ENTRY/EXIT feature
(Y page 130)
R Storing settings (Y page 135)
R Operating the on-board computer
(Y page 314). Steering wheel heating
Switching on/off X
Turn the key to position 2in the ignition
lock (Y page 187).
X To switch on/off: turn the lever in the
direction of arrow :or;.
Indicator lamp =lights up or goes out. Vehicles without KEYLESS-GO: when you
remove the key from the ignition lock, the
steering wheel heating is switched off.
Vehicles with KEYLESS-GO: when you switch
off the ignition and open the driver's door, the steering wheel heating is switched off. Steering wheel
129Seats, steering wheel and mirrors Z
Page 133 of 497
Problems with the steering wheel heating
Problem
Possible causes/consequences and
M
MSolutions The steering wheel
heating has switched
itself off prematurely or
cannot be switched on. The on-board voltage is too low because too many electrical con-
sumers are switched on.
X Switch off electrical consumers that you do not need, such as
the rear window heating or interior lighting. EASY-ENTRY/EXIT feature
Important safety notes G
WARNING
When the EASY-ENTRY/EXIT feature adjusts
the steering wheel, you and other vehicle
occupants – particularly children – could
become trapped. There is a risk of injury.
While the EASY-ENTRY/EXIT feature is mak-
ing adjustments, make sure that no one has
any body parts in the sweep of the steering
wheel.
Move the steering wheel adjustment lever if
there is a risk of entrapment by the steering
wheel. The adjustment process is stopped.
Press one of the memory function position
buttons. The adjustment process is stopped.
This function is only available on vehicles with
a memory function. G
WARNING
If children activate the EASY-ENTRY/EXIT fea- ture, they can become trapped, particularly
when unattended. There is a risk of injury.
When leaving the vehicle, always take the key with you and lock the vehicle. Never leave
children unattended in the vehicle. G
WARNING
If you drive off while the EASY-ENTRY/EXIT
feature is making adjustments, you could lose
control of the vehicle. There is a risk of an
accident.
Always wait until the adjustment process is
complete before driving off. The EASY-ENTRY/EXIT feature makes getting
in and out of your vehicle easier.
You can activate and deactivate the EASY-
ENTRY/EXIT feature using Audio 20/
COMAND Online; see the separate Audio 20/ COMAND Online operating instructions.
Position of the steering wheel when the EASY-ENTRY/EXIT feature is active The steering wheel tilts upwards if you:
R remove the key from the ignition lock
R with KEYLESS-GO: open the driver's door;
KEYLESS-GO must be in position 1
R with the key: open the driver's door; the
key must be in position 0or 1in the ignition
lock (Y page 187)
R open the driver's door when the ignition is
switched off
i The steering wheel only tilts upwards if
the driving position is stored after the seat or steering wheel has been adjusted
(Y page 135).
The most recent driving position of the steer-
ing wheel is stored if:
R the ignition is switched off
R the setting is stored using the memory
function (Y page 135)
i The steering wheel only moves upwards if
it has not already reached the upper steer-
ing limiter. 130
Steering wheelSeats, steering wheel and mirrors