2015 MERCEDES-BENZ GLC SUV wiper blades
[x] Cancel search: wiper bladesPage 10 of 497
Matt paintwork .............................. 423
Notes ............................................. 420
Paint ..............................................4 23
Plastic trim ................................... .427
Reversing camera .......................... 425
Roof lining ...................................... 428
Seat belt ........................................ 428
Seat cover ..................................... 427
Sensors ......................................... 425
Side running board ........................ 425
Steering wheel ............................... 427
Trim pieces ................................... .427
Washing by hand ........................... 422
Wheels .......................................... .423
Windows ........................................ 424
Wiper blades .................................. 424
Wooden trim .................................. 427
CD player (on-board computer) ........323
Central locking
Locking/unlocking (key ).................. 95
Centre console
Lower section .................................. 40
Upper section .................................. 39
Changing bulbs
Dipped-beam headlamp s............... 147
Main-beam headlamp s................... 147
Opening and closing the side trim panels ............................................ 148
Reversing lamps ............................ 148
Turn signals (front) ......................... 148
Turn signals (rear) .......................... 148
Changing the media source ............. 322
Charging
see Charging the high-voltage bat-
tery (important safety notes)
Charging cable
Connection .................................... 215
Control panel ................................. 213
Disconnecting ................................ 216
Heating up ..................................... 212
Important safety notes .................. 213
Indicator lamps .............................. 214
Storing ........................................... 213
Charging the high-voltage battery
(important safety notes) ................... 210
Child
Restraint system .............................. 66 Child seat
Forward-facing restraint system ...... 71
ISOFIX .............................................. 67
On the front-passenger sea t............ 69
Rearward-facing restraint system .... 70
Recommendations ........................... 75
Suitable positions ............................ 71
Top Tether ....................................... 68
Child-proof locks
Important safety notes .................... 77
Rear doors ....................................... 77
Cigarette lighter ................................ 405
Cleaning
Mirror turn signal ........................... 424
Trailer tow hitch ............................. 426
Climate control
Auxiliary heating/ventilation .......... 178
Control panel for THERMATIC
automatic climate control (2-
zone) .............................................. 157
Controlling automaticall y............... 164
Convenience opening/closing
(air-recirculation mode) ................. 170
Cooling with air dehumidification .. 162
Demisting the windows .................. 168
Demisting the windscreen ............. 168
ECO start/stop function ................ 162
ECO start/stop function
(THERMATIC 2-zone) ...................... 159
Immediate pre-entry climate con-
trol ................................................. 177
Indicator lamp ................................ 164
Information about using
THERMATIC automatic climate
control (2 ‑zone) ............................. 158
Information on using
THERMOTRONIC automatic cli-
mate control .................................. 161
Ionisation ....................................... 174
Overview of systems ...................... 156
Perfume atomizer .......................... 172
Pre-entry climate control at
departure time ............................... 176
Pre-entry climate control via key ... 174
Problem with the rear window
heating .......................................... 170
Problems with cooling with air
dehumidification ............................ 164 Index
7
Page 27 of 497
Wheel bolt tightening torque
........... 467
Wheel chock ...................................... 465
Wheels
Changing a wheel .......................... 463
Changing/replacing ....................... 463
Checking ........................................ 455
Cleaning ......................................... 423
Emergency spare wheel ................. 474
Fitting a new wheel ........................ 467
Fitting a wheel .............................. .464
General notes ................................ 468
Important safety notes .................. 454
Information on driving .................... 454
Removing a wheel .......................... 466
Snow chains .................................. 457
Storing .......................................... .464
Tightening torque ........................... 467
Wheel size/tyre size ..................... .468
Windowbag
Display message ............................ 347
Operation ......................................... 56
Windows
Cleaning ......................................... 424
see Side windows
Windscreen
Demisting ...................................... 168
Windscreen washer fluid
see Windscreen washer system
Windscreen washer system
Important safety notes .................. 487
Topping up ..................................... 418
Windscreen wipers
Problem (malfunction) ................... 154
Rear window wiper ........................ 151
Replacing the wiper blades ............ 151
Switching on/off ........................... 150
Winter operation
Important safety notes .................. 456
Radiator cover ............................... 416
Slippery road surfaces ................... 226
Snow chains .................................. 457
Summer tyres ................................ 456
Winter tyres
Limiting the speed (on-board com-
puter) ............................................. 333
M+S tyres ...................................... 456
Wiper blades
Cleaning ......................................... 424 Important safety notes .................. 151
Replacing ....................................... 151
Replacing (on the rear window) ..... 153
Replacing (windscreen) .................. 151
Wooden trim (cleaning instruc-
tions) ................................................. .427 24
Index
Page 153 of 497
X
Position trim Dand engage it in place by
tapping it with your hand.
X Before beginning the installation, check
that all of the metal clips are inserted in the
parts which were placed on one side: 2
clips ;in the upper section of handle =
and 4 clips Ain trim B.
X If not, remove the missing metal clips from
the panel apertures in the tailgate and
insert them in the corresponding positions.
X Grasp trim Band connect plug connector
C to the surround lighting.
i The surround lighting only illuminates
when the tailgate has been shut and reop-
ened.
X Vehicles with EASY-PACK tailgate: push in
the plug connector for the switch of the
EASY-PACK tailgate in the top right of the
trim.
X Vehicles with electric fold-out trailer tow
hitch: push in the plug connector for the
electric fold-out trailer tow hitch in the top
left of the trim.
X Position trim Band engage it in place by
tapping it with your hand, starting from the
outside.
X Clip in the lower section of handle :again.
X Insert and engage the upper section of han-
dle =into lower section :.Windscreen wipers
Switching the windscreen wipers on/
off
! Do not operate the windscreen wipers
when the windscreen is dry, as this could
damage the wiper blades. Moreover, dust
that has collected on the windscreen can
scratch the glass if wiping takes place when the windscreen is dry.
If it is necessary to switch on the wind-
screen wipers in dry weather conditions,
always operate them using washer fluid. !
If the windscreen wipers leave smears on
the windscreen after the vehicle has been
washed in an automatic car wash, this may
be due to wax or other residue. Clean the
windscreen with washer fluid after an auto- matic car wash.
! Intermittent wiping with rain sensor: due
to optical influences and the windscreen
becoming dirty in dry weather conditions,
the windscreen wipers may be activated
inadvertently. This could damage the wind- screen wiper blades or scratch the wind-
screen.
For this reason, you should always switch
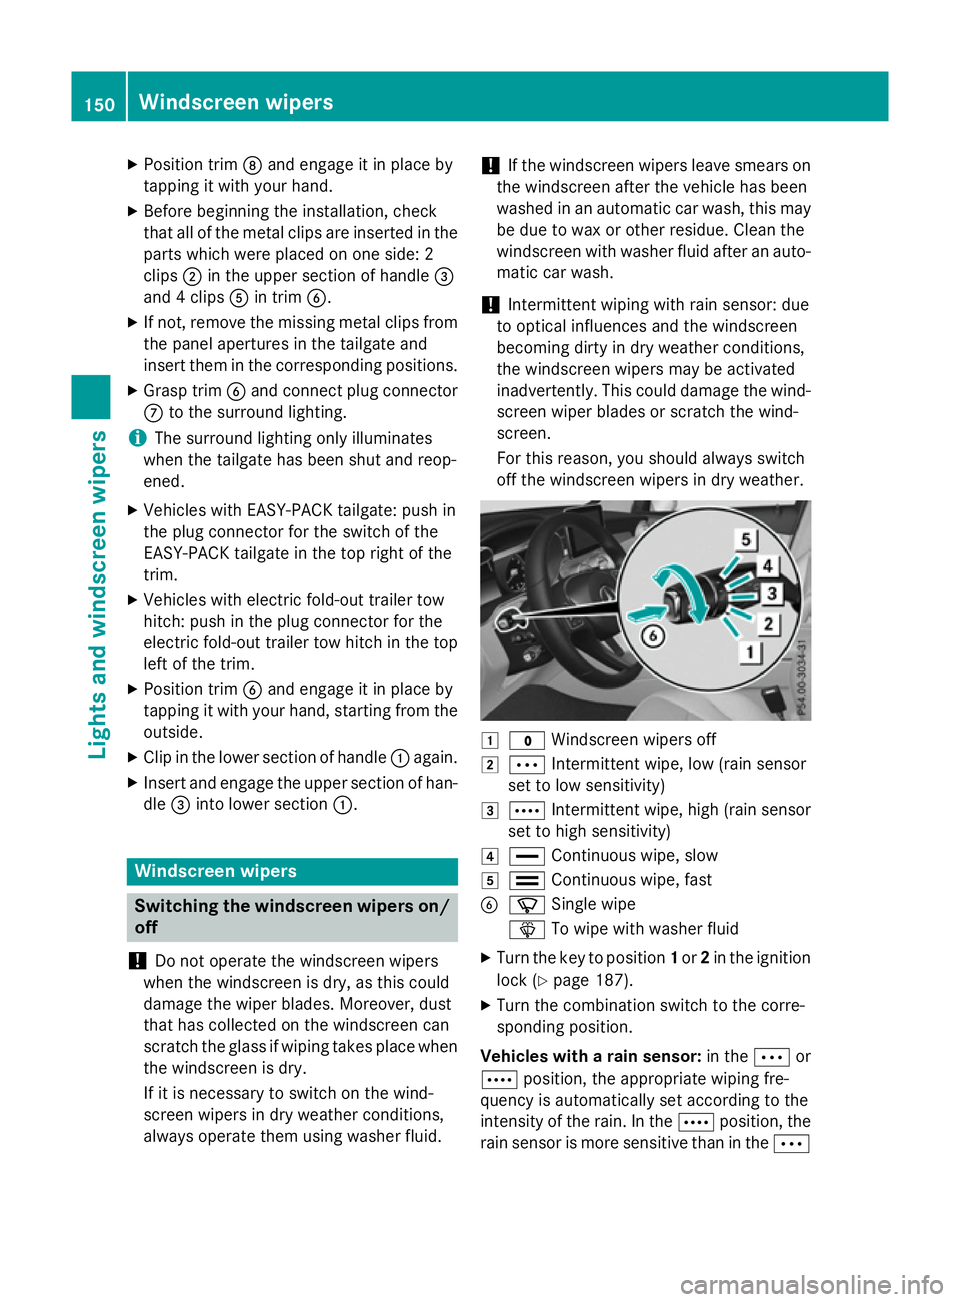
off the windscreen wipers in dry weather. 1
$ Windscreen wipers off
2 Ä Intermittent wipe, low (rain sensor
set to low sensitivity)
3 Å Intermittent wipe, high (rain sensor
set to high sensitivity)
4 ° Continuous wipe, slow
5 ¯ Continuous wipe, fast
B í Single wipe
î To wipe with washer fluid
X Turn the key to position 1or 2in the ignition
lock (Y page 187).
X Turn the combination switch to the corre-
sponding position.
Vehicles with a rain sensor: in theÄor
Å position, the appropriate wiping fre-
quency is automatically set according to the
intensity of the rain. In the Åposition, the
rain sensor is more sensitive than in the Ä150
Windscreen wipersLights and windscreen wipers
Page 154 of 497
position, causing the windscreen wiper to
wipe more frequently.
If the wiper blades are worn, the windscreen
will no longer be wiped properly. This could
prevent you from observing the traffic condi-
tions. Switching the rear window wiper on/
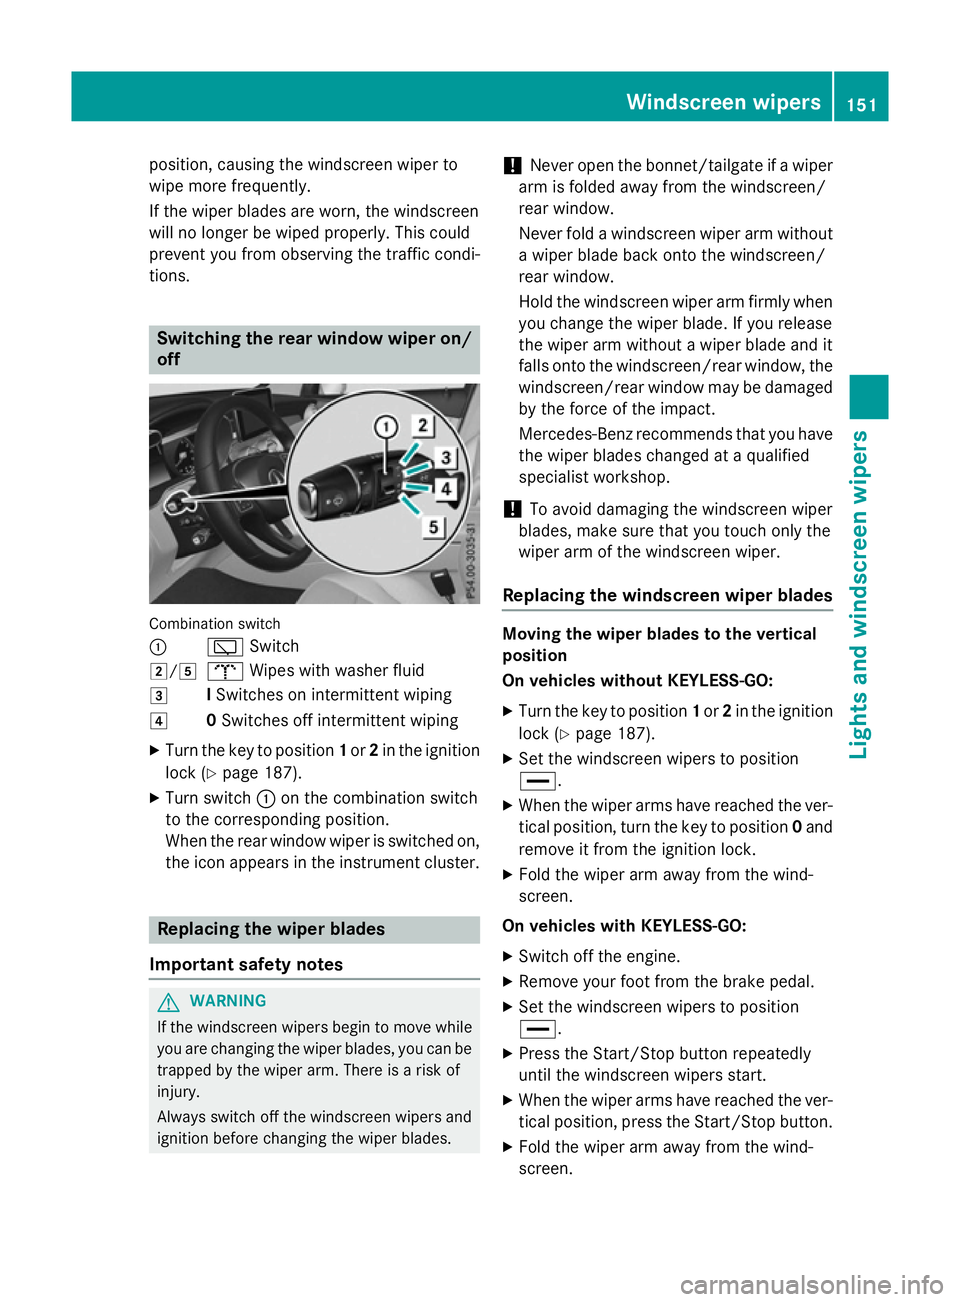
off Combination switch
:
èSwitch
2/5 bWipes with washer fluid
3 ISwitches on intermittent wiping
4 0Switches off intermittent wiping
X Turn the key to position 1or 2in the ignition
lock (Y page 187).
X Turn switch :on the combination switch
to the corresponding position.
When the rear window wiper is switched on,
the icon appears in the instrument cluster. Replacing the wiper blades
Important safety notes G
WARNING
If the windscreen wipers begin to move while
you are changing the wiper blades, you can be trapped by the wiper arm. There is a risk of
injury.
Always switch off the windscreen wipers and
ignition before changing the wiper blades. !
Never open the bonnet/tailgate if a wiper
arm is folded away from the windscreen/
rear window.
Never fold a windscreen wiper arm without a wiper blade back onto the windscreen/
rear window.
Hold the windscreen wiper arm firmly when
you change the wiper blade. If you release
the wiper arm without a wiper blade and it
falls onto the windscreen/rear window, the windscreen/rear window may be damaged
by the force of the impact.
Mercedes-Benz recommends that you have the wiper blades changed at a qualified
specialist workshop.
! To avoid damaging the windscreen wiper
blades, make sure that you touch only the
wiper arm of the windscreen wiper.
Replacing the windscreen wiper blades Moving the wiper blades to the vertical
position
On vehicles without KEYLESS-GO:
X Turn the key to position 1or 2in the ignition
lock (Y page 187).
X Set the windscreen wipers to position
°.
X When the wiper arms have reached the ver-
tical position, turn the key to position 0and
remove it from the ignition lock.
X Fold the wiper arm away from the wind-
screen.
On vehicles with KEYLESS-GO:
X Switch off the engine.
X Remove your foot from the brake pedal.
X Set the windscreen wipers to position
°.
X Press the Start/Stop button repeatedly
until the windscreen wipers start.
X When the wiper arms have reached the ver-
tical position, press the Start/Stop button.
X Fold the wiper arm away from the wind-
screen. Windscreen wipers
151Lights and windscreen wipers Z
Page 155 of 497
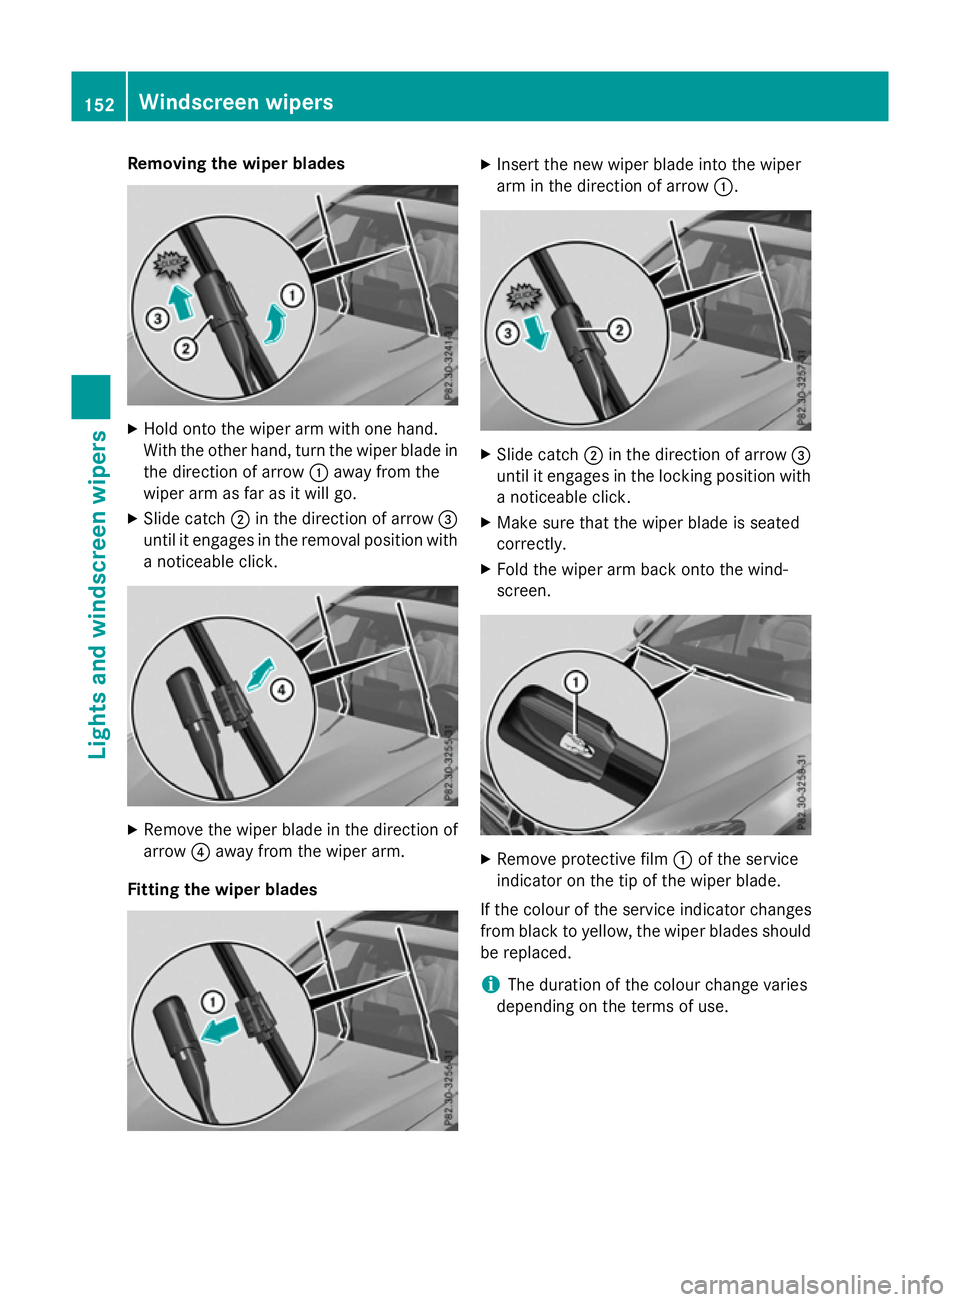
Removing the wiper blades
X
Hold onto the wiper arm with one hand.
With the other hand, turn the wiper blade in
the direction of arrow :away from the
wiper arm as far as it will go.
X Slide catch ;in the direction of arrow =
until it engages in the removal position with
a noticeable click. X
Remove the wiper blade in the direction of
arrow ?away from the wiper arm.
Fitting the wiper blades X
Insert the new wiper blade into the wiper
arm in the direction of arrow :. X
Slide catch ;in the direction of arrow =
until it engages in the locking position with a noticeable click.
X Make sure that the wiper blade is seated
correctly.
X Fold the wiper arm back onto the wind-
screen. X
Remove protective film :of the service
indicator on the tip of the wiper blade.
If the colour of the service indicator changes
from black to yellow, the wiper blades should be replaced.
i The duration of the colour change varies
depending on the terms of use. 152
Windscreen wipersLights and windscreen wipers
Page 156 of 497
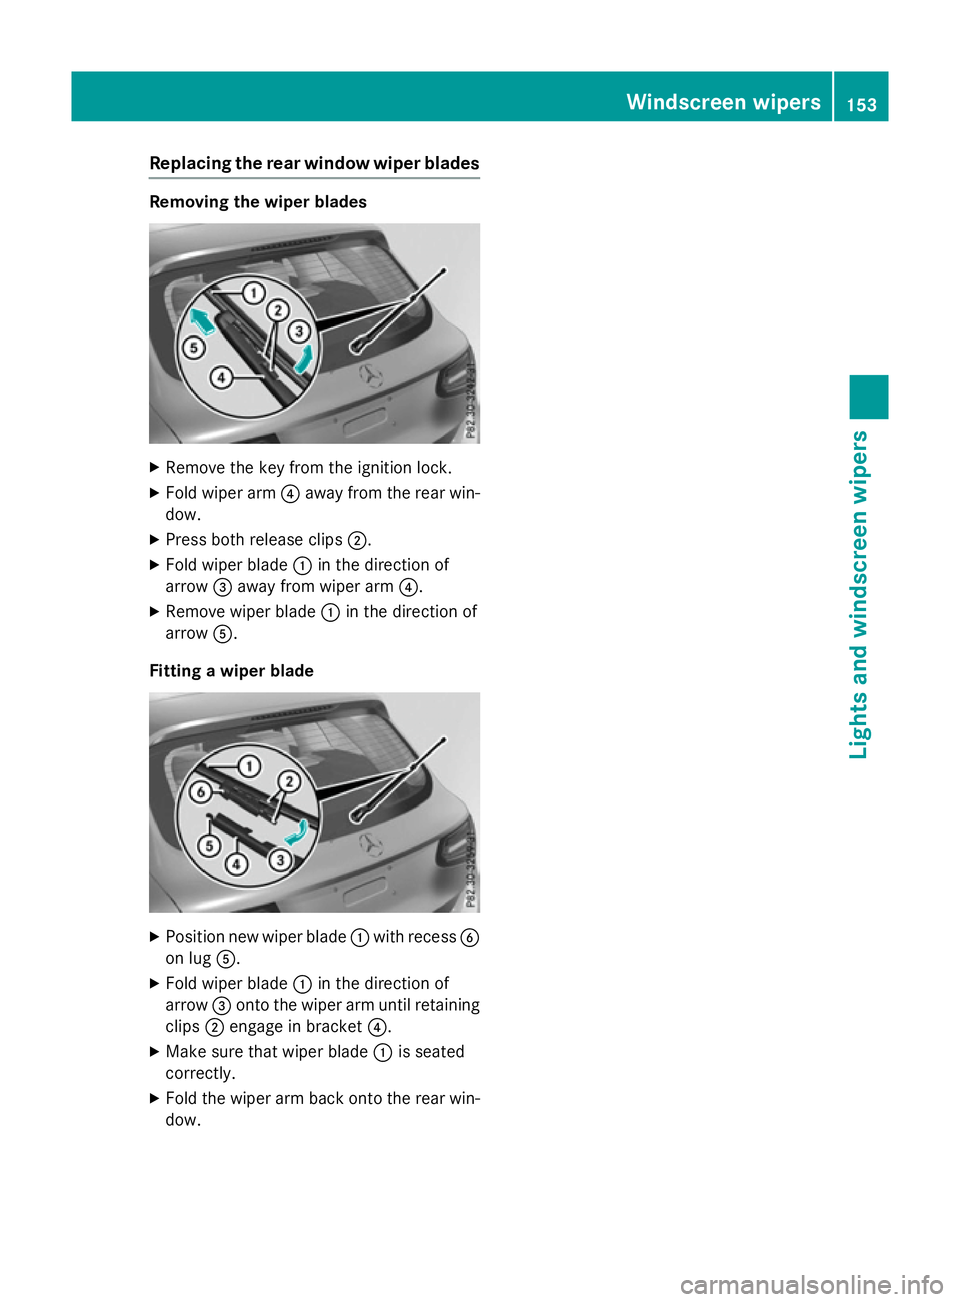
Replacing the rear window wiper blades
Removing the wiper blades
X
Remove the key from the ignition lock.
X Fold wiper arm ?away from the rear win-
dow.
X Press both release clips ;.
X Fold wiper blade :in the direction of
arrow =away from wiper arm ?.
X Remove wiper blade :in the direction of
arrow A.
Fitting a wiper blade X
Position new wiper blade :with recess B
on lug A.
X Fold wiper blade :in the direction of
arrow =onto the wiper arm until retaining
clips ;engage in bracket ?.
X Make sure that wiper blade :is seated
correctly.
X Fold the wiper arm back onto the rear win-
dow. Windscreen wipers
153Lights and windscreen wipers Z
Page 425 of 497
You can wash the vehicle in an automatic car
wash from the very start.
Wash off excess dirt before cleaning the vehi- cle in an automatic car wash.
After using an automatic car wash, wipe off
wax from the windscreen and the wiper
blades. This will prevent smears and reduce
wiping noises caused by residue on the wind-
screen.
Washing by hand In some countries, washing by hand is only
allowed at specially equipped washing bays.
Observe the legal requirements for each indi- vidual country.
X Do not use hot water and do not wash the
vehicle in direct sunlight.
X Use a soft sponge to clean.
X Use a mild cleaning agent, such as a car
shampoo approved by Mercedes-Benz.
X Thoroughly hose down the vehicle with a
gentle jet of water.
X Do not point the water jet directly towards
the air inlet.
X Use plenty of water and rinse out the
sponge frequently.
X Rinse the vehicle with clean water and dry
thoroughly with a chamois.
X Do not let the cleaning agent dry on the
paintwork.
When using the vehicle in winter, remove all
traces of road salt deposits carefully and as
soon as possible.
High-pressure cleaning equipment G
WARNING
The water jet of circular-jet nozzles (dirt grind- ers) can cause damage not visible from the
outside to tyres or chassis components. Com-
ponents damaged in this way can unexpect-
edly fail. There is a risk of an accident.
Do not use high-pressure cleaners with circu-
lar-jet nozzles to clean the vehicle. Have dam- aged tyres or chassis components replaced
immediately.
! Always maintain a distance of at least
30 cm between the vehicle and the high-
pressure cleaner nozzle. Information about the correct distance is available from the
equipment manufacturer.
Move the high-pressure cleaner nozzle
around when cleaning your vehicle.
Do not aim directly at any of the following:
R tyres
R door gaps, roof gaps, joints etc.
R electrical components
R battery
R connectors
R lights
R seals
R trim elements
R ventilation slots
Damaged seals or electrical components
can lead to leaks or failures.
! If the key is within the rear detection
range of KEYLESS-GO, situations such as
the following could lead to the uninten-
tional opening of the boot lid/tailgate:
R using a car wash
R using a high-pressure cleaner
Make sure that the key is at least 3 maway
from the vehicle.
! If the key is within the rear detection
range of KEYLESS-GO, the following situa-
tions, for example, could lead to the unin-
tentional opening of the tailgate:
R using a car wash
R using a high-pressure cleaner
Make sure that the key is at least 3 maway
from the vehicle.
! Edition 1 special model: parts of your
vehicle are covered with a decorative foil.
Maintain a distance of at least 70 cm
between the foil-wrapped parts of the vehi- 422
CareMaintenance and care
Page 427 of 497
!
Do not use acidic wheel cleaning products
to remove brake dust. This could damage
wheel bolts and brake components.
! Do not park up the vehicle for an extended
period straight after cleaning it, particularly after having cleaned the wheels with wheel cleaner. Wheel cleaners could cause
increased corrosion of the brake discs and
brake pads/linings. For this reason, you
should drive for a few minutes after clean-
ing. Braking heats the brake discs and the
brake pads/linings, thus drying them. The
vehicle can then be parked up.
Cleaning the windows G
WARNING
If the windscreen wipers are set in motion
when cleaning the windscreen or wiper
blades, you could become trapped. There is a danger of injury.
Always switch off the windscreen wipers and
the ignition before cleaning the windscreen orwiper blades.
! Do not use dry cloths, abrasive products,
solvents or cleaning agents containing sol- vents to clean the inside of the windows. Do
not touch the insides of the windows with
hard objects, e.g. an ice scraper or ring.
There is otherwise a risk of damaging the
windows.
! Clean the water drainage channels of the
windscreen and the rear window at regular
intervals. Deposits such as leaves, petals
and pollen may under certain circumstan-
ces prevent water from draining away. This
can lead to corrosion damage and damage to electronic components.
X Clean the inside and outside of the win-
dows with a damp cloth and a cleaning
agent that is recommended and approved
by Mercedes-Benz. Cleaning the wiper blades G
WARNING
If the windscreen wipers are set in motion
when cleaning the windscreen or wiper
blades, you could become trapped. There is a danger of injury.
Always switch off the windscreen wipers and
the ignition before cleaning the windscreen orwiper blades.
! Do not pull on the wiper blade. Otherwise,
the wiper blade could be damaged.
! Do not clean wiper blades too often and
do not rub them too hard. Otherwise, the
graphite coating could be damaged. This
could cause wiper noise.
! Hold the wiper arm securely when folding
back. The windscreen could be damaged if
the wiper arm hits against it suddenly.
X Fold the wiper arms away from the wind-
screen.
X Clean the wiper blades carefully using a
damp cloth.
X Fold the windscreen wipers back again
before switching on the ignition.
Cleaning the exterior lighting !
Only use cleaning agents or cleaning
cloths that are suitable for plastic lenses.
Unsuitable cleaning agents or cleaning
cloths could scratch or damage the plastic lenses of the exterior lighting.
X Clean the plastic lenses of the exterior
lighting using a wet sponge and a mild
cleaning agent, e.g. Mercedes-Benz car
shampoo or cleaning cloths.
Cleaning the mirror turn signal !
Only use cleaning agents or cleaning
cloths that are suitable for plastic lenses.
Unsuitable cleaning agents or cleaning
cloths could scratch or damage the plastic lenses of the mirror turn signals. 424
CareMaintenance and care