2015 MERCEDES-BENZ GLC SUV change wheel
[x] Cancel search: change wheelPage 287 of 497
you do not react to the warning, a lane-cor-
recting application of the brakes can bring the vehicle back into the original lane.
Important safety notes
If you fail to adapt your driving style, Active
Lane Keeping Assist can neither reduce the
risk of an accident nor override the laws of
physics. Active Lane Keeping Assist cannot
take account of road and weather conditions.
It may not detect traffic situations. Active
Lane Keeping Assist is only an aid. You are
responsible for the distance to the vehicle in
front, for vehicle speed, for braking in good
time and for staying in lane.
Active Lane Keeping Assist cannot continu-
ously keep your vehicle in its lane. G
WARNING
Active Lane Keeping Assist cannot always
clearly detect lane markings.
In such cases, Active Lane Keeping Assist
can:
R give an unnecessary warning and then
make a course-correcting brake application
to the vehicle
R neither give a warning nor intervene
There is a risk of an accident.
Always pay particular attention to the traffic
situation and keep within the lane, especially
if Active Lane Keeping Assist alerts you. Ter-
minate the intervention in a non-critical driv-
ing situation.
The system may be impaired or may not func-
tion if:
R there is poor visibility, e.g. due to insuffi-
cient illumination of the road, or due to
snow, rain, fog or spray
R there is glare, e.g. from oncoming traffic,
the sun or reflection from other vehicles
(e.g. if the road surface is wet)
R the windscreen is dirty, misted up, dam-
aged or covered, for instance by a sticker,
in the vicinity of the camera R
the radar sensors in the front or rear bump-
ers or the radiator trim are dirty, e.g.
obscured by snow
R no or several, unclear lane markings are
present for one lane, e.g. in a construction
area
R the lane markings are worn away, dark or
covered up, e.g. by dirt or snow
R the distance to the vehicle in front is too
small and the lane markings thus cannot be
detected
R the lane markings change quickly, e.g.
lanes branch off, cross one another or
merge
R the road is narrow and winding
R there are highly variable shade conditions
on the road
If no vehicle is detected in the adjacent lane
and broken lane markings are detected, no
lane-correcting brake application is made.
Warning vibration through the steering
wheel
A warning may be given if a front wheel
passes over a lane marking. It will warn you by means of intermittent vibration in the steer-
ing wheel for up to 1.5 seconds.
Lane-correcting brake application
If you leave your lane under certain circum-
stances, the vehicle will brake briefly on one
side. This is intended to help you return the
vehicle to the original lane. G
WARNING
A lane-correcting brake application cannot
always bring the vehicle back into the original lane. There is a risk of an accident.
Always steer, brake or accelerate yourself,
especially if Active Lane Keeping Assist warns
you or makes a lane-correcting brake appli-
cation. 284
Driving syste
msDriving and parking
Page 299 of 497
R
the climate control
- the climate control settings
- the rear window heating operation period
- the performance of the seat heating
R the availability of the Eco Assistant
If the ignition is switched off for less than four hours, the previously selected drive program
is activated when the engine is next started. If
the ignition is switched off for more than four hours, drive program Cis activated when the
engine is next started. X
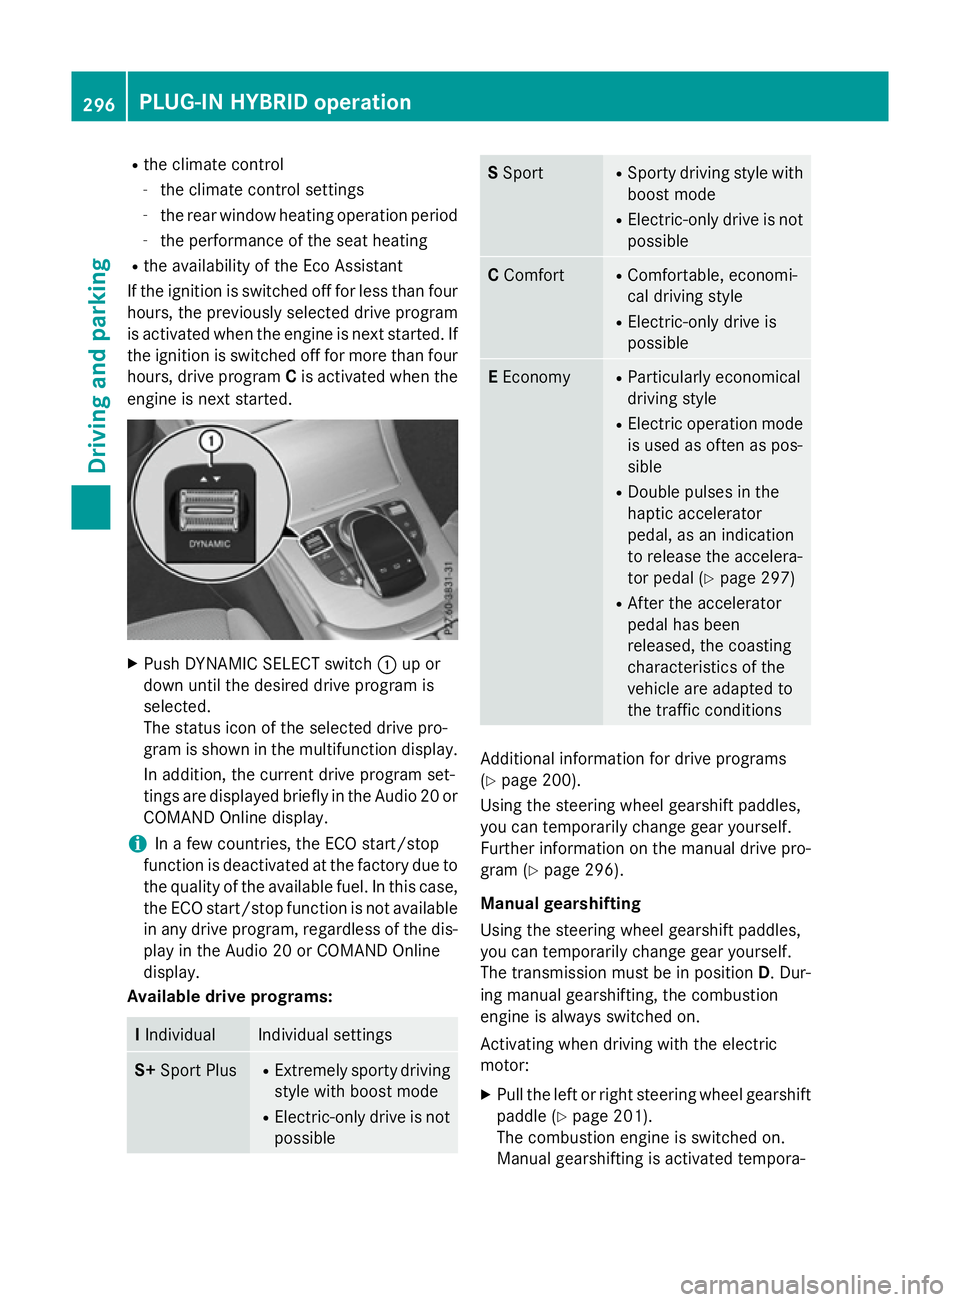
Push DYNAMIC SELECT switch :up or
down until the desired drive program is
selected.
The status icon of the selected drive pro-
gram is shown in the multifunction display.
In addition, the current drive program set-
tings are displayed briefly in the Audio 20 or COMAND Online display.
i In a few countries, the ECO start/stop
function is deactivated at the factory due to the quality of the available fuel. In this case,
the ECO start/stop function is not available in any drive program, regardless of the dis-
play in the Audio 20 or COMAND Online
display.
Available drive programs: I
Individual Individual settings
S+
Sport Plus R
Extremely sporty driving
style with boost mode
R Electric-only drive is not
possible S
Sport R
Sporty driving style with
boost mode
R Electric-only drive is not
possible C
Comfort R
Comfortable, economi-
cal driving style
R Electric-only drive is
possible E
Economy R
Particularly economical
driving style
R Electric operation mode
is used as often as pos-
sible
R Double pulses in the
haptic accelerator
pedal, as an indication
to release the accelera-
tor pedal (Y page 297)
R After the accelerator
pedal has been
released, the coasting
characteristics of the
vehicle are adapted to
the traffic conditions Additional information for drive programs
(Y page 200).
Using the steering wheel gearshift paddles,
you can temporarily change gear yourself.
Further information on the manual drive pro-
gram (Y page 296).
Manual gearshifting
Using the steering wheel gearshift paddles,
you can temporarily change gear yourself.
The transmission must be in position D. Dur-
ing manual gearshifting, the combustion
engine is always switched on.
Activating when driving with the electric
motor:
X Pull the left or right steering wheel gearshift
paddle (Y page 201).
The combustion engine is switched on.
Manual gearshifting is activated tempora- 296
PLUG
‑IN HYBRI D operationDriving an d parking
Page 323 of 497
You can reset the values of the following func-
tions:
R Trip meter
R "From start" trip computer
R "From reset" trip computer
R ECO display
If you reset the values in the "ECO display",
the values in the "From start" trip computer
are also reset. If you reset the values in the
"From start" trip computer, the values in the
"ECO display" are also reset. Navigation menu
Displaying navigation instructions In the
Navi Navimenu, the multifunction display
shows navigation instructions.
Further information on navigation can be
found in the separate Audio 20 or COMAND
Online operating instructions.
X Switch on Audio 20 or COMAND Online;
see the separate operating instructions.
X Press òon the steering wheel to open
the menu list.
X Press :or9 on the steering wheel
to select the Navi
Navi menu.
X Confirm by pressing aon the steering
wheel.
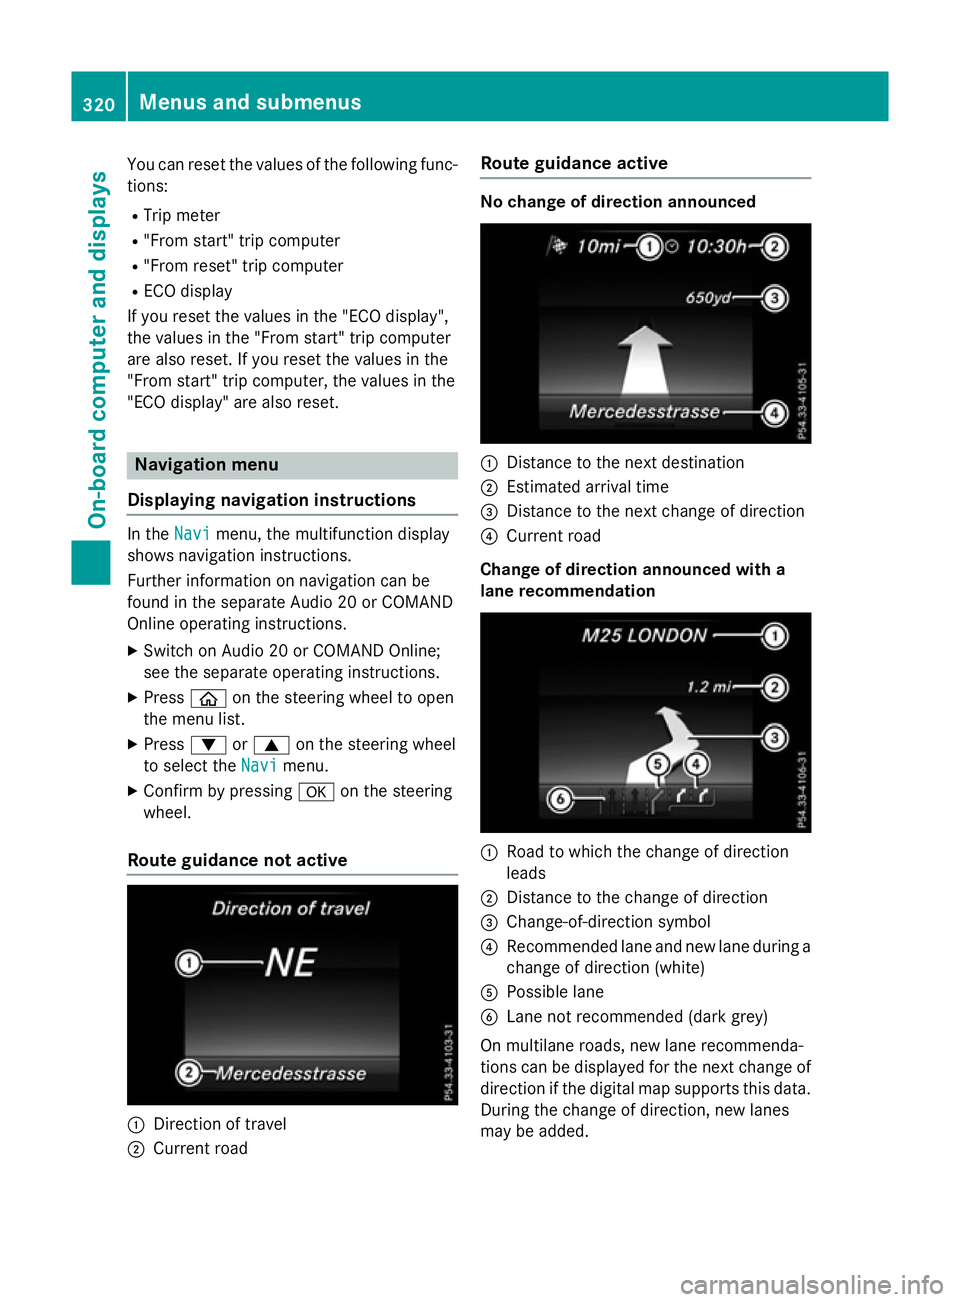
Route guidance not active :
Direction of travel
; Current road Route guidance active No change of direction announced
:
Distance to the next destination
; Estimated arrival time
= Distance to the next change of direction
? Current road
Change of direction announced with a
lane recommendation :
Road to which the change of direction
leads
; Distance to the change of direction
= Change-of-direction symbol
? Recommended lane and new lane during a
change of direction (white)
A Possible lane
B Lane not recommended (dark grey)
On multilane roads, new lane recommenda-
tions can be displayed for the next change of
direction if the digital map supports this data.
During the change of direction, new lanes
may be added. 320
Menus and submenusOn-board computer and displays
Page 325 of 497
You have reached the destination or an
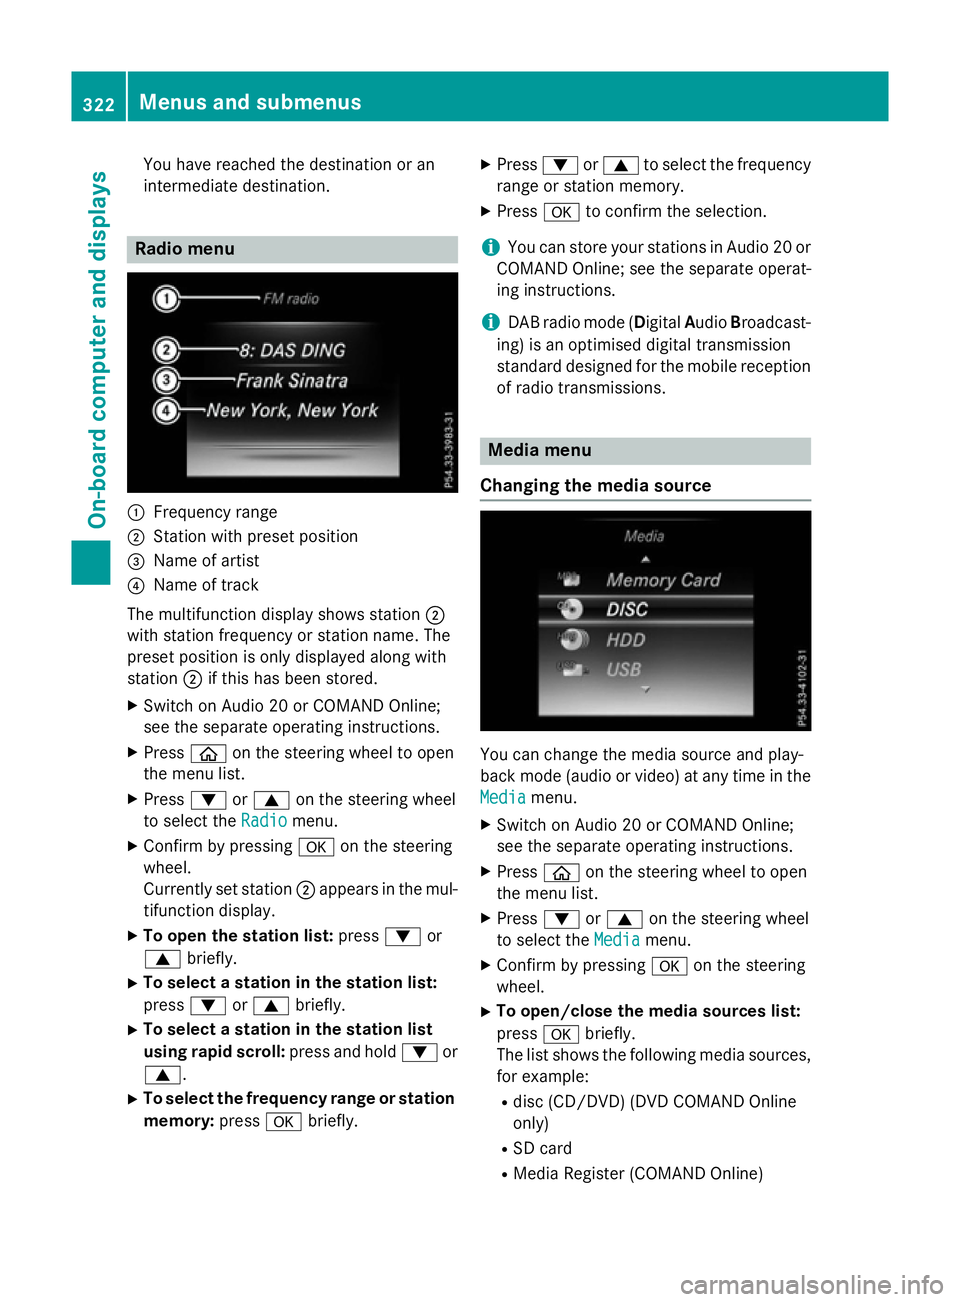
intermediate destination. Radio menu
:
Frequency range
; Station with preset position
= Name of artist
? Name of track
The multifunction display shows station ;
with station frequency or station name. The
preset position is only displayed along with
station ;if this has been stored.
X Switch on Audio 20 or COMAND Online;
see the separate operating instructions.
X Press òon the steering wheel to open
the menu list.
X Press :or9 on the steering wheel
to select the Radio Radiomenu.
X Confirm by pressing aon the steering
wheel.
Currently set station ;appears in the mul-
tifunction display.
X To open the station list: press:or
9 briefly.
X To select a station in the station list:
press :or9 briefly.
X To select a station in the station list
using rapid scroll: press and hold:or
9.
X To select the frequency range or station
memory: pressabriefly. X
Press :or9 to select the frequency
range or station memory.
X Press ato confirm the selection.
i You can store your stations in Audio 20 or
COMAND Online; see the separate operat-
ing instructions.
i DAB radio mode (Digital
AudioBroadcast-
ing) is an optimised digital transmission
standard designed for the mobile reception
of radio transmissions. Media menu
Changing the media source You can change the media source and play-
back mode (audio or video) at any time in the
Media Media menu.
X Switch on Audio 20 or COMAND Online;
see the separate operating instructions.
X Press òon the steering wheel to open
the menu list.
X Press :or9 on the steering wheel
to select the Media Mediamenu.
X Confirm by pressing aon the steering
wheel.
X To open/close the media sources list:
press abriefly.
The list shows the following media sources,
for example:
R disc (CD/DVD) (DVD COMAND Online
only)
R SD card
R Media Register (COMAND Online) 322
Menus and submenusOn-board computer and displays
Page 332 of 497
For further information about Active Blind
Spot Assist, see (Y page 280).
Setting ATTENTION ASSIST X Press òon the steering wheel to open
the menu list.
X Press the :or9 button on the steer-
ing wheel to select the Settings
Settingsmenu.
X Confirm by pressing aon the steering
wheel.
X Use : or9 to select the Assis‐
Assis‐
tance
tance submenu.
X Press ato confirm.
X Press :or9 to select ATTENTION
ATTENTION
ASSIST
ASSIST.
X Press ato confirm.
X Press :or9 to select Deactiva‐
Deactiva‐
ted
ted, Standard
Standard orSensitive
Sensitive.
X Press the abutton to confirm the selec-
tion.
When ATTENTION ASSIST is deactivated,
the é symbol appears in the Assis‐
Assis‐
tance graphic tance graphic menu in the multifunction
display.
For further information about ATTENTION
ASSIST; see (Y page 272).
Setting Lane Keeping Assist
X Press òon the steering wheel to open
the menu list.
X Press :or9 on the steering wheel
to select the Settings
Settingsmenu.
X Confirm by pressing aon the steering
wheel.
X Press :or9 to select the Assis‐
Assis‐
tance
tance submenu.
X Press ato confirm.
X Select Lane Keeping Assist
Lane Keeping Assist with:
or 9.
X Press ato confirm.
The current selection, Standard
Standard orAdap‐
Adap‐
tive
tive , appears.
X To change the setting: pressaagain. For further information about Lane Keeping
Assist; see (Y
page 279).
Further information about Active Lane Keep-
ing Assist (Y page 283).
HYBRID submenu (PLUG-IN HYBRID
vehicles) Setting the maximum charge current
Using the
Max. charge current Max. charge current function,
you can limit the charge current value at
which the high-voltage battery should be
charged.
If there are no charge current settings on the charging cable, set the maximum charge cur-
rent in the on-board computer.
If there are charge current settings on the
charging cable, set the maximum charge cur- rent on the charging cable (Y page 214).
X Press òon the steering wheel to open
the menu list.
X Press :or9 on the steering wheel
to select the Settings
Settings menu.
X Confirm by pressing aon the steering
wheel.
X Use : or9 to select the Hybrid
Hybrid
submenu.
X Press ato confirm.
X Using :or9, select the Max. Max.
charge current
charge current function.
You will see the selected setting.
X Press the abutton to save the setting.
Before charging the high-voltage battery,
check the maximum permissible charge cur-
rent for the relevant power socket.
The maximum charge current values in the
on-board computer may deviate from the
charging cable values.
Further information on charging the high-volt-
age battery (PLUG-IN HYBRID vehicles)
(Y page 211). Menus and submenus
329On-board computer and displays Z
Page 334 of 497
X
Confirm by pressing aon the steering
wheel.
X Press :or9 to select the Head-up
Head-up
display
display submenu.
X Press ato confirm.
X Select Display content
Display content with: or
9.
X Press ato confirm.
A graphic selection list appears.
X Press :or9 to select the desired
display.
X Press the abutton to confirm the selec-
tion.
Further information on navigation can be
found in the separate Audio 20 or COMAND
Online operating instructions.
Further information about Traffic Sign Assist
(Y page 274).
Setting the position
You can adjust the position of the head-up
display on the windscreen. You can compen-
sate for height differences if the seat posi-
tions are changed, for example.
X Switch on the head-up display
(Y page 316).
X Press òon the steering wheel to open
the menu list.
X Press :or9 on the steering wheel
to select the Settings
Settings menu.
X Confirm by pressing aon the steering
wheel.
X Use : or9 to select the Head-up
Head-up
display
display submenu.
X Press ato confirm.
X Using :or9, select the Position Position
function.
X Press ato save the setting.
X Press :or9 to adjust the position
to a level from Level +5
Level +5toLevel -5
Level -5.
X Press aor% to save the setting.
Using the Memory function, you can save and call up the set position of the head-up display
as a single memory preset (Y page 134).Adjusting the brightness
The brightness of the head-up display is auto-
matically adjusted to the surrounding light
conditions. You can also individually adjust
the brightness of the head-up display.
X Switch on the head-up display
(Y page 316).
X Press òon the steering wheel to open
the menu list.
X Press :or9 on the steering wheel
to select the Settings
Settings menu.
X Confirm by pressing aon the steering
wheel.
X Use : or9 to select the Head-up
Head-up
display display submenu.
X Press ato confirm.
X Using :or9, select the Bright‐
Bright‐
ness
ness function.
X Press the abutton to save the setting.
X Press :or9 to adjust the bright-
ness to a level from Level +5
Level +5(bright) to
Level -5
Level -5 (dark).
X Press the aor% button to save the
setting.
Light submenu Switching the Intelligent Light System
on/off
X Press òon the steering wheel to open
the menu list.
X Press :or9 on the steering wheel
to select the Settings Settingsmenu.
X Confirm by pressing aon the steering
wheel.
X Press :or9 to select the Lights Lights
submenu.
X Press ato confirm.
X Using :or9, select the Intelli‐ Intelli‐
gent Light System
gent Light System function.
If the Intelligent Light System Intelligent Light System func-
tion has been switched on, the cone of light Menus and submenus
331On-board computer and displays Z
Page 335 of 497
and the
Lsymbol in the multifunction
display are shown in white.
X Press the abutton to save the setting.
If you switch on the Intelligent Light
Intelligent Light
System
System function, the following functions are
activated:
R Motorway mode
R Active light function
R Cornering light function
R Extended range foglamps
R Off-road lights
If you set the dipped-beam headlamps for
driving on the right/left, the multifunction
display shows the Inactive for left-
Inactive for left-
side traffic side traffic orInactive for right-
Inactive for right-
side traffic
side traffic display message in the
Lights
Lights submenu instead of the Intelli‐
Intelli‐
gent Light System
gent Light System function (Ypage 332).
This display message will only appear if the
setting for driving on the left/right is set
opposite to your vehicle's country version.
Further information on the Intelligent Light
System (Y page 141).
Setting the dipped-beam headlamps for
driving on the left/right
This function is only available on vehicles with
the Intelligent Light System.
You can use this function to switch between
symmetrical and asymmetrical dipped beam
(Y page 138).
X Press òon the steering wheel to open
the menu list.
X Press the :or9 button on the steer-
ing wheel to select the Settings Settingsmenu.
X Confirm by pressing aon the steering
wheel.
X Use : or9 to select the Lights
Lights
submenu.
X Press ato confirm. X
Using :or9, select the Dipped
Dipped
beams Setting for
beams Setting for function.
You will see the selected setting, right-
right-
side traffic
side traffic orleft-side traffic
left-side traffic.
X Press the abutton to save the setting.
If you change the setting, conversion does
not take place until the next time the vehi-
cle is stationary.
If you set the dipped-beam headlamps for
driving on the right/left, then motorway
mode and the extended range foglamps are
unavailable. These are only deactivated if the setting for driving on the left/right is set
opposite to your vehicle's country version.
A qualified specialist workshop can set the
dipped-beam headlamps for driving on the
left/right.
Instrument cluster submenu Selecting the distance unit
The
Display Display unit
unitSpeed-/odometer
Speed-/odometer func-
tion allows you to choose whether certain
displays appear in kilometres or miles in the
multifunction display.
X Press òon the steering wheel to open
the menu list.
X Press the :or9 button on the steer-
ing wheel to select the Settings Settingsmenu.
X Confirm by pressing aon the steering
wheel.
X Use : or9 to select the Instru‐
Instru‐
ment cluster
ment cluster submenu.
X Press ato confirm.
X Press :or9 to select the Display
Display
unit Speed-/odometer
unit Speed-/odometer function.
The current setting km
kmorMiles
Miles appears.
X Press the abutton to save the setting.
The selected unit of measurement for dis-
tance applies to the:
R digital speedometer in the Trip Tripmenu
R total distance recorder and the trip meter
R trip computer
R current consumption and the range 332
Menus and submenusOn-board computer and displays
Page 336 of 497
R
navigation instructions in the Navi
Navimenu
R cruise control
R SPEEDTRONIC
R DISTRONIC PLUS with Steering Assist and
Stop&Go Pilot
R ASSYST PLUS service interval display
Selecting permanent display
United Kingdom: this function is unavailable.
This function is only available on PLUG-IN
HYBRID vehicles.
Using the Permanent display Permanent display function, you
can switch on the outside temperature or the
additional speedometer in the multifunction
display.
X Press òon the steering wheel to open
the menu list.
X Press :or9 on the steering wheel
to select the Settings
Settings menu.
X Confirm by pressing aon the steering
wheel.
X Press :or9 to select the Instru‐
Instru‐
ment cluster
ment cluster submenu.
X Press ato confirm.
X Using :or9, select the Perma‐
Perma‐
nent display
nent display function.
X Press ato confirm.
The current selection, Outside tempera‐
Outside tempera‐
ture
ture orDig. speedo [km/h]
Dig. speedo [km/h] , appears.
i The multifunction display shows the unit
in the additional speedometer inverse to
the speedometer unit in the instrument
cluster.
X To change the setting: pressaagain.
Switching the additional speedometer
on/off
United Kingdom: this function is unavailable.
The additional speedometer is always
switched on.
This function is not available in PLUG-IN
HYBRID vehicles.
The Digital speedo [km/h]
Digital speedo [km/h] function
allows you to choose whether the status area in the multifunction display shows the speed
digitally. The unit in the additional speedom-
eter is always inverse to the speedometer
unit.
X Press òon the steering wheel to open
the menu list.
X Press :or9 on the steering wheel
to select the Settings Settingsmenu.
X Confirm by pressing aon the steering
wheel.
X Press :or9 to select the Instru‐
Instru‐
ment cluster
ment cluster submenu.
X Press ato confirm.
X Using :or9, select the Digital
Digital
speedo [km/h]
speedo [km/h] function.
The current selection appears.
X To switch on/off: press theabutton
again.
Vehicle submenu Setting permanent SPEEDTRONIC
X Press òon the steering wheel to open
the menu list.
X Press the :or9 button on the steer-
ing wheel to select the Settings
Settingsmenu.
X Confirm by pressing aon the steering
wheel.
X Use : or9 to select the Vehicle
Vehicle
submenu.
X Press ato confirm.
X Using :or9, select the Limit
Limit
speed (winter tyres)
speed (winter tyres) function.
The current setting appears.
X Press ato confirm.
X Press :or9 to adjust permanent
SPEEDTRONIC in increments of ten ( 240
240
km/h
km/h to160 km/h
160 km/h). The Off
Offsetting
switches permanent SPEEDTRONIC off.
X Press the abutton to store the entry.
For further information on permanent SPEED- TRONIC (Y page 236). Menus and submenus
333On-board computer and displays Z