2015 MERCEDES-BENZ GLC SUV lock
[x] Cancel search: lockPage 220 of 497
audibly switch on during the charging proc-
ess.
Removing the charging cable The high-voltage battery is fully charged
when:
R the charge level display reaches 100% in
the multifunction display
R the indicator lamp in the vehicle socket
lights up green after unlocking or locking
the vehicle
You can find information on the charge status indicator in the multifunction display in
"PLUG-IN HYBRID operation", section
"Menus and submenus" under "Energy flow
display" (Y page 291).
i After the charging cable has been discon-
nected, the indicator lamps in the vehicle
socket remain lit for some time before
switching off.
X Unlock the vehicle.
X Remove the charging cable from vehicle
socket Awithin 30 seconds. Otherwise,
the vehicle will relock.
X Close socket cap ;.
X Close charge socket flap :.
X Wallbox without a preinstalled cable: where
necessary, remove the charging cable from the wallbox and stow it safely in the vehicle. Charging the high-voltage battery at
the charging station
Before beginning the charging process at a
charging station without communication
capabilities, you must first activate the sta-
tion, e.g. using an RFID card. Observe the on- site operator instructions for the charging
station.
Connecting the vehicle to a charging station
is identical to connecting it to a wallbox
(Y page 216). Charging the high-voltage battery (PLUG-IN HYBRID vehicles)
217Driving and parking Z
Page 221 of 497
Problems with the charging process
Problem
Possible causes/consequences and
M
MSolutions The charge socket flap
cannot be opened. The charge socket flap is not unlocked.
X Unlock the vehicle (Y page 95).
If the key battery is discharged:
X Unlock the driver's door using the emergency key element
(Y page 97).
or
X Unlock the vehicle centrally from the inside (Y page 101).The charge socket flap is unlocked, but the opening mechanism is
jammed.
X Lock the vehicle and unlock it again.
If, after that, the opening mechanism is still jammed:
X Consult a qualified specialist workshop. The charging cable can-
not be inserted into the
vehicle socket. The vehicle socket is locked.
X Unlock the vehicle (Y page 95).
X Shift the transmission to position P.The high-voltage bat-
tery is not being
charged. The
Ý indicator lamp on the vehicle socket does not light up or
flashes red.
A malfunction has occurred during the initialisation of the charging
process or during charging.
X Remove the charging cable connector from the vehicle socket
and re-insert it into the vehicle socket.
If the problem persists:
X Use a different charging station.
or
X Consult a qualified specialist workshop. The high-voltage bat-
tery is not charged dur-
ing the charging proc-
ess when connected to
a mains socket. The
Ý indicator lamp on
the vehicle socket does not light up after the
charging cable connec-
tor has been inserted
into the vehicle socket. The mains socket is faulty.
X Have the mains socket checked to test if it is functioning prop-
erly.
or
X Use a different mains socket. 218
Charging the high-voltage battery (PLUG-IN HYBRID vehicles)Driving and parking
Page 222 of 497
Problem
Possible causes/consequences and
M
MSolutions The charging cable con-
nector cannot be
removed from the vehi- cle socket. The charging cable connector has not been unlocked.
X Press the %button on the key. The charging cable connector
on the vehicle socket is unlocked.
X Remove the charging cable connector from the vehicle socket. The charging cable connector is blocked.
X Consult a qualified specialist workshop. Parking
Important safety notes
G
WARNING
Flammable material such as leaves, grass or
twigs may ignite if they come into contact with hot parts of the exhaust system or exhaust
gas flow. There is a risk of fire.
Park the vehicle so that no flammable mate-
rial can come into contact with hot vehicle
components. In particular, do not park on dry grassland or harvested grain fields. G
WARNING
If you switch off the ignition while driving,
safety-relevant functions are only available
with limitations, or not at all. This could affect, for example, the power steering and the brake
boosting effect. You will require considerably
more effort to steer and brake. There is a risk of an accident.
Do not switch off the ignition while driving. G
WARNING
If you leave children unattended in the vehi-
cle, they may be able to set the vehicle in
motion if, for example, they:
R release the parking brake
R shift the automatic transmission out of park
position P
R start the engine In addition, they may operate vehicle equip-
ment and become trapped. There is a risk of
an accident and injury.
When leaving the vehicle, always take the key
with you and lock the vehicle. Never leave
children unattended in the vehicle.
! Always secure the vehicle correctly
against rolling away. Otherwise, the vehicle
or its drivetrain could be damaged.
To ensure that the vehicle is safeguarded
against rolling away unintentionally: R the electric parking brake must be applied
R the transmission must be in position Pand
the key must be removed from the ignition lock
R the front wheels must be turned towards
the kerb on steep uphill or downhill gradi-
ents
R the empty vehicle must be secured at the
front axle with a wheel chock or similar
object, for example, on uphill or downhill
gradients
R a laden vehicle must also be secured at the
rear axle with a wheel chock or similar
object, for example, on uphill or downhill
gradients Parking
219Driving and parking Z
Page 223 of 497
Switching off the engine
Important safety notes G
WARNING
The automatic transmission switches to neu-
tral position Nwhen you switch off the engine.
The vehicle may roll away. There is a risk of an
accident.
After switching off the engine, always switch
to parking position P. Prevent the parked vehi-
cle from rolling away by applying the parking
brake.
Vehicles with automatic transmission X
Apply the electric parking brake.
X Shift the transmission to position P.
X With the key: turn the key to position 0in
the ignition lock and remove it.
The immobiliser is activated.
X With the Start/Stop button: press the
Start/Stop button (Y page 187).
The engine stops and all the indicator
lamps in the instrument cluster go out.
When the driver's door is closed, this cor-
responds to key position 1. When the driv-
er's door is open, this corresponds to key
position 0: "key removed".
If you switch the engine off with the trans-
mission in position Ror D, the automatic
transmission shifts to Nautomatically.
With the key: if you then open the driver's
door or the front-passenger door or remove
the key from the ignition, the automatic trans- mission shifts to Pautomatically.
With the Start/Stop button: if you then
open the driver's door or the front-passenger
door, the automatic transmission shifts to P
automatically.
If you want the automatic transmission to
remain in neutral N, e.g. when having the
vehicle cleaned in an automatic car wash with a towing system: With the key:
X Switch the ignition on.
X Depress the brake pedal and keep it
depressed.
X Shift to neutral N.
X Release the brake pedal.
X Release the electric parking brake.
X Switch off the ignition and leave the key in
the ignition lock.
With the Start/Stop button:
X Switch the ignition on.
X Depress the brake pedal and keep it
depressed.
X Remove the Start/Stop button from the
ignition lock.
X Insert the key into the ignition lock.
X Shift to neutral N.
X Release the brake pedal.
X Release the electric parking brake.
X Switch off the ignition and leave the key in
the ignition lock.
The engine can be switched off while the vehi-
cle is in motion by pressing and holding the
Start/Stop button for about three seconds.
This function operates independently of the
ECO start/stop automatic engine switch-off
function. Electric parking brake
General notes G
WARNING
If you leave children unattended in the vehi-
cle, they may be able to set the vehicle in
motion if, for example, they:
R release the parking brake
R shift the automatic transmission out of park
position P
R start the engine 220
ParkingDriving and parking
Page 224 of 497
In addition, they may operate vehicle equip-
ment and become trapped. There is a risk of
an accident and injury.
When leaving the vehicle, always take the key with you and lock the vehicle. Never leave
children unattended in the vehicle.
The function of the electric parking brake is
dependent on the on-board voltage. If the on-
board voltage is low or if there is a malfunc-
tion in the system, it may not be possible to
apply the released parking brake.
X If this is the case, only park the vehicle on
level ground and secure it to prevent it from
rolling away.
X Shift the automatic transmission to posi-
tion P.
It may not be possible to release an applied
parking brake if the on-board voltage is low or if there is a malfunction in the system. Con-
tact a qualified specialist workshop.
The electric parking brake carries out a func-
tion check at regular intervals when the
engine is switched off. Noises that occur are
normal.
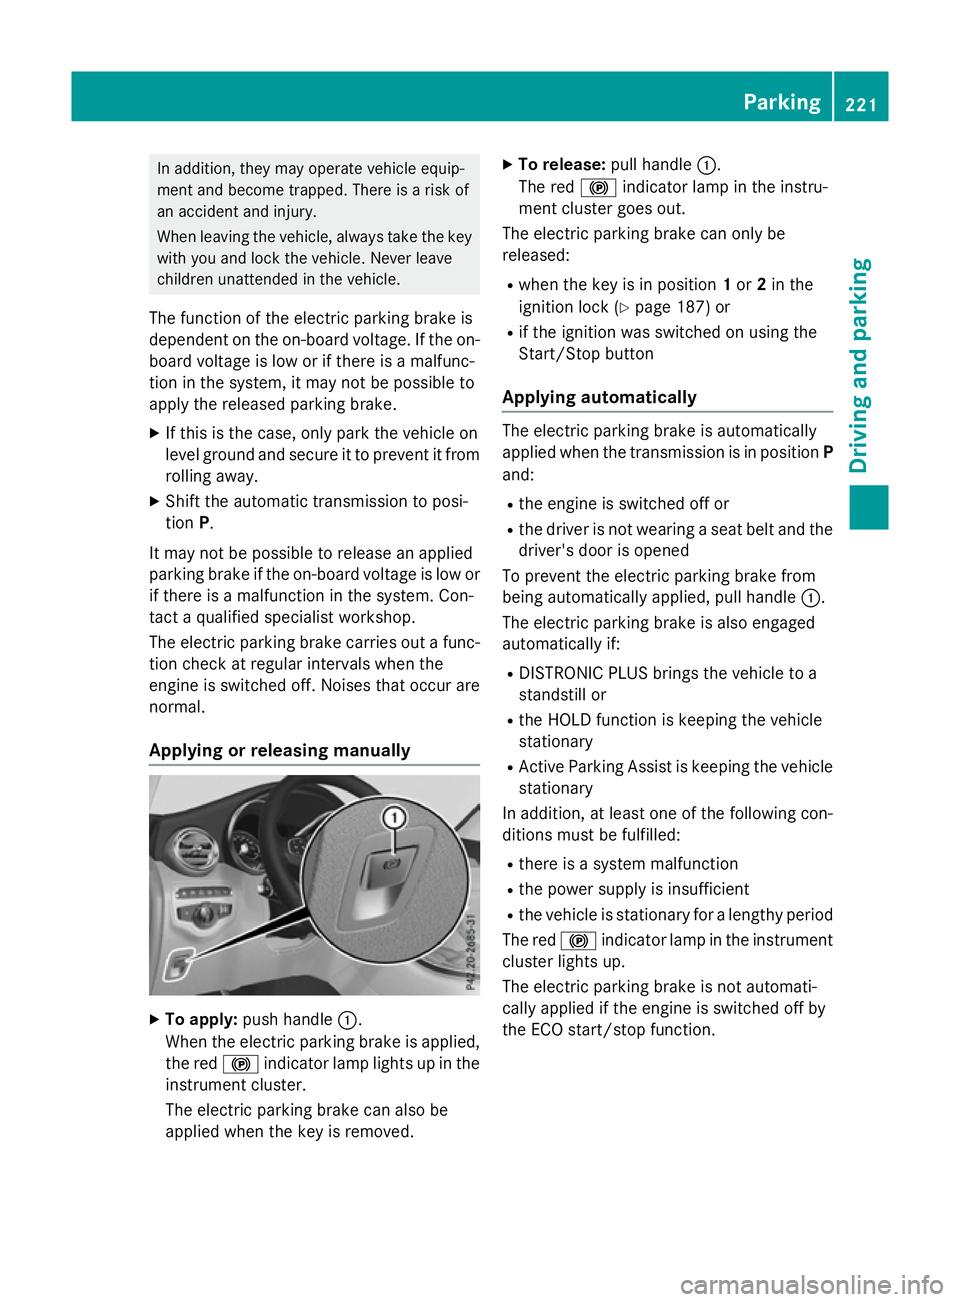
Applying or releasing manually X
To apply: push handle :.
When the electric parking brake is applied, the red !indicator lamp lights up in the
instrument cluster.
The electric parking brake can also be
applied when the key is removed. X
To release: pull handle:.
The red !indicator lamp in the instru-
ment cluster goes out.
The electric parking brake can only be
released:
R when the key is in position 1or 2in the
ignition lock (Y page 187) or
R if the ignition was switched on using the
Start/Stop button
Applying automatically The electric parking brake is automatically
applied when the transmission is in position
P
and:
R the engine is switched off or
R the driver is not wearing a seat belt and the
driver's door is opened
To prevent the electric parking brake from
being automatically applied, pull handle :.
The electric parking brake is also engaged
automatically if:
R DISTRONIC PLUS brings the vehicle to a
standstill or
R the HOLD function is keeping the vehicle
stationary
R Active Parking Assist is keeping the vehicle
stationary
In addition, at least one of the following con-
ditions must be fulfilled:
R there is a system malfunction
R the power supply is insufficient
R the vehicle is stationary for a lengthy period
The red !indicator lamp in the instrument
cluster lights up.
The electric parking brake is not automati-
cally applied if the engine is switched off by
the ECO start/stop function. Parking
221Driving and parking Z
Page 229 of 497
R
avoid sudden steering movements
R brake carefully
Driving on flooded roads !
Bear in mind that vehicles travelling in
front or in the opposite direction create
waves. This may cause the maximum per-
missible water depth to be exceeded.
These notes must be observed under all
circumstances. You could otherwise dam-
age the engine, the electronics or the trans- mission.
If you must drive on stretches of road on
which water has collected, please bear in
mind that:
R in the case of standing water, the water
level may be no higher than the lower edge of the vehicle body
R you should drive no faster than walking
pace Winter driving
G
WARNING
If you shift down on a slippery road surface in an attempt to increase the engine's braking
effect, the drive wheels could lose their grip.
This increases the risk of skidding and having
an accident.
Do not shift down for additional engine brak-
ing on a slippery road surface. G
DANGER
If the exhaust pipe is blocked or adequate
ventilation is not possible, poisonous gases
such as carbon monoxide (CO) may enter the vehicle. This is the case, e.g. if the vehicle
becomes trapped in snow. There is a risk of
fatal injury.
If you leave the engine or the auxiliary heating
running, make sure the exhaust pipe and area
around the vehicle are clear of snow. To
ensure an adequate supply of fresh air, open a window on the side of the vehicle that is not
facing into the wind.
Have your vehicle winterproofed at a qualified specialist workshop at the onset of winter.
You should drive particularly carefully on slip- pery road surfaces. Avoid sudden accelera-
tion, steering and braking manoeuvres. Do
not use cruise control or DISTRONIC PLUS.
If the vehicle threatens to skid or cannot be
stopped when moving at low speed:
X Shift the transmission to position N.
X Try to bring the vehicle under control by
using corrective steering.
The outside temperature indicator is not
designed to serve as an ice-warning device
and is therefore unsuitable for that purpose.
Changes in the outside temperature are dis-
played after a short delay.
Indicated temperatures just above the freez-
ing point do not guarantee that the road sur-
face is free of ice. The road may still be icy,
especially in wooded areas or on bridges. The vehicle could skid if you fail to adapt your
driving style. Always adapt your driving style
and drive at a speed to suit the prevailing
weather conditions.
You should pay special attention to road con-
ditions when temperatures are around freez-
ing point.
Further information on driving with snow
chains (Y page 457).
Further information on driving with summer
tyres (Y page 456).
Observe the notes in the "Winter operation"
section (Y page 456). Off-road driving
Important safety notes G
WARNING
If you drive up a steep incline at an angle or
turn on a steep incline, the vehicle could slip 226
Driving tipsDriving and parking
Page 233 of 497
Hill start assist will aid you when pulling away
on a hill. For further information about hill
start assist, see (Y page 191).
Do not shift into transmission position N
when driving off-road. You could lose control
of the vehicle if you attempt to brake the
vehicle using the service brake. If the gradient
is too steep for your vehicle, back up in
reverse gear.
Always observe the approach/departure
angle values (Y page 489).
Maximum gradient-climbing capability Always observe the maximum gradient climb-
ing ability values (Y page 489).
Hilltops When driving up an uphill gradient, slightly
reduce pressure on the accelerator immedi-
ately before reaching the brow of the hill.
Make use of the vehicle's own impetus to
travel over the brow.
This style of driving prevents:
R the vehicle from lifting off the ground on the
brow of a hill
R the vehicle from travelling too quickly down
the other side
Driving downhill R
Drive slowly.
R Do not drive at an angle down steep
inclines. Steer into the line of fall and drive with the front wheels aligned straight. Oth-erwise, the vehicle could slip sideways, tip
and overturn.
R Before tackling steep downhill gradients,
use the left-hand steering wheel gearshift
paddle to shift to a lower gear.
R Activate DSR. If this is not sufficient, brake
gently. When doing so, make sure that the
vehicle is facing in the direction of the line
of fall.
R Check that the brakes are working normally
after a long downhill stretch. Off-road ABS is activated when the off-road
program is selected.
At speeds below 30 km/h the front wheels
lock cyclically during braking. The digging-in
effect achieved in the process reduces the
stopping distance when driving off-road. The
steerability of the vehicle is considerably
reduced if the wheels lock.
Driving systems
Mercedes-Benz Intelligent Drive
Mercedes-Benz Intelligent Drive stands for
innovative driver assistance and safety sys-
tems which enhance comfort and support the
driver in critical situations. With these intelli-
gent co-ordinated systems Mercedes-Benz
has set a milestone on the path towards
autonomous driving.
Mercedes-Benz Intelligent Drive embraces all elements of active and passive safety in one
well thought-out system – for the safety of the vehicle occupants and that of other road
users.
Further information on driving safety systems (Y page 78). Cruise control
General notes Cruise control maintains a constant road
speed for you. It brakes automatically in order to avoid exceeding the set speed. Change into
a lower gear in good time on long and steep
downhill gradients. Take particular note of
this when driving a laden vehicle and when
towing a trailer. By doing so, you will make
use of the braking effect of the engine. This
relieves the load on the brake system and
prevents the brakes from overheating and
wearing too quickly.
Use cruise control only if road and traffic con- ditions are appropriate for maintaining a
steady speed for a prolonged period. You canstore any road speed above 30 km/h. 230
Driving systemsDriving and parking
Page 255 of 497
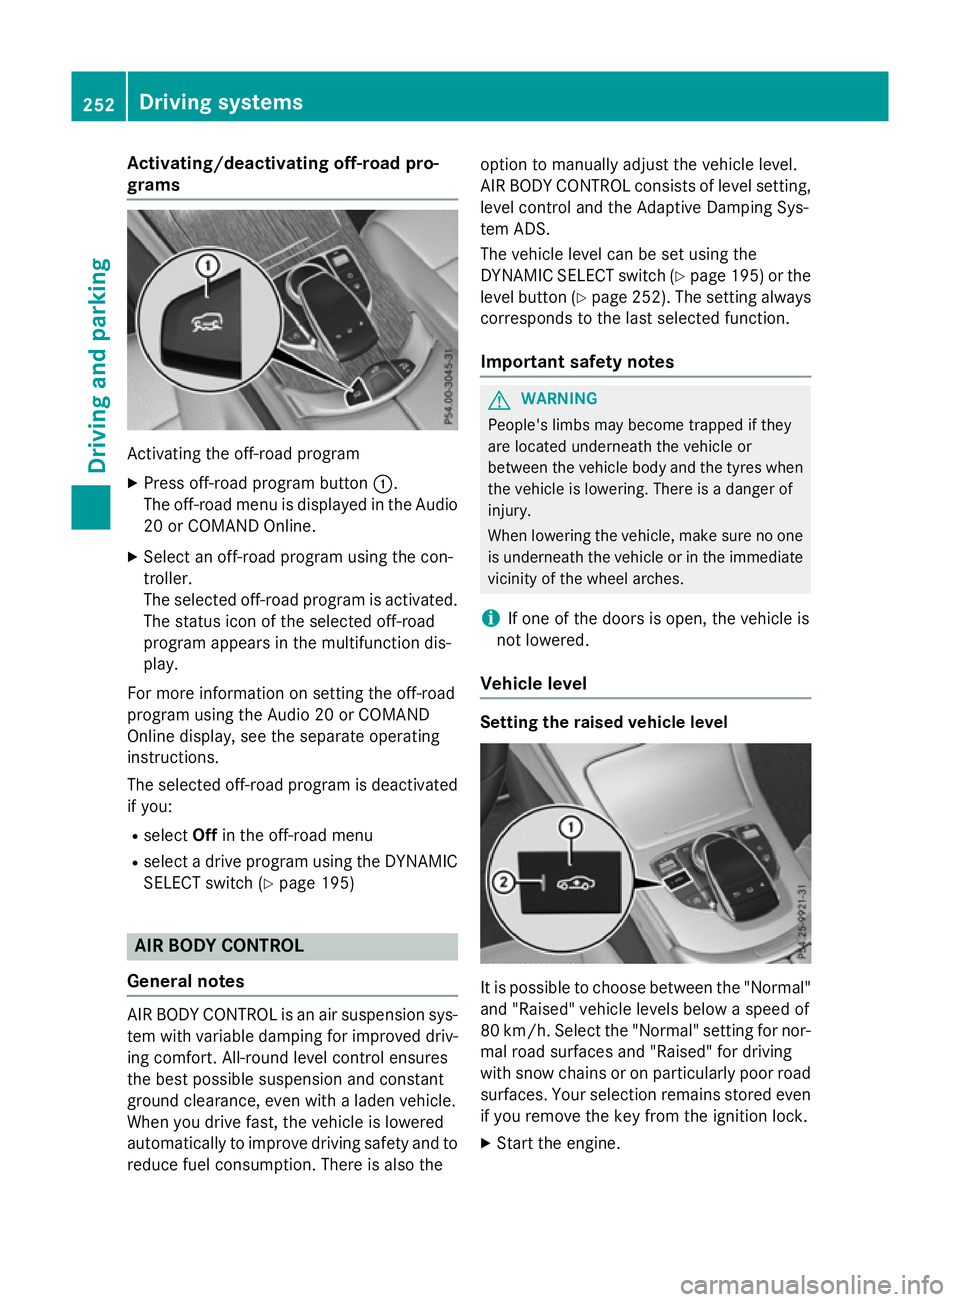
Activating/deactivating off-road pro-
grams Activating the off-road program
X Press off-road program button :.
The off-road menu is displayed in the Audio
20 or COMAND Online.
X Select an off-road program using the con-
troller.
The selected off-road program is activated.
The status icon of the selected off-road
program appears in the multifunction dis-
play.
For more information on setting the off-road
program using the Audio 20 or COMAND
Online display, see the separate operating
instructions.
The selected off-road program is deactivated if you:
R select Offin the off-road menu
R select a drive program using the DYNAMIC
SELECT switch (Y page 195)AIR BODY CONTROL
General notes AIR BODY CONTROL is an air suspension sys-
tem with variable damping for improved driv-
ing comfort. All-round level control ensures
the best possible suspension and constant
ground clearance, even with a laden vehicle.
When you drive fast, the vehicle is lowered
automatically to improve driving safety and to reduce fuel consumption. There is also the option to manually adjust the vehicle level.
AIR BODY CONTROL consists of level setting,
level control and the Adaptive Damping Sys-
tem ADS.
The vehicle level can be set using the
DYNAMIC SELECT switch (Y page 195) or the
level button (Y page 252). The setting always
corresponds to the last selected function.
Important safety notes G
WARNING
People's limbs may become trapped if they
are located underneath the vehicle or
between the vehicle body and the tyres when the vehicle is lowering. There is a danger of
injury.
When lowering the vehicle, make sure no one
is underneath the vehicle or in the immediate vicinity of the wheel arches.
i If one of the doors is open, the vehicle is
not lowered.
Vehicle level Setting the raised vehicle level
It is possible to choose between the "Normal"
and "Raised" vehicle levels below a speed of
80 km/h. Select the "Normal" setting for nor-
mal road surfaces and "Raised" for driving
with snow chains or on particularly poor road surfaces. Your selection remains stored even
if you remove the key from the ignition lock.
X Start the engine. 252
Driving systemsDriving and pa
rking