2015 MERCEDES-BENZ GLC SUV lock
[x] Cancel search: lockPage 208 of 497
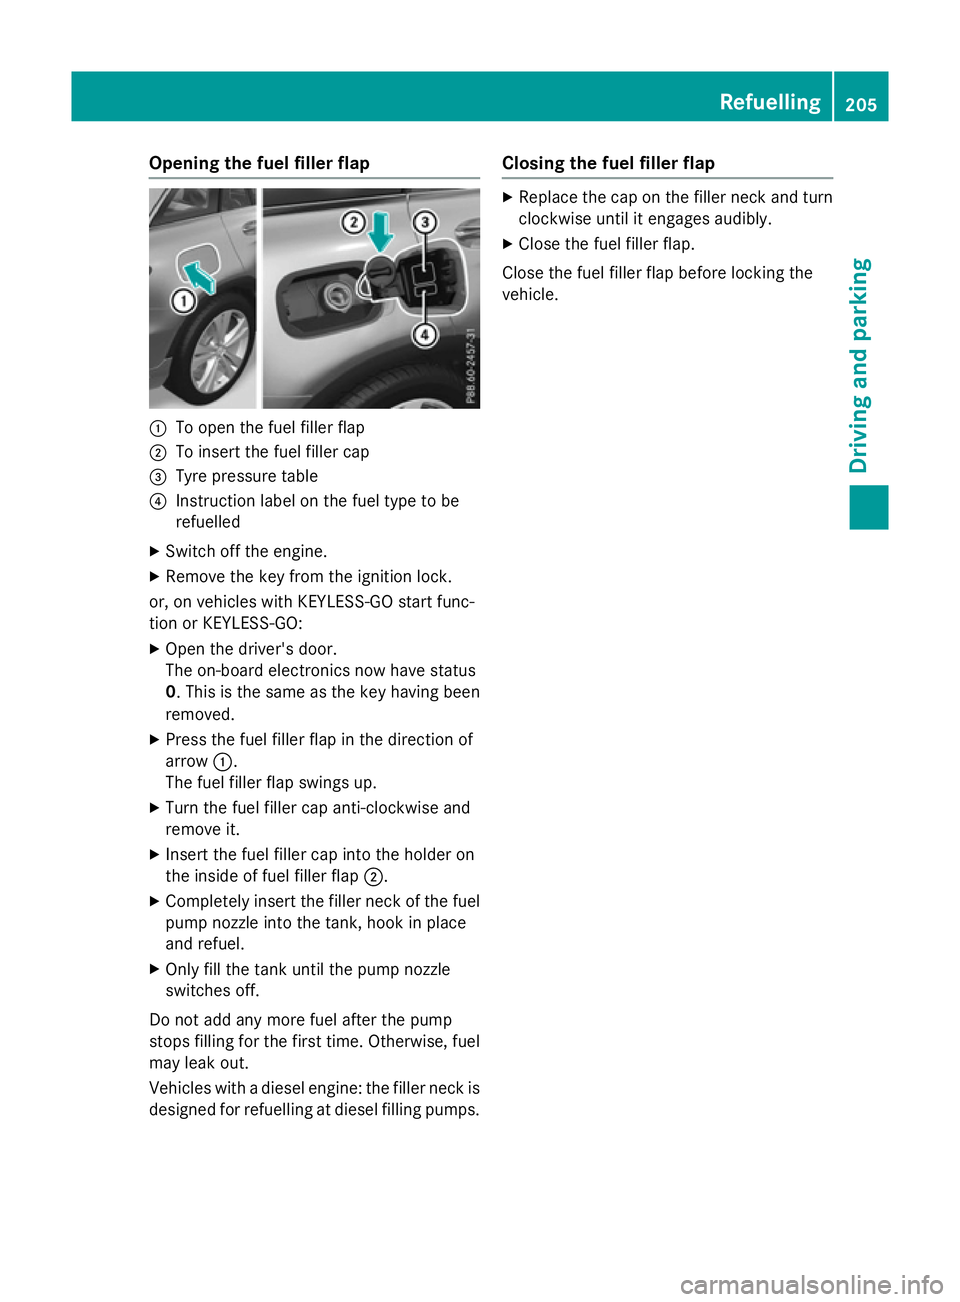
Opening the fuel filler flap
:
To open the fuel filler flap
; To insert the fuel filler cap
= Tyre pressure table
? Instruction label on the fuel type to be
refuelled
X Switch off the engine.
X Remove the key from the ignition lock.
or, on vehicles with KEYLESS-GO start func-
tion or KEYLESS‑ GO:
X Open the driver's door.
The on-board electronics now have status
0. This is the same as the key having been
removed.
X Press the fuel filler flap in the direction of
arrow :.
The fuel filler flap swings up.
X Turn the fuel filler cap anti-clockwise and
remove it.
X Insert the fuel filler cap into the holder on
the inside of fuel filler flap ;.
X Completely insert the filler neck of the fuel
pump nozzle into the tank, hook in place
and refuel.
X Only fill the tank until the pump nozzle
switches off.
Do not add any more fuel after the pump
stops filling for the first time. Otherwise, fuel
may leak out.
Vehicles with a diesel engine: the filler neck is designed for refuelling at diesel filling pumps. Closing the fuel filler flap X
Replace the cap on the filler neck and turn
clockwise until it engages audibly.
X Close the fuel filler flap.
Close the fuel filler flap before locking the
vehicle. Refuelling
205Driving and parking Z
Page 209 of 497
Problems with the fuel and fuel tank
Problem
Possible causes/consequences and
M
MSolutions Fuel is leaking from the
vehicle. G
WARNING
The fuel line or the fuel tank is faulty.
There is a risk of fire or explosion.
X Apply the electric parking brake.
X Switch off the engine.
X Remove the key from the ignition lock.
or, on vehicles with KEYLESS-GO start function or KEYLESS ‑GO:
X Open the driver's door.
The on-board electronics now have status 0. This is the same as
the key having been removed.
X Do not restart the engine under any circumstances.
X Consult a qualified specialist workshop. The engine does not
start. The fuel tank of a vehicle with a diesel engine has been run com-
pletely dry.
X Refuel the vehicle with at least 5 litres of diesel.
X Turn the ignition on for approximately ten seconds
(Y page 187).
X Start the engine continuously for a maximum of ten seconds
until it runs smoothly.
If the engine does not start:
X Turn the ignition on again a maximum of ten seconds
(Y page 187).
X Start the engine again continuously for a maximum of ten sec-
onds until it runs smoothly.
If the engine does not start after three attempts:
X Consult a qualified specialist workshop. The fuel filler flap can-
not be opened. The fuel filler flap is not unlocked.
X Unlock the vehicle (Y page 95). The key battery is discharged or nearly discharged.
X Unlock the vehicle using the emergency key element
(Y page 97). The fuel filler flap is unlocked, but the opening mechanism is jam-
med.
X Consult a qualified specialist workshop. 206
RefuellingDriving and parking
Page 211 of 497
with the vehicle parked on a level surface.
Fluctuations in capacity will thus be avoi-
ded. Filling a vehicle standing on an uneven surface is not permitted. There is a danger
of overfilling, which can cause damage to
BlueTEC exhaust gas aftertreatment com-
ponents.
! Surfaces which have come into contact
with AdBlue ®
while refilling should be
rinsed immediately with water, or remove
AdBlue ®
with a moist cloth and cold water.
If AdBlue ®
has already crystallised, use a
sponge and cold water to clean the area.
AdBlue ®
residue crystallises after a certain
amount of time and soils the affected sur-
faces.
! AdBlue ®
is not a fuel additive and must
not be added to the fuel tank. If AdBlue ®
is
added to the fuel tank, this can lead to
engine damage.
Have the AdBlue ®
tank refilled at a qualified
specialist workshop. However, you can also
top up the AdBlue ®
tank:
R at a filling station with an AdBlue ®
filling
pump
R with AdBlue ®
refill bottles
R with an AdBlue ®
refill canister
When the pump nozzle switches off automat- ically during filling at a filling pump, the
AdBlue ®
tank has been completely filled. Do
not fill the AdBlue ®
tank any further. AdBlue ®
may leak out.
To avoid transporting already opened refill
containers in the vehicle, completely empty
refill bottles or canisters when filling the
AdBlue ®
tank, if possible.
Further information on AdBlue ®
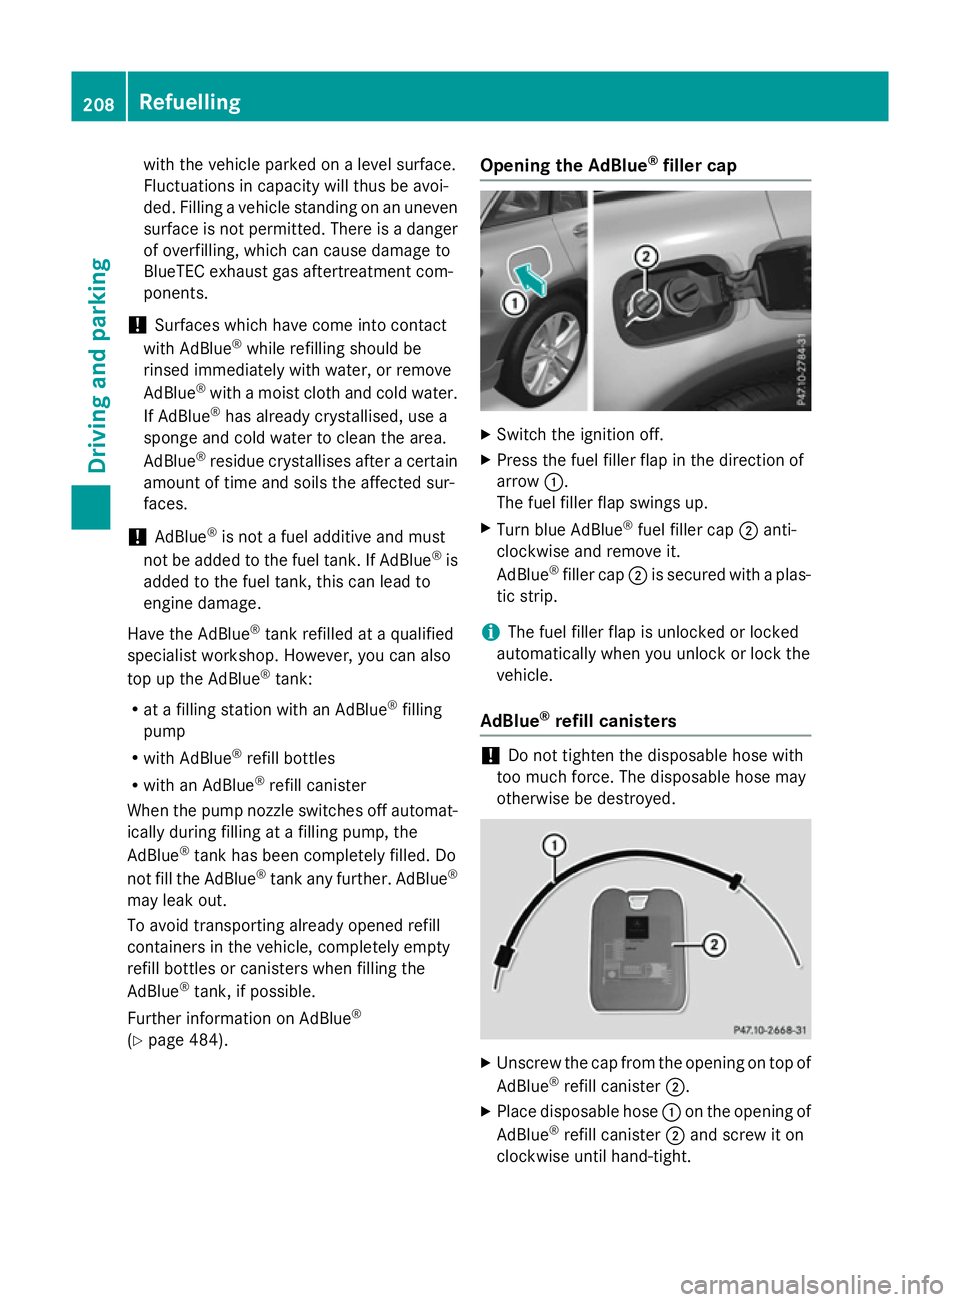
(Y page 484). Opening the AdBlue
®
filler cap X
Switch the ignition off.
X Press the fuel filler flap in the direction of
arrow :.
The fuel filler flap swings up.
X Turn blue AdBlue ®
fuel filler cap ;anti-
clockwise and remove it.
AdBlue ®
filler cap ;is secured with a plas-
tic strip.
i The fuel filler flap is unlocked or locked
automatically when you unlock or lock the
vehicle.
AdBlue ®
refill canisters !
Do not tighten the disposable hose with
too much force. The disposable hose may
otherwise be destroyed. X
Unscrew the cap from the opening on top of
AdBlue ®
refill canister ;.
X Place disposable hose :on the opening of
AdBlue ®
refill canister ;and screw it on
clockwise until hand-tight. 208
RefuellingDriving and parking
Page 212 of 497
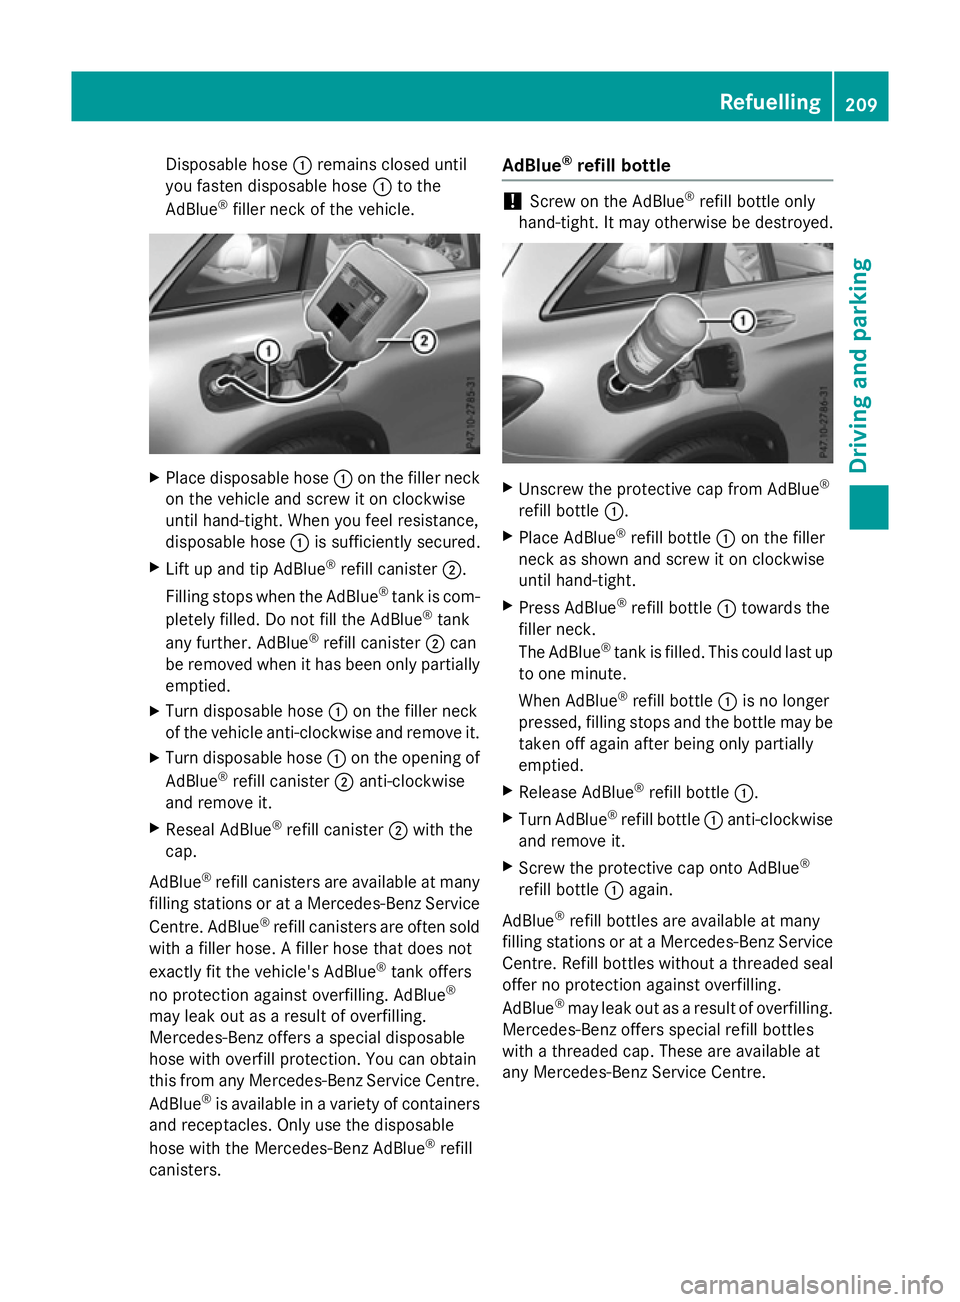
Disposable hose
:remains closed until
you fasten disposable hose :to the
AdBlue ®
filler neck of the vehicle. X
Place disposable hose :on the filler neck
on the vehicle and screw it on clockwise
until hand-tight. When you feel resistance,
disposable hose :is sufficiently secured.
X Lift up and tip AdBlue ®
refill canister ;.
Filling stops when the AdBlue ®
tank is com-
pletely filled. Do not fill the AdBlue ®
tank
any further. AdBlue ®
refill canister ;can
be removed when it has been only partially emptied.
X Turn disposable hose :on the filler neck
of the vehicle anti-clockwise and remove it.
X Turn disposable hose :on the opening of
AdBlue ®
refill canister ;anti-clockwise
and remove it.
X Reseal AdBlue ®
refill canister ;with the
cap.
AdBlue ®
refill canisters are available at many
filling stations or at a Mercedes-Benz Service
Centre. AdBlue ®
refill canisters are often sold
with a filler hose. A filler hose that does not
exactly fit the vehicle's AdBlue ®
tank offers
no protection against overfilling. AdBlue ®
may leak out as a result of overfilling.
Mercedes-Benz offers a special disposable
hose with overfill protection. You can obtain
this from any Mercedes-Benz Service Centre.
AdBlue ®
is available in a variety of containers
and receptacles. Only use the disposable
hose with the Mercedes-Benz AdBlue ®
refill
canisters. AdBlue
®
refill bottle !
Screw on the AdBlue ®
refill bottle only
hand-tight. It may otherwise be destroyed. X
Unscrew the protective cap from AdBlue ®
refill bottle :.
X Place AdBlue ®
refill bottle :on the filler
neck as shown and screw it on clockwise
until hand-tight.
X Press AdBlue ®
refill bottle :towards the
filler neck.
The AdBlue ®
tank is filled. This could last up
to one minute.
When AdBlue ®
refill bottle :is no longer
pressed, filling stops and the bottle may be
taken off again after being only partially
emptied.
X Release AdBlue ®
refill bottle :.
X Turn AdBlue ®
refill bottle :anti-clockwise
and remove it.
X Screw the protective cap onto AdBlue ®
refill bottle :again.
AdBlue ®
refill bottles are available at many
filling stations or at a Mercedes-Benz Service Centre. Refill bottles without a threaded seal
offer no protection against overfilling.
AdBlue ®
may leak out as a result of overfilling.
Mercedes-Benz offers special refill bottles
with a threaded cap. These are available at
any Mercedes-Benz Service Centre. Refuelling
209Driving and parking Z
Page 213 of 497
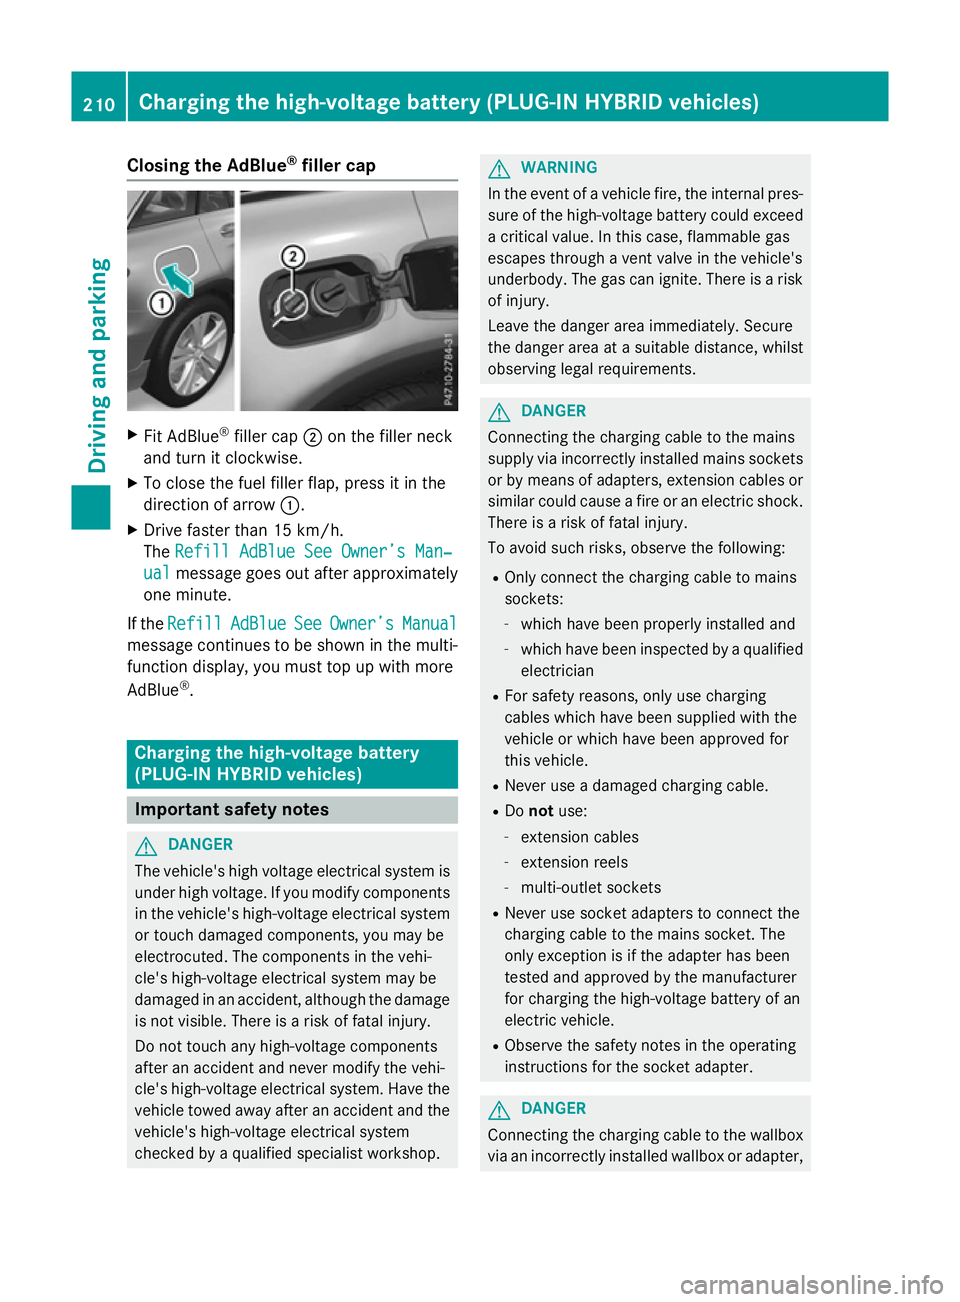
Closing the AdBlue
®
filler cap X
Fit AdBlue ®
filler cap ;on the filler neck
and turn it clockwise.
X To close the fuel filler flap, press it in the
direction of arrow :.
X Drive faster than 15 km/h.
The Refill AdBlue See Owner’s Man‐
Refill AdBlue See Owner’s Man‐
ual
ual message goes out after approximately
one minute.
If the Refill Refill AdBlue
AdBlueSee
SeeOwner’s
Owner’s Manual
Manual
message continues to be shown in the multi-
function display, you must top up with more
AdBlue ®
. Charging the high-voltage battery
(PLUG-IN HYBRID vehicles) Important safety notes
G
DANGER
The vehicle's high voltage electrical system is under high voltage. If you modify components
in the vehicle's high-voltage electrical system or touch damaged components, you may be
electrocuted. The components in the vehi-
cle's high-voltage electrical system may be
damaged in an accident, although the damage
is not visible. There is a risk of fatal injury.
Do not touch any high-voltage components
after an accident and never modify the vehi-
cle's high-voltage electrical system. Have the vehicle towed away after an accident and the vehicle's high-voltage electrical system
checked by a qualified specialist workshop. G
WARNING
In the event of a vehicle fire, the internal pres- sure of the high-voltage battery could exceeda critical value. In this case, flammable gas
escapes through a vent valve in the vehicle's
underbody. The gas can ignite. There is a risk
of injury.
Leave the danger area immediately. Secure
the danger area at a suitable distance, whilst
observing legal requirements. G
DANGER
Connecting the charging cable to the mains
supply via incorrectly installed mains sockets or by means of adapters, extension cables or
similar could cause a fire or an electric shock. There is a risk of fatal injury.
To avoid such risks, observe the following:
R Only connect the charging cable to mains
sockets:
- which have been properly installed and
- which have been inspected by a qualified
electrician
R For safety reasons, only use charging
cables which have been supplied with the
vehicle or which have been approved for
this vehicle.
R Never use a damaged charging cable.
R Do not use:
- extension cables
- extension reels
- multi-outlet sockets
R Never use socket adapters to connect the
charging cable to the mains socket. The
only exception is if the adapter has been
tested and approved by the manufacturer
for charging the high-voltage battery of an
electric vehicle.
R Observe the safety notes in the operating
instructions for the socket adapter. G
DANGER
Connecting the charging cable to the wallbox via an incorrectly installed wallbox or adapter, 210
Charging the high-voltage battery (PLUG-IN HYBRID vehicles)Driving and parking
Page 216 of 497
Reset the building's circuit breaker. Other-
wise, the charging process cannot be contin- ued.
General information on the charging
process Observe the "Important safety notes"
(Y page 210).
The vehicle socket is located in the rear
bumper on the right below the tail lamp.
The charge socket flap and the vehicle are
centrally locked or unlocked simultaneously. Charging the high-voltage battery via
the mains socket
Charging cable for mains sockets Important safety notes
! Only use the charging cable to charge the
high-voltage battery. Do not use the charg-
ing cable for other purposes. It may other-
wise be damaged.
The vehicle is supplied with a charging cable
for connection to a mains socket. Only use
the charging cable supplied with the vehicle
or a charging cable approved for the vehicle.
i The charging process can vary depending
on the mains power supply. Therefore,
always observe the local information.
i For short charge times (charging with 16
A), connect the fast-charging cable to the
wallbox or charging station. You can also
use the optionally available charging cable
with the CE plug.
Information about charging from a wallbox
can be found at (Y page 216).
Information about charging at a charging sta-
tion can be found at (Y page 217).
Stowing the charging cable
The charging cable can be stowed in the bag
supplied in the luggage compartment of the vehicle and held in place with the Velcro fas-
tener.
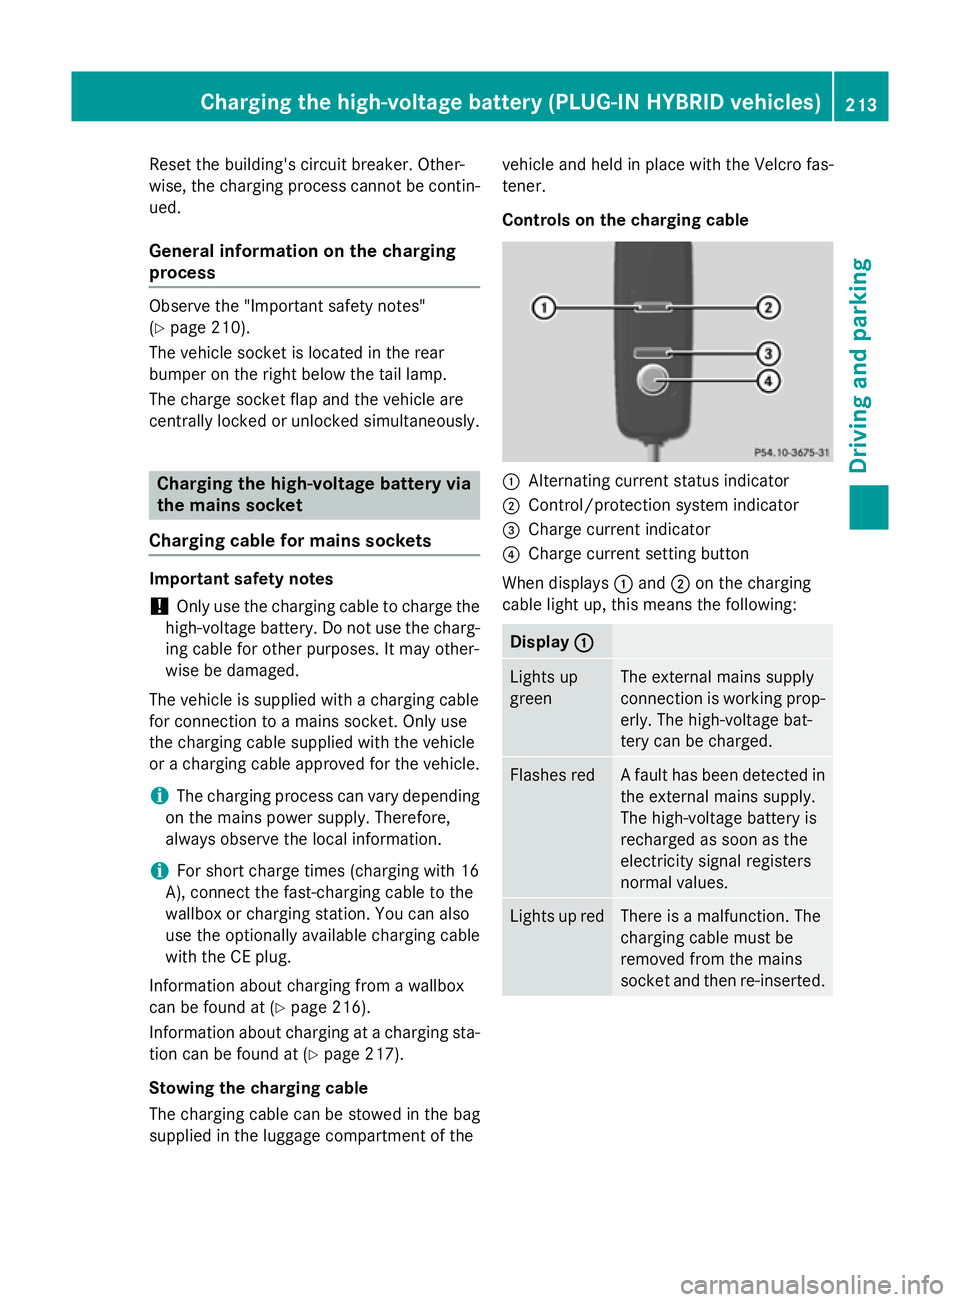
Controls on the charging cable
:
Alternating current status indicator
; Control/protection system indicator
= Charge current indicator
? Charge current setting button
When displays :and ;on the charging
cable light up, this means the following: Display
:
: Lights up
green The external mains supply
connection is working prop-
erly. The high-voltage bat-
tery can be charged. Flashes red A fault has been detected in
the external mains supply.
The high-voltage battery is
recharged as soon as the
electricity signal registers
normal values. Lights up red There is a malfunction. The
charging cable must be
removed from the mains
socket and then re-inserted.Cha
rging the high-voltage battery (PLUG-IN HYBRI D vehicles)
213Driving and parking Z
Page 218 of 497
Right indi-
cator lamp
Ý Ý
Flashes
orange The connection between
the vehicle and the current
source is being established
before charging begins.
Flashes
green The high-voltage battery is
charging.
Flashes red A malfunction has occurred
while charging.
The indicator lamp goes out
after approximately
90 seconds. Lights up
orange Charging of the high-voltage
battery has been tempora-
rily interrupted.
The indicator lamp goes out
after approximately
90 seconds. Lights up
green The high-voltage battery is
fully charged.
The indicator lamp goes out
after approximately
90 seconds. i
If the indicator lamps are off, lock or
unlock the vehicle. The indicator lamps will then display the current status of the charg-ing process again. Connecting the charging cable
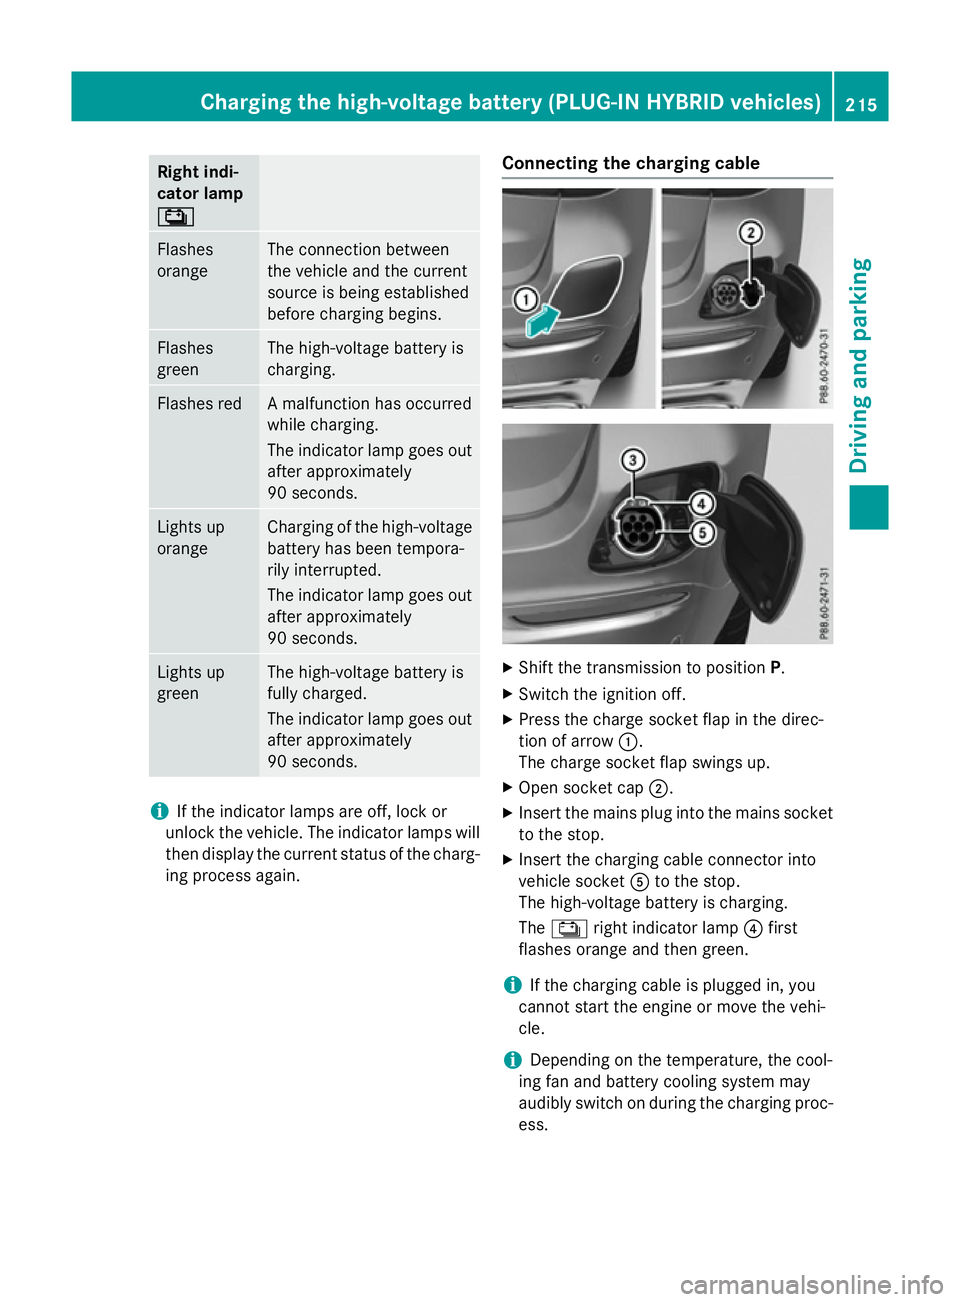
X
Shift the transmission to position P.
X Switch the ignition off.
X Press the charge socket flap in the direc-
tion of arrow :.
The charge socket flap swings up.
X Open socket cap ;.
X Insert the mains plug into the mains socket
to the stop.
X Insert the charging cable connector into
vehicle socket Ato the stop.
The high-voltage battery is charging.
The Ý right indicator lamp ?first
flashes orange and then green.
i If the charging cable is plugged in, you
cannot start the engine or move the vehi-
cle.
i Depending on the temperature, the cool-
ing fan and battery cooling system may
audibly switch on during the charging proc- ess. Charging the high-voltage battery (PLUG-IN HYBRID vehicles)
215Driving and parking Z
Page 219 of 497
Removing the charging cable
The high-voltage battery is fully charged
when:
R the charge level display reaches 100% in
the multifunction display
R the indicator lamp in the vehicle socket
lights up green after unlocking or locking
the vehicle
You can find information on the charge status indicator in the multifunction display in
"PLUG-IN HYBRID operation", section
"Menus and submenus" under "Energy flow
display" (Y page 291).
i After the charging cable has been discon-
nected, the indicator lamps in the vehicle
socket remain lit for some time before
switching off.
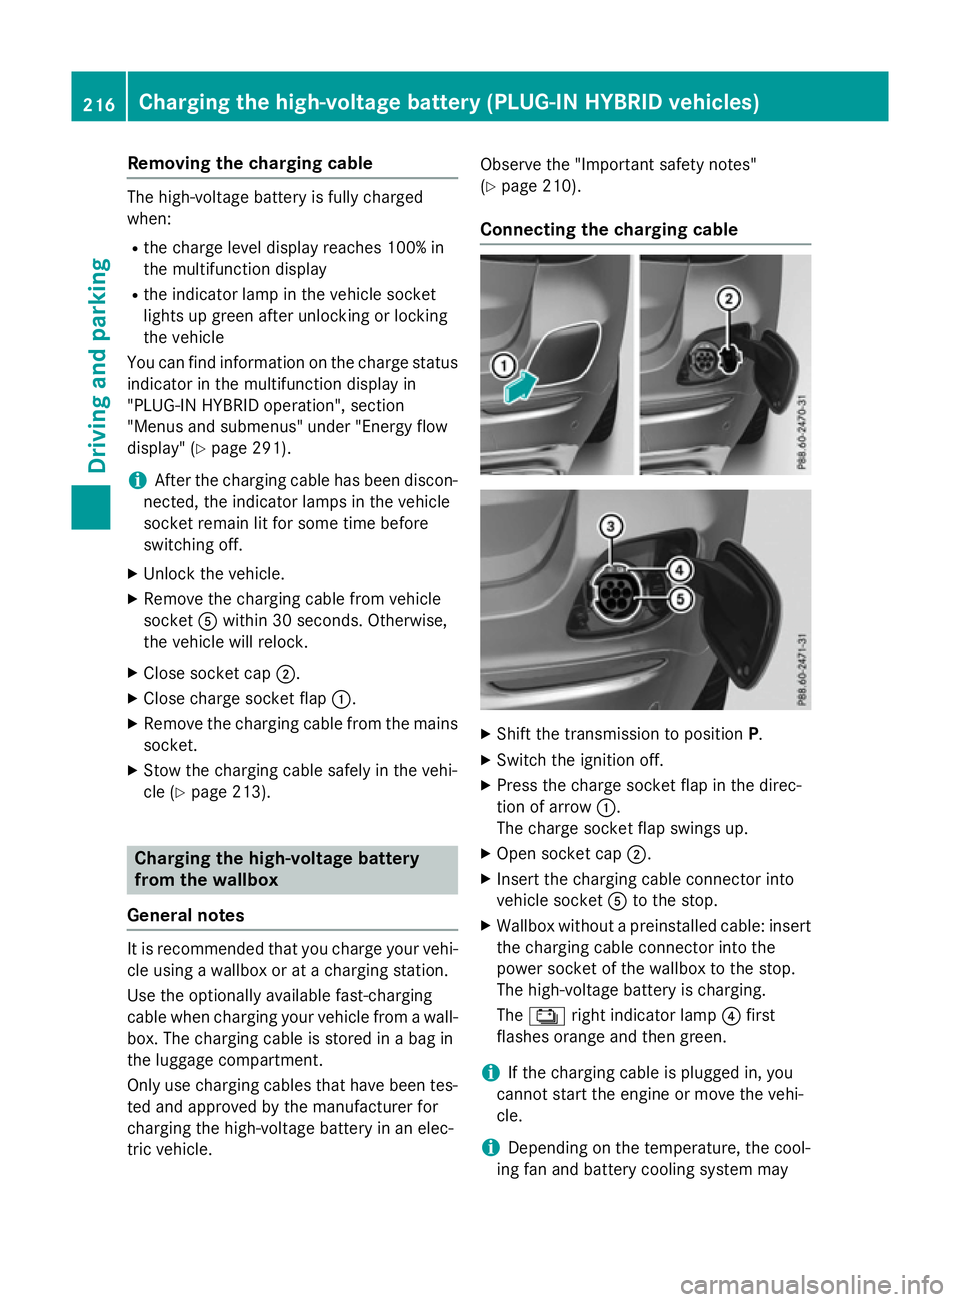
X Unlock the vehicle.
X Remove the charging cable from vehicle
socket Awithin 30 seconds. Otherwise,
the vehicle will relock.
X Close socket cap ;.
X Close charge socket flap :.
X Remove the charging cable from the mains
socket.
X Stow the charging cable safely in the vehi-
cle (Y page 213). Charging the high-voltage battery
from the wallbox
General notes It is recommended that you charge your vehi-
cle using a wallbox or at a charging station.
Use the optionally available fast-charging
cable when charging your vehicle from a wall- box. The charging cable is stored in a bag in
the luggage compartment.
Only use charging cables that have been tes-ted and approved by the manufacturer for
charging the high-voltage battery in an elec-
tric vehicle. Observe the "Important safety notes"
(Y
page 210).
Connecting the charging cable X
Shift the transmission to position P.
X Switch the ignition off.
X Press the charge socket flap in the direc-
tion of arrow :.
The charge socket flap swings up.
X Open socket cap ;.
X Insert the charging cable connector into
vehicle socket Ato the stop.
X Wallbox without a preinstalled cable: insert
the charging cable connector into the
power socket of the wallbox to the stop.
The high-voltage battery is charging.
The Ý right indicator lamp ?first
flashes orange and then green.
i If the charging cable is plugged in, you
cannot start the engine or move the vehi-
cle.
i Depending on the temperature, the cool-
ing fan and battery cooling system may 216
Charging the high-voltage battery (PLUG-IN HYBRID vehicles)Driving and parking