2015 MERCEDES-BENZ G-CLASS SUV ignition
[x] Cancel search: ignitionPage 87 of 274
interrupted, e.g. if the battery has been com-pletely discharged or disconnected.
X Make sure that the cup holder on the center
console is folded down ( Ypage 197).
X Move the seat as far forward as possible
and the head restraint in as far as possible.
Rear seat head restraints
Important safety notes
GWARNING
If head restraints are not installed and adjus-
ted correctly, they cannot provide protection
as intended. There is an increased risk of
injury in the head and neck area, e.g. in the
event of an accident or when braking.
Always drive with the head restraints instal-
led. Before driving off, make sure for every
vehicle occupant that the center of the head
restraint supports the back of the head at
about eye level.
Observe the following when adjusting the
head restraints: X Do not rotate the head restraints of the
front and rear seats.
Otherwise, you cannot adjust the height
and angle of the head restraints correctly.
X Adjust the head restraint so that it is as
close as possible to your head.
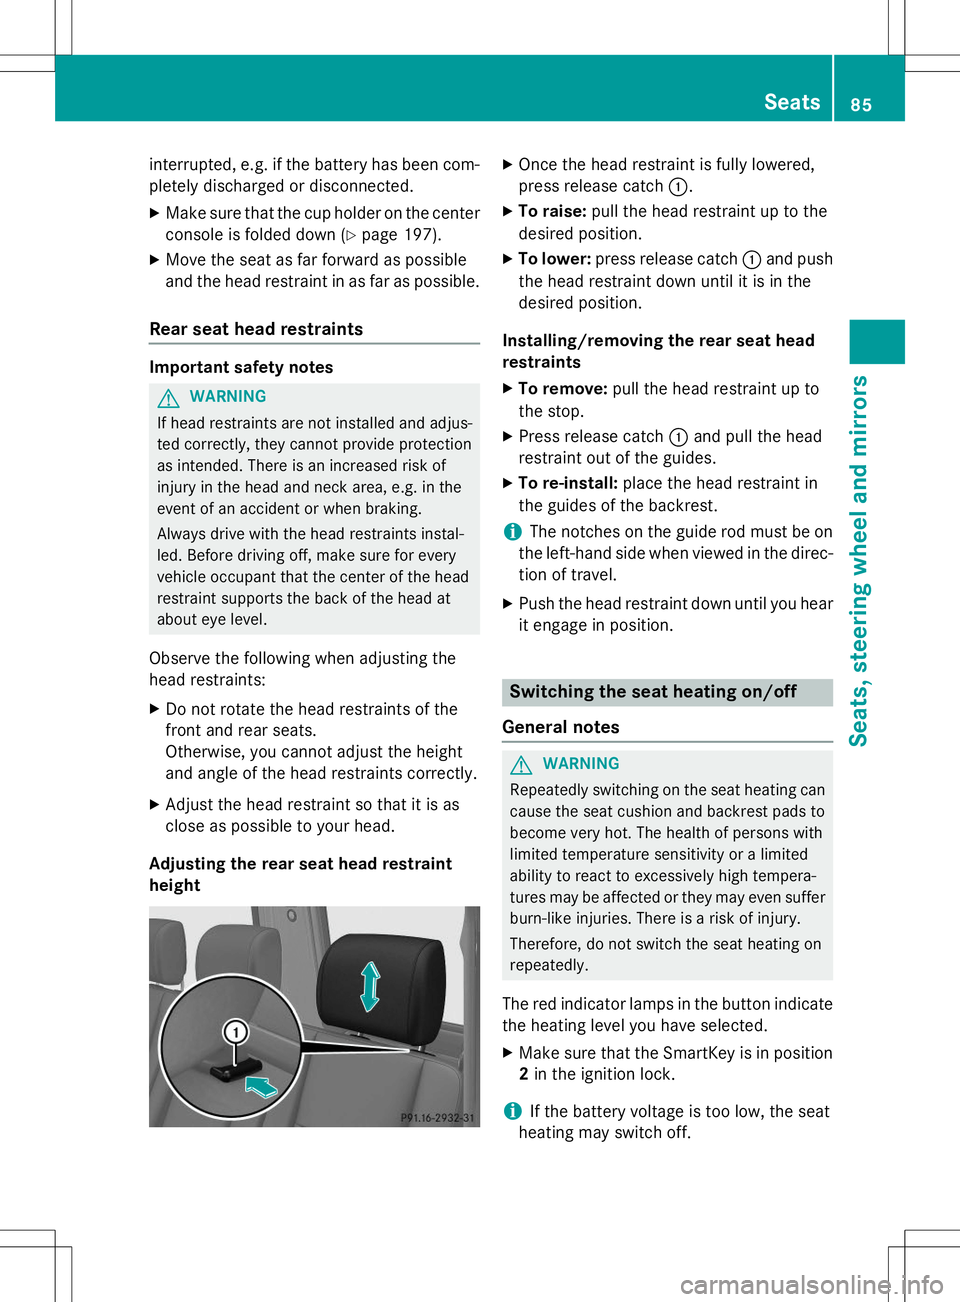
Adjusting the rear seat head restraintheight
X Once the head restraint is fully lowered,
press release catch :.
X To raise: pull the head restraint up to the
desired position.
X To lower: press release catch :and push
the head restraint down until it is in the
desired position.
Installing/removing the rear seat head
restraints
X To remove: pull the head restraint up to
the stop.
X Press release catch :and pull the head
restraint out of the guides.
X To re-install: place the head restraint in
the guides of the backrest.
iThe notches on the guide rod must be on
the left-hand side when viewed in the direc- tion of travel.
X Push the head restraint down until you hear
it engage in position.
Switching the seat heating on/off
General notes
GWARNING
Repeatedly switching on the seat heating can
cause the seat cushion and backrest pads to
become very hot. The health of persons with
limited temperature sensitivity or a limited
ability to react to excessively high tempera-
tures may be affected or they may even suffer burn-like injuries. There is a risk of injury.
Therefore, do not switch the seat heating on
repeatedly.
The red indicator lamps in the button indicate the heating level you have selected.
X Make sure that the SmartKey is in position
2 in the ignition lock.
iIf the battery voltage is too low, the seat
heating may switch off.
Seats85
Seats, steering wheel and mirrors
Z
Page 88 of 274
One or more of the indicator lamps in the
seat heating button are flashing.
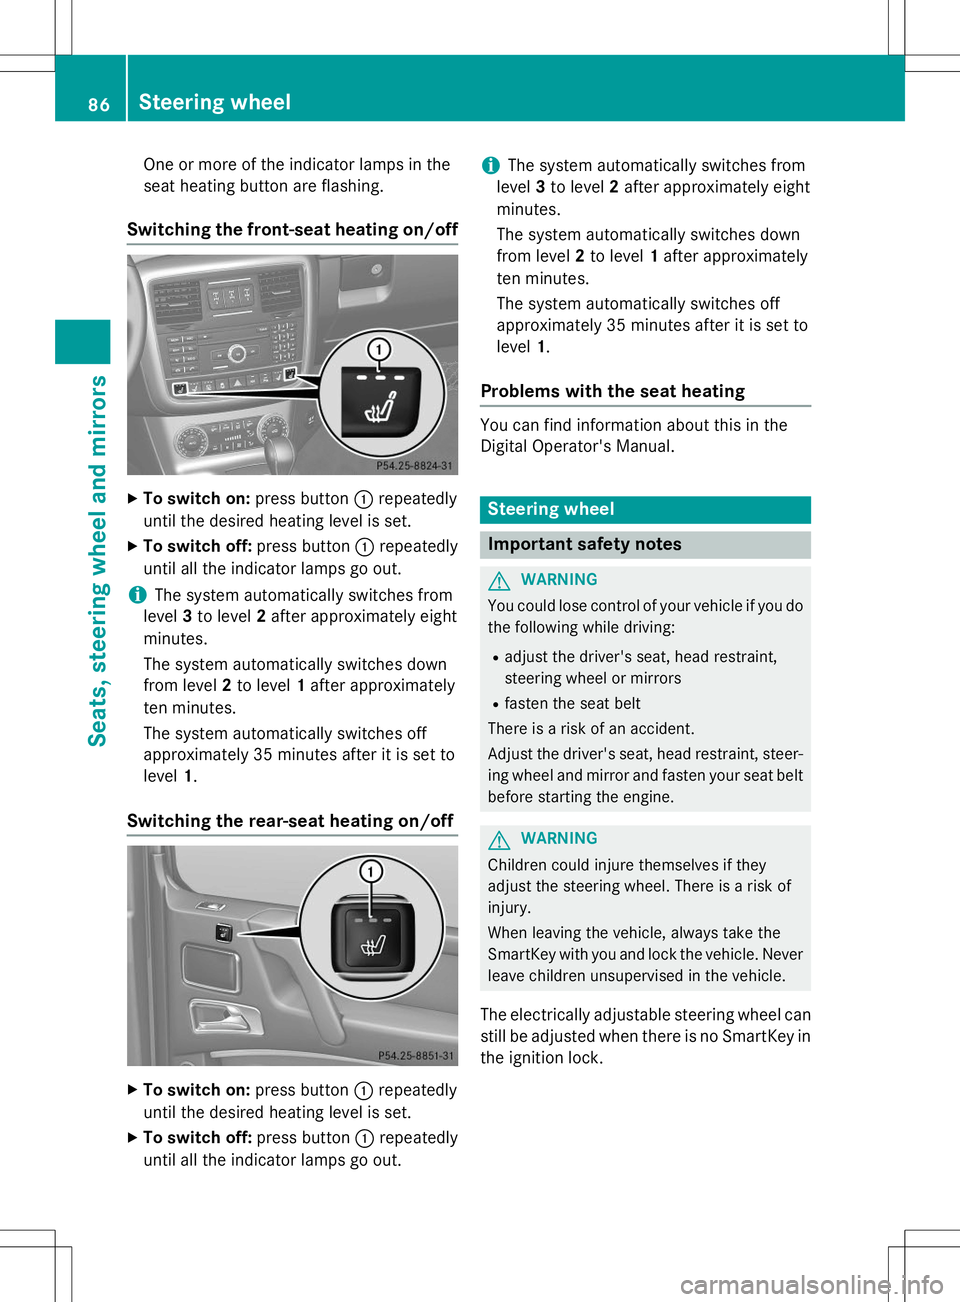
Switching the front-seat heating on/off
XTo switch on: press button:repeatedly
until the desired heating level is set.
X To switch off: press button:repeatedly
until all the indicator lamps go out.
iThe system automatically switches from
level 3to level 2after approximately eight
minutes.
The system automatically switches down
from level 2to level 1after approximately
ten minutes.
The system automatically switches off
approximately 35 minutes after it is set tolevel 1.
Switching the rear-seat heating on/off
X
To switch on: press button:repeatedly
until the desired heating level is set.
X To switch off: press button:repeatedly
until all the indicator lamps go out.
iThe system automatically switches from
level 3to level 2after approximately eight
minutes.
The system automatically switches down
from level 2to level 1after approximately
ten minutes.
The system automatically switches off
approximately 35 minutes after it is set tolevel 1.
Problems with the seat heating
You can find information about this in the
Digital Operator's Manual.
Steering wheel
Important safety notes
GWARNING
You could lose control of your vehicle if you do
the following while driving:
R adjust the driver's seat, head restraint,
steering wheel or mirrors
R fasten the seat belt
There is a risk of an accident.
Adjust the driver's seat, head restraint, steer-
ing wheel and mirror and fasten your seat belt before starting the engine.
GWARNING
Children could injure themselves if they
adjust the steering wheel. There is a risk ofinjury.
When leaving the vehicle, always take the
SmartKey with you and lock the vehicle. Neverleave children unsupervised in the vehicle.
The electrically adjustable steering wheel can
still be adjusted when there is no SmartKey in
the ignition lock.
86Steering wheel
Seats, steering wheel and mirrors
Page 93 of 274

If you hear a warning tone when you leave the
vehicle, the lights may still be switched on.X Turn the light switch to Ã.
The turn signals, high-beam headlamps and
the high-beam flasher are operated using the combination switch ( Ypage 92).
The exterior lighting (except the parking/
standing lamps) switches off automatically if
you:
R remove the SmartKey from the ignition lock
R open the driver's door with the SmartKey in
position 0
Low-beam headlamps
X
To switch on the low-beam headlamps:
turn the SmartKey in the ignition lock to
position 2or start the engine.
X Turn the light switch to L.
The L indicator lamp in the instrument
cluster lights up.
Fog lamps (except AMG vehicles)
GWARNING
When the light switch is set to Ã, the low-
beam headlamps may not be switched on
automatically if there is fog, snow or other
causes of poor visibility due to the weather
conditions such as spray. There is a risk of anaccident.
In such situations, turn the light switch to L .
The automatic headlamp feature is only an
aid. The driver is responsible for the vehicle's lighting at all times. X To switch on the fog lamps: turn the
SmartKey in the ignition lock to position 2
or start the engine.
X Turn the light switch to T,L or
à . X
Press the Nbutton.
The green Nindicator lamp in the instru-
ment cluster lights up.
X To switch off the fog lamps: press the
N button.
The green Nindicator lamp in the instru-
ment cluster goes out.
Only vehicles with front fog lamps have the
fog lamps function.
Rear fog lamp
X To switch on the rear fog lamp: turn the
SmartKey in the ignition lock to position 2
or start the engine.
X Turn the light switch to Lorà .
X Press the Rbutton.
The yellow Rindicator lamp in the
instrument cluster lights up.
X To switch off the rear fog lamp: press the
R button.
The yellow Rindicator lamp in the
instrument cluster goes out.
Parking lamps
X To switch on: turn the light switch to T.
Standing lamps
Switching on the standing lamps ensures the
corresponding side of the vehicle is illumina- ted.
X To switch on the standing lamps: the
SmartKey is not inserted in the ignition lock
or it is in position 0(Y page 103).
X Turn the light switch to W(left-hand side
of the vehicle) or X(right-hand side of
the vehicle).
Exterior lighting91
Lights and windshield wipers
Z
Page 97 of 274

XLightly press bulb ?, turn it counter-clock-
wise and pull it out.
X Insert the new bulb and, applying slight
pressure, turn it clockwise until it engages.
X Insert the bulb holder into housing ;.
X Attach dust cover =.
X Insert housing ;.
X Replace and tighten screws :.
Windshield wipers
Switching the windshield wipers
on/off
If the wiper blades are worn, the windshield
will no longer be wiped properly. This could
prevent you from observing the traffic condi-
tions, thereby causing an accident.
Combination switch 1
$ Windshield wipers off
2ÄIntermittent wipe, low (rain sensor
set to low sensitivity)
3Å Intermittent wipe, high (rain sensor
set to high sensitivity)
4° Continuous wipe, slow
5¯Continuous wipe, fast
BíSingle wipe
CîTo wipe with washer fluid
X Switch on the ignition.
X Turn the combination switch to the corre-
sponding position.
In the ÄorÅ position, the appropriate
wiping frequency is set automatically accord-
ing to the intensity of the rain. In the Å
position, the rain sensor is more sensitive
than in the Äposition, causing the wind-
shield wipers to wipe more frequently.
Switching the rear window wiper on/ off
Combination switch :
è Switch
2bWipes with washer fluid
3ISwitches on intermittent wiping
40 Switches off intermittent wiping
5b Wipes with washer fluid
X Turn the SmartKey to position 1or 2in the
ignition lock.
X Turn switch :on the combination switch
to the corresponding position.
When the rear window wiper is switched on,
the icon appears in the instrument cluster.
iThe rear window wiper comes on auto-
matically if you shift the selector lever to R
while the windshield wiper are on.
Windshield wipers95
Lights and windshield wipers
Z
Page 98 of 274
Replacing the wiper blades
Important safety notes
GWARNING
If the windshield wipers begin to move while
you are changing the wiper blades, you could be trapped by the wiper arm. There is a risk of
injury.
Always switch off the windshield wipers and
ignition before changing the wiper blades.
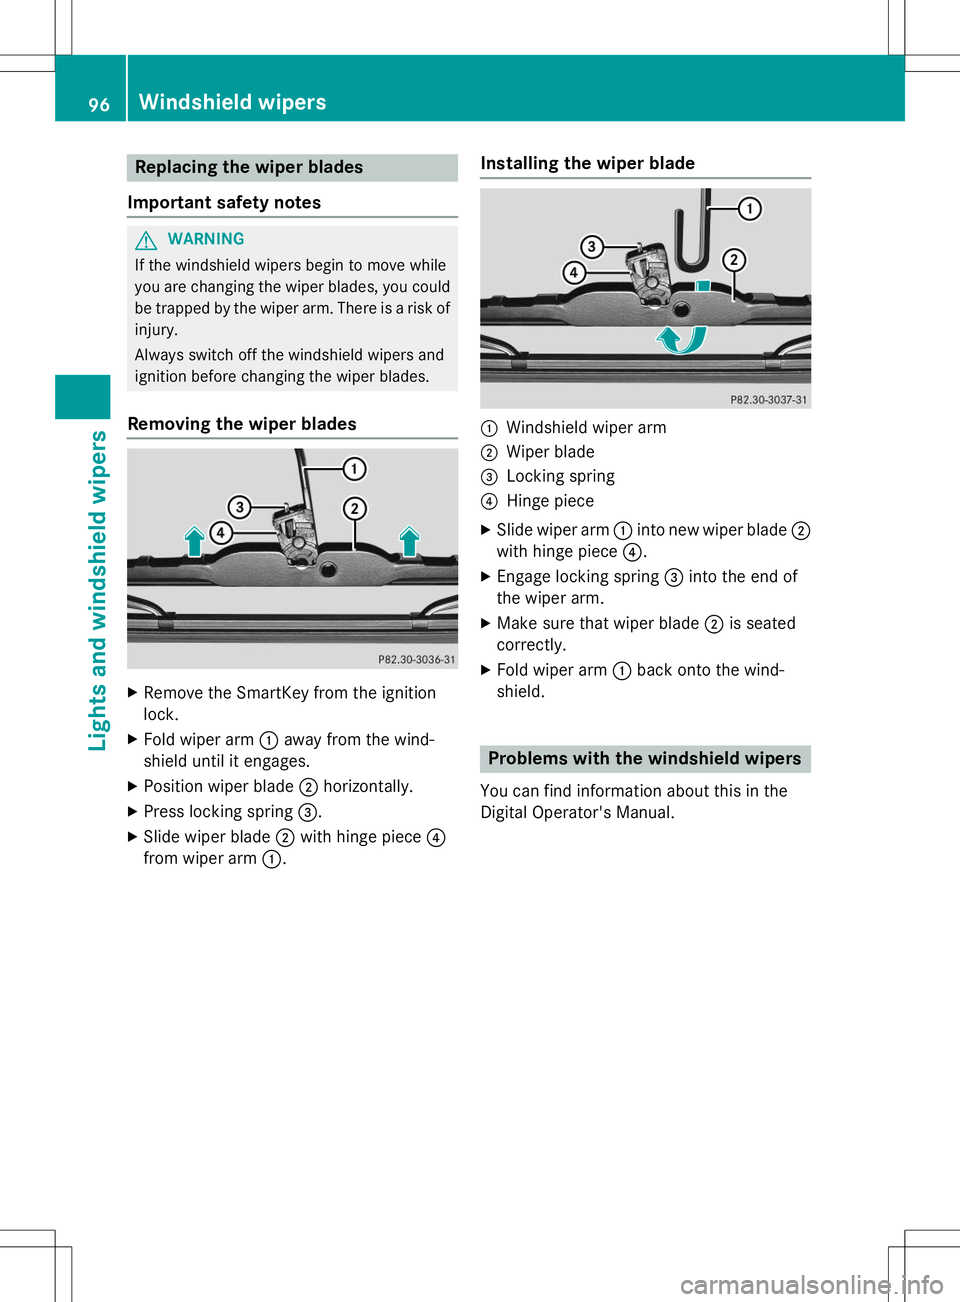
Removing the wiper blades
X Remove the SmartKey from the ignition
lock.
X Fold wiper arm :away from the wind-
shield until it engages.
X Position wiper blade ;horizontally.
X Press locking spring =.
X Slide wiper blade ;with hinge piece ?
from wiper arm :.
Installing the wiper blade
:Windshield wiper arm
;Wiper blade
=Locking spring
?Hinge piece
X Slide wiper arm :into new wiper blade ;
with hinge piece ?.
X Engage locking spring =into the end of
the wiper arm.
X Make sure that wiper blade ;is seated
correctly.
X Fold wiper arm :back onto the wind-
shield.
Problems with the windshield wipers
You can find information about this in the
Digital Operator's Manual.
96Windshield wipers
Lights and windshield wipers
Page 105 of 274
the driver's footwell. Install the floormats
securely and as specified in order to ensure
sufficient clearance for the pedals. Do not useloose floormats and do not place floormats ontop of one another.
GWARNING
Unsuitable footwear can hinder correct usage of the pedals, e.g.:
R shoes with thick soles
R shoes with high heels
R slippers
There is a risk of an accident.
Wear suitable footwear to ensure correct
usage of the pedals.
GWARNING
If you switch off the ignition while driving,
safety-relevant functions are only available
with limitations, or not at all. This could affect, for example, the power steering and the brake
boosting effect. You will require considerably
more effort to steer and brake. There is a risk
of an accident.
Do not switch off the ignition while driving.
GWARNING
If the parking brake has not been fully
released when driving, the parking brake can:
R overheat and cause a fire
R lose its hold function.
There is a risk of fire and an accident. Release
the parking brake fully before driving off.
!Warm up the engine quickly. Do not use
the engine's full performance until it has
reached operating temperature.
Only shift the automatic transmission to
the desired drive position when the vehicle
is stationary.
Where possible, avoid spinning the drive
wheels when pulling away on slippery
roads. You could otherwise damage the
drive train.
!Avoid high engine speeds when the
engine is cold. The engine's service life
could otherwise be significantly shortened.
Do not use the engine's full performance
until it has reached operating temperature.
!AMG vehicles: at low engine oil temper-
atures below 68 ‡ (+20 †), the maximum
engine speed is restricted in order to pro-
tect the engine. To protect the engine and
maintain smooth engine operation, avoid
driving at full throttle when the engine is
cold.
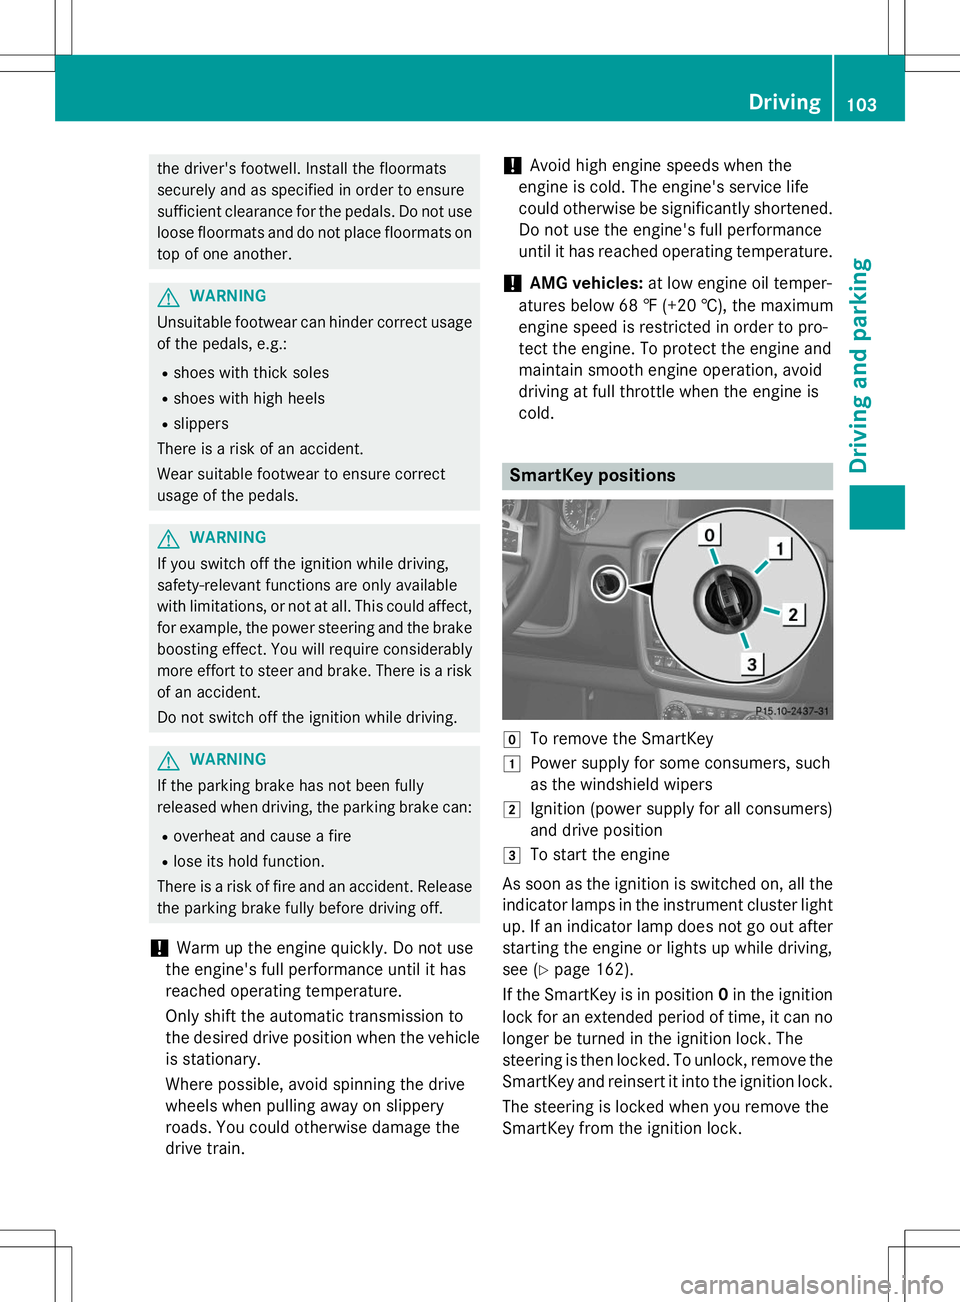
SmartKey positions
gTo remove the SmartKey
1Power supply for some consumers, such
as the windshield wipers
2Ignition (power supply for all consumers)
and drive position
3To start the engine
As soon as the ignition is switched on, all the
indicator lamps in the instrument cluster light up. If an indicator lamp does not go out after
starting the engine or lights up while driving,
see ( Ypage 162).
If the SmartKey is in position 0in the ignition
lock for an extended period of time, it can no
longer be turned in the ignition lock. The
steering is then locked. To unlock, remove the SmartKey and reinsert it into the ignition lock.
The steering is locked when you remove the
SmartKey from the ignition lock.
Driving103
Driving an d parking
Z
Page 106 of 274
XRemove the SmartKey when the engine is
switched off.
The starter battery could otherwise be dis-
charged.
If you cannot turn the SmartKey in the ignition
lock, the starter battery may not be charged
sufficiently. X Check the starter battery and charge it if
necessary ( Ypage 219).
or
X Jump-start the vehicle ( Ypage 220).
iYou can only remove the SmartKey if:
R the SmartKey is in position 0in the igni-
tion lock.
R the automatic transmission selector
lever is in P.
Starting the engine
Important safety notes
GWARNING
Combustion engines emit poisonous exhaust
gases such as carbon monoxide. Inhaling
these exhaust gases leads to poisoning. There is a risk of fatal injury. Therefore never leave
the engine running in enclosed spaces with-
out sufficient ventilation.
GWARNING
Flammable materials introduced through
environmental influence or by animals can
ignite if in contact with the exhaust system orparts of the engine that heat up. There is a risk
of fire.
Carry out regular checks to make sure that
there are no flammable foreign materials in
the engine compartment or in the exhaust
system.
!Do not depress the accelerator when
starting the engine.
Starting procedure
X Shift the automatic transmission to posi-
tion P.
The transmission position display in the
multifunction display shows P.
iFor further information about the auto-
matic transmission, see ( Ypage 105).
iIf you depress the brake when starting the
engine, pedal travel is unusually long and
there is less pedal resistance.
X Make sure that the parking brake is
applied.
X Turn the SmartKey to position 3
( Y page 103) in the ignition lock and release
it as soon as the engine is running.
iYou can also use the touch-start function.
To do this, turn the SmartKey to position 3
( Y page 103) and release it immediately.
The engine then starts automatically.
Pulling away
Automatic transmission
GWARNING
If the engine speed is above the idling speed
and you engage transmission position Dor R,
the vehicle could pull away suddenly. There is a risk of an accident.
When engaging transmission position Dor R,
always firmly depress the brake pedal and do not simultaneously accelerate.
!Only shift the automatic transmission to
reverse gear Ror park position Pwhen the
vehicle is stationary. Otherwise, the auto-
matic transmission could be damaged.
!Do not depress the accelerator pedal
while depressing the brake pedal. This
impairs engine performance and results in
premature wear on the brake system and
drivetrain.
104Driving
Driving and pa rking
Page 108 of 274

The vehicle may roll away. There is a risk of anaccident.
After switching off the engine, always switch
to parking position P. Prevent the parked vehi-
cle from rolling away by applying the parkingbrake.
iBear in mind that the power transmission
between the engine and the transmission is interrupted when the engine is switched
off. For this reason, shift the automatic
transmission to Pwhen the engine is
switched off and the vehicle is at a stand-
still. Apply the parking brake to prevent the vehicle from rolling away.
Selector lever
Overview of transmission positions
!If the engine speed is too high or if the
vehicle is rolling, do not shift the transmis-
sion directly from Dto R, from Rto Dor
directly to P.
Do not open the driver's door while the
vehicle is in motion. At low speeds in trans-
mission position Dor R, park position Pis
otherwise engaged automatically.
The transmission could be damaged.
Selector lever j
Park position
kReverse gear
iNeutral
hDrive In the Digital Operator's Manual you will find
information on the following topics: R
Engaging park position P
R Engaging reverse gear R
R Engaging neutral N
R Neutral Nin the ECO start/stop function
(AMG vehicles)
R Shifting to transmission position D
R Transmission position Din the ECO start/
stop function (AMG vehicles)
Transmission position and drive pro-
gram display
!If the transmission position display in the
multifunction display is not working, you
should pull away carefully to check whether the desired transmission position is
engaged. Select transmission position D.
Do not restrict the shift range.
:Transmission position
;Drive program
Current transmission position :and current
drive program ;appear in the multifunction
display.
The current position of the selector lever is
shown by the indicators next to the selectorlever.
The indicators light up when the SmartKey is inserted into the ignition lock. The indicators go out when the SmartKey is removed from
the ignition lock.
When the selector lever is in position D, you
can influence the gearshifts made by the
automatic transmission by:
R restricting the shift range
R changing gear yourself
106Automatic transmission
Driving and parking