2015 MERCEDES-BENZ G-CLASS SUV manual transmission
[x] Cancel search: manual transmissionPage 112 of 274
Problems with the fuel and fuel tank
ProblemPossible causes/consequences andMSolutions
Fuel is leaking from the
vehicle.The fuel line or the fuel tank is defective.
GWARNING
Risk of explosion or fire.
X Turn the SmartKey to position 0(Y page 103) immediately and
remove it.
X Do not restart the engine under any circumstances.
X Consult a qualified specialist workshop.
The fuel filler flap can-
not be opened.The fuel filler flap is not unlocked. or
The SmartKey batteries are discharged. X Unlock the vehicle ( Ypage 72).
or
X Unlock the vehicle using the mechanical key ( Ypage 73).
X Open the rear door.
X Manually unlock the fuel filler flap using the emergency release (Y page 109).
The fuel filler flap is unlocked, but the opening mechanism is jam- med.
X Manually unlock the fuel filler flap using the emergency release(Y page 109).
X Consult a qualified specialist workshop.
Parking
Important safety notes
GWARNING
If you leave children unsupervised in the vehi-
cle, they could set it in motion by, for example:
R release the parking brake.
R shift the automatic transmission out of the
parking position P.
R start the engine.
In addition, they may operate vehicle equip-
ment and become trapped. There is a risk of
an accident and injury.
When leaving the vehicle, always take the
SmartKey with you and lock the vehicle. Never leave children unsupervised in the vehicle.
GWARNING
Flammable material such as leaves, grass or
twigs may ignite if they come into contact withhot parts of the exhaust system or exhaust
gas flow. There is a risk of fire.
Park the vehicle so that no flammable mate-
rials come into contact with parts of the vehi- cle which are hot. Take particular care not to
park on dry grassland or harvested grainfields.
110Parking
Driving and parking
Page 113 of 274
GWARNING
If you switch off the ignition while driving,
safety-relevant functions are only available
with limitations, or not at all. This could affect,for example, the power steering and the brake
boosting effect. You will require considerably
more effort to steer and brake. There is a risk
of an accident.
Do not switch off the ignition while driving.
Switching off the engine
Important safety notes
GWARNING
If you switch off the ignition while driving,
safety-relevant functions are only available
with limitations, or not at all. This could affect, for example, the power steering and the brake
boosting effect. You will require considerably
more effort to steer and brake. There is a risk
of an accident.
Do not switch off the ignition while driving.
GWARNING
The automatic transmission switches to neu-
tral position Nwhen you switch off the engine.
The vehicle may roll away. There is a risk of an
accident.
After switching off the engine, always switch
to parking position P. Prevent the parked vehi-
cle from rolling away by applying the parkingbrake.
Information in the Digital Operator'sManual
A description of how to switch off the engine
can be found in the Digital Operator's Manual.
Parking brake
GWARNING
If you must brake the vehicle with the parking brake, the braking distance is considerably
longer and the wheels could lock. There is anincreased danger of skidding and accidents.
Only use the parking brake to brake the vehi-cle when the service brake is faulty. Do not
apply the parking brake too firmly. If the
wheels lock, release the parking brake until
the wheels begin turning again.
GWARNING
If you leave children unsupervised in the vehi- cle, they could set it in motion by, for example:
R release the parking brake.
R shift the automatic transmission out of the
parking position P.
R start the engine.
In addition, they may operate vehicle equip-
ment and become trapped. There is a risk of
an accident and injury.
When leaving the vehicle, always take the
SmartKey with you and lock the vehicle. Never
leave children unsupervised in the vehicle.
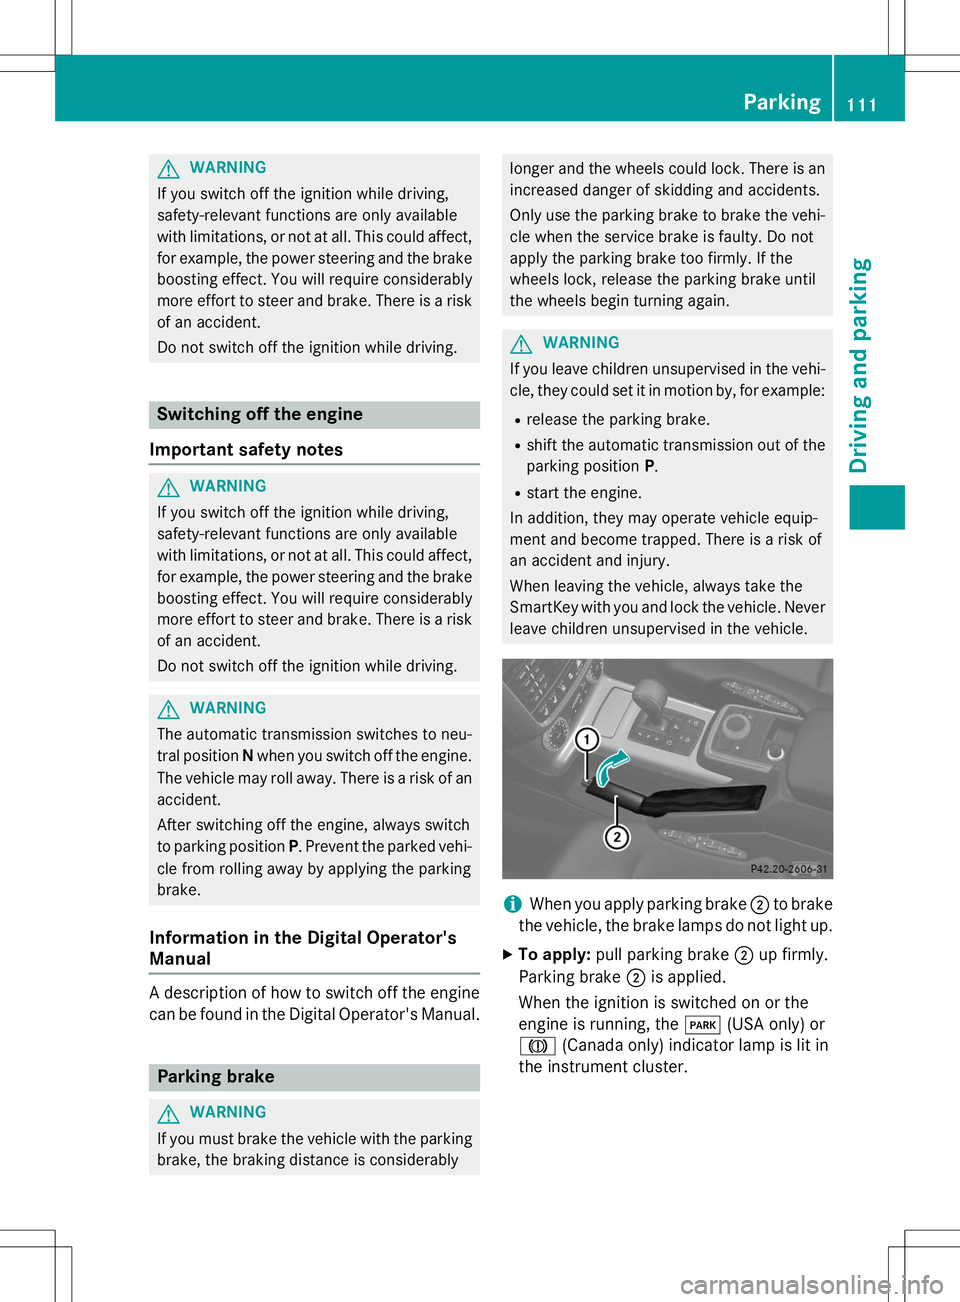
iWhen you apply parking brake ;to brake
the vehicle, the brake lamps do not light up.
X To apply: pull parking brake ;up firmly.
Parking brake ;is applied.
When the ignition is switched on or the
engine is running, the F(USA only) or
J (Canada only) indicator lamp is lit in
the instrument cluster.
Parking111
Driving and parking
Z
Page 121 of 274
iCanada only: This device complies with
RSS-210 of Industry Canada. Operation is
subject to the following two conditions:
1. This device may not cause harmful inter- ference, and
2. This device must accept any interference
received, including interference that may
cause undesired operation of the device.
Removal, tampering, or altering of the
device will void any warranties, and is not
permitted. Do not tamper with, alter, or use
in any non-approved way.
Any unauthorized modification to this
device could void the user's authority to
operate the equipment.
Information in the Digital Operator's
Manual
In the Digital Operator's Manual you will find
information on the following topics: R Setting a speed
R Setting the specified minimum distance
R DISTRONIC PLUS displays in the instru-
ment cluster
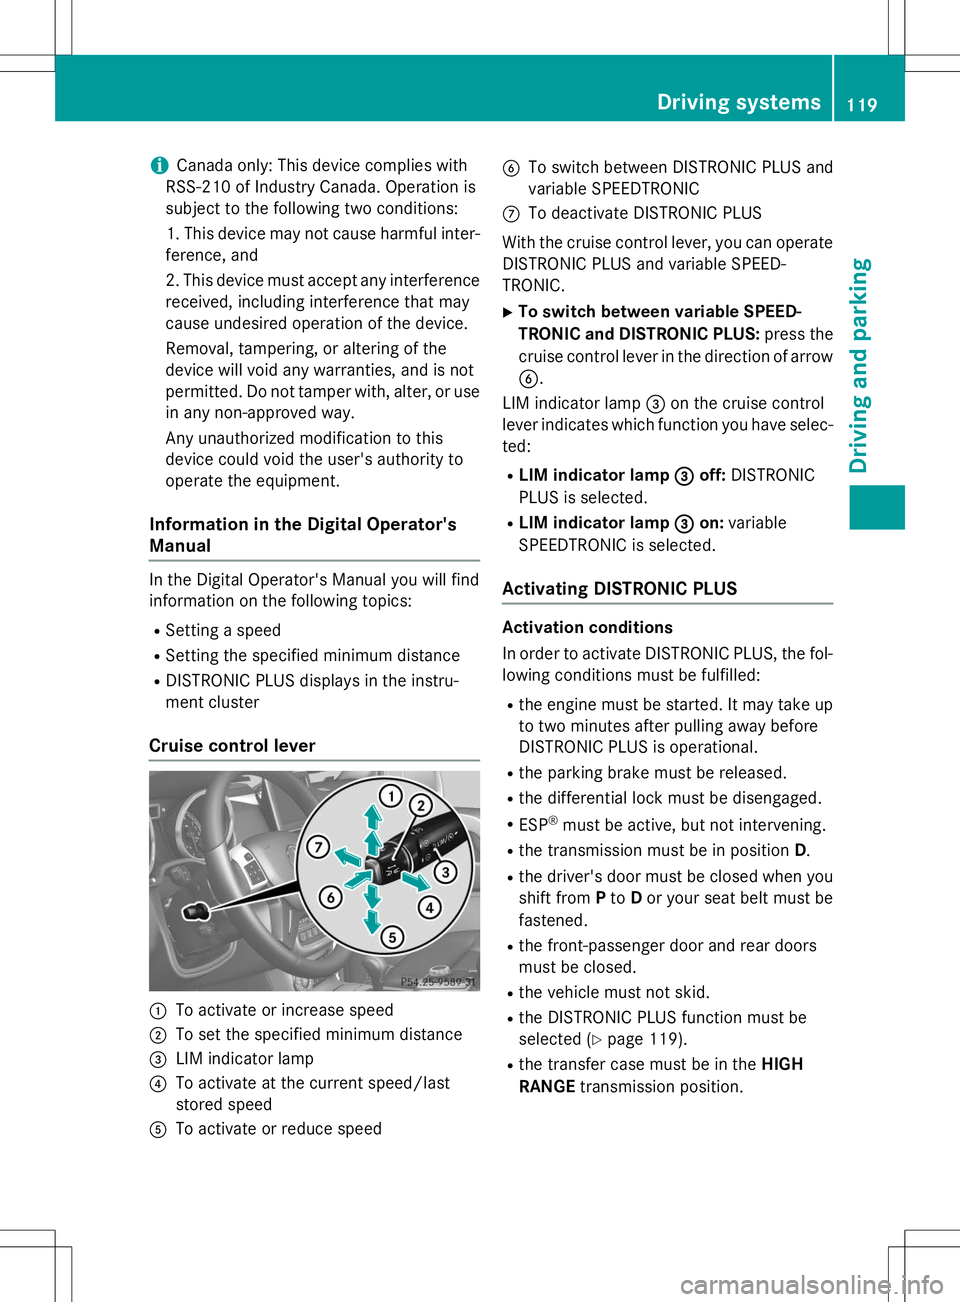
Cruise control lever
:To activate or increase speed
;To set the specified minimum distance
=LIM indicator lamp
?To activate at the current speed/last
stored speed
ATo activate or reduce speed
BTo switch between DISTRONIC PLUS and
variable SPEEDTRONIC
CTo deactivate DISTRONIC PLUS
With the cruise control lever, you can operate
DISTRONIC PLUS and variable SPEED-
TRONIC. X To switch between variable SPEED-
TRONIC and DISTRONIC PLUS: press the
cruise control lever in the direction of arrow B .
LIM indicator lamp =on the cruise control
lever indicates which function you have selec-
ted:
R LIM indicator lamp =
off:DISTRONIC
PLUS is selected.
R LIM indicator lamp =
on:variable
SPEEDTRONIC is selected.
Activating DISTRONIC PLUS
Activation conditions
In order to activate DISTRONIC PLUS, the fol- lowing conditions must be fulfilled:
R the engine must be started. It may take up
to two minutes after pulling away before
DISTRONIC PLUS is operational.
R the parking brake must be released.
R the differential lock must be disengaged.
R ESP ®
must be active, but not intervening.
R the transmission must be in position D.
R the driver's door must be closed when you
shift from Pto Dor your seat belt must be
fastened.
R the front-passenger door and rear doors
must be closed.
R the vehicle must not skid.
R the DISTRONIC PLUS function must be
selected ( Ypage 119).
R the transfer case must be in the HIGH
RANGE transmission position.
Driving systems119
Driving and pa rking
Z
Page 129 of 274
Deactivating the HOLD function
GWARNING
When leaving the vehicle, it can still roll awaydespite being braked by the HOLD function if:
R there is a malfunction in the system or in
the voltage supply.
R the HOLD function has been deactivated by
pressing the accelerator pedal or the brake
pedal, e.g. by a vehicle occupant.
R the electrical system in the engine com-
partment, the battery or the fuses have
been tampered with.
R the battery is disconnected
There is a risk of an accident.
If you wish to exit the vehicle, always turn off the HOLD function and secure the vehicle
against rolling away.
The HOLD function is deactivated automati-
cally if: R you accelerate and the transmission is in
position Dor R.
R you shift the transmission to position P.
R you depress the brake pedal again with a
certain amount of pressure until ëdis-
appears from the multifunction display.
R you activate DISTRONIC PLUS.
On steep uphill or downhill gradients or if
there is a malfunction, the transmission may
also be automatically shifted into position P.
Permanent all-wheel drive
!
Never tow the vehicle with one axle
raised. This may damage the transfer case. Damage of this sort is not covered by the
Mercedes-Benz Limited Warranty. All
wheels must remain either on the ground or
be fully raised. Observe the instructions for
towing the vehicle with all wheels in full
contact with the ground.
!When testing the parking brake, operate
the vehicle only briefly (for a maximum of ten seconds) on a brake test dynamometer.
When doing this, turn the SmartKey to posi-
tion 0or 1in the ignition. Failure to do this
can cause damage to the drive train or the brake system.
!A function or performance test should
only be carried out on a two-axle dyna-
mometer. Before you operate the vehicle
on such a dynamometer, please consult a
qualified workshop. You could otherwise
damage the drive train or the brake system.
The all-wheel drive system ensures that all
four wheels are permanently driven. The all-
wheel drive system improves vehicle traction together with ESP ®
and 4ETS if a drive wheel
spins due to insufficient grip.
If a drive wheel spins due to insufficient grip: R Only depress the accelerator pedal as far as
necessary when pulling away.
R Take your foot off the accelerator, slowly,
while the vehicle is in motion.
The permanent all-wheel drive system can
neither reduce the risk of accident nor over-
ride the laws of physics if you fail to adapt
your driving style or if you are inattentive. The
all-wheel drive system cannot take into
account road, weather or traffic conditions.
The all-wheel drive system is only an aid. You
are responsible for maintaining a safe dis-
tance to the vehicle in front, for vehicle speed, for braking in good time and for staying in
lane.
In wintry driving conditions, always use winter
tires (M+S tires) and if necessary, snow
chains ( Ypage 232). Only in this way can the
maximum effect of all-wheel drive be ach-
ieved.
For information on driving off-road, see the
Digital Operator's Manual.
Driving syste ms127
Driving and parking
Z
Page 134 of 274
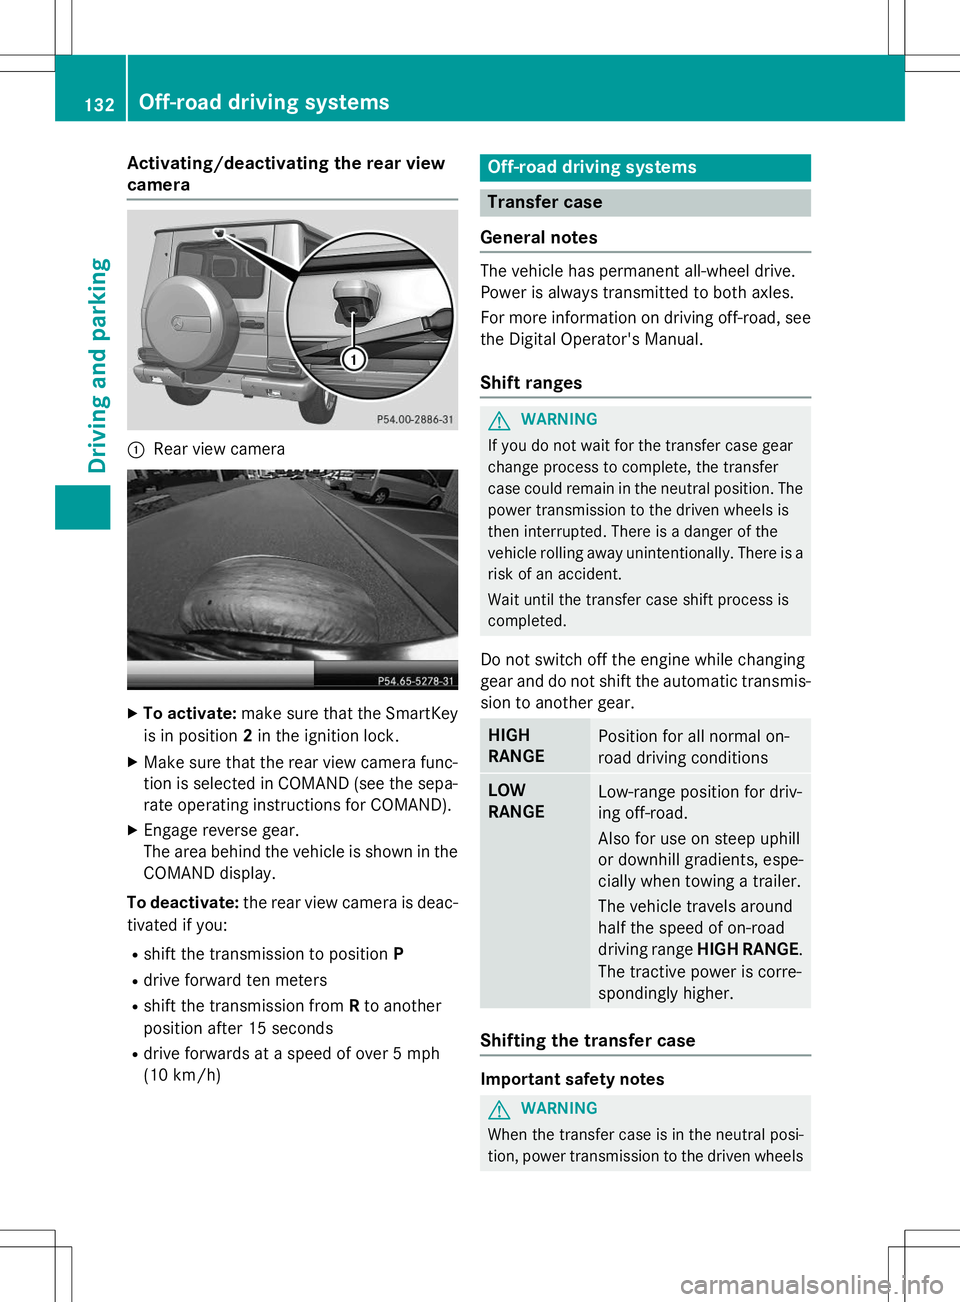
Activating/deactivating the rear view
camera
:Rear view camera
XTo activate: make sure that the SmartKey
is in position 2in the ignition lock.
X Make sure that the rear view camera func-
tion is selected in COMAND (see the sepa-
rate operating instructions for COMAND).
X Engage reverse gear.
The area behind the vehicle is shown in the
COMAND display.
To deactivate: the rear view camera is deac-
tivated if you:
R shift the transmission to position P
R drive forward ten meters
R shift the transmission from Rto another
position after 15 seconds
R drive forwards at a speed of over 5 mph
(10 km/h)
Off-road driving systems
Transfer case
General notes
The vehicle has permanent all-wheel drive.
Power is always transmitted to both axles.
For more information on driving off-road, see the Digital Operator's Manual.
Shift ranges
GWARNING
If you do not wait for the transfer case gear
change process to complete, the transfer
case could remain in the neutral position. The power transmission to the driven wheels is
then interrupted. There is a danger of the
vehicle rolling away unintentionally. There is a
risk of an accident.
Wait until the transfer case shift process is
completed.
Do not switch off the engine while changing
gear and do not shift the automatic transmis-
sion to another gear.
HIGH
RANGEPosition for all normal on-
road driving conditions
LOW
RANGELow-range position for driv-
ing off-road.
Also for use on steep uphill
or downhill gradients, espe-
cially when towing a trailer.
The vehicle travels around
half the speed of on-road
driving range HIGH RANGE .
The tractive power is corre-
spondingly higher.
Shifting the transfer case
Important safety notes
GWARNING
When the transfer case is in the neutral posi-
tion, power transmission to the driven wheels
132Off-road driving systems
Driving and pa rking
Page 144 of 274

stopping and backing up in a traffic-free location.
R Before driving, check:
- Trailer tow hitch
- Safety switch for braked trailers
- Safety chains
- Electrical connections
- Lights
- Wheels
R Adjust the exterior mirrors to provide an
unobstructed view of the rear section of the
trailer.
R If the trailer features electronically control-
led brakes, pull away the vehicle/trailer
combination carefully, manually brake
using the brake controller, and check the
brakes for correct function.
R Secure any objects on the trailer to prevent
the cargo from slipping when the vehicle is
in motion.
R If you couple up a trailer, regularly check
the cargo for secure fastening and make
sure that the trailer lamps and (if applica-
ble) the trailer brakes are functioning cor-rectly.
R Bear in mind that the handling will be less
stable when towing a trailer than when driv-
ing without one. Avoid sudden steeringmovements.
R The vehicle/trailer combination is heavier,
accelerates more slowly, has a decreased
gradient climbing capability and a longer
braking distance.
It is more susceptible to side winds and
requires more careful steering.
R If possible, avoid abrupt braking. Depress
the brake pedal moderately at first, so that
the trailer can activate its own brakes. Thenincrease the pressure on the brake pedal.
R If the automatic transmission continues to
shift back and forth between two gears
when driving up or downhill, restrict the
shift range. Select shift range 4, 3, 2,or1.
A lower gear and lower speed reduce the
risk of engine failure. R
When driving downhill, shift to a lower gear
to utilize the engine's braking effect.
Avoid continuous brake application as this
may overheat the vehicle brakes and, if
installed, the trailer brakes.
R If the coolant temperature increases dra-
matically while the air-conditioning system
is switched on, switch off the air-condition-
ing system.
Coolant heat can additionally be dissipated
by opening the windows and by setting the
blower fan and the interior temperature tomaximum.
R When overtaking, pay particular attention
to the extended length of your vehicle/
trailer combination.
Due to the length of your vehicle/trailer
combination, you will have to travel an addi-
tional distance beyond the vehicle you are
overtaking before returning to the previous lane.
Decoupling a trailer
!
Do not disconnect a trailer with an
engaged overrun brake. Otherwise, your
vehicle could be damaged by the rebound- ing of the overrun brake.
X Make sure that the automatic transmission
is set to position P.
X Apply the parking brake.
X Start the engine.
X Close all doors, including the rear door.
X Apply the trailer's parking brake.
X Detach the trailer cable and decouple thetrailer.
X Switch off the engine.
Permissible trailer and drawbar loads
Weight specifications
The gross trailer weight is calculated by add-
ing the weight of the trailer to the weight of
142Towing a trailer
Driving and parking
Page 214 of 274
!Make sure that the automatic transmis-
sion is in position Nwhen washing your
vehicle in a tow-through car wash. The vehi-
cle could be damaged if the transmission is
in another position.
!Make sure that:
R the side windows and sliding sunroof are
closed completely.
R the blower for the ventilation/heating is
switched off (airflow control is turned toposition 0/the à andÁ buttons
are switched off).
R the windshield wiper switch is at position0.
The vehicle could otherwise be damaged.
You can wash the vehicle in an automatic car wash from the very start.
If the vehicle is very dirty, pre-wash it before
cleaning it in an automatic car wash.
After using an automatic car wash, wipe off
wax from the windshield and the wiper
blades. This will prevent smears and reduce
wiping noises caused by residue on the wind-shield.
Interior care
Information in the Digital Operator's Manual
In the Digital Operator's Manual you will find
information on the following topics: R Cleaning the display
R Cleaning the plastic trim
R Cleaning the steering wheel and gear or
selector lever
R Cleaning wooden trim and trim strips
R Cleaning the seat covers
R Cleaning the seat belts
R Cleaning the headliner and carpets
212Care
Maintenance and care
Page 220 of 274
!You should have all work involving the
battery carried out at a qualified specialist
workshop. In the exceptional case that it is
necessary for you to disconnect the battery yourself, make sure that:
R you switch off the engine and remove the
SmartKey. Check that all the indicator
lamps in the instrument cluster are off.
Otherwise, electronic components, such
as the alternator, may be damaged.
R you first remove the negative terminal
clamp and then the positive terminal
clamp. Never swap the terminal clamps.
Otherwise, the vehicle's electronic sys-
tem may be damaged.
R on vehicles with automatic transmission,
the transmission is locked in position P
after disconnecting the battery. The vehi-
cle is secured against rolling away. You
can then no longer move the vehicle.
The battery and the cover of the positive
terminal clamp must be installed securely
during operation.
HEnvironmental note
Batteries contain dangerous
substances. It is against the
law to dispose of them with
the household rubbish. They
must be collected separately and recycled to protect the
environment.
Dispose of batteries in an
environmentally friendly
manner. Take discharged
batteries to a qualified spe-
cialist workshop or a special
collection point for used bat-teries.
In order for the battery to achieve the maxi-
mum possible service life, it must always be
sufficiently charged.
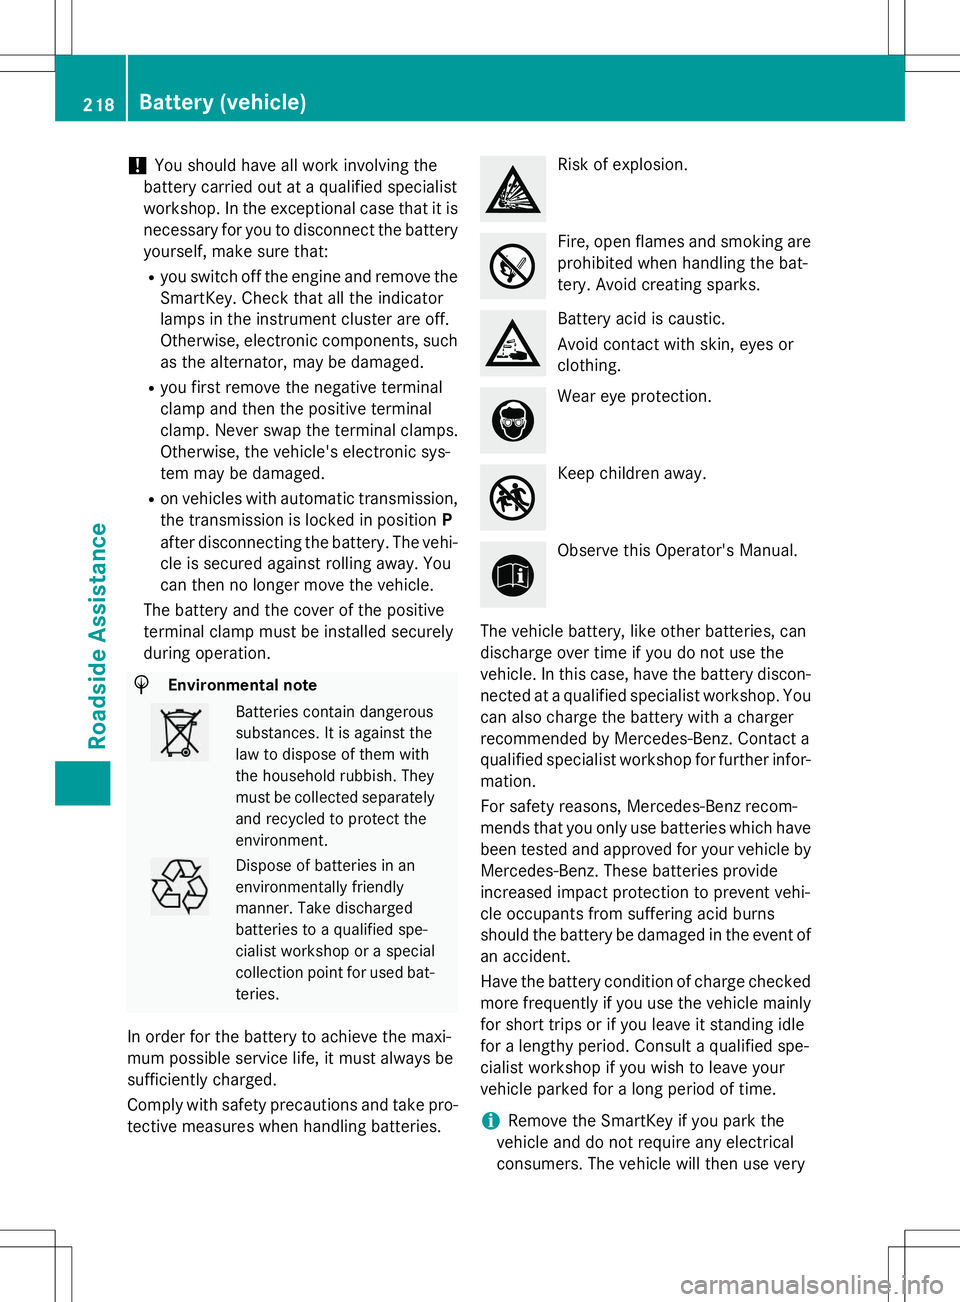
Comply with safety precautions and take pro-
tective measures when handling batteries.
Risk of explosion.
Fire, open flames and smoking are
prohibited when handling the bat-
tery. Avoid creating sparks.
Battery acid is caustic.
Avoid contact with skin, eyes or clothing.
Wear eye protection.
Keep children away.
Observe this Operator's Manual.
The vehicle battery, like other batteries, can
discharge over time if you do not use the
vehicle. In this case, have the battery discon-
nected at a qualified specialist workshop. You can also charge the battery with a charger
recommended by Mercedes-Benz. Contact a
qualified specialist workshop for further infor-
mation.
For safety reasons, Mercedes-Benz recom-
mends that you only use batteries which have been tested and approved for your vehicle by
Mercedes-Benz. These batteries provide
increased impact protection to prevent vehi-
cle occupants from suffering acid burns
should the battery be damaged in the event of an accident.
Have the battery condition of charge checked
more frequently if you use the vehicle mainly
for short trips or if you leave it standing idle
for a lengthy period. Consult a qualified spe-
cialist workshop if you wish to leave your
vehicle parked for a long period of time.
iRemove the SmartKey if you park the
vehicle and do not require any electrical
consumers. The vehicle will then use very
218Battery (vehicle)
Roadside Assistance