2015 MERCEDES-BENZ E-CLASS SALOON engine
[x] Cancel search: enginePage 387 of 497
Further information on windscreen washer
fluid/antifreeze (Y page 480).Service
ASSYST PLUS
Servic emessages The ASSYST PLUS service interval display
informs yo uofthe next service du edate.
Information on the typ eofservice and service
interval s(seet he separate Service Booklet).
You can obtain further information from a
Mercedes-Benz Service Centre.
i The ASSYST PLUS service interval display
doe snot sho wany information on the
engine oil level .Observe the notes on the
engine oil level (Y page 380).
The multifunction display shows aservice
messag efor afew seconds, e.g.:
R Service Ain..d ays
Service Ain..d ays
R Service Aoverdue
Service Aoverdue
R Service Aoverdue by .. days
Service Aoverdue by .. days
Depending on the operating conditions of the vehicle, the remaining time or distance until
the next service du edateisd isplayed.
The letter indicates which service is due. A A
stand sfor am inorservice and B
B for am ajor
service. Anumber or another letter may be
displayed afte rthe letter.
Only for certain countries :the positio nafter
the letter A
A or B
Bindicates any necessar yaddi-
tiona lmaintenance work to be performed. If
yo un otify aquali fied specialist worksho pof
this display ,you will receive astatement on
the associated costs.
The ASSYST PLUS service interval display
doe snot take into account any period sof
time during which the battery is disconnec-
ted. Maintaining the time-dependent service
schedule:
X Note dow nthe service du edated isplayed
in the multifunction display before discon-
necting the battery.
or
X After reconnecting the battery ,sub tract
the battery disconnection period sfrom the
service date shown on the display.
Hiding servic emessages X
Pres sthe a or% button on the steer-
ing wheel.
Displayin gservic em essages X
Switch the ignition on.
X Pres sthe = or; button on the steer-
ing wheel to select the Service Servicemenu.
X Pres sthe 9 or: button to select the
ASSYST PLUS
ASSYST PLUS submenu and confir mby
pressing the abutton.
The service du edatea ppears in the multi-
function display.
Informatio nabout Service Resettin
gthe ASSYST PLU Sservic einter-
val display
! If the ASSYST PLUS service interval dis-
play ha sbeeni nadvertently reset, this set-
ting can be corrected at aquali fied special-
ist workshop.
Have service work carried ou tasd escribed
in the Service Booklet. Thi smay otherwise
lead to increase dweara nd damag etothe
majo rassemblies or the vehicle.
Aq uali fied specialist workshop, e.g. a
Mercedes-Benz Service Centre, will rese tthe
ASSYST PLUS service interval display after
the service work ha sbeenc arried out. You
can also obtain further information on main-
tenance work, for example. 384
ServiceMaintenance and care
Page 388 of 497
Special service requirements
The prescribed service interval is based on
normal operation of the vehicle. Service work
will need to be performed more often if the
vehicle is operated under arduousc onditions
or increased loads, for example:
R regular city driving with frequent intermedi-
ate stops
R if the vehicle is primarily used to travel
short distances
R for frequent operation in mountainous ter-
rain or on poor road surfaces
R if the engine is often left idling for long peri-
ods
In these or similar operating conditions, have,
for example, the air filter, engine oil and oil
filter changed more frequently. The tyres
must be checked more frequently if the vehi-
cle is operated under increased loads. Fur-
ther information can be obtained at aquali-
fied specialist workshop, e.g. aMercedes-
Benz Service Centre.
Driving abroad
An extensive Mercedes-Benz Service network is also available in other countries. You can
obtain further information from any
Mercedes-Benz Service Centre. AdBlue
®
service indicator
i For BlueTEC vehicles only.
To function properly, BlueTEC exhaust gas
aftertreatment must be operated with the
reducing agent AdBlue ®
.A dBlue ®
is topped
up as part of the service. Under normal oper-
ating conditions, afull tank of AdBlue ®
should
last until the next service due date.
Depending on how and where the vehicle is
used, there may be an increase in the
AdBlue ®
consumption, resulting in the next
service due date being brought forward.
Certain display messages show that AdBlue ®
must be topped up, e.g.: Refill AdBlue at workshop See Own‐ Refill AdBlue at workshop See Own‐
er's Manual er's Manual
Refill AdBlue at workshop No start Refill AdBlue at workshop No start
in .. km in .. km
Aw
arning signal also sounds.
You can no longer start the vehicle when the
AdBlue ®
supply has been used up
(Y page 314).
! Have the AdBlue ®
tank topped up at a
qualified specialist workshop only. The
vehicle may otherwise be damaged or
soiled.
Before driving your vehicle outside Europe,
have the AdBlue ®
supply checked at aquali-
fied specialist workshop. If necessary, have
AdBlue ®
topped up. Before aprolonged stay
outside of Europe, consult aqualified special-
ist workshop.
Observe the notes on AdBlue ®
(Y page 477).
Further information about BlueTEC exhaust
gas aftertreatment and AdBlue ®
can be
obtained at aqualified specialist workshop,
e.g. aMercedes-Benz Service Centre. Care
General notes
H
Environmental note
Dispose of empty packaging and cleaning
cloths in an environmentally responsible man- ner.
! For cleaning your vehicle, do not use any
of the following:
R dry, rough or hard cloths
R abrasive cleaning agents
R solvents
R cleaning agents containing solvents
Do not scrub.
Do not touch the surfaces or protective
films with hard objects, e.g. aring or ice
scraper. You could otherwise scratchor
damage the surfaces and protective film. Care
385Maintenance and care Z
Page 389 of 497
!
Do not park up the vehicle for an extended
period straight after cleaning it, particularly after having cleaned the wheels with wheel cleaner. Wheel cleaners could cause
increased corrosion of the brake discs and
brake pads/linings. For this reason, you
should drive for afew minutes after clean-
ing. Braking heats the brake discs and the
brake pads/linings, thus drying them. The
vehicle can then be parked up.
Regular care of your vehicle is acondition for
retaining the quality in the long term.
Use care products and cleaning agents rec-
ommended and approved by Mercedes-Benz. Washing the vehiclea
nd cleaning the
paintwork
Automatic car wash G
WARNING
Braking efficiency is reduced after the vehicle has been washed.T here isarisk of an acci-
dent.
After washing the vehicle, brake carefully
while paying attention to the traffic conditions in order to restore full braking efficiency.
! When DISTRONIC PLUS or the HOLD
function is activated, the vehicle brakes
automaticallyinc ertain situations.
To avoid damage to the vehicle, deactivate DISTRONIC PLUS and the HOLD function in
the following or similars ituations:
R when towing away
R in ac ar wash
! Make sure that:
R the side windows and sliding sunroof are
closed completely.
R the blowerf or the ventilation/heating is
switched off (OFF button is depressed).
R the windscreen wiper switch is at posi-
tion 0.
The vehicle could otherwise be damaged. !
In car washes with
atowing mechanism,
make sure that the automatic transmission
is in transmission position N;otherwise,
the vehicle could be damaged.
R Vehicles with DIRECT SELECT lever and
key:
do not remove the key from the ignition
lock. Do not open the driver's door or
front-passenger door when the engine is
switched off. Otherwise, the automatic
transmission selects park position P
automaticallya nd locks the wheels. You
can prevent this by shifting the auto-
matic transmission to Nbeforehand.
R Vehicles with DIRECT SELECT lever and
KEYLESS-GO:
do not open the driver's door or front-
passenger door when the engine is
switched off. Otherwise, the automatic
transmission selects park position P
automaticallya nd locks the wheels.
! If the key is within the rear detection
range of KEYLESS-GO, situations such as
the following could lead to the uninten-
tional opening of the boot lid/tailgate:
R using acar wash
R using ahigh-pressure cleaner
Make sure that the key is at least 3maway
fro mt hevehicle.
Observe th efollowing to mak esure that the
automatic transmission on vehicles with
DIRECT SELECT stays in position N:
X Make sure th evehicle is stationar yand the
ignitio nisswitche doff.
X Turn th ekey to position 2(Y page 179) in
th ei gnitio nlock.
Use th ekey instead of th eStart/Sto pbut-
to nonv ehicles with KEYLESS-GO.
X Depress th ebrak epedal and kee pit
depressed.
X Shift th eautomatic transmission to posi-
tion N.
X Release th ebrak epedal. 386
CareMaintenance and care
Page 400 of 497
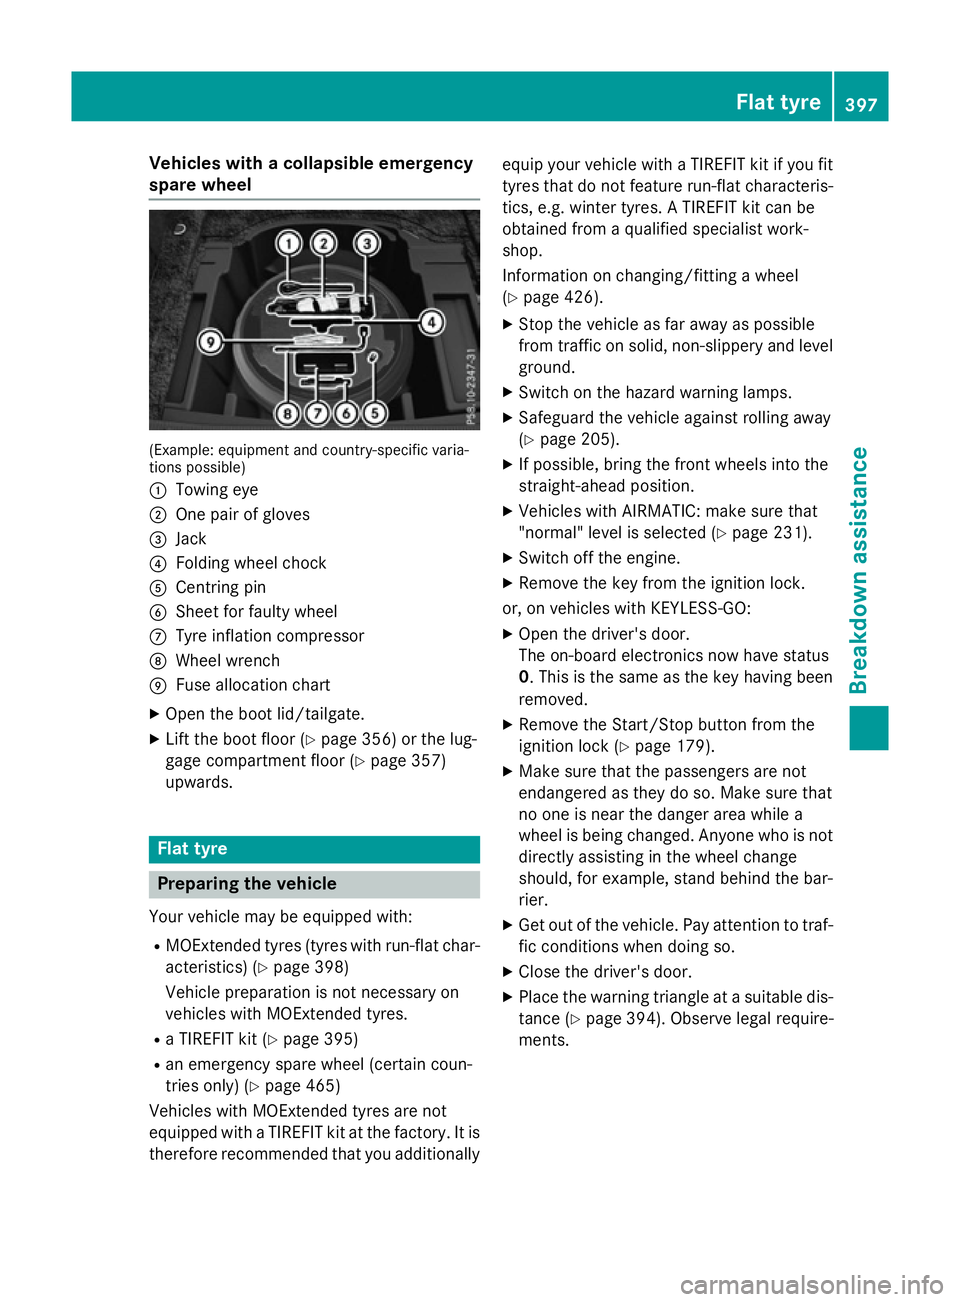
Vehicles with
acolla psibl eemergency
spare wheel (Example: equipment and country-specifi
cvaria-
tions possible)
: Towing eye
; One pair of gloves
= Jack
? Folding whee lchock
A Centring pin
B Shee tfor faulty wheel
C Tyre inflation compressor
D Wheel wrench
E Fusealloc ation chart
X Ope nthe boot lid/tailgate.
X Lif tthe boot floor (Y page 356)orthe lug-
gage compartment floor (Y page 357)
upwards. Flat tyre
Preparin
gthe vehicle
Your vehicl emaybe equipped with:
R MOExtende dtyres (tyres with run-fla tchar-
acteristics )(Ypage 398)
Vehicl epreparatio nisn ot necessary on
vehicles with MOExtende dtyres.
R aT IREFIT kit (Y page 395)
R an emergency spare whee l(certai ncoun-
trie sonly) (Y page 465)
Vehicles with MOExtende dtyres ar enot
equipped with aTIREFIT kit at the factory .Itis
therefore recommende dthatyou additionally equi
pyourvehicl ewithaT IREFIT kit if yo ufit
tyres tha tdon ot feature run-fla tcharacteris-
tics ,e.g.w inter tyres. ATIREFIT kit can be
obtained from aquali fied specialist work-
shop.
Informatio nonchanging/fitting awheel
( Y page 426).
X Stop the vehicl easfar away as possible
from traffic on solid ,non-slippery and level
ground.
X Switch on the hazard warning lamps.
X Safeguar dthe vehicl eagain st rolling away
(Y page 205).
X If possible, bring the front wheels into the
straight-ahea dposition.
X Vehicles with AIRMATIC: make sure that
"normal" level is selecte d(Ypage 231).
X Switch off the engine.
X Remove the key from the ignition lock.
or, on vehicles with KEYLESS‑ GO:
X Ope nthe driver' sdoor.
The on-boar delectronics now have status
0.T hisist he same as the key having been
removed.
X Remove the Start/Sto pbutton from the
ignition lock (Y page 179).
X Make sure tha tthe passenger sarenot
endangere dasthey do so. Make sure that
no one is nea rthe danger area whil ea
whee lisbeing changed .Anyone wh oisnot
directl yassis ting in the whee lchange
should, for example, stand behind the bar-
rier.
X Ge toutof the vehicle. Pa yattentio ntotraf-
fic conditions when doing so.
X Close the driver' sdoor.
X Place the warning triangl eatasuitabl edis-
tance (Y page 394). Observe lega lrequire-
ments. Flat tyre
397Breakdown assis tance
Page 406 of 497
Observe the service intervals in the Service
Booklet or contact aqualified specialist
workshop for more information.
! You should have all work involving the
battery carried out at aqualified specialist
workshop. In the exceptional case that it is
necessary for you to disconnect the battery yourself, make sure that:
R you switch off the engine and remove the
key. On vehicles with KEYLESS-GO,
ensure that the ignition is switched off.
Check that all the indicator lamps in the
instrument cluster are off. Otherwise,
electronic components, such as the
alternator, may be damaged.
R you first remove the negative terminal
clamp and then the positive terminal
clamp. Never swap the terminal clamps.
Otherwise, the vehicle's electronic sys-
tem may be damaged.
R in vehicles with automatic transmission,
the transmission is locked in position P
after disconnecting the battery. The vehi-
cle is secured against rolling away. You
can then no longer move the vehicle.
The battery and the cover of the positive
terminal clamp must be fitted securely dur- ing operation.
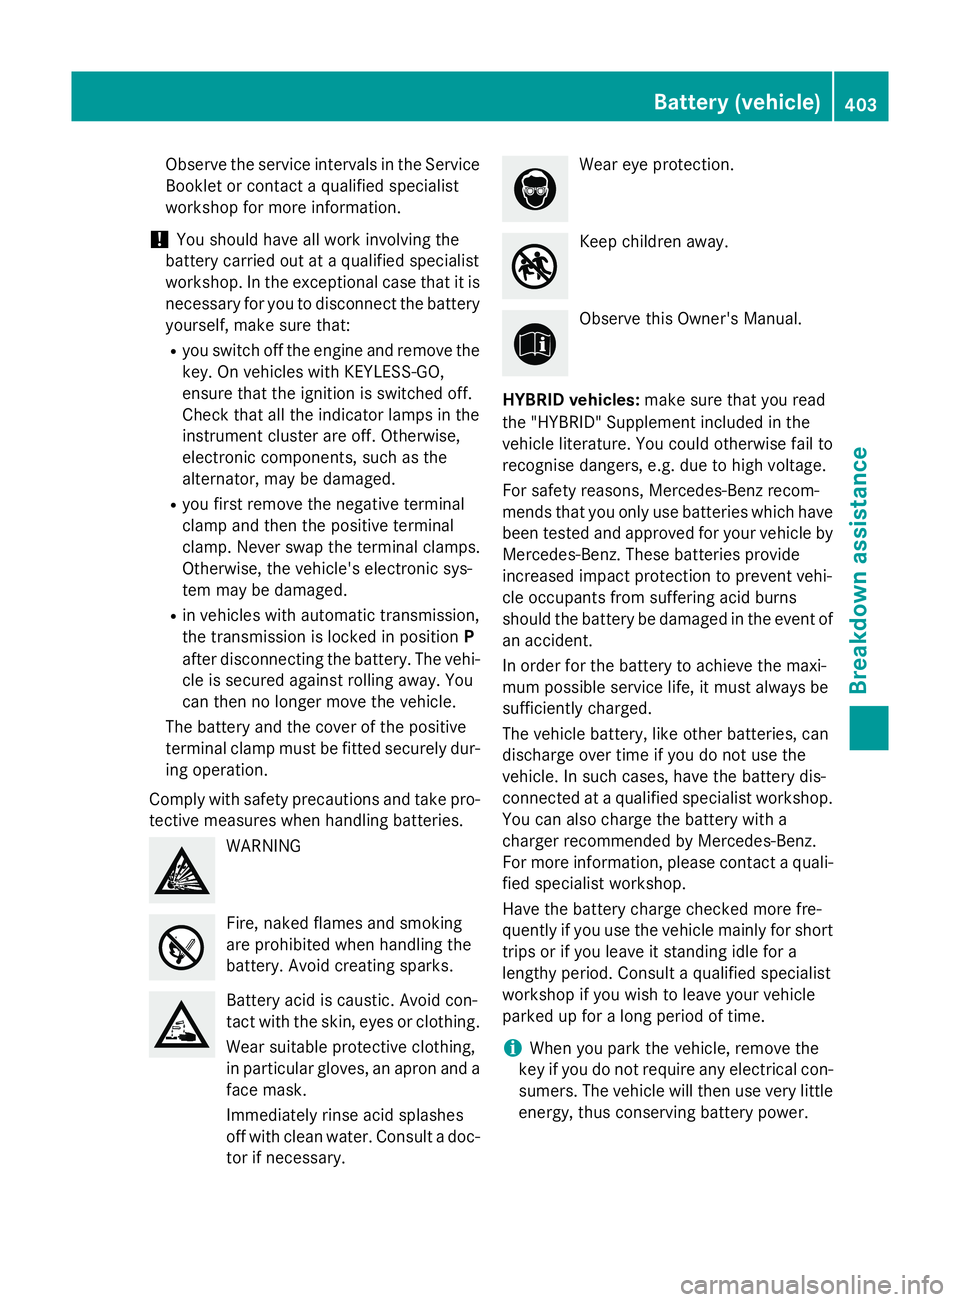
Comply with safety precautions and take pro-
tective measures when handling batteries. WARNING
Fire, naked flames and smoking
are prohibited when handling the
battery. Avoid creating sparks.
Battery acid is caustic. Avoid con-
tact with the skin, eyes or clothing.
Wear suitablep rotective clothing,
in particularg loves, an apron and a
face mask.
Immediately rinse acid splashes
off with clean water. Consult adoc-
tor if necessary. Wear eye protection.
Keep children away.
Observe this Owner's Manual.
HYBRID vehicles: make sure that you read
the "HYBRID" Supplement included in the
vehicle literature. You could otherwise fail to
recognise dangers, e.g. due to high voltage.
For safety reasons, Mercedes-Benz recom-
mends that you only use batteries which have been tested and approved for your vehicle by
Mercedes-Benz.T hese batteries provide
increased impact protection to prevent vehi-
cle occupants from suffering acid burns
should the battery be damagedint he event of
an accident.
In order for the battery to achieve the maxi-
mum possibles ervice life, it must always be
sufficiently charged.
The vehicle battery, like other batteries, can
discharge over time if you do not use the
vehicle. In such cases, have the battery dis-
connected at aqualified specialist workshop.
You can also charge the battery with a
charger recommended by Mercedes-Benz.
For more information, pleasec ontactaquali-
fied specialist workshop.
Have the battery charge checked more fre-
quently if you use the vehicle mainly for short
trips or if you leave it standing idle for a
lengthy period. Consult aqualified specialist
workshop if you wish to leave your vehicle
parked up for along period of time.
i When you park the vehicle, remove the
key if you do not require any electrical con-
sumers. The vehicle will then use very little energy, thus conserving battery power. Battery (vehicle)
403Breakdown assistance Z
Page 408 of 497
Jump-starting
For the jump-starting procedure, use only the jump-starting connection point, consisting of a positive terminal and an earth point, in the engine compartment. G
WARNING
Battery acid is caustic. There is arisk of injury.
Avoid contact with the skin, eyes or clothing. Do not breathe in any battery gases. Do not lean over the battery. Keep the batteries out of the reach of children. Immediately rinse off battery acid
thoroughly with plenty of clean water and seek medical attention at once. G
WARNING
During charging and jump-starting, explosive gases can escape from the battery. There is arisk
of an explosion.
Particularly avoid fire, naked flames, creating sparks and smoking. Ensure there is sufficient
ventilation while charging and jump-starting. Do not lean over abattery. G
WARNING
During the charging process, abattery produces hydrogen gas. If ashort circuit occurs or sparks
are created, the hydrogen gas can ignite. There is arisk of an explosion.
R Make sure that the positive terminal of aconnected battery does not come into contact with
vehicle parts.
R Never place metal objects or tools on abattery.
R It is important that you observe the described order of the battery terminals when connecting
and disconnecting abattery.
R When jump-starting, make sure that the battery poles with identical polarity are connected.
R It is particularly important to observe the described order when connecting and disconnecting
the jump leads.
R Never connect or disconnectt he battery terminals while the engine is running.G
WARNING
Ad ischarged battery can freeze at temperatures below freezing point. When jump-starting the
vehicle or charging the battery, gases can escape from the battery. There is arisk of an explosion.
Allow the frozen battery to thaw out before charging it or jump-starting.
! Vehicles with
apetrol engine: avoid repeated and lengthy startinga ttempts. Otherwise,
the non-combusted fuel may damage the catalytic converter.
HYBRID vehicles: make sure that you read the "HYBRID" Supplement included in the vehicle
literature. You could otherwise fail to recognise dangers, e.g. due to high voltage. Jump-starting
405Breakdown assistance Z
Page 409 of 497
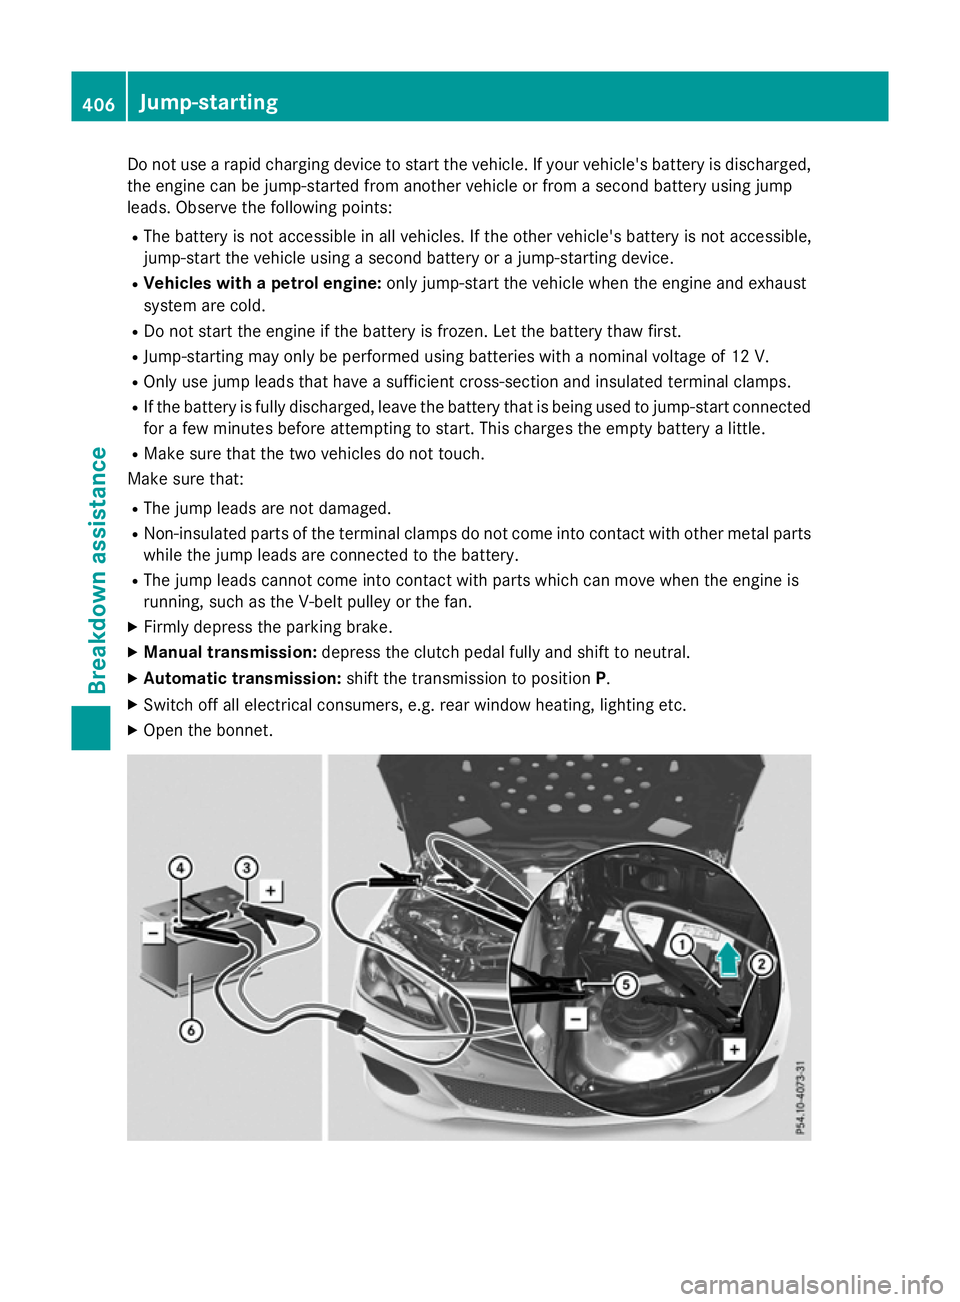
Do not us
earapid charging device to start the vehicle. If your vehicle' sbattery is discharged,
the engine can be jump-started fro manothe rvehicl eorf romas econd battery using jump
leads. Observe the following points:
R Th eb attery is not accessibl einallvehicles .Ifthe other vehicle' sbattery is not accessible,
jump-star tthe vehicl eusing asecond battery or ajump-starting device.
R Vehicle swithap etrolengine: onlyjump-star tthe vehicl ewhent he engine and exhaust
syste marecold.
R Do not start the engine if the battery is frozen. Let the battery tha wfirst.
R Jump-starting ma yonlybep erforme dusing batteries with anominal voltag eof12V.
R Onl yusejum pleads thathaveas ufficient cross-sectio nand insulate dtermina lclamps.
R If the battery is full ydischarged, leav ethe battery tha tisb eing used to jump-star tconnected
for afew minute sbefor ea ttempting to start. This charge sthe empty battery alittle.
R Make sure tha tthe two vehicles do not touch.
Make sure that:
R Th ej um pleads aren ot damaged.
R Non-insulate dparts of the termina lclamps do not come into contact with other meta lparts
whil ethe jum pleads arec onnected to the battery.
R Th ej um pleads cannot come into contact with parts which can mov ewhent he engine is
running ,suc hast he V-bel tpulle yort he fan.
X Firml ydepress the parking brake.
X Manual transmission: depress the clutch peda lfully and shift to neutral.
X Automatic transmission: shift the transmission to position P.
X Switch off al lelectrica lconsumers ,e.g.r ea rw indo wh eating, lighting etc.
X Open the bonnet. 406
Jump-startingBreakdow
nassistance
Page 410 of 497
Position number
Bidentifies the charged batter yofthe other vehicle or an equivalent jump-
starting device.
X Slide cover :of positive terminal ;in the direction of the arrow.
X Connec tpositive terminal ;on your vehicle to positive terminal =of donor battery B
using the jump lead, alway sbeginnin gwith positive terminal ;on your own vehicle first.
X Start the engine of the donor vehicle and run it at idling speed.
X Connec tnegative terminal ?of donor battery Bto earth point Aof your vehicle using the
jump lead, connectin gthe jump lead to donor battery Bfirst.
X Start the engine.
X Before disconnectin gthe jump leads, let the engines run for several minutes.
X First ,remove the jump leads from earth point Aand negative terminal ?,then from pos-
itive clamp ;and positive terminal =.Begin each time at the contacts on your own vehicle
first.
X Close cover :of positive clamp ;after removin gthe jump leads.
X Have the batter ychecked at aqualified specialist workshop.
i Jump-starting is not considered to be
anormal operating condition.
i Jump-starting cables and further information regarding jump starting can be obtained at
any qualified specialist workshop. Towing away and tow-starting
Important safety notes
G
WARNING
Safety-relevant functions are restricted or not
availabl eif:
R the engine is not running.
R the brake system or the power steerin gis
malfunctioning
R the voltage supply or the vehicle's electrical
system is malfunctioning.
If your vehicle is towed, significantly greater
force may be required to steer the vehicle or
to brake. There is arisk of an accident.
In such circumstances, use atowing bar.
Make sure that the steerin gismoving freely
before towing. G
WARNING
When towing or tow-starting another vehicle
and its weight is greater than the permissible gross weight of your vehicle, the:
R towing eye may be torn off
R car/trailer combination may swerve or
even overturn
There is arisk of an accident.
When towing or tow-starting another vehicle,
its weight should not be greater than the per- missible gross weight of your vehicle.
i Details on the permissible gross vehicle
weight of your vehicle can be found on the
vehicle identification plate (Y page 472).
! When DISTRONIC PLUS or the HOLD
function is activated, the vehicle brakes
automatically in certain situations.
To avoid damage to the vehicle, deactivate
DISTRONIC PLUS and the HOLD function in the following or similar situations:
R when towing away
R in ac ar wash Towing away and tow-starting
407Breakdown assistance Z