2015 MERCEDES-BENZ E-CLASS SALOON engine
[x] Cancel search: enginePage 372 of 497
The garage door opener is only available for
certain countries. Observe the legal require-
mentsf or each individual country.
The HomeLink ®
garage door opener is com-
patible with most European garage and gate
opener drives. More information on Home-
Link ®
and/or compatible products is availa-
ble:
R at aq ualified specialist workshop
R via the HomeLink ®
Hotline
(0) 080004 66 354 65 or alternatively
+49 (0) 6838 907-277
R on the Internet at http://
www.homelink.com
Important safety notes G
WARNING
When you operate or program the garage door with the integrated garage door opener, per-
sons in the range of movemen tofthe garage
door can become trapped or struck by the
garage door. There is arisk of injury.
When using the integrated garage door
opener, alway smake sure that nobody is
within the range of movemen tofthe garage
door. G
WARNING
Combustion engines emit poisonous exhaust
gases such as carbon monoxide. Inhaling
these exhaust gases leads to poisoning. There is ar isk of fatal injury. Therefore never leave
the engine runnin ginenclosed spaces with-
out sufficient ventilation.
Programming Programming buttons
Pay attention to the "Importan
tsafety notes"
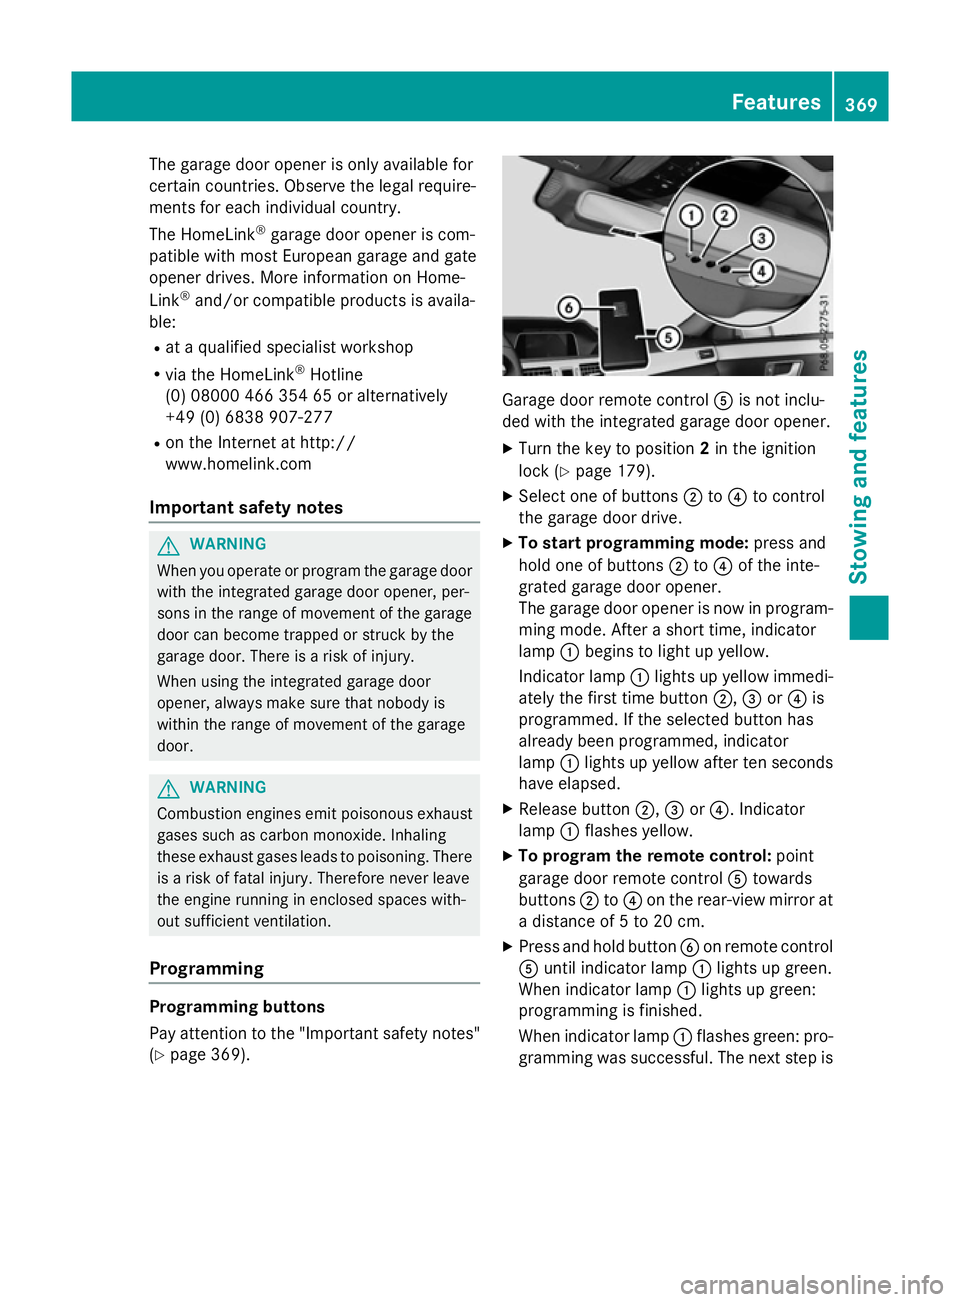
(Y page 369). Garage door remot
econtrol Ais not inclu-
ded with the integrated garage door opener.
X Turn the key to position 2in the ignition
lock (Y page 179).
X Select one of buttons ;to? to control
the garage door drive.
X To startp rogramming mode: press and
hold one of buttons ;to? of the inte-
grated garage door opener.
The garage door opener is now in program- ming mode. After ashort time, indicator
lamp :begins to light up yellow.
Indicator lamp :lights up yellow immedi-
ately the first time button ;,=or? is
programmed. If the selected button has
already been programmed, indicator
lamp :lights up yellow after ten seconds
have elapsed.
X Release button ;,=or?.I ndicator
lamp :flashes yellow.
X To program the remot econtrol: point
garage door remot econtrol Atowards
buttons ;to? on the rear-view mirror at
ad istanc eof5to20c m.
X Press and hold button Bon remot econtrol
A until indicator lamp :lights up green.
When indicator lamp :lights up green:
programming is finished.
When indicator lamp :flashes green: pro-
gramming was successful. The next step is Features
369Stowing and features Z
Page 380 of 497
Useful information
............................378
Engine compartment ........................378
Service ............................................... 384
Care .................................................... 385 377Maintenance and care
Page 381 of 497
Useful information
i This Owner's Manual describes all mod-
els, series and optional equipment for your
vehicle that were available at the time of
going to press. National variation sare pos-
sible. Not ethat your vehicle may not be
equipped with all of the function sdescri-
bed. This is also the case for system sand
function srelevan ttosafety.
i Read the information on qualified special-
ist workshops: (Y page 27). Engine compartment
Bonnet
Important safet ynotes G
WARNING
An unlocked bonnet may open up when the
vehicle is in motion and block your view. There is ar isk of an accident.
Never unlock the bonnet when driving. Before
every trip, ensure that the bonnet is locked. G
WARNING
When being opened and closed, the bonnet
may suddenly fall int othe closed position.
There is arisk of injury to person sinthe range
of movement of the bonnet.
Open and close the bonnet only when nobody
is in the range of movement. G
WARNING
If you open the bonnet while the engin eis
overheating or while ther eisafire in the
engin ecompartment, you could come into
contact with hot gases or other leaking ser-
vice products. There is adanger of injury.
Allow an overheating engin etocool down
before openin gthe bonnet. If ther eisafire in
the engin ecompartment, leave the bonnet
closed and notify the fire brigade. G
WARNING
There are movin gcomponents in the engine
compartment. Certain components may con-
tinue to move or suddenly move again even
after the ignition has been switched off, e.g.
the radiator fan. There is arisk of injury.
If you have to carry out work in the engine
compartment:
R switc hoff the ignition
R neve rtouc hthe dangerous areas surround-
ing movin gcomponents, e.g. the rotation
area of the fan
R remov ejewellery and watches
R keep items of clothing and hair, for exam-
ple, away from movin gparts. G
WARNING
The ignition system and the fuel injection sys- tem operate with ahigh voltage. If you touch
the live components, you could receiv ean
electric shock .There is adanger of injury.
Never touc hcomponents of the ignition sys-
tem or the fuel injection system when the
ignition is switched on. G
WARNING
Hybrid vehicles :ensure that you read the
"HYBRID "supplement .You could otherwise
fail to recognise dangers.
Active bonnet (pedestria nprotection) Operating principle
! An activ
ebonnet that had been triggered
must be repaired at aqualified specialist
workshop. The activ ebonnet function will
then be available again. The additional
pedestrian protection provided by the
activ ebonnet will then be restored.
! Do not try to press down the raised bon-
net at the back. Otherwise, the bonnet
could be damaged. 378
Engine compartmentMaintenance and care
Page 382 of 497

i
The active bonnet is only available in cer-
tain countries. It is available for all models,
except for AMG vehicles.
The active bonnet can reduce the risk of injury to pedestrians in certain accident situations.
Raising the active bonnet increases the clear-
ance to hard components, such as the engine. If active bonnet
:has been triggered, it will
be raised at the back by about 50 mm. Lids ;
will then no longer rest on housings =.The
active bonnet is triggered by pyrotechnics.
You can reset atriggered active bonnet your-
self.
Even if the active bonnet has been triggered,
you can still continue driving and have it reset
at aq ualified specialist workshop. If you pull
the bonnet release lever, you must reset the
bonnet before driving on.
Resetting G
WARNING
Certain components in the engine compart-
ment could be very hot, e.g. the engine, the
radiator and parts of the exhaust system.
There is arisk of injury when accessing the
engine compartment.
As far as possible, allow the engine to cool
down and only touch the components descri- bed in the following. X
Open the bonnet (Y page 380).
X With both hands, lift the bonnet up in the
centre A.The bonnet is open wide enough
when both lids of bonnet lifter ;no longer
move.
If you push the lids back, you will notice
resistance.
X Release bonnet :.
X Check whether the lids of bonnet lifter ;
are restin gonhousings =(arrow).
X The lids of bonnet lifter ; ;are resting
on the housings: close bonnet:
(Y page 380).
or
X The lids of bonnet lifter ;
;are not rest-
ing on the housings: first, lift up bon-
net :on left-hand side ?and then on
right-hand side B.Lift up bonnet :until
the respective lid of bonnet lifter ;no lon-
ger moves.
The lids of bonnet lifter ;must rest on
housings =(arrow).
X Close bonnet :(Ypage 380).
If you cannot close bonnet :or if the L
symbol appears in the multifunction display,
repeat the steps.
If the bonnet still does not engage correctly or
the L symbol appears in the multifunction
display ,donot drive any further .Contact a
qualified specialist workshop.
If active bonnet :has been triggered, it will
be raised at the back by about 50 mm. Lids ;
will then no longer rest on housings =.The
active bonnet is triggered by pyrotechnics. Engine compartment
379Maintenance and care Z
Page 383 of 497

Opening the bonnet
G
WARNING
Certain componentsint he engine compart-
ment could be very hot, e.g. the engine, the
radiator and parts of the exhaust system.
There is arisk of injur ywhen accessin gthe
engin ecompartment.
As far as possible, allow the engine to cool
down and only touch the componentsd escri-
bed in the following. G
WARNING
When the bonnet is open, and the windscreen wipers are set in motion ,you can be injured by
the wiper linkage. There is arisk of injury.
Always switch off the windscreen wipers and
the ignition before opening the bonnet.
! Make sure that the windscreen wipers are
not folded away from the windscreen. Oth-
erwise, you could damage the windscreen
wipers or the bonnet. X
Make sure that the windscreen wipers are
switched off.
X Pull release lever :on the bonnet.
The bonnet is released. X
Reach intot he gap, pull bonnet catc hhan-
dle ;up and lift the bonnet.
If you lift the bonnet by approximately
40 cm, the bonnet is opened and held open automatically by the gas-filled strut.
Closing the bonnet X
Lower the bonnet and let it fall from a
height of approximately 20 cm.
X Check that the bonnet has engaged prop-
erly.
If the bonnet can be raised slightly, it is not
properly engaged. Open it again and close
it with alittle more force. Radiator
Vehicles with adiesel engine: do not cover
the radiator. Do not use thermal mats, insect
protection cover soranythin gsimilar. Doing
so can cause the Onboard Diagnostics Sys-
tem to display inaccurate values. Some of
these values are legally required and must
alway sbec orrect. Engine oil
General notes G
WARNING
Hybrid vehicles: ensure that you read the
"HYBRID "supplement .You could otherwise
fail to recognise dangers. 380
Engine compartmentMaintenance and care
Page 384 of 497

Depending on your driving style
,the vehicle
consumes up to 0.8 litres of oi lper 1000 km.
Th eo ilconsumption ma ybehighertha nt his
when the vehicl eisnew or if yo ufrequently
drive at high engine speeds.
Depending on the engine ,the oi ldipst ick may
be installe datadifferent location.
When checking the oi llev el:
R park the vehicl eonalevel surface
R the engine shoul dbeswitched off for
approximately fiv eminute sift he engine is
at normal operating temperature
R if the engine is not at normal operating
temperature, e.g .ifthe engine wa sonly
started briefly, wait approximately
30 minute sbefor ec arrying ou tthe meas-
urement
Checking the oi llevel using the oi ldip-
stick G
WARNING
Certain components in the engine compart-
ment could be ver yhot,e .g.t he engine ,the
radiato rand parts of the exhaust system.
There is ariskofi njury when accessing the
engine compartment.
As fa rasp ossible, allo wthe engine to cool
down and onl ytouch the components descri-
be dint he following. Example: vehicles with
apetrol engine Example: vehicles with
adiese lengine
X Pull oi ldipst ick:outoft he oi ldipst ick
tube.
X Wipe off oi ldipst ick:.
X Slowl yslide oild ipst ick:into the guide
tub etot he stop ,and take it ou tagain.
If the level is between MIN mark =and
MAX mark ;,the oi llev el is correct.
X If the oi llev el ha sdropped to MIN mark =
or below, top up with 1.0 lofengine oil.
Addin gengin eoil G
WARNING
Certain components in the engine compart-
ment could be ver yhot,e .g.t he engine ,the
radiato rand parts of the exhaust system.
There is ariskofi njury when accessing the
engine compartment.
As fa rasp ossible, allo wthe engine to cool
down and onl ytouch the components descri-
be dint he following. Engine compartment
381Maintenance and care Z
Page 385 of 497
G
WARNING
If engine oil comes into contact with hot com- ponents in the engine compartment, it may
ignite. There is arisk of fire and injury.
Make sure that engine oil does not spil lout
over the filler neck. Allow the engine to cool
downa nd thoroughly clea nthe components
that have come into contact with engine oil
before you start the engine. H
Environmental note
When topping up the oil,t ake care not to spill
any. If oil enters the soil or waterways, it is
harmfu ltothe environment.
! Only use engine oilsa
nd oil filters that
have been approved for vehicles with aser-
vice system. You can obtai nalistoft he
engine oilsa nd oil filters tested and
approved in accordance with the
Mercedes-Benz Specifications for Service
Products at any Mercedes-Benz Service
Centre.
Damag etothe engine or exhaust system is
caused by the following:
R using engine oilsa nd oil filters that have
not been specifically approved for the
service system
R changing the engine oil and oil filter after
missing the change interval required by
the service system
R using engine oil additives
! Do not add too much oil.T
opping up with
too much engine oil can result in damage to
the engine or to the catalytic converter.
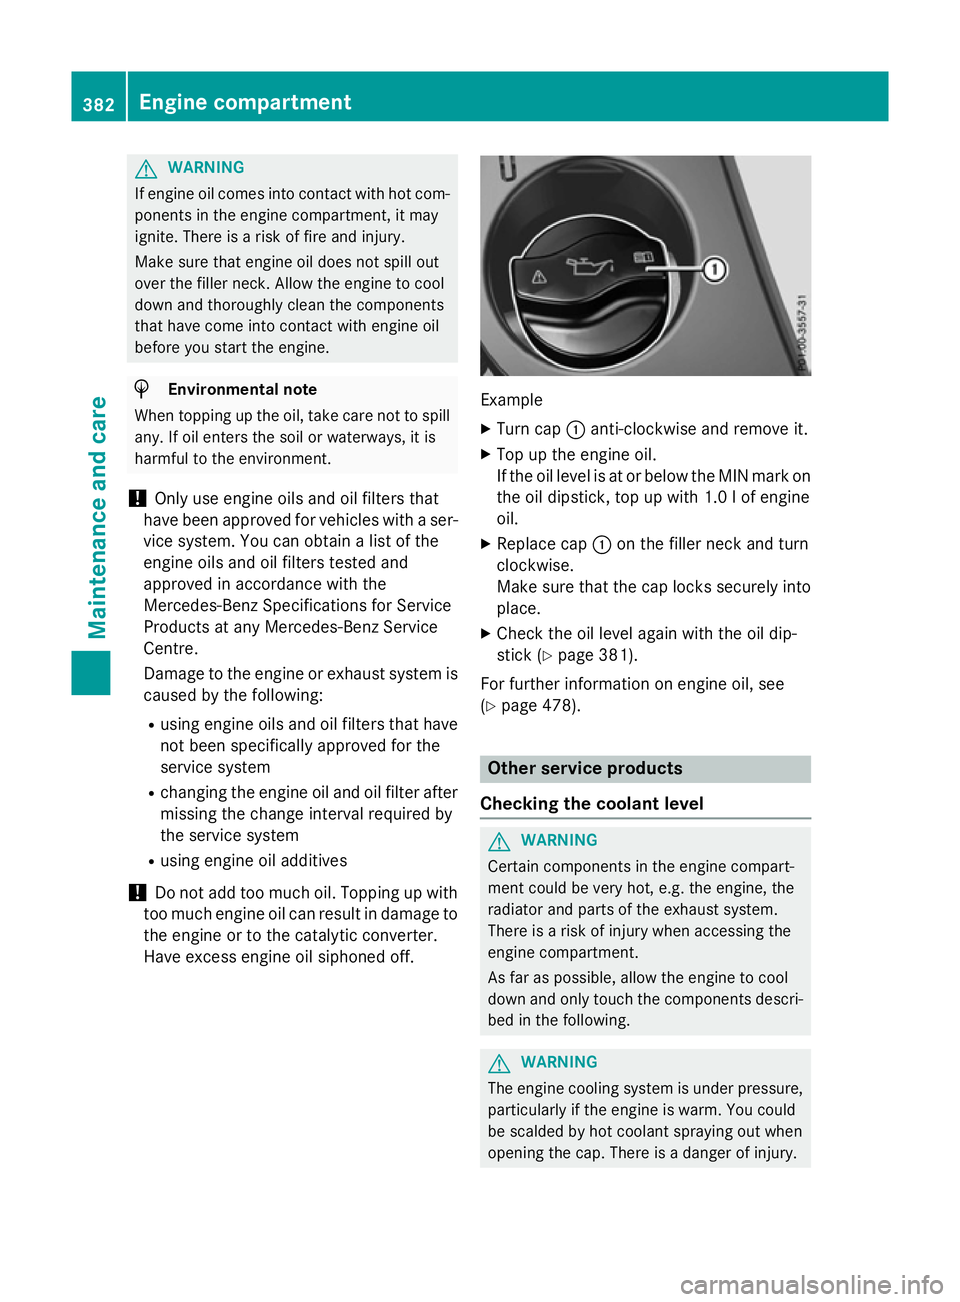
Have excess engine oil siphoned off. Example
X Turn cap :anti-clockwise and remove it.
X Top up the engine oil.
If the oil leve lisatorbelow the MIN mark on
the oil dipstick, top up with 1.0 lofe ngine
oil.
X Replace cap :on the filler neck and turn
clockwise.
Make sure that the cap locks securely into place.
X Check the oil level again with the oil dip-
stick (Y page 381).
For further information on engine oil, see
(Y page 478). Other service products
Checking the coolant level G
WARNING
Certain components in the engine compart-
ment could be very hot, e.g. the engine, the
radiator and parts of the exhaust system.
There is arisk of injury when accessing the
engine compartment.
As far as possible, allow the engine to cool
down and only touch the components descri- bed in the following. G
WARNING
The engine cooling system is under pressure, particularly if the engine is warm. You could
be scalded by hot coolant spraying out when
opening the cap. There is adanger of injury. 382
Engine compartmentMaintenance and care
Page 386 of 497
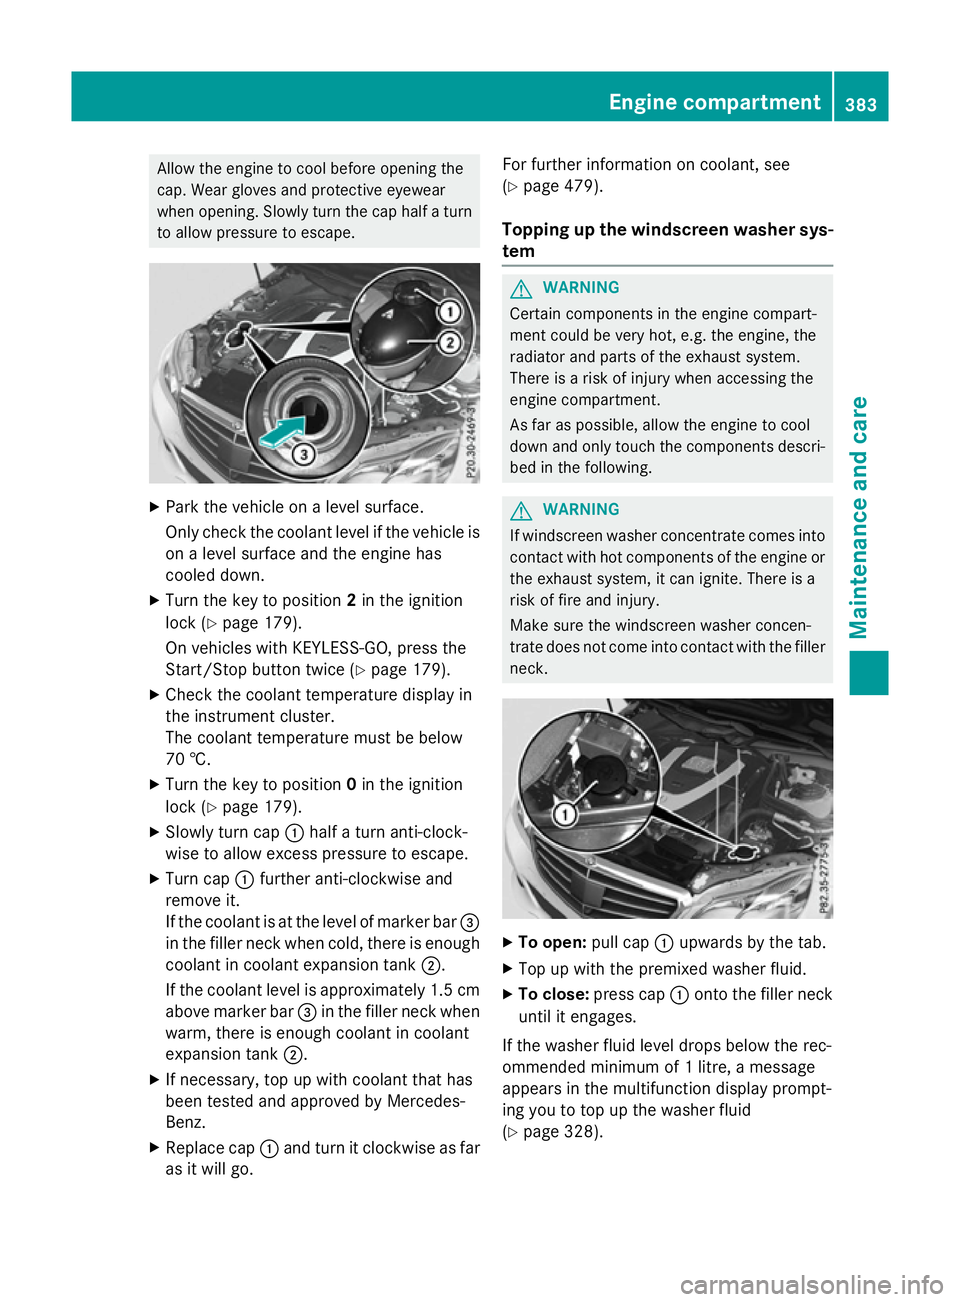
Allow the engine to coo
lbefore opening the
cap .Wearg love sa nd protective eyewear
when opening. Slowl yturn the cap half aturn
to allo wpressure to escape. X
Park the vehicl eonalevel surface.
Onl ycheck the coolant level if the vehicl eis
on alevel surface and the engine has
coole ddown.
X Turn the key to position 2in the ignition
lock (Y page 179).
On vehicles with KEYLESS-GO ,press the
Start/Stop button twice (Y page 179).
X Check the coolant temperature display in
the instrument cluster.
The coolant temperature must be below
70 †.
X Turn the key to position 0in the ignition
lock (Y page 179).
X Slowl yturn cap :half aturn anti-clock-
wise to allo wexcess pressure to escape.
X Turn cap :furthe ranti-clockwise and
remove it.
If the coolant is at the level of marker bar =
in the fille rneck when cold, ther eisenough
coolant in coolant expansio ntank ;.
If the coolant level is approximatel y1.5 cm
above marker bar =in the fille rneck when
warm, ther eisenoughcoolant in coolant
expansio ntank ;.
X If necessary ,top up with coolant tha thas
been teste dand approved by Mercedes-
Benz.
X Replace cap :and turn it clockwise as far
as it will go. For furthe
rinformatio noncoolant, see
(Y page 479).
Topping up the windscreen washe rsys-
tem G
WARNING
Certai ncomponents in the engine compart-
ment could be ver yhot, e.g .the engine ,the
radiato rand parts of the exhaus tsystem.
There is ariskofi njury when accessing the
engine compartment.
As far as possible, allo wthe engine to cool
down and onl ytouch the components descri-
be dint he following. G
WARNING
If windscree nwashe rconcentrate come sinto
contact with hot components of the engine or
the exhaus tsystem ,itc an ignite .There is a
ris koff irea nd injury.
Make sure the windscree nwashe rc oncen-
trate does not come into contact with the filler neck. X
To open: pull cap:upwards by the tab.
X Top up with the premixe dwashe rfluid.
X To close: press cap :onto the fille rneck
unti lite ngages.
If the washe rfluid level drops belo wthe rec-
ommende dminimu mof1l itre, am essage
appear sinthe multifunctio ndisplay prompt-
ing yo utotop up the washe rfluid
(Y page 328). Engine compartment
383Maintenance and care Z