2015 MERCEDES-BENZ E-CLASS SALOON engine
[x] Cancel search: enginePage 414 of 497
N,y
ou must provide power to the vehicle's
electrical system in the same way as when
jump-startin g(Ypage 405).
Have the vehicle transported on atransporter
or trailer. Tow-starting (emergency engine
starting)
! Vehicles with automatic transmission
must not be tow-started. The transmission
may otherwise be damaged.
i You can find information on "Jump-start-
ing" under (Y page 405).
Before tow-starting, the following conditions
must be fulfilled:
R the battery is connected
R the engin ehas cooled down
R the exhaust system has cooled down
When tow-starting, it is important that you
observ ethe safet ynotes (Y page 407) and the
legal requirementsine ach respective coun-
try.
X Switch on the hazard warnin glamps
(Y page 145).
X Fit the towin geye (Y page 409).
X Secure the rigid towin gbar or the towing
rope.
X Depress the brake pedal and keep it
depressed.
X Turn the key to position 2in the ignition
lock.
X Depress the clutc hpedal fully, engage sec-
ond gear and continue to keep the clutch
pedal fully depressed.
X Release the brake pedal.
X Tow-start the vehicle.
X Release the clutc hpedal slowly, do not
depress the accelerator pedal while doing
so.
X When the engin ehas been started, imme-
diately depress the clutc hpedal fully and
shift to neutral. X
Pull over at asuitable place and sto pthe
vehicle safely, paying attention to road and
traffic conditions.
X Depress the parkin gbrake.
X Remove the rigid towin gbar or towin grope.
X Remove the towin geye (Y page 409).
X Switch off the hazard warnin glamps. Electrical fuses
Important safet
ynotes G
WARNING
If you manipulate, bridge or replace afaulty
fuse with afuse of ahigher amperage, the
electric cables could be overloaded. This may result in afire. There is arisk of an accident
and injury.
Always replace faulty fuses with specified new fuses of the correct amperage.
! Only use fuses that have been approved
for Mercedes-Benz vehicles and which
have the correct fuse ratin gfor the system
concerned. Otherwise, components or sys-
tem scould be damaged.
The fuses in your vehicle serv etodisconnect
faulty circuits. If afuse blows, all the compo-
nents on the circuit and their function swill
fail.
Blown fuses must be replaced with fuses of
the same rating, which you can recognise by
the colour and fuse rating. The fuse ratings
are listed in the fuse allocation chart.
If the newly inserted fuse also blows, have the
cause traced and rectified at aqualified spe-
cialist workshop, e.g. aMercedes-Benz Ser-
vice Centre. Befor
ereplacing afuse
Pay attention to the important safet ynotes
(Y page 411). Electrical fuses
411Breakdown assistance Z
Page 415 of 497
X
Safeguard the vehicl eagains trolling away
(Y page 205).
X Switch off the engine.
X Switch off al lelectrical consumers.
X Remove the key from the ignition lock.
or, on vehicles with KEYLESS‑GO,
X Ope nthe driver' sdoor.
The on-board electronics now have status
0.T hisist he same as the key having been
removed.
The driver' sdoorc an be closed again.
All indicator lamps in the instrument cluster
mus tbeo ff.
The fuses are locate dinvarious fus eboxes:
R fus ebox in the engine compartment on the
left-hand sid eofthe vehicle, when viewed
in the direction of travel
R fus ebox in the boot/luggage compartment
on the right-hand sid eofthe vehicle, when
viewe dinthe direction of travel
The fus ealloc ation chart is locate dinthe
vehicl etool kit in the stowag ecompartment
under the boot/luggage compartment floor
(Y page 395). Fus
eboxin the engine compartment
Pa ya ttention to the important safety notes
(Y page 411). G
WARNING
Whe nthe bonne tiso pen, and the windscreen
wipers are set in motion, yo ucan be injured by
the wipe rlinkage. There is ariskofi njury.
Alway sswitch off the windscreen wipers and
the ignition before opening the bonnet.
! Make sure tha
tnomoisture can enter the
fus eb ox when the cove risopen.
! Whe
nclosing the cover, make sure tha tit
is lying correctly on the fus ebox. Moisture
seeping in or dirt could otherwise impair
the operation of the fuses. X
Make sure tha tthe windscreen wipers are
switche doff.
X Ope nthe bonnet.
X Remove any existing moisture from the
fus eb ox using adry cloth.
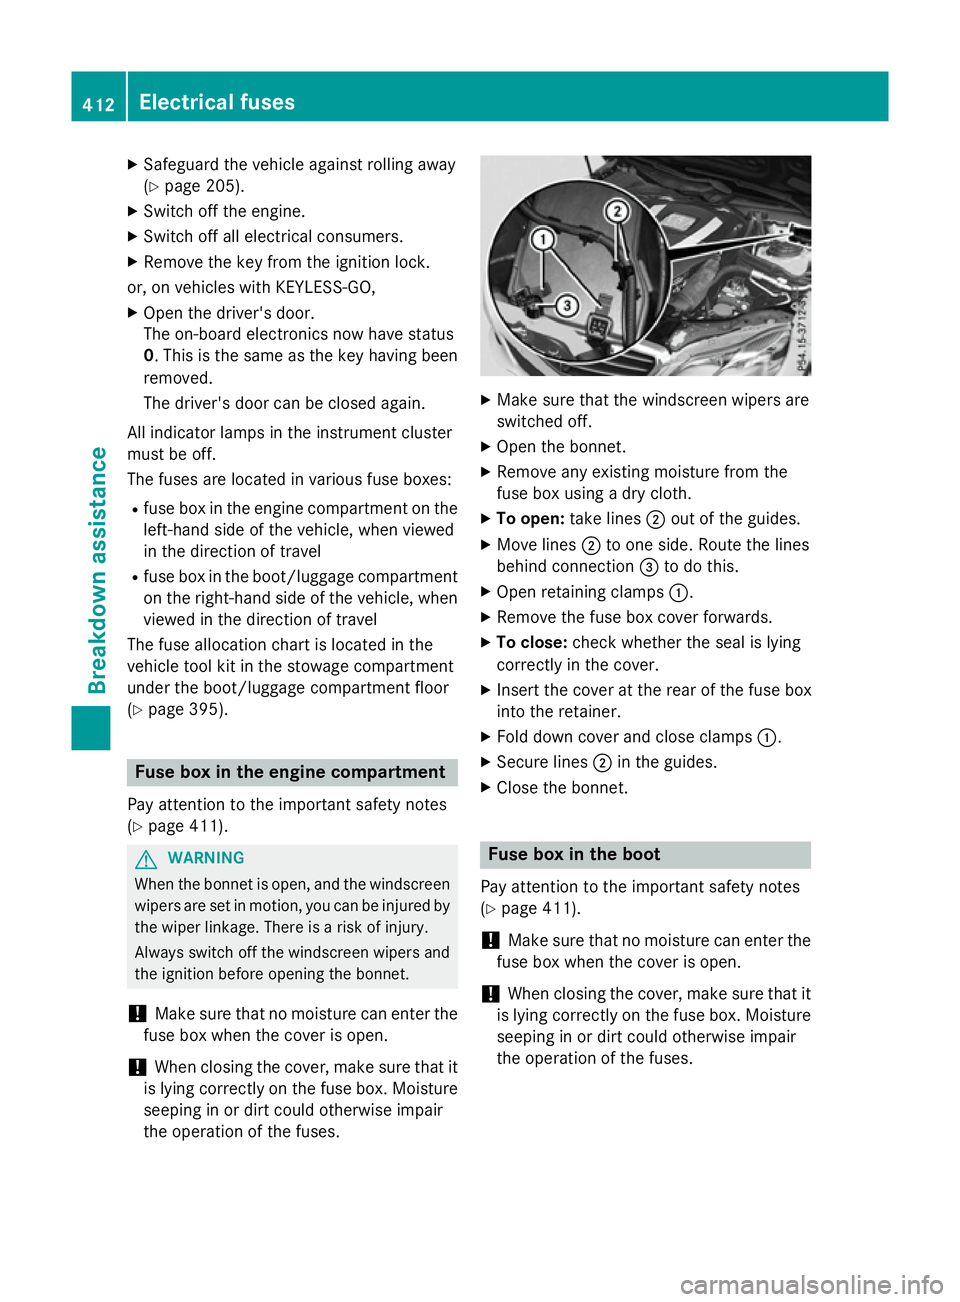
X To open: take lines ;outoft he guides.
X Mov elines ; to one side. Route the lines
behind connection =to do this.
X Ope nretaining clamps :.
X Remove the fus ebox cove rforwards.
X To close: check whethe rthe sea lislying
correctly in the cover.
X Insert the cove ratthe rea rofthe fus ebox
into the retainer.
X Fol dd ownc ove rand close clamps :.
X Secure lines ;in the guides.
X Close the bonnet. Fus
eboxin the boot
Pa ya ttention to the important safety notes
(Y page 411).
! Make sure tha
tnomoisture can enter the
fus eb ox when the cove risopen.
! Whe
nclosing the cover, make sure tha tit
is lying correctly on the fus ebox. Moisture
seeping in or dirt could otherwise impair
the operation of the fuses. 412
Electrical fusesBreakdown assistance
Page 429 of 497
Changing
awheel Flat tyre
You can fin dinformatio nonwhat to do in the
event of aflat tyr einthe"Breakdown assis-
tance" sectio n(Ypage 397). Information on
driving wit hMOExtended tyres in th eevent of
af lat tyr ecan be foun dunde r"Breakdown
assistance" (Y page 398).
Vehicles with an emergency spare wheel: in th eevent of aflat tyre, th eemergency
spar ewheel is fitte daccording to th edescrip-
tio nu nde r"Fittin gaw heel" (Y page 426). Interchanging th
ewheels G
WARNING
Interchangin gthe fron tand rear wheel smay
severely impai rthe driving characteristic sif
th ew heel sort yres have different dimensions.
The wheel brakes or suspension components may also be damaged. Ther eisariskofa cci-
dent.
Interchange fron tand rear wheel sonlyift he
wheel sand tyres are of th esame dimensions.
! On vehicle
sfitte dw ithat yrep ressure
monitor, electronic component sare loca-
te dint hewheel.
Tyre-fittin gtools should no tbeapplied in
th ea rea of th evalve, as this could damage
th ee lectronic components.
Only have tyres changed at aqualified spe-
cialist workshop.
Interchangin gthe fron tand rear wheels of
differin gdimension scan render th egeneral
operatin gpermit invalid.
Observ ethe instruction sand safety note sin
th e" Fittin gaw heel" sectio n(Ypage 426).
The wear pattern sonthefron tand rear tyres
differ dependin gontheoperatin gconditions.
Interchange th ewheels before aclear wear
pattern has formed on th etyres. Fron ttyres
typically wear mor eontheshoulder sand the
rear tyres in th ecentre. On vehicle
stha th ave th esame siz efront and
rear wheels ,you can interchange th ewheels
every 5,000 to 10,00 0kmdependin gonthe
degree of tyr ewear. Ensure that th edirection
of rotatio nismaintained.
Clean th econtac tsurfaces of th ewheel and
th eb rak edisc thoroughly every tim eawheel
is interchanged. Chec kthe tyrep ressure and,
if necessary, restar tthe tyrep ressure loss
warning system (Y page 422) or thetyrep res-
sure monito r(Ypage 424). Direction of rotation
Tyres wit haspecifie ddirection of rotation
have additional benefits, e.g .ifthere is arisk
of aquaplaning .Thes eadvantages can only be
gained if th etyres are fitte dcorres ponding to
th ed irection of rotation.
An arrow on th esidewal lofthetyreindicates
its correct direction of rotation. Storing wheels
Store wheels that are no tbein gused in acool,
dry and preferabl ydark place. Protect the
tyres against oil, grease, petrol and diesel. Fitting
awheel
Preparin gthe vehicle X
Stop th evehicle on solid ,non-sl ippery and
leve lground.
X Apply th eparking brake.
X Mov ethe fron twheels to th estraight-
ahead position.
X Vehicles with manua ltra nsmission:
depress th eclutch pedal fully and engage
first or revers egear.
X Vehicles with automatic transmission:
shif tthe transmission to position P.
X Vehicle swithA IRMATIC: mak esure that
"normal" leve lisselecte d(Ypage 231).
X Switch off th eengine. 426
Changing
awheelWheels and tyres
Page 431 of 497
jack could tip ove
rwitht he vehicl eraised.
There is ariskofi njury.
Onl yposit iont he jack at the appropriate jack-
ing point of the vehicle. The base of the jack
must be positioned vertically, directl yunder
the jacking point of the vehicle.
Observe the following when raising the vehi-
cle:
R to rais ethe vehicle, onl yusethe vehicle-
specific jack tha thas been teste dand
approved by Mercedes-Benz. If the jack is
used incorrectly ,itcould tip ove rwhile the
vehicl eisraised.
R the jack is designe donlytor aiseand hold
the vehicl efor as hort time whil eawheel
is being changed. It is not suitabl efor per-
formin gmaintenance work under the vehi-
cle.
R avoi dchanging the whee lonuphilland
downhil lslope s.
R befor eraisi ng the vehicle, safeguard it from
rolling away by applying the parking brake
and positioning whee lchocks. Never
release the parking brake whil ethe vehicle
is raised.
R the jack must be place donafirm, flatand
non-sli psurface. On aloo se surface, a
large ,flatl oad- bearing underlay must be
used .Ona slippery surface, anon-slip
underlay must be used ,e.g.r ubbe rmats.
R do not us ewoode nblocks or similar
objects as ajack underlay .Otherwise, the
jack will not be able to achieve its load-
bearing capacity du etothe restricted
height.
R make sure tha tthe distance between the
undersid eofthe tyres and the ground does
not exceed 3cm.
R neve rplace your hands or fee tunder the
raised vehicle.
R do not li eunder the vehicle.
R do not start the engine when the vehicl eis
raised. R
do not open or close adoorort he boot lid/
tailgate when the vehicl eisraised.
R make sure tha tnopersons ar epresent in
the vehicl ewhent he vehicl eisraised.
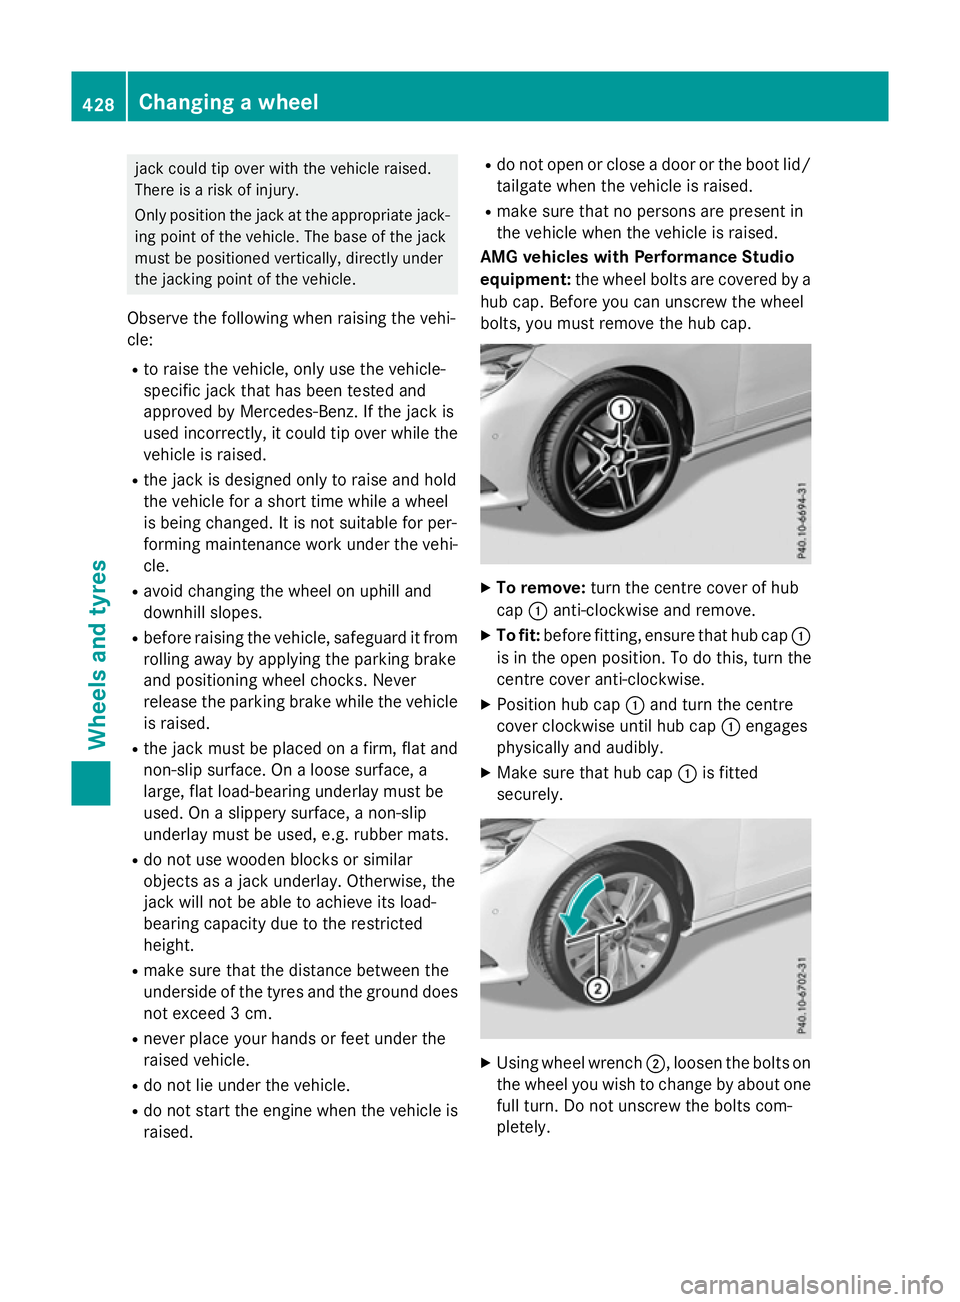
AM Gvehicle swithP erformanc eStudio
equipment: the wheelbolts ar ecovered by a
hu bc ap.B efore yo ucan unscrew the wheel
bolts ,you must remove the hu bcap. X
To remove: turnthe centre cove rofhub
cap :anti-clockwise and remove.
X To fit: beforefitting, ensur etha thub cap :
is in the open position. To do this, tur nthe
centre cove ranti-clockwise.
X Positio nhub cap :and tur nthe centre
cove rclockwise unti lhub cap :engages
physicall yand audibly.
X Make sure tha thub cap :is fitted
securely. X
Using whee lwrench ;,l oosent he bolts on
the whee lyou wish to change by abou tone
full turn. Do not unscrew the bolts com-
pletely. 428
Changin
gawheelWheels an dtyres
Page 471 of 497
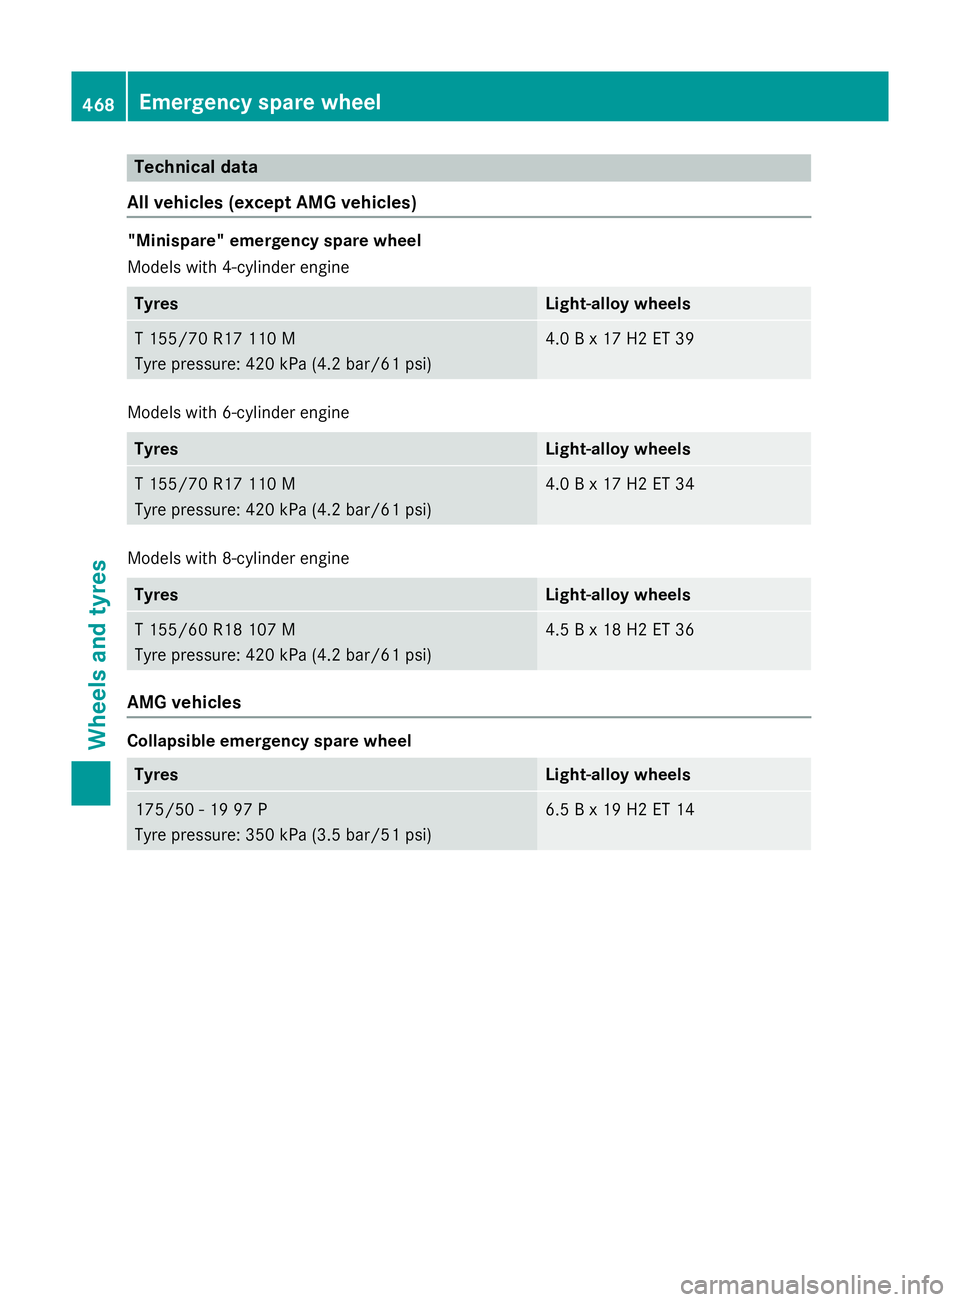
Technica
ldata
Al lv eh icle s(exce pt AM Gvehicles) "Minispare
"emergenc yspare wheel
Model swith4 -cylinde rengine Tyres Light-alloy wheels
T1
55/7 0R17110M
Tyr ep ressure: 420 kPa (4. 2bar/ 61 psi) 4.0
Bx17H2ET39 Models with 6-cylinder engine
Tyres Light-allo
ywheels T1
55/70 R17 110 M
Tyr ep ressure :420 kPa (4.2 bar/61 psi) 4.0
Bx17H2ET34 Models with 8-cylinder engine
Tyres Light-allo
ywheels T1
55/60 R18 107 M
Tyr ep ressure :420 kPa (4.2 bar/61 psi) 4.5
Bx18H2ET36 AMG vehicles
Collapsibl
eemergency spare wheel Tyres Light-allo
ywheels 175/50
-1997P
Tyr ep ressure :350 kPa (3.5 bar/51 psi) 6.5
Bx19H2ET14 468
Emergencys
pare wheelWheels and tyres
Page 473 of 497

Useful information
i This Owner's Manual describes all mod-
els, series and optional equipment for your
vehicle that were available at the time of
going to press. National variation sare pos-
sible. Not ethat your vehicle may not be
equipped with all of the function sdescri-
bed. This is also the case for system sand
function srelevan ttosafety.
i Read the information on qualified special-
ist workshops: (Y page 27). Information on technical data
G
WARNING
Hybrid vehicles :ensure that you read the
"HYBRID "supplement .You could otherwise
fail to recognise dangers.
You can find current technical data on the
Interne tonour Mercedes‑ Benzhomepage.
i The technical data was determined in
accordance with EU Directives .All data
applies to the vehicle' sstandard equip-
ment .The data may therefore differ for
vehicles with optional equipment .You can
obtain further information from a
Mercedes-Benz Service Centre. Vehicle electronics
Tampering with the engine electron-
ics
! Only have work carried out on the engine
electronics and its associated parts, such
as contro lunits ,sensors, actuating com-
ponents and connector leads, at aqualified
specialist workshop. Vehicle components
may otherwise wear more quickly and the
vehicle' soperatin gpermit may be invalida-
ted. Retrofitting two-way radios and
mobile phones (RF transmitters)
G
WARNING
If RF transmitter sare tampered with or not
properly retrofitted, the electromagnetic radi- ation they emit can interfer ewith the vehicle
electronics. This may jeopardis ethe opera-
tional safet yofthe vehicle. There is arisk of an
accident.
You should have all work on electrical and
electronic components carried out at aquali-
fied specialist workshop. G
WARNING
If you operate RF transmitter sincorrectly in
the vehicle, the electromagnetic radiation
could interfer ewith the vehicle electronics,
e.g.:
R if the RF transmitter is not connected to an
exterior aerial
R the exterior aerial has been fitted incor-
rectly or is not alow-reflection type
This could jeopardis ethe operatin gsafet yof
the vehicle. There is arisk of an accident.
Have the low-reflection exterior aerial fitted at
aq ualified specialist workshop. When oper-
ating RF transmitter sinthe vehicle, always
connec tthem to the low-reflection exterior
aerial.
! The operatin
gpermit may be invalidated if
the instructions for installation and use of
RF transmitter sare not observed.
In particular, the following condition smust
be complied with:
R only approved wavebands may be used.
R observ ethe maximum permissible out-
put in thes ewavebands.
R only approved aerial position smay be
used.
Excessiv elevels of electromagnetic radiation
may cause damage to your health and to the
health of others. The use of an exterior aerial
takes int oconsideration the scientific discus- 470
Vehicle electronicsTechnical data
Page 476 of 497

X
Slide the right-hand front sea ttoits rear-
mos tposition.
X Fol dfloor covering :upwards.
VIN ;can be seen. Engine number
The engine number is stampe dinto the crank-
case. Yo ucan obtain further information from
any qualified specialist workshop. Servic
eproducts and capacities Important safety notes
G
WARNING
Service product can be poisonous and haz-
ardou stohealth. There is ariskofi njury.
Observe the instructions on the respective
original containe rwhenu sing ,storing and dis-
posing off service products. Alway sstore ser-
vice products in the seale doriginal container.
Alway skeep service products ou tofthe reach
of children. H
Environmental note
Dispose of service products in an environ-
mentally-responsible manner.
Service products includ ethe following:
R fuels
R exhaus tgas aftertreatment additives, e.g.
AdBlue ®
R lubricants (e.g. engine oil, transmissio noil)
R coolant
R brake fluid
R windscreen washe rfluid
R climate control system refrigerant
Components and service products mus tbe
matched .Only us eproducts recommended
by Mercedes-Benz. Damage which is caused
by the us eofproducts which have not been
recommended is not covered by the
Mercedes-Benz warranty or goodwil lges- tures. The
yare listed in this Mercedes-Benz
Owner's Manua linthe appropriate section.
Yo uc an identif yservice products approved
by Mercedes-Benz by the following inscrip-
tions on the container:
R MB-Freigab e(e.g. MB-Freigab e229.51)
R MB Approva l(e.g. MB Approva l229.51)
Othe rdesignations or recommendations indi-
cate alevel of quality or aspecification in
accordance with an MB Shee tNum ber(e.g.
MB 229.5) .The yh aven ot necessaril ybeen
approved by Mercedes-Benz.
Othe ride ntifications ,for example:
R 0W -30
R 5W -30
R 5W -40
Further information can be obtaine dfrom any
Mercedes-Benz Service Centre or on the
Interne tath ttp://bevo.mercedes-benz.com. Fuel
Important safety notes G
WARNING
Fue lish ighl yf lammable. If yo uhandlef uel
incorrectly, ther eisariskoff irea nd explo-
sion.
Yo um usta void fire, nake dflames ,creating
sparks and smoking. Switch off the engine
and ,ifa pplicable, the auxiliary heating before
refuelling. G
WARNING
Fuels are poisonous and hazardou stohealth.
There is adanger of injury.
Do not swallo wfuelorl etit come into contact
with skin, eyes or clothing .Donot inhale fuel
vapours. Kee pfuels ou tofthe reach of chil-
dren. Servic
eproducts and capacities
473Technical data
Z
Page 477 of 497

If you or others come into contact with fuel,
observe the following:
R Wash the fuel off any affected areasofs kin
with water and soap immediately.
R If you get fuel in youre yes,rinse them thor-
oughlyw ith clean water immediately.S eek
immediate medica lattention.
R If fuel is swallowed, seek immediate medi-
cal attention. Do not induce vomiting.
R Change any clothing that has come into
contact with fuel immediately.
Tank capacity The total capacity of the fuel tank may vary,
depending on the vehicle equipment.
Model Total capa-
city E5
00
E5 00 4MATIC 80.0 l
AMG vehicles
66.0 l
or
80.0 l All other models
59.0 l
or
80.0 l Model Of which
reserve fuel Models with 59.0
ltotal
capacity Approx.
8.0 l Models with 80.0
ltotal
capacity Approx.
9.0 l AMG vehicles
Approx.
14.0 l Petrol
Fuel grade
!
Do not use dieseltor
efuel vehicleswith a
petrol engine. Do not switch on the ignition if you accidentally refuel with the wrong
fuel.O therwise ,the fuel wille nter the fuel
system. Even small amounts of the wrong
fuel can resultind amage to the fuel system
and the engine. Notify aqualified specialist
workshop and have the fuel tank and fuel
lines drained completely.
! Only refuel using premium-grade unlea-
ded petrol with at least 95 ROZ/85 MOZ,
that conforms to Europea nstandard
EN 228 or EDIN 51626–1 or an equivalent
specification.
Fuel of this specification can contain up to
10 %ethanol.
Fuel that does not conform to EN 228 or
ED IN 51626–1 can leadtoi ncreased wear
and damage the engine and exhaust sys-
tem.
! Only use the fuel recommended. Operat-
ing the vehicle with other fuelsc an leadto
engine failure.
! Do not use the following:
R E85 (petrol with 85% ethanol)
R E100 (100% ethanol)
R M15 (petrol with 15% methanol)
R M30 (petrol with 30% methanol)
R M85 (petrol with 85% methanol)
R M100 (100% methanol)
R Petrol with additive scontaining metal
R Diesel
Do not mix such fuel switht he fuel recom-
mended for you rvehicle. Do not use addi-
tives. Otherwise ,engine damage may
occur. Thi sdoes not include cleaning addi-
tives for the remova land prevention of res-
idu eb uild-up. Petrol must only be mixed
with additive srecommended by Mercedes-
Benz; see "Additives". You can obtai nfur- 474
Service products and capacitiesTechnical data