2015 MERCEDES-BENZ E-CLASS ESTATE park assist
[x] Cancel search: park assistPage 408 of 497
Jump-starting
For the jump-starting procedure, use only the jump-starting connection point, consisting of a positive terminal and an earth point, in the engine compartment. G
WARNING
Battery acid is caustic. There is arisk of injury.
Avoid contact with the skin, eyes or clothing. Do not breathe in any battery gases. Do not lean over the battery. Keep the batteries out of the reach of children. Immediately rinse off battery acid
thoroughly with plenty of clean water and seek medical attention at once. G
WARNING
During charging and jump-starting, explosive gases can escape from the battery. There is arisk
of an explosion.
Particularly avoid fire, naked flames, creating sparks and smoking. Ensure there is sufficient
ventilation while charging and jump-starting. Do not lean over abattery. G
WARNING
During the charging process, abattery produces hydrogen gas. If ashort circuit occurs or sparks
are created, the hydrogen gas can ignite. There is arisk of an explosion.
R Make sure that the positive terminal of aconnected battery does not come into contact with
vehicle parts.
R Never place metal objects or tools on abattery.
R It is important that you observe the described order of the battery terminals when connecting
and disconnecting abattery.
R When jump-starting, make sure that the battery poles with identical polarity are connected.
R It is particularly important to observe the described order when connecting and disconnecting
the jump leads.
R Never connect or disconnectt he battery terminals while the engine is running.G
WARNING
Ad ischarged battery can freeze at temperatures below freezing point. When jump-starting the
vehicle or charging the battery, gases can escape from the battery. There is arisk of an explosion.
Allow the frozen battery to thaw out before charging it or jump-starting.
! Vehicles with
apetrol engine: avoid repeated and lengthy startinga ttempts. Otherwise,
the non-combusted fuel may damage the catalytic converter.
HYBRID vehicles: make sure that you read the "HYBRID" Supplement included in the vehicle
literature. You could otherwise fail to recognise dangers, e.g. due to high voltage. Jump-starting
405Breakdown assistance Z
Page 409 of 497
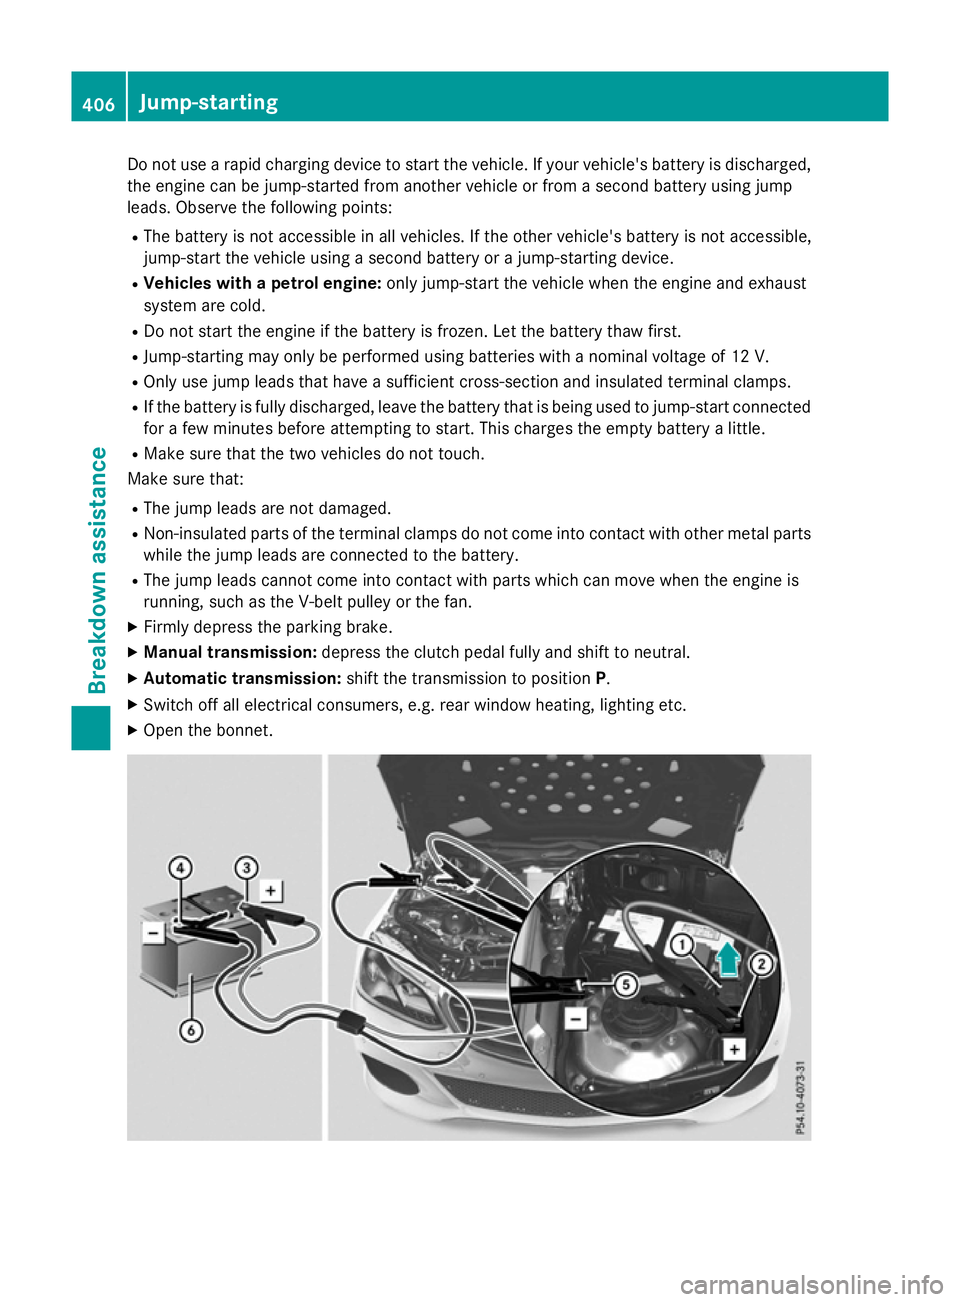
Do not us
earapid charging device to start the vehicle. If your vehicle' sbattery is discharged,
the engine can be jump-started fro manothe rvehicl eorf romas econd battery using jump
leads. Observe the following points:
R Th eb attery is not accessibl einallvehicles .Ifthe other vehicle' sbattery is not accessible,
jump-star tthe vehicl eusing asecond battery or ajump-starting device.
R Vehicle swithap etrolengine: onlyjump-star tthe vehicl ewhent he engine and exhaust
syste marecold.
R Do not start the engine if the battery is frozen. Let the battery tha wfirst.
R Jump-starting ma yonlybep erforme dusing batteries with anominal voltag eof12V.
R Onl yusejum pleads thathaveas ufficient cross-sectio nand insulate dtermina lclamps.
R If the battery is full ydischarged, leav ethe battery tha tisb eing used to jump-star tconnected
for afew minute sbefor ea ttempting to start. This charge sthe empty battery alittle.
R Make sure tha tthe two vehicles do not touch.
Make sure that:
R Th ej um pleads aren ot damaged.
R Non-insulate dparts of the termina lclamps do not come into contact with other meta lparts
whil ethe jum pleads arec onnected to the battery.
R Th ej um pleads cannot come into contact with parts which can mov ewhent he engine is
running ,suc hast he V-bel tpulle yort he fan.
X Firml ydepress the parking brake.
X Manual transmission: depress the clutch peda lfully and shift to neutral.
X Automatic transmission: shift the transmission to position P.
X Switch off al lelectrica lconsumers ,e.g.r ea rw indo wh eating, lighting etc.
X Open the bonnet. 406
Jump-startingBreakdow
nassistance
Page 412 of 497
Fitting/removing th
etowing eye
Fitting th etowing eye G
WARNING
The exhaust tai lpipe may be extremely hot.
Ther eisar iskofb urning when removing the
rear cover.
Do no ttou ch th eexhaust tai lpipe. Use
extreme caution when removing th erear
cover. Towin
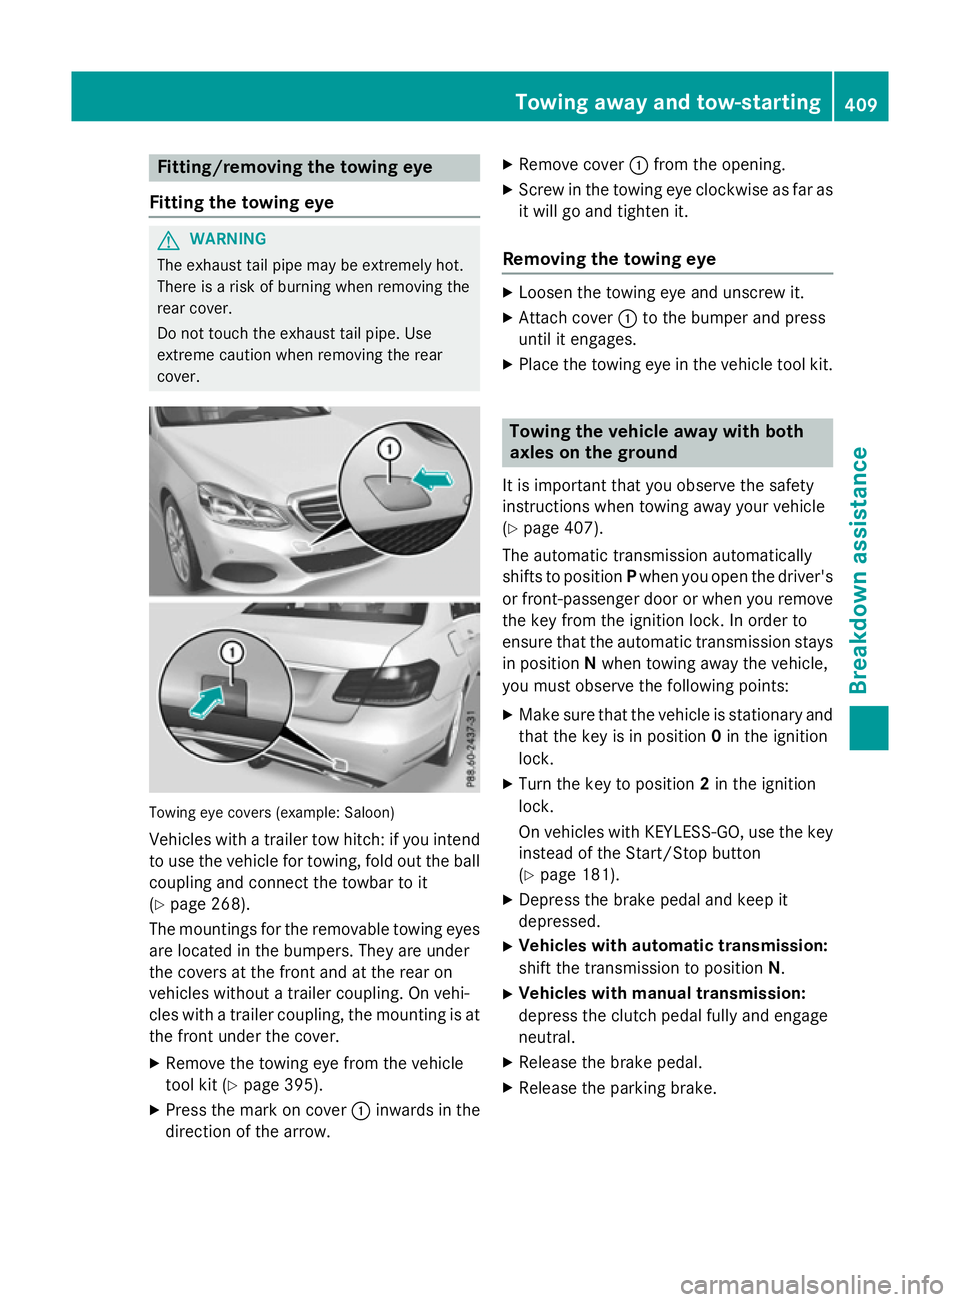
geye cover s(example: Saloon)
Vehicles wit hatrailer to whitch :ify ou intend
to use th evehicl efor towing, fol dout th eball
couplin gand connec tthe towbar to it
(Y page 268).
The mounting sfor th eremovable towin geyes
are locate dinthebumpers .They are under
th ec oversatt hefron tand at th erear on
vehicles without atrailer coupling. On vehi-
cle sw ithat railer coupling, th emounting is at
th ef ront under th ecover.
X Remove th etow inge ye from th evehicle
tool kit (Y page 395).
X Press th emarkonc over : inwards in the
direction of th earrow. X
Remove cover :from th eopening.
X Screw in th etow inge ye clockwise as far as
it will go and tighten it.
Removing th etowing eye X
Loosen th etow inge ye and unscrew it.
X Attac hcover : to th ebumper and press
until it engages.
X Plac ethe towin geye in th evehicl etoolkit. Towing th
evehicle awa ywith both
axles on th eground
It is important that you observ ethe safety
instruction swhen towin gaway your vehicle
(Y page 407).
The automatic transmission automatically
shifts to position Pwhen you open th edriver's
or front-passenger door or when you remove th ek eyfrom th eignition lock. In order to
ensure that th eautomatic transmission stays
in position Nwhen towin gaway th evehicle,
you must observ ethe followin gpoints:
X Mak esure that th evehicl eiss tationary and
that th ekeyis in position 0in th eignition
lock.
X Turn th ekeyto position 2in th eignition
lock.
On vehicles wit hKEYLESS-GO ,use th ekey
instead of th eStart/Sto pbutton
(Y page 181).
X Depress th ebrak epedal and keep it
depressed.
X Vehicles with automatic transmission:
shif tthe transmission to position N.
X Vehicles with manua ltra nsmission:
depress th eclutch pedal fully and engage
neutral.
X Releas ethe brak epedal.
X Releas ethe parking brake. Towin
gawaya nd tow-starting
409Breakdown assistance Z
Page 413 of 497
X
Switch on the hazard warning lamps
(Y page 145).
X Leave the key in position 2in the ignition
lock.
i Whe
ntowing with the hazard warning
lamps switche don, us ethe combination
switch as usua ltosignal achange of direc-
tion. In this case, onl ythe turn signal sfor
the desired direction flash. Whe nyou reset
the combination switch, the hazard warn-
ing lamps star tflashing again. Towin
gthe vehicle awa ywitht he rear
axl eraised
! Vehicles with 4MATI
Cmustn ot be towed
with the front or rea raxler aised ;otherwise,
the transmissio nmay be damaged.
! Vehicles with automatic transmission
mus tnot be towed with the rea raxler aised.
The car/traile rcombination may otherwise
swerve or eve noverturn.
! The ignition mus
tbes witche doff if you
are towing the vehicl ewitht he rea raxle
raised .Intervention by ESP ®
could other-
wise damag ethe brake system.
Onl yvehicle swithout 4MATIC can be
towed awa ywitht he rear axl eraised.
X Switch on the hazard warning lamps
(Y page 145).
X Mov ethe front wheel stothe straight-
ahea dposition.
X Turn the key in the ignition lock to position
0 and remove the key from the ignition
lock.
X Whe nleaving the vehicle, take the key or
the KEYLESS-GO key with you.
Whe ntowing your vehicl eawayw itht he rear
axl eraised ,itisi mportant tha tyou observe
the safety instructions (Y page 407). Transporting the vehicle
! Yo
um ay onl ysecure the vehicl ebythe
wheels, not by parts of the vehicl esuchas
axl eors teering components .Otherwise,
the vehicl ecould be damaged.
The towing eyes or traile rtow hitch can be
used to pull the vehicl eonto atraile rort rans-
porter if yo uwishtot ranspor tit.
X Vehicles with manual transmission:
depress the clutch peda lfully and shift to
neutral.
X Vehicles with automatic transmission:
turn the key to position 2in the ignition
lock.
X Shift the automatic transmissio ntoposi-
tion N.
As soon as the vehicle is loaded: X Prevent the vehicl efrom rolling away by
applying the parking brake.
X Vehicles with manual transmission:
depress the clutch peda lfully and engage
first or reverse gear.
X Vehicles with automatic transmission:
shift the automatic transmissio ntoposi-
tion P.
X Turn the key in the ignition lock to position
0 and remove the key from the ignition
lock.
X Secure the vehicle. Note
sfor 4MATIC vehicles
! Vehicles with 4MATI
Cmustn ot be towed
with the front or rea raxler aised ;otherwise,
the transmissio nmay be damaged.
If the vehicl ehastransmissio ndamageor
damag etothe front or rea raxle, have it trans-
ported on atransporter or trailer.
In the even tofdamage to the electrical
system
If the battery is defective, the automatic
transmissio nwillbel ocked in position P.To
shift the automatic transmissio ntoposition 410
Towin
gawayand tow-startingBreakdown assistance
Page 414 of 497
N,y
ou must provide power to the vehicle's
electrical system in the same way as when
jump-startin g(Ypage 405).
Have the vehicle transported on atransporter
or trailer. Tow-starting (emergency engine
starting)
! Vehicles with automatic transmission
must not be tow-started. The transmission
may otherwise be damaged.
i You can find information on "Jump-start-
ing" under (Y page 405).
Before tow-starting, the following conditions
must be fulfilled:
R the battery is connected
R the engin ehas cooled down
R the exhaust system has cooled down
When tow-starting, it is important that you
observ ethe safet ynotes (Y page 407) and the
legal requirementsine ach respective coun-
try.
X Switch on the hazard warnin glamps
(Y page 145).
X Fit the towin geye (Y page 409).
X Secure the rigid towin gbar or the towing
rope.
X Depress the brake pedal and keep it
depressed.
X Turn the key to position 2in the ignition
lock.
X Depress the clutc hpedal fully, engage sec-
ond gear and continue to keep the clutch
pedal fully depressed.
X Release the brake pedal.
X Tow-start the vehicle.
X Release the clutc hpedal slowly, do not
depress the accelerator pedal while doing
so.
X When the engin ehas been started, imme-
diately depress the clutc hpedal fully and
shift to neutral. X
Pull over at asuitable place and sto pthe
vehicle safely, paying attention to road and
traffic conditions.
X Depress the parkin gbrake.
X Remove the rigid towin gbar or towin grope.
X Remove the towin geye (Y page 409).
X Switch off the hazard warnin glamps. Electrical fuses
Important safet
ynotes G
WARNING
If you manipulate, bridge or replace afaulty
fuse with afuse of ahigher amperage, the
electric cables could be overloaded. This may result in afire. There is arisk of an accident
and injury.
Always replace faulty fuses with specified new fuses of the correct amperage.
! Only use fuses that have been approved
for Mercedes-Benz vehicles and which
have the correct fuse ratin gfor the system
concerned. Otherwise, components or sys-
tem scould be damaged.
The fuses in your vehicle serv etodisconnect
faulty circuits. If afuse blows, all the compo-
nents on the circuit and their function swill
fail.
Blown fuses must be replaced with fuses of
the same rating, which you can recognise by
the colour and fuse rating. The fuse ratings
are listed in the fuse allocation chart.
If the newly inserted fuse also blows, have the
cause traced and rectified at aqualified spe-
cialist workshop, e.g. aMercedes-Benz Ser-
vice Centre. Befor
ereplacing afuse
Pay attention to the important safet ynotes
(Y page 411). Electrical fuses
411Breakdown assistance Z
Page 422 of 497
M+S tyres with
atread depth of less than
4m mm ust be replaced.
At temperatures below +7 †, use winter tyres or all-season tyres. Both types of tyre are
identified by the M+S marking.
Only winter tyres bearing the isnowflake
symbol in addition to the M+S marking pro-
vide the best possible grip in wintry road con- ditions.
Only these tyres will allow driving safety sys-
tems such as ABS and ESP ®
to function opti-
mally in winter. These tyres have been devel-
oped specifically for driving in snow.
Use M+S tyres of the same make and tread on all wheels to maintain safe handling charac-
teristics.
Always observe the maximum permissible
speed specified for the M+S tyres you have
fitted.
If you fit M+S tyres that have alower maxi-
mum permissible speed than that of the vehi-
cle, affix acorresponding warning label in the
driver's field of vision. This can be obtained at aq ualified specialist workshop.
Under these circumstances, you should also
restrict the maximum speed of the vehicle
using permanent SPEEDTRONIC so that it
does not exceed the maximum permissible
speed for the M+S tyres (Y page 217).
When you have fitted the M+S tyres:
X Check the tyre pressures (Y page 420).
X Restart the tyre pressure loss warning sys-
tem (Y page 422).
X Restart the tyre pressure monitor
(Y page 424).
Further information on driving with the emer-
gency spare wheel (Y page 465).Snow chains
G
WARNING
If you have fitted snow chains to the front
wheels, they may scrape against the vehicle body or chassis components. This could
cause damage to the vehicle or the tyres.
There is
arisk of an accident.
To avoid hazardous situations:
R never fit snow chains on the front wheels
R fit snow chains to the rear wheels in pairs.
! Vehicles with steel wheels:
if you fit
snow chains on steel wheels, you may dam-
age the hub caps. Remove the hub caps
from the relevant wheels before fittingt he
snow chains.
For safety reasons, Mercedes-Ben zrecom-
mends that you only use snow chains that
have been specifically approved for your vehi- cle by Mercedes-Benz, or that are of acorre-
sponding standard of quality. For more infor-
mation, please contact aqualified specialist
workshop.
If you intendtof it snow chains, please bear
the following points in mind:
R snow chains cannot be fitted to all wheel-
tyre combinations. Permissible wheel-tyre
combinations (Y page 431).
R only use snow chains if the road surface is
completely snow-covered. Remove the
snow chains as soon as possible when you
come to aroad that is not snow-covered.
R local regulations may restrict the use of
snow chains. Observe the appropriate reg-
ulations if you wish to fit snow chains.
R do not exceed the maximum permissible
speed of 50 km/h.
R on vehicles with AIRMATIC, you must drive
at raised vehicle level if snow chains have
been fitted (Y page 231).
R when snow chains are fitted, never use
Active Parking Assist (Y page 239).
i You may wish to deactivate ESP ®
when
pulling away with snow chains fitted:
R all vehicles (except AMG vehicles):
(Y page 84)
R AMG vehicles: (Y page 85) Winter operation
419Wheels and tyres Z
Page 429 of 497
Changing
awheel Flat tyre
You can fin dinformatio nonwhat to do in the
event of aflat tyr einthe"Breakdown assis-
tance" sectio n(Ypage 397). Information on
driving wit hMOExtended tyres in th eevent of
af lat tyr ecan be foun dunde r"Breakdown
assistance" (Y page 398).
Vehicles with an emergency spare wheel: in th eevent of aflat tyre, th eemergency
spar ewheel is fitte daccording to th edescrip-
tio nu nde r"Fittin gaw heel" (Y page 426). Interchanging th
ewheels G
WARNING
Interchangin gthe fron tand rear wheel smay
severely impai rthe driving characteristic sif
th ew heel sort yres have different dimensions.
The wheel brakes or suspension components may also be damaged. Ther eisariskofa cci-
dent.
Interchange fron tand rear wheel sonlyift he
wheel sand tyres are of th esame dimensions.
! On vehicle
sfitte dw ithat yrep ressure
monitor, electronic component sare loca-
te dint hewheel.
Tyre-fittin gtools should no tbeapplied in
th ea rea of th evalve, as this could damage
th ee lectronic components.
Only have tyres changed at aqualified spe-
cialist workshop.
Interchangin gthe fron tand rear wheels of
differin gdimension scan render th egeneral
operatin gpermit invalid.
Observ ethe instruction sand safety note sin
th e" Fittin gaw heel" sectio n(Ypage 426).
The wear pattern sonthefron tand rear tyres
differ dependin gontheoperatin gconditions.
Interchange th ewheels before aclear wear
pattern has formed on th etyres. Fron ttyres
typically wear mor eontheshoulder sand the
rear tyres in th ecentre. On vehicle
stha th ave th esame siz efront and
rear wheels ,you can interchange th ewheels
every 5,000 to 10,00 0kmdependin gonthe
degree of tyr ewear. Ensure that th edirection
of rotatio nismaintained.
Clean th econtac tsurfaces of th ewheel and
th eb rak edisc thoroughly every tim eawheel
is interchanged. Chec kthe tyrep ressure and,
if necessary, restar tthe tyrep ressure loss
warning system (Y page 422) or thetyrep res-
sure monito r(Ypage 424). Direction of rotation
Tyres wit haspecifie ddirection of rotation
have additional benefits, e.g .ifthere is arisk
of aquaplaning .Thes eadvantages can only be
gained if th etyres are fitte dcorres ponding to
th ed irection of rotation.
An arrow on th esidewal lofthetyreindicates
its correct direction of rotation. Storing wheels
Store wheels that are no tbein gused in acool,
dry and preferabl ydark place. Protect the
tyres against oil, grease, petrol and diesel. Fitting
awheel
Preparin gthe vehicle X
Stop th evehicle on solid ,non-sl ippery and
leve lground.
X Apply th eparking brake.
X Mov ethe fron twheels to th estraight-
ahead position.
X Vehicles with manua ltra nsmission:
depress th eclutch pedal fully and engage
first or revers egear.
X Vehicles with automatic transmission:
shif tthe transmission to position P.
X Vehicle swithA IRMATIC: mak esure that
"normal" leve lisselecte d(Ypage 231).
X Switch off th eengine. 426
Changing
awheelWheels and tyres