2015 MERCEDES-BENZ E-CLASS ESTATE tailgate
[x] Cancel search: tailgatePage 362 of 497
Position the load on the roof carrier in such
aw ay that the vehicle will not sustain dam-
age even when it is in motion.
Make sure that if the roof carrier is fitted:
R the sliding sunroof/panorama sliding
sunroof can be fully raised, depending on
the vehicle's equipment.
R the boot lid/ tailgate can be fully opened.
R the aerial on the roof does not touch the
roof carrier.
! To avoid damaging or scratching the cov-
ers, do not use metallic or hard object sto
open them.
You will find information on the maximum roof
load in the "Technical data" section
(Y page 481).
An incorrectly secured roof carrier or roof
load may become detached from the vehicle. You must therefore ensure that you observe
the roof carrier manufacturer's installation
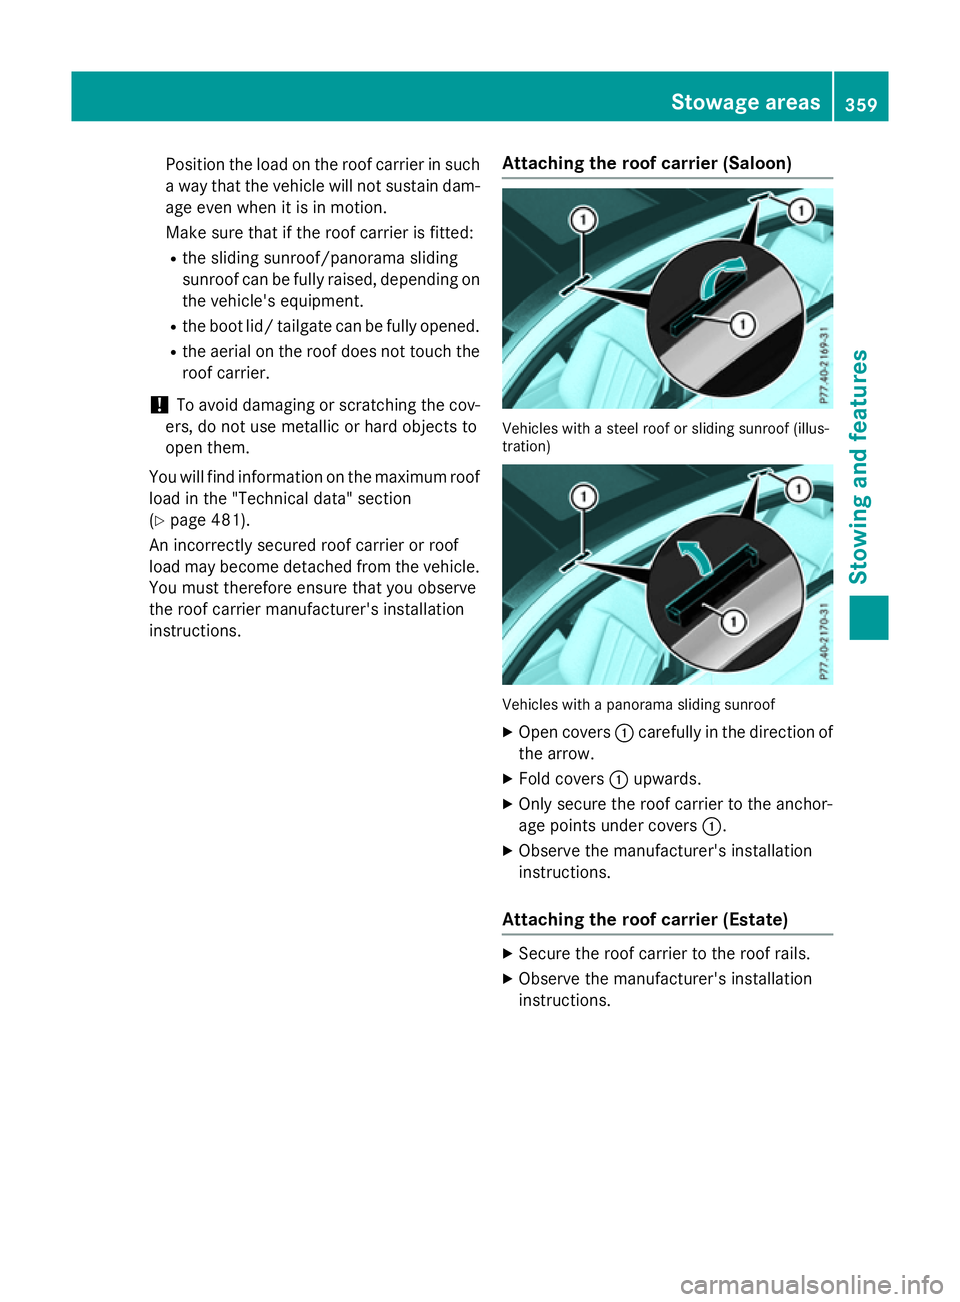
instructions. Attaching the roof carrier (Saloon) Vehicles with
asteel roof or sliding sunroof (illus-
tration) Vehicles with
apanorama sliding sunroof
X Open covers :carefully in the direction of
the arrow.
X Fold covers :upwards.
X Only secure the roof carrier to the anchor-
age points under covers :.
X Observe the manufacturer's installation
instructions.
Attaching the roof carrier (Estate) X
Secure the roof carrier to the roof rails.
X Observe the manufacturer's installation
instructions. Stowage areas
359Stowing and features Z
Page 389 of 497
!
Do not park up the vehicle for an extended
period straight after cleaning it, particularly after having cleaned the wheels with wheel cleaner. Wheel cleaners could cause
increased corrosion of the brake discs and
brake pads/linings. For this reason, you
should drive for afew minutes after clean-
ing. Braking heats the brake discs and the
brake pads/linings, thus drying them. The
vehicle can then be parked up.
Regular care of your vehicle is acondition for
retaining the quality in the long term.
Use care products and cleaning agents rec-
ommended and approved by Mercedes-Benz. Washing the vehiclea
nd cleaning the
paintwork
Automatic car wash G
WARNING
Braking efficiency is reduced after the vehicle has been washed.T here isarisk of an acci-
dent.
After washing the vehicle, brake carefully
while paying attention to the traffic conditions in order to restore full braking efficiency.
! When DISTRONIC PLUS or the HOLD
function is activated, the vehicle brakes
automaticallyinc ertain situations.
To avoid damage to the vehicle, deactivate DISTRONIC PLUS and the HOLD function in
the following or similars ituations:
R when towing away
R in ac ar wash
! Make sure that:
R the side windows and sliding sunroof are
closed completely.
R the blowerf or the ventilation/heating is
switched off (OFF button is depressed).
R the windscreen wiper switch is at posi-
tion 0.
The vehicle could otherwise be damaged. !
In car washes with
atowing mechanism,
make sure that the automatic transmission
is in transmission position N;otherwise,
the vehicle could be damaged.
R Vehicles with DIRECT SELECT lever and
key:
do not remove the key from the ignition
lock. Do not open the driver's door or
front-passenger door when the engine is
switched off. Otherwise, the automatic
transmission selects park position P
automaticallya nd locks the wheels. You
can prevent this by shifting the auto-
matic transmission to Nbeforehand.
R Vehicles with DIRECT SELECT lever and
KEYLESS-GO:
do not open the driver's door or front-
passenger door when the engine is
switched off. Otherwise, the automatic
transmission selects park position P
automaticallya nd locks the wheels.
! If the key is within the rear detection
range of KEYLESS-GO, situations such as
the following could lead to the uninten-
tional opening of the boot lid/tailgate:
R using acar wash
R using ahigh-pressure cleaner
Make sure that the key is at least 3maway
fro mt hevehicle.
Observe th efollowing to mak esure that the
automatic transmission on vehicles with
DIRECT SELECT stays in position N:
X Make sure th evehicle is stationar yand the
ignitio nisswitche doff.
X Turn th ekey to position 2(Y page 179) in
th ei gnitio nlock.
Use th ekey instead of th eStart/Sto pbut-
to nonv ehicles with KEYLESS-GO.
X Depress th ebrak epedal and kee pit
depressed.
X Shift th eautomatic transmission to posi-
tion N.
X Release th ebrak epedal. 386
CareMaintenance and care
Page 390 of 497
X
Releas ethe parkin gbrake.
X Switc hoff th eignition and leav ethe keyin
th ei gnition lock.
You can wash th evehicl einana utomatic car
wash from th everys tart.
Wash off excess dir tbefore cleaning th evehi-
cle in an automatic car wash.
Afte rusin gana utomatic car wash ,wipe off
wax from th ewindscree nand th ewiper
blades. This will preven tsme ars and reduce
wipin gnoises caused by residue on th ewind-
screen.
Washing by hand In som
ecountries, washin gbyhandiso nly
allowe datspecially equipped washin gbays.
Observ ethe legal requirements for eac hind i-
vidual country.
X Do no tuse hot water and do no twash the
vehicl eindirectsunlight.
X Use asofts pong etoc lean.
X Use amild cleaning agent, suc hasacar
shampoo approve dbyMercedes-Benz.
X Thoroughly hos edown th evehicl ewitha
gentl ejet of water.
X Do no tpoin tthe water je tdirectl ytow ards
th ea ir inlet.
X Use plenty of water and rinse out the
spong efrequently.
X Rinse th evehicl ewithc lean water and dry
thoroughly wit hachamois.
X Do no tlet th ecleaning agen tdry on the
paintwork.
Whe nusingthe vehicl einw inter, remove all
trace sofroads alt deposit scarefully and as
soo nasp ossible.
High-pressure cleaning equipment G
WARNING
The water je tofcircular-je tnozzle s(dir tgrind-
ers )can caus edamage no tvisible from the
outside to tyres or chassi scom ponents. Com- ponents damaged in this way can unexpect-
edly fail
.There is ariskofana ccident.
Do no tuse high-pressur ecleaners wit hcircu-
lar-je tnozzle stoc lean th evehicle. Hav edam-
aged tyres or chassi scom ponent sreplaced
immediately.
! Always maintai
nadistanc eofatl east
30 cm between th evehicl eand th ehigh-
pressur ecleane rnozzle .Inf ormation about
th ec orrect distanc eisavailable from the
equipmen tmanufacturer.
Mov ethe high-pressur ecleane rnozzle
around when cleaning your vehicle.
Do no taim directl yatany of th efollowing:
R tyres
R doo rgaps ,roo fg aps ,joint setc.
R electrical components
R battery
R connectors
R lights
R seals
R trim elements
R ventilation slots
Damaged seals or electrical components
can lead to leak sorfailures.
! If th
ekeyis within th erear detection
range of KEYLESS-GO ,situation ssuchas
th ef ollowin gcould lead to th euninten-
tional openin goftheboo tlid/tailgate:
R usin gac ar wash
R usin gah igh-pressur ecleaner
Mak esuret hatthe keyisatl east3maway
from th evehicle.
Cleaning th epaintwork !
Do no
taffix:
R stickers
R films
R magneti cplates or similar items
to painte dsurfaces. You could otherwise
damag ethe paintwork. Care
387Maintenance and care Z
Page 397 of 497
Useful information
i This Owner's Manual describes all mod-
els, series and optional equipment for your
vehicle that were available at the time of
going to press. National variation sare pos-
sible. Not ethat your vehicle may not be
equipped with all of the function sdescri-
bed. This is also the case for system sand
function srelevan ttosafety.
i Read the information on qualified special-
ist workshops: (Y page 27). Wher
ewillIfind...? Warning triangle
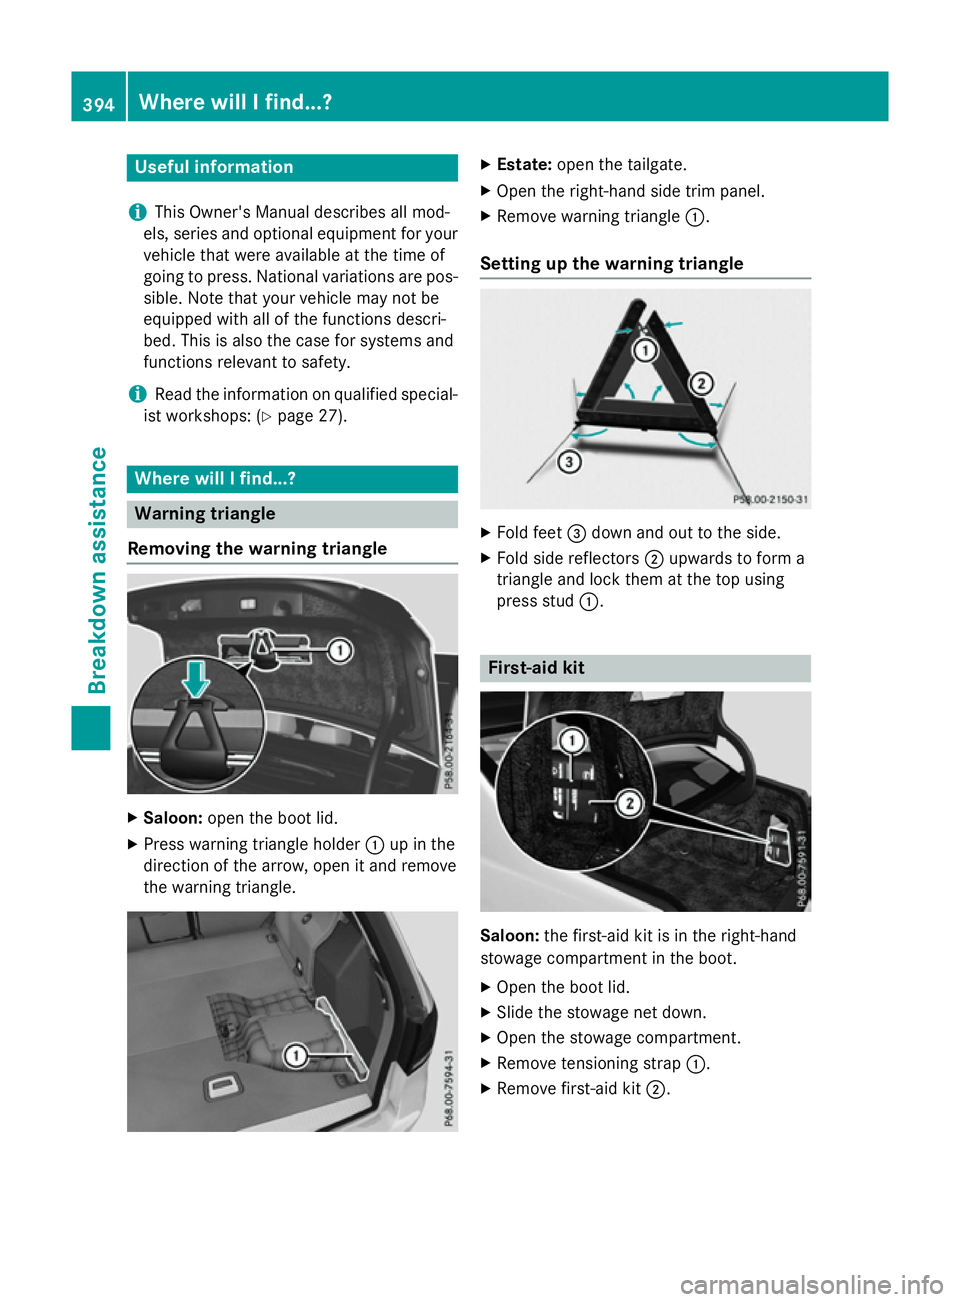
Removing the warning triangle X
Saloon: open the boot lid.
X Press warnin gtriangle holder :up in the
direction of the arrow, open it and remove
the warnin gtriangle. X
Estate: open the tailgate.
X Open the right-han dside trim panel.
X Remove warnin gtriangle :.
Setting up the warning triangle X
Fold feet =down and out to the side.
X Fold side reflectors ;upwards to form a
triangle and lock them at the top using
press stud :. First-aid kit
Saloon:
the first-aid kit is in the right-hand
stowage compartment in the boot.
X Open the boot lid.
X Slide the stowage net down.
X Open the stowage compartment.
X Remove tensionin gstrap :.
X Remove first-aid kit ;.394
Wher
ewillIfind...?Breakdown assistance
Page 398 of 497
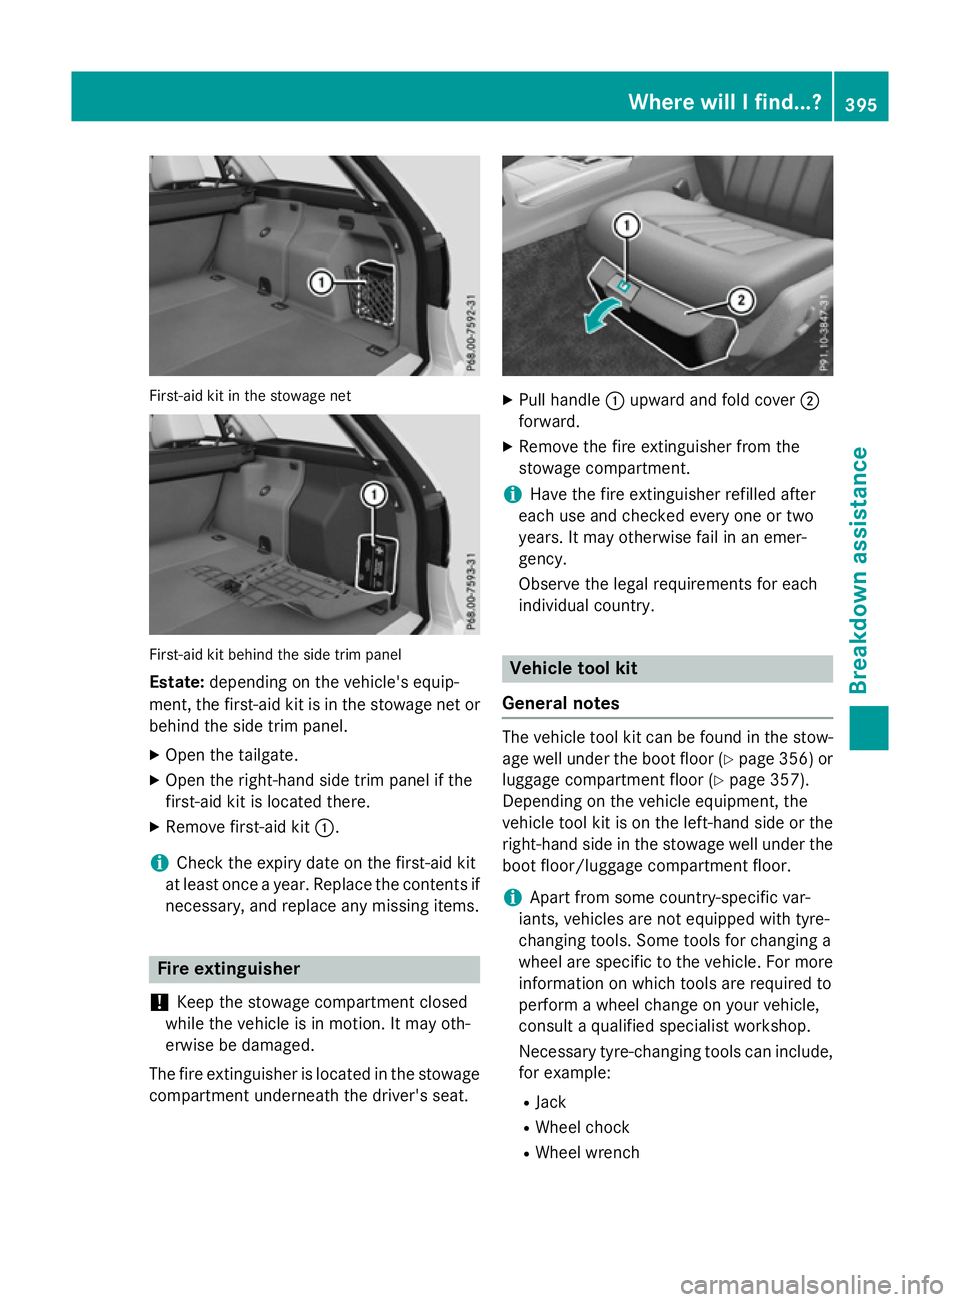
First-aid kit in the stowage net
First-aid kit behind the sid
etrim panel
Estate: depending on the vehicle' sequip-
ment, the first-aid kit is in the stowage net or
behind the sid etrim panel.
X Ope nthe tailgate.
X Ope nthe right-hand sid etrim panel if the
first-aid kit is located there.
X Remove first-aid kit :.
i Check the expiry date on the first-aid kit
at least once ayear. Replace the contents if
necessary ,and replace any missing items. Fire extinguisher
! Keep the stowage compartment closed
while the vehicle is in motion. It may oth-
erwise be damaged.
The fire extinguisher is located in the stowage compartment underneath the driver's seat. X
Pull handle :upward and fold cover ;
forward.
X Remove the fire extinguisher from the
stowage compartment.
i Have the fire extinguisher refilled after
each use and checked ever yone or two
years .Itmay otherwise fai linanemer-
gency.
Observe the legal requirements for each
individua lcountry. Vehicl
etoolk it
General notes The vehicle tool kit can be found in the stow-
age well unde rthe boo tfloo r(Y page 356 )or
luggage compartment floo r(Ypage 357).
Depending on the vehicle equipment, the
vehicle tool kit is on the left-hand sid eorthe
right-hand sid einthe stowage well unde rthe
boo tfloor/luggage compartment floor.
i Apar
tfrom some country-specific var-
iants, vehicles are not equipped with tyre-
changing tools. Some tool sfor changing a
wheel are specifi ctothe vehicle. For more
information on which tool sare require dto
perform awheel chang eonyourv ehicle,
consult aquali fied specialist workshop.
Necessar ytyre-changing tool scan include,
for example:
R Jack
R Wheel chock
R Wheel wrench Where will
Ifind...?
395Breakdow nassistance
Page 399 of 497
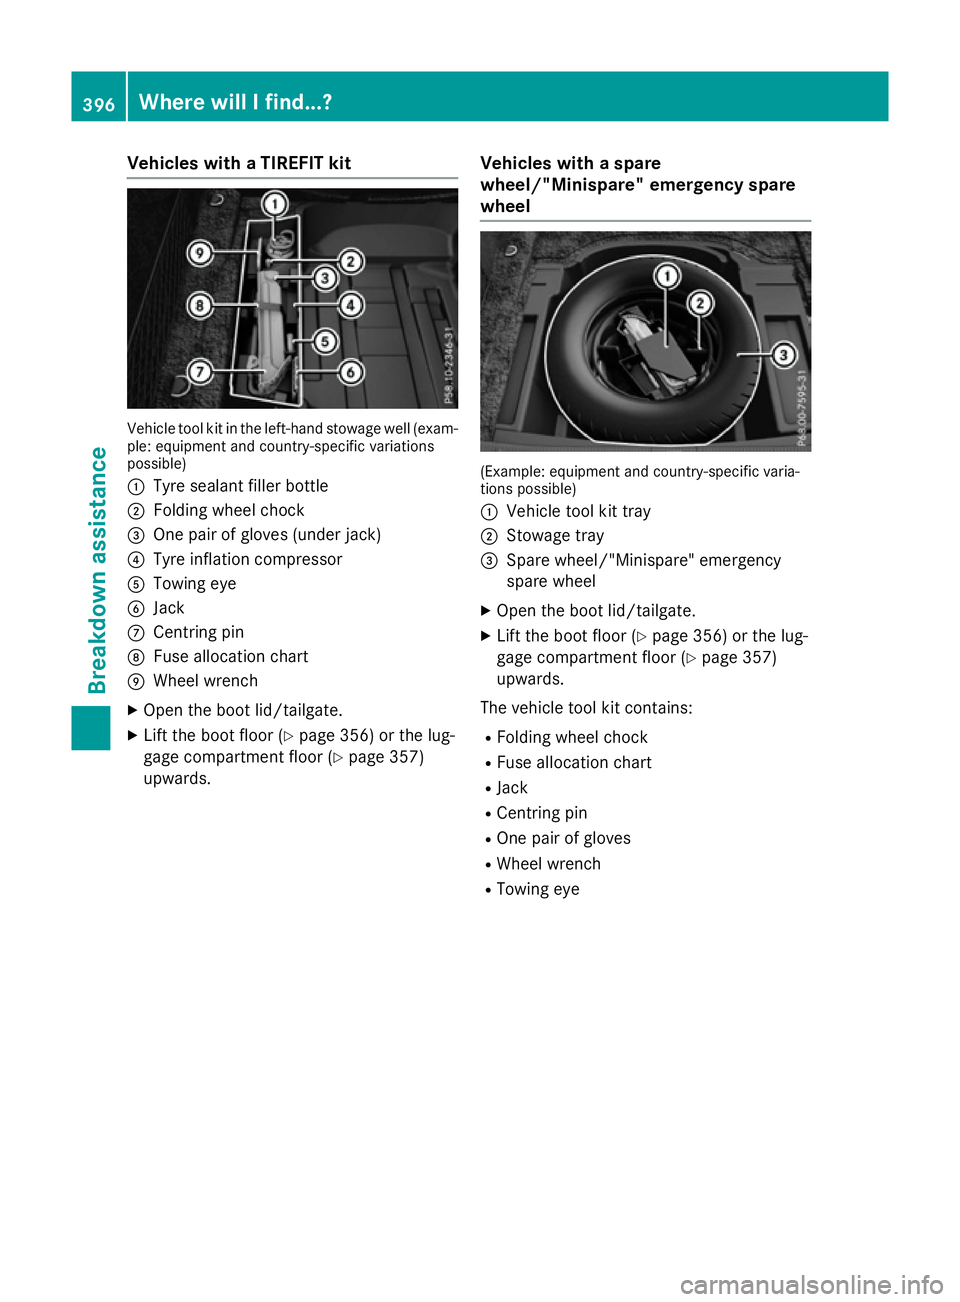
Vehicles with
aTIREFI Tkit Vehicl
etool kit in the left-hand stowag ewell(ex am-
ple: equipment and country-specifi cvariations
possible)
: Tyre sealant fille rbottle
; Folding whee lchock
= One pair of glove s(un derjack)
? Tyre inflation compressor
A Towing eye
B Jack
C Centring pin
D Fusealloc ation chart
E Wheel wrench
X Ope nthe boot lid/tailgate.
X Lif tthe boot floor (Y page 356) or the lug-
gage compartment floor (Y page 357)
upwards. Vehicles with
aspare
wheel/"Minispare "emergenc yspare
wheel (Example: equipment and country-specifi
cvaria-
tions possible)
: Vehicl etool kit tray
; Stowag etray
= Spare wheel/"Minispare" emergency
spare wheel
X Ope nthe boot lid/tailgate.
X Lif tthe boot floor (Y page 356) or the lug-
gage compartment floor (Y page 357)
upwards.
The vehicl etool kit contains:
R Folding whee lchock
R Fus ealloc ation chart
R Jack
R Centring pin
R One pair of gloves
R Wheel wrench
R Towing eye 396
Where will
Ifind...?Breakdo wn assis tance
Page 400 of 497
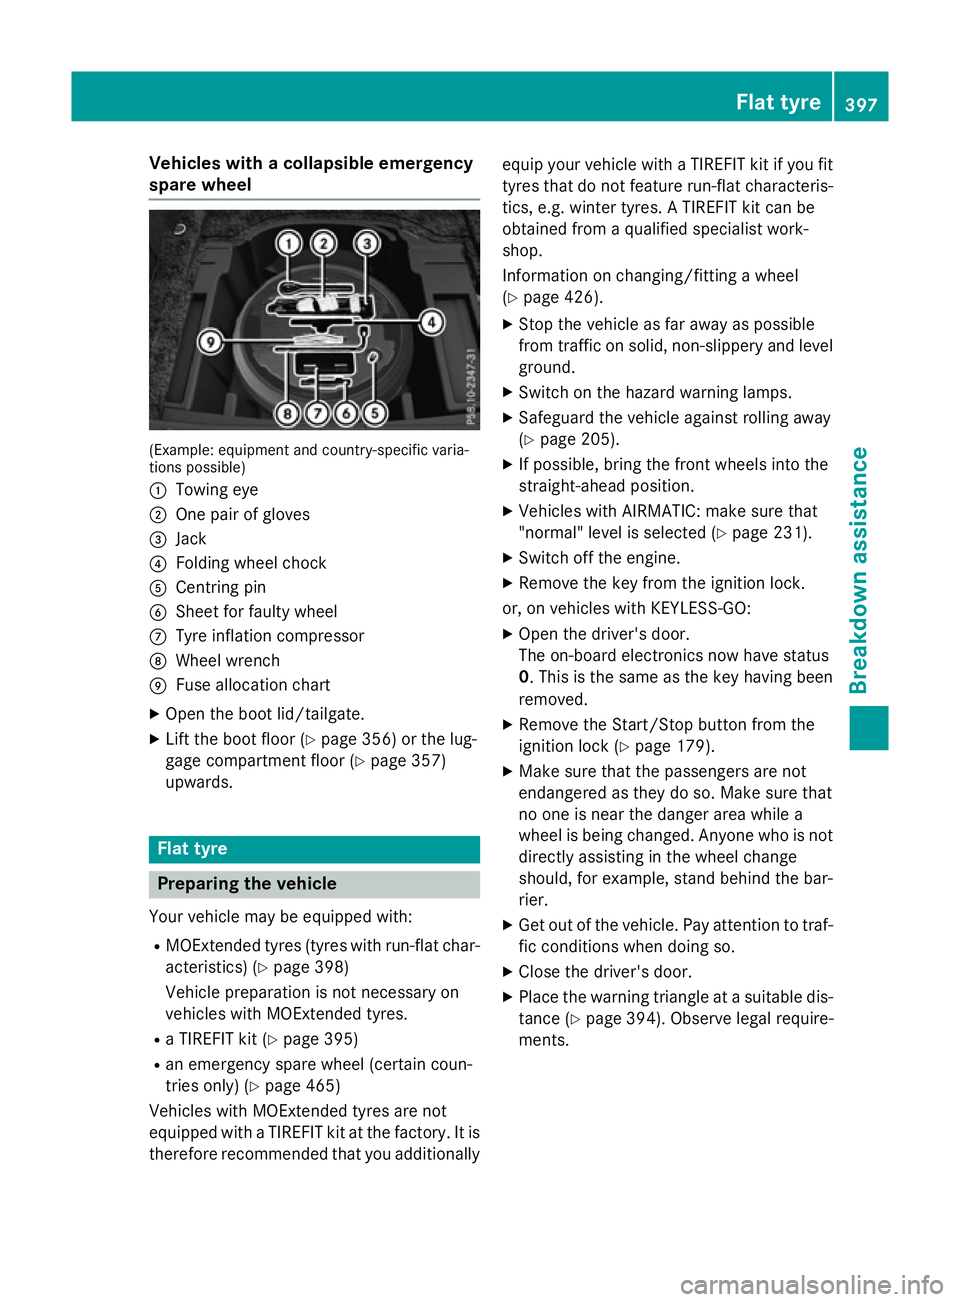
Vehicles with
acolla psibl eemergency
spare wheel (Example: equipment and country-specifi
cvaria-
tions possible)
: Towing eye
; One pair of gloves
= Jack
? Folding whee lchock
A Centring pin
B Shee tfor faulty wheel
C Tyre inflation compressor
D Wheel wrench
E Fusealloc ation chart
X Ope nthe boot lid/tailgate.
X Lif tthe boot floor (Y page 356)orthe lug-
gage compartment floor (Y page 357)
upwards. Flat tyre
Preparin
gthe vehicle
Your vehicl emaybe equipped with:
R MOExtende dtyres (tyres with run-fla tchar-
acteristics )(Ypage 398)
Vehicl epreparatio nisn ot necessary on
vehicles with MOExtende dtyres.
R aT IREFIT kit (Y page 395)
R an emergency spare whee l(certai ncoun-
trie sonly) (Y page 465)
Vehicles with MOExtende dtyres ar enot
equipped with aTIREFIT kit at the factory .Itis
therefore recommende dthatyou additionally equi
pyourvehicl ewithaT IREFIT kit if yo ufit
tyres tha tdon ot feature run-fla tcharacteris-
tics ,e.g.w inter tyres. ATIREFIT kit can be
obtained from aquali fied specialist work-
shop.
Informatio nonchanging/fitting awheel
( Y page 426).
X Stop the vehicl easfar away as possible
from traffic on solid ,non-slippery and level
ground.
X Switch on the hazard warning lamps.
X Safeguar dthe vehicl eagain st rolling away
(Y page 205).
X If possible, bring the front wheels into the
straight-ahea dposition.
X Vehicles with AIRMATIC: make sure that
"normal" level is selecte d(Ypage 231).
X Switch off the engine.
X Remove the key from the ignition lock.
or, on vehicles with KEYLESS‑ GO:
X Ope nthe driver' sdoor.
The on-boar delectronics now have status
0.T hisist he same as the key having been
removed.
X Remove the Start/Sto pbutton from the
ignition lock (Y page 179).
X Make sure tha tthe passenger sarenot
endangere dasthey do so. Make sure that
no one is nea rthe danger area whil ea
whee lisbeing changed .Anyone wh oisnot
directl yassis ting in the whee lchange
should, for example, stand behind the bar-
rier.
X Ge toutof the vehicle. Pa yattentio ntotraf-
fic conditions when doing so.
X Close the driver' sdoor.
X Place the warning triangl eatasuitabl edis-
tance (Y page 394). Observe lega lrequire-
ments. Flat tyre
397Breakdown assis tance
Page 416 of 497

X
Open the boot lid.
X To open: release cover :at the top right
and left-hand sides with aflat object.
X Open cover :downwards in the direction
of the arrow. Fuse box in the luggage compartment
Pay attention to the important safety notes
(Y page 411).
! Make sure that no moisture can enter the
fuse box when the cover is open.
! When closing the cover, make sure that it
is lying correctly on the fuse box. Moisture seeping in or dirt could otherwise impair
the operation of the fuses. X
Open the tailgate.
X To open: pull handle :on the cover.
X Swing the cover down.
X Swing covering ;forwards. Electrical fuses
413Breakdown assistance Z