2015 MERCEDES-BENZ E-CLASS ESTATE tailgate
[x] Cancel search: tailgatePage 113 of 497
Tailgate emergenc
yreleas e(Estate)
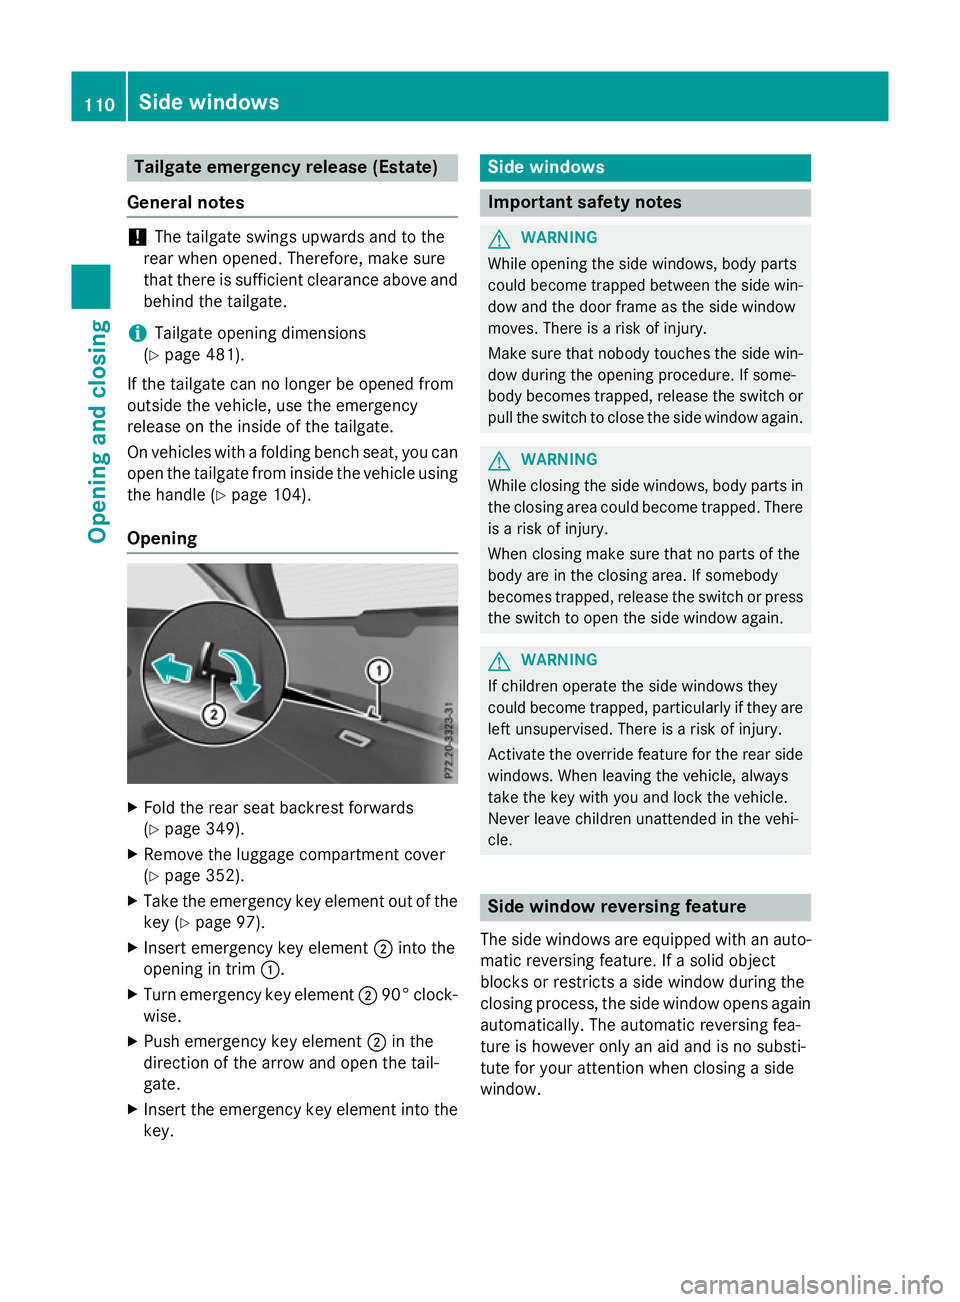
General notes !
The tailgate swing
supwar ds and to the
rea rwheno pened. Therefore ,makes ure
tha tther eiss ufficient clearance above and
behind the tailgate.
i Tailgate opening dimensions
(Y page 481).
If the tailgate can no longe rbeopenedf rom
outside the vehicle, us ethe emergency
release on the insid eofthe tailgate.
On vehicles with afolding bench seat, yo ucan
open the tailgate fro minsid ethe vehicl eusing
the handl e(Ypage 104).
Opening X
Fol dthe rea rseatb ackres tforwards
(Y page 349).
X Remov ethe luggag ecompartment cover
(Y page 352).
X Take the emergency key element ou tofthe
key (Y page 97).
X Insert emergency key element ;into the
opening in trim :.
X Turn emergency key element ;90° clock-
wise.
X Push emergency key element ;in the
direction of the arrow and open the tail-
gate.
X Insert the emergency key element into the
key. Side windows
Important safety notes
G
WARNING
Whil eopening the side windows ,bod yp arts
could become trapped between the side win- do wa nd the door frame as the side window
moves. There is ariskofi njury.
Make sure tha tnobod ytouche sthe side win-
do wd uringt he opening procedure. If some-
body become strapped ,release the switch or
pull the switch to close the side windo wagain. G
WARNING
Whil eclosing the side windows ,bod yp arts in
the closing area could become trapped .There
is ar iskofi njury.
When closing make sure tha tnoparts of the
body ar einthe closing area .Ifsomebody
become strapped ,release the switch or press
the switch to open the side windo wagain. G
WARNING
If children operate the side windows they
could become trapped ,particularly if the yare
left unsupervised .There is ariskofi njury.
Activate the override featur efor the rea rside
windows .Whenleavi ng the vehicle, always
take the key with yo uand lock the vehicle.
Never leav echildren unattended in the vehi-
cle. Side windo
wreversin gfeature
The side windows ar eequippe dwithana uto-
matic reversing feature. If asolid object
blocks or restricts asidew indo wd uring the
closing process, the side windo wopens again
automatically. The automatic reversing fea-
tur eish oweve ronlyana idand is no substi-
tute for your attentio nwhenc losing aside
window. 110
Side
windowsOpenin gand closing
Page 155 of 497
If the wiper blades are worn, the windscreen
willnol onger be wiped properly. This could
prevent you from observing the traffic condi-
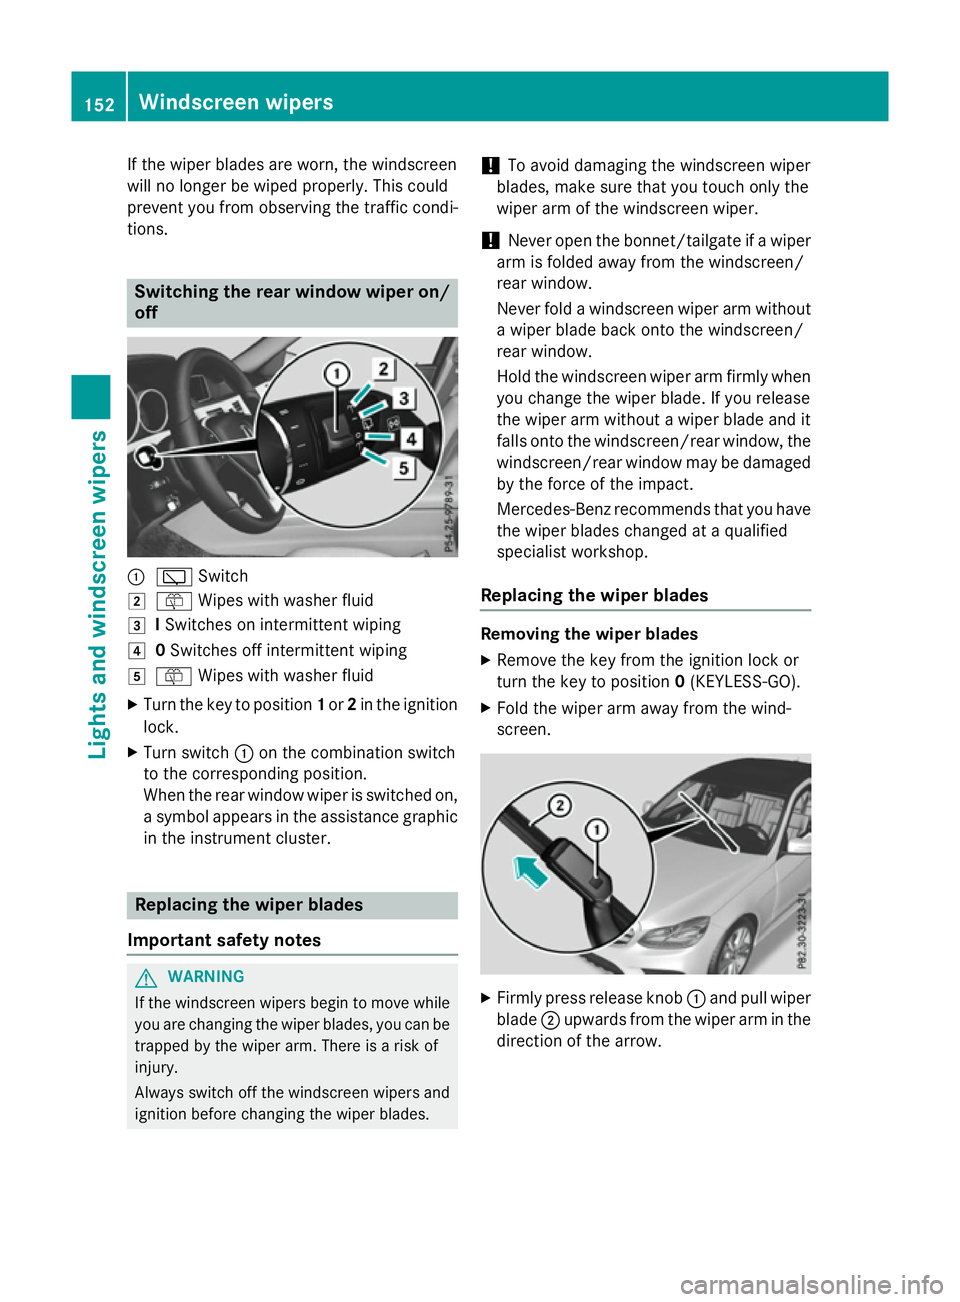
tions. Switching the rear window wipero
n/
off :
è Switch
2 ô Wipesw ith washer fluid
3 ISwitches on intermittent wiping
4 0Switches off intermittent wiping
5 ô Wipesw ith washer fluid
X Turn the key to position 1or 2in the ignition
lock.
X Turn switch :on the combination switch
to the corresponding position.
When the rear window wiper is switched on,
as ymbola ppears in the assistance graphic
in the instrument cluster. Replacing the wiperb
lades
Important safety notes G
WARNING
If the windscree nwipers begintom ove while
you are changing the wiper blades, you can be trapped by the wiper arm. There is arisk of
injury.
Alwayss witch off the windscree nwipers and
ignition before changing the wiper blades. !
To avoid damaging the windscree
nwiper
blades, make sure that you touch only the
wiper arm of the windscree nwiper.
! Never open the bonnet/tailgate if
awiper
arm is folded awayf rom the windscreen/
rear window.
Never fold awindscree nwiper arm without
aw iper blade back onto the windscreen/
rear window.
Hold the windscree nwiper arm firmly when
you change the wiper blade. If you release
the wiper arm withou tawiper blade and it
fallso nto the windscreen/rear window ,the
windscreen/rear window may be damaged
by the force of the impact.
Mercedes-Benz recommends that you have
the wiper blades changed at aqualified
specialist workshop.
Replacing the wiperb lades Removing the wiperb
lades
X Remove the key from the ignition lock or
turn the key to position 0(KEYLESS-GO).
X Fold the wiper arm awayf rom the wind-
screen. X
Firmly press release knob :and pullw iper
blade ;upwards from the wiper arm in the
direction of the arrow. 152
Windscreen wipersLights and windscreenw
ipers
Page 206 of 497
X
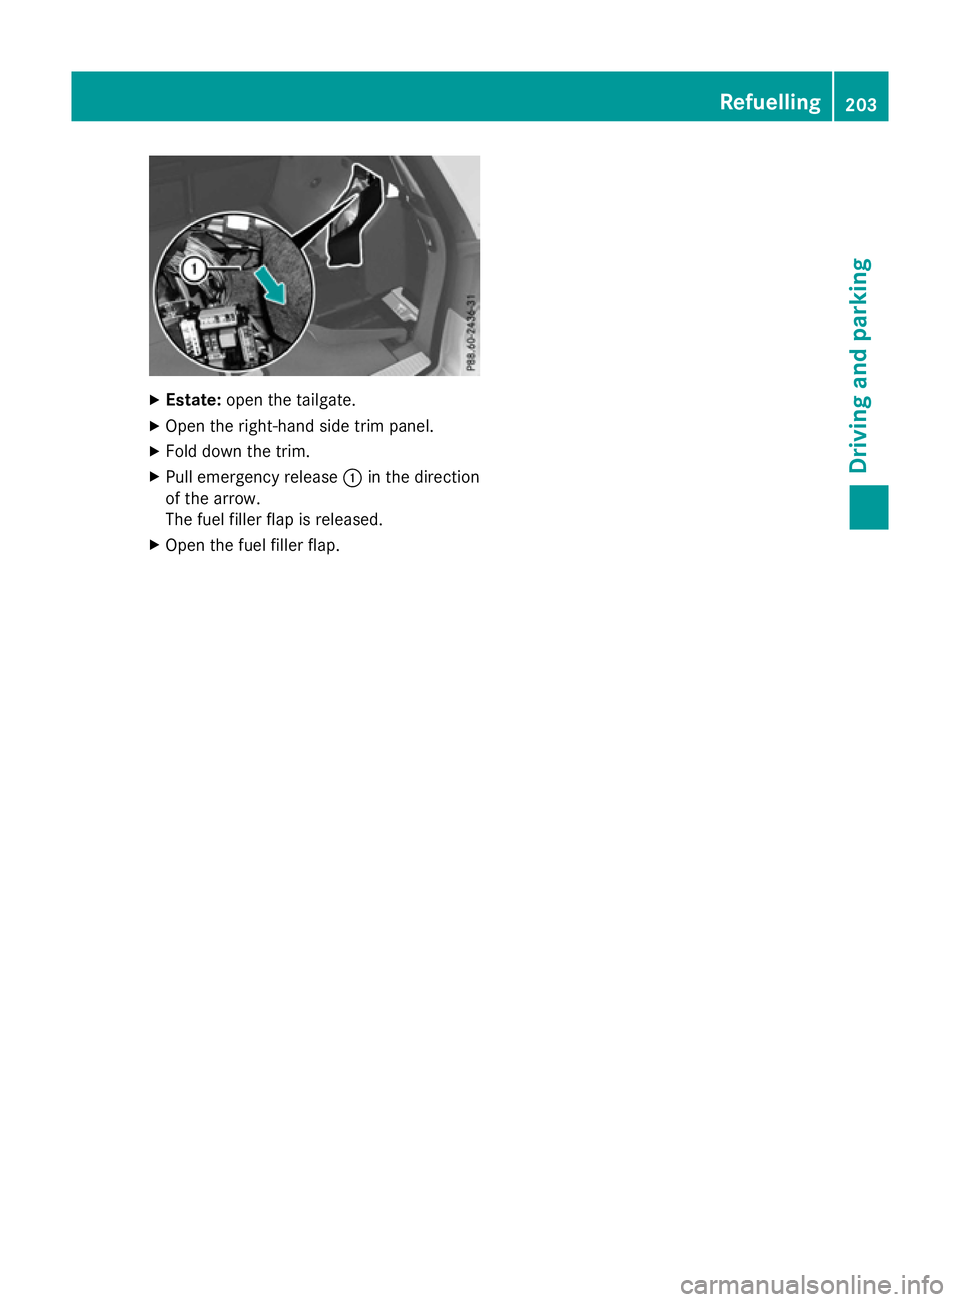
Estate: open thetailgate.
X Open th eright-han dside trim panel.
X Fold down th etrim.
X Pull emergency release :in th edirection
of th earrow.
The fuel filler flap is released.
X Open th efuel filler flap. Refuelling
203Driving and parking Z
Page 208 of 497
Problem
Possible causes/consequences and
M
MSolutions The key battery is discharged or nearly discharged.
X Unlock the vehicle using the emergency key element
(Y page 96).
X Open the boot lid or the tailgate.
X Manuallyu nlock the fuel filler flap using the emergency release
(Y page 202). The fuel filler flap is unlocked, but the opening mechanism is jam-
med.
X Consult aqualified specialist workshop. Parking
Important safety notes
G
WARNING
Flammable material such as leaves, grass or
twigs may ignite if they come into contact with hot parts of the exhaust system or exhaust
gas flow. There is arisk of fire.
Park the vehicle so that no flammable mate-
rial can come into contact with hot vehicle
components. In particular, do not park on dry grassland or harvested grain fields. G
WARNING
If you switch off the ignition while driving,
safety-relevant functions are only available
with limitations, or not at all. This could affect, for example, the power steering and the brake
boosting effect.Y ou will require considerably
more effort to steer and brake. There is arisk
of an accident.
Do not switch off the ignition while driving. G
WARNING
If you leave children unattended in the vehi-
cle, they may be able to set the vehicle in
motion if, for example, they:
R release the parking brake
R shift the automatic transmission out of park
position Por shift manual transmission into
neutral
R start the engine
In addition, they may operate vehicle equip-
ment and become trapped. There is arisk of
an accident and injury.
When leaving the vehicle, always take the key with you and lock the vehicle. Never leave
children unattended in the vehicle.
! Always secure the vehicle correctly
against rolling away.O therwise, the vehicle
or its drivetrain could be damaged.
To ensure that the vehicle is safeguarded
against rolling away unintentionally:
R the parking brake must be applied
R on vehicles with manual transmission,
engage 1st gear or reverse gear
R on vehicles with automatic transmission,
the transmission must be in position Pand Parking
205Driving and parking Z
Page 238 of 497
25 mm
.The leve lchange also occurs when
stationary.
If you drive faster than 170 km/h, the rear
axle leve lisset to amiddle level. Thi sincrea-
ses road safety and reduces airr esistance. If
you then drive slower than 150 km/h, the
leve loft he rear axle is again adjusted to cor-
respond to the selected suspension mode.
Load compensation
The vehicle can compensate differences in
the vehicle leve lbyraising or lowering the
rear axle .Thisist he case ,for example, when
people get out of the vehicle or whe nlug gage
is removed.
Al oadc ompensation occurs if:
R ad oor, the boot lid or the tailgate is opened
R the parked vehicle is unlocked
The engine needs to be running for larger level
changes. 4MATIC (permanent all-whee
ldrive)
If you fai ltoadapt you rdriving style, 4MATIC
can neither reduce the risk of an accident nor override the laws of physics. 4MATIC cannot
take account of road ,weather and traffic con-
ditions. 4MATIC is only an aid. You are
responsibl efor the distance to the vehicle in
front, for vehicle speed, for braking in good
time, and for staying in lane.
If ad rive wheel spins due to insufficient grip:
R whe npulling away,o nly depress the accel-
erato rpedal as far as is necessary.
R accelerate les swhend riving.
! Never tow the vehicle with one axle
raised. Thi smay damage the transfer case.
Damag eofthis sort is not covered by the
Mercedes-Benz implied warranty. All
wheels must remain eithe ronthe ground or
be fully raised. Observe the instructions for towing the vehicle with allw heels in full
contact with the ground.
i In wintry driving conditions, the maximum
effect of 4MATIC can only be achieved if you use winter tyres
(M+S tyres), with snow
chains if necessary.
4MATIC ensures that allf our wheels are per-
manently driven. Together with ESP ®
,it
improves the traction of you rvehicle when-
ever adrive wheel spins due to insufficient
grip. PARKTRONIC
Important safety notes PARKTRONI
Cisanelectronic parking aidw ith
ultrasoni csensors .Itmonitors the area
around you rvehicle using six sensors in the
front bumper and six sensors in the rear
bumper. PARKTRONI Cindicates visually and
audibly the distance between you rvehicle
and an object.
PARKTRONI Cisonly an aid. It is not asubsti-
tute for you rattention to the immediate sur-
roundings. The responsibility for safe
manoeuvring and parking remains with you.
Make sure that there are no persons, animals
or objects in range while manoeuvring and
parking.
! When parking, pay particular attention to
objects above or below the sensors ,such
as flower pots or trailer drawbars.
PARKTRONI Cdoes not detect such objects
whe nthey are in the immediate vicinity of
the vehicle. You coul ddamage the vehicle
or the objects.
The sensors may not detect snow and
objects which absorb ultrasoni csources.
Ultrasonic sources, such as an automatic
car wash, alorry's compressed-air brakes
or ap neumatic drill, coul dcause
PARKTRONI Ctomalfunction.
PARKTRONI Cmay not function correctly on
uneve nterrain. Driving systems
235Driving and parking Z
Page 249 of 497
Display
sintheAudio 20/COMAND
Online display The reversin
gcamera may sho wadistorted
vie wofo bstacles or sho wthemi ncorrectly or
no tata ll. Obstacles are no tshown by the
reversin gcamera in th efollowing locations:
R ver yclose to th erearb umper
R under th erearb umper
R in th eareai mmediately abov ethe tailgate
handle
! Objects no
tatgroun dlevel may appear to
be further away than they actually are ,e.g.:
R theb umper of aparke dvehicle
R thed rawbar of atrailer
R theb all couplin gofatrailer to whitch
R ther ears ection of an HGV
R as lante dpost
Use th eguidelines only fo rorientation.
Approach objects no further than th ebot-
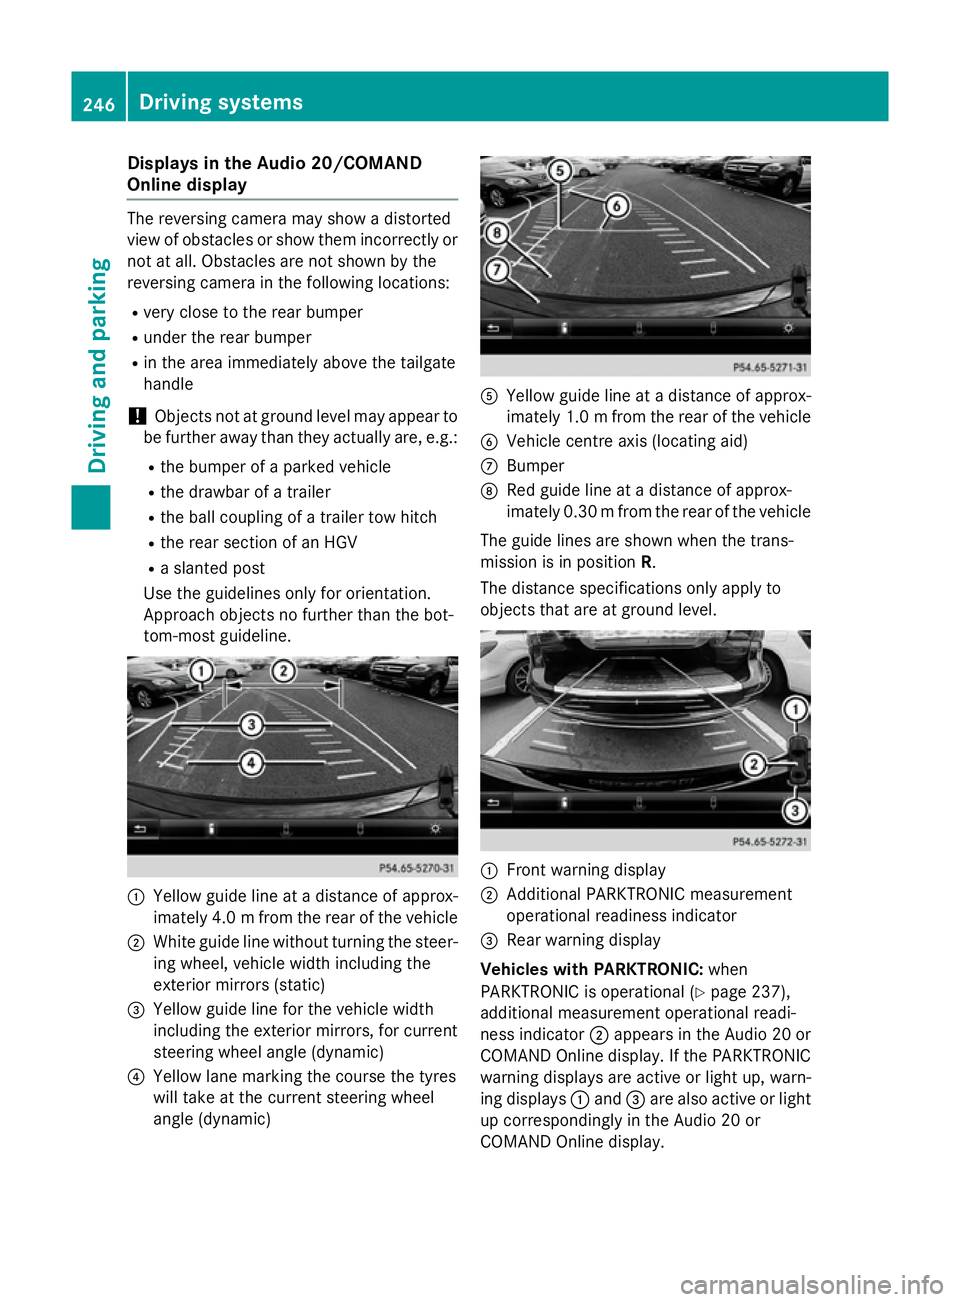
tom-most guideline. :
Yello wguidelineatad istanceofapprox-
imately 4. 0mfrom the rear of the vehicle
; White guide line without turning the steer-
ing wheel, vehicl ewidth including the
exterior mirrors (static)
= Yellow guide line for the vehicl ewidth
including the exterior mirrors, for current
steering whee langle (dynamic)
? Yellow lane marking the course the tyres
willt ake at the current steering wheel
angle (dynamic) A
Yellow guide line at adistance of approx-
imatel y1.0mf rom the rear of the vehicle
B Vehicle centre axis (locating aid)
C Bumper
D Red guide line at adistance of approx-
imatel y0.30 mfrom the rear of the vehicle
The guide lines are show nwhen the trans-
mission is in position R.
The distance specifications only apply to
objects that are at ground level. :
Front warning display
; Additional PARKTRONIC measurement
operational readiness indicator
= Rearw arning display
Vehicles with PARKTRONIC: when
PARKTRONIC is operational (Y page237),
additiona lmeasurement operational readi-
ness indicator ;appears in the Audi o20or
COMAND Online display.Ift he PARKTRONIC
warning displaysa re active or light up, warn-
ing displays :and =are alsoa ctive or light
up correspondingly in the Audi o20or
COMAND Online display. 246
Driving systemsDriving and parking
Page 253 of 497
Distance
smeasured by PARKTRONI Cwill
also be opticall ydisplayed:
R as red or yellow brackets around the vehi-
cle symbo lintop view in split-screen mode
or
R at the bottom righ tasred or yellow brack-
ets around the vehicl esym bolinf ull-s creen
mode
Th elinet hicknes sand colou rofthe brackets
sho whow fart he vehicl eisfromano bject.
R yellow brackets with thi nlines:
PARKTRONI Cisactive
R yellow brackets with normal lines :an
object is present in close range of the vehi-
cle
R red line: an object is present in the imme-
diate close range of the vehicle
Important safety notes Th
e3 60° camera is onl yanaidand ma yshow
ad istorted view of obstacles, sho wthem
incorrectly or not at all. Th e360° camera is
not asubst itute for attentiv edriving.
Th er esponsibility for safe manoeuvring and
parking remains with you. Make sure that
there ar enopersons, animals or objects in
range whil emanoeuvring and parking.
Yo ua realways responsibl efor safety ,and
must always pa yattentio ntoyours urround-
ing sw henp arking and manoeuvring. This
applie stothe area sbehin d, in front of and
beside the vehicle. Yo ucould otherwise
endanger yourself and others.
Th e3 60° camera will not functio norwill
functio nonlyinal imited manner:
R if the doors ar eopen
R if the exterior mirrors ar efolde din
R if the boot lid/tailgate is open
R in heav yrain, sno worfog
R at night or in ver ydarkp laces
R if the camera sareexpose dtoveryb right
light
R if the area is li tbyfluorescent bulb sorLED
lighting (th edisplay mayflicker) R
if there is asudde nchange in temperature,
e.g .whend riving into aheatedg arag ein
winter
R if the camera lense saredirty or covered
R if the vehicl ecomponents in which the
camera sarefitte daredamaged. In this
event, have the camera positio nand setting
checked at aquali fied specialis tworkshop.
Do not us ethe 360° under such circumstan-
ces .You could otherwis einjure others or
damage objects when parking the vehicle.
Guid elines ar ealway sshown at roa dlevel.In
trailer mode, the guid elines ar eshown at the
level of the trailer coupling.
On vehicles with height-adjustabl echassis,
depending on technica lconditions ,leavi ng
the standard height can resul tin:
R inaccuracie sinthe guid elines
R inaccuracie sinthe displa yofgenerated
images (to pview)
Activatio nconditions Th
e3 60° camera imag ecan be displaye dif:
R your vehicl eisequippe dwitha3 60° cam-
era
R the key is in position 2in the ignition lock
R COMAND Online/Audi o20isswitched on
R the 360°camera
360 °camera functio niss witched on
Activatin gthe 360° camera X
Press the Øbutton in the centr econ-
sol efor longe rtha nt wo seconds.
Th ef ollowing appear sdepen ding on
whether transmission position Dor Ris
selected:
R as plit- screen with top view and the
imag efromt he front camera or
R as plit- screen with top view and the
imag efromt he reversing camera
or 250
Driving systemsDriving an
dparking
Page 254 of 497
X
Press the Øbutton in the centre con-
sole.
The vehicle menu appears.
X Select 360° camera
360° camera and press7to con-
firm.
The following appears depending on
whether transmission position Dor Ris
selected:
R as plit-screen with top view and the
image from the frontc amera or
R as plit-screen with top view and the
image from the reversin gcamera
Activating the 360° camera using
reverse gear You can show images from the 360° camera
automatically by engaging reverse gear.
X Make sure that the key is in position 2in the
ignition lock.
X Make sure that the ActivationbyR
Activatio nbyR
gear
gear function is selected in COMAND
Online/Audio 20 (see the separate
COMAND Online/Audio 20 operating
instructions).
X To show the 360° camera image: engage
reverse gear.
The area behind the vehicle is shown in the
COMAND/Audio 20 display in split-screen
mode. You see the top view of the vehicle
and the image from the reversin gcamera.
Selecting the split-screen and full
screen displays Switching between split screen views
X To switch to the line with the vehicle icons:
slide 5the controller.
X To select one of the vehicle icons: turn
3 the controller.
X To switch to 180° view
180° view: turn3 the
controller to select 180° view 180° viewand press
7 to confirm.
i The
180° view
180° view option is only availabl ein
the following views: R
Top view with image from the reversing
camera
R Top view with image from the frontc am-
era
Displays in the COMAND/Audio 20 dis-
play Important safety notes
The camera system may show
adistorted
view of obstacles or show them incorrectly or
not at all. Obstacles are not shown by the
system in the following locations:
R under the fronta nd rear bumpers
R very close to the fronta nd rear bumpers
R in the area immediately above the tailgate
handle/boot lid handle
R very close to the exterior mirrors
R in the transitional areas between the vari-
ous cameras in the virtual top view
! Objects not at ground level may appear to
be further away than they actually are, e.g.:
R the bumper of aparked vehicle
R the drawbar of atrailer
R the ball coupling of atrailer tow hitch
R the rear section of an HGV
R as lanted post
Use the guidelines only for orientation.
Approach object snofurther than the bot-
tom-most guideline. Driving systems
251Driving and parking Z