2015 MERCEDES-BENZ E-CLASS ESTATE tailgate
[x] Cancel search: tailgatePage 295 of 497
X
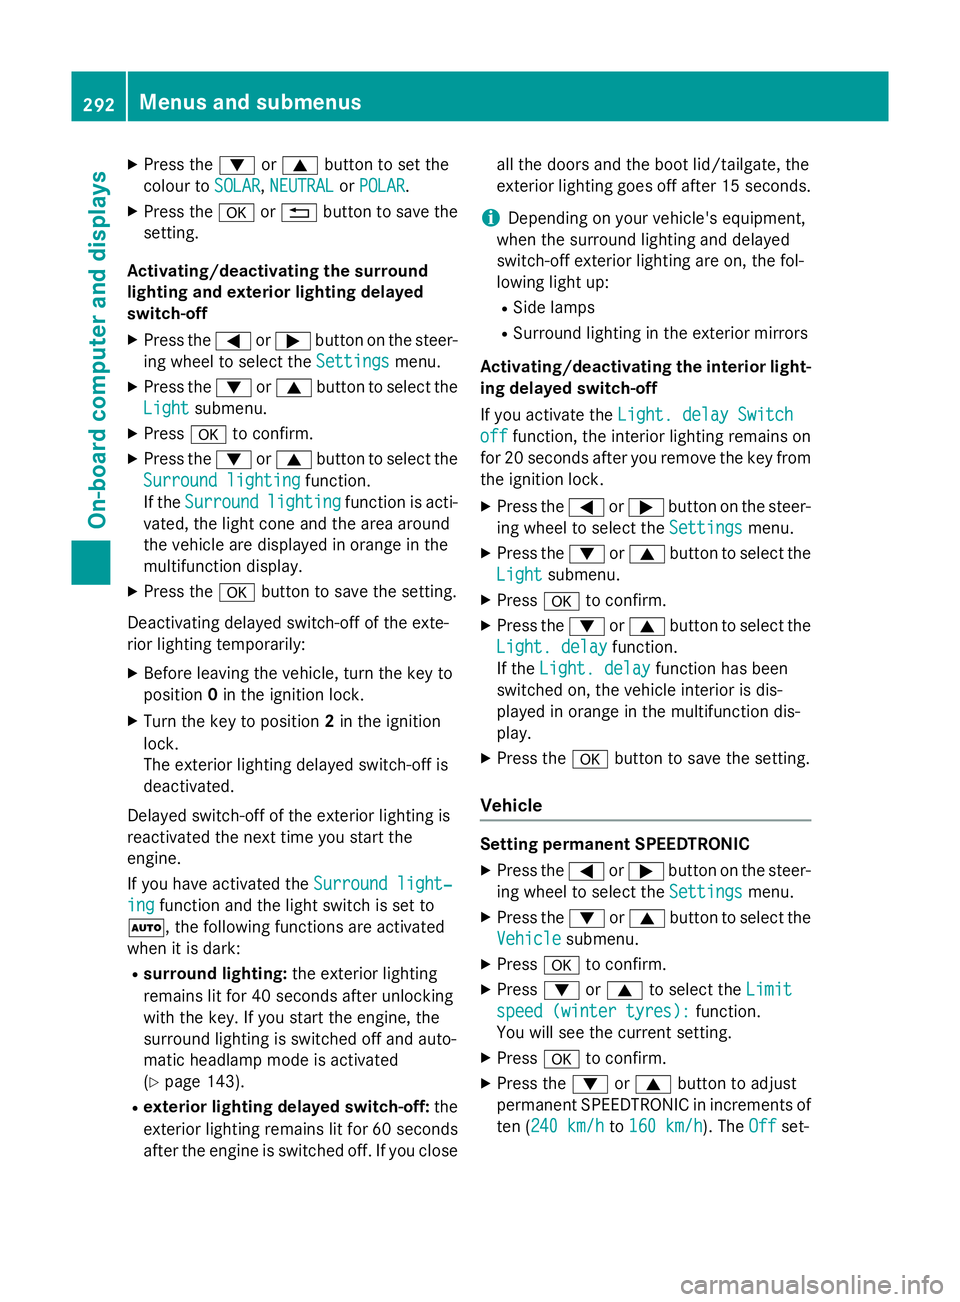
Press the :or9 button to set the
colour to SOLAR SOLAR,NEUTRAL NEUTRAL orPOLAR
POLAR.
X Press the aor% button to save the
setting.
Activating/deactivating the surround
lighting and exterior lighting delayed
switch-off
X Press the =or; button on the steer-
ing wheel to select the Settings
Settings menu.
X Press the :or9 button to select the
Light Light submenu.
X Press ato confirm.
X Press the :or9 button to select the
Surround lighting
Surround lighting function.
If the Surround
Surround lighting
lightingfunction is acti-
vated, the light cone and the area around
the vehicle are displayed in orange in the
multifunction display.
X Press the abutton to save the setting.
Deactivating delayed switch-off of the exte-
rior lighting temporarily:
X Before leaving the vehicle, turn the key to
position 0in the ignition lock.
X Turn the key to position 2in the ignition
lock.
The exterior lighting delayed switch-off is
deactivated.
Delayed switch-off of the exterior lighting is
reactivated the next time you start the
engine.
If you have activated the Surround light‐
Surround light‐
ing
ing function and the light switch is set to
Ã,t he following functions are activated
when it is dark:
R surround lighting: the exterior lighting
remains lit for 40 seconds after unlocking
with the key. If you start the engine, the
surround lighting is switched off and auto-
matic headlamp mode is activated
(Y page 143).
R exterior lighting delayed switch-off: the
exterior lighting remains lit for 60 seconds
after the engine is switched off. If you close all the doors and the boot lid/tailgate, the
exterior lighting goes off after 15 seconds.
i Dependin
gonyour vehicle's equipment,
when the surround lighting and delayed
switch-off exterior lighting are on, the fol-
lowing light up:
R Side lamps
R Surround lighting in the exterior mirrors
Activating/deactivating the interior light-
ing delayed switch-off
If you activat ethe Light. delay Switch Light. delay Switch
off
off function, the interior lighting remains on
for 20 seconds after you remove the key from the ignition lock.
X Press the =or; button on the steer-
ing wheel to select the Settings
Settings menu.
X Press the :or9 button to select the
Light
Light submenu.
X Press ato confirm.
X Press the :or9 button to select the
Light. delay
Light. delay function.
If the Light. delay
Light. delay function has been
switched on, the vehicle interior is dis-
played in orange in the multifunction dis-
play.
X Press the abutton to save the setting.
Vehicle Setting permanent SPEEDTRONIC
X Press the =or; button on the steer-
ing wheel to select the Settings Settingsmenu.
X Press the :or9 button to select the
Vehicle
Vehicle submenu.
X Press ato confirm.
X Press :or9 to select the Limit
Limit
speed (winter tyres):
speed (winter tyres): function.
You will see the curren tsetting.
X Press ato confirm.
X Press the :or9 button to adjust
permanen tSPEEDTRONIC in increment sof
ten (240 km/h 240 km/h to160 km/h
160 km/h). The Off
Offset- 292
Menus and submenusOn-board computer and displays
Page 329 of 497
Display messages
Possible causes/consequences and
M
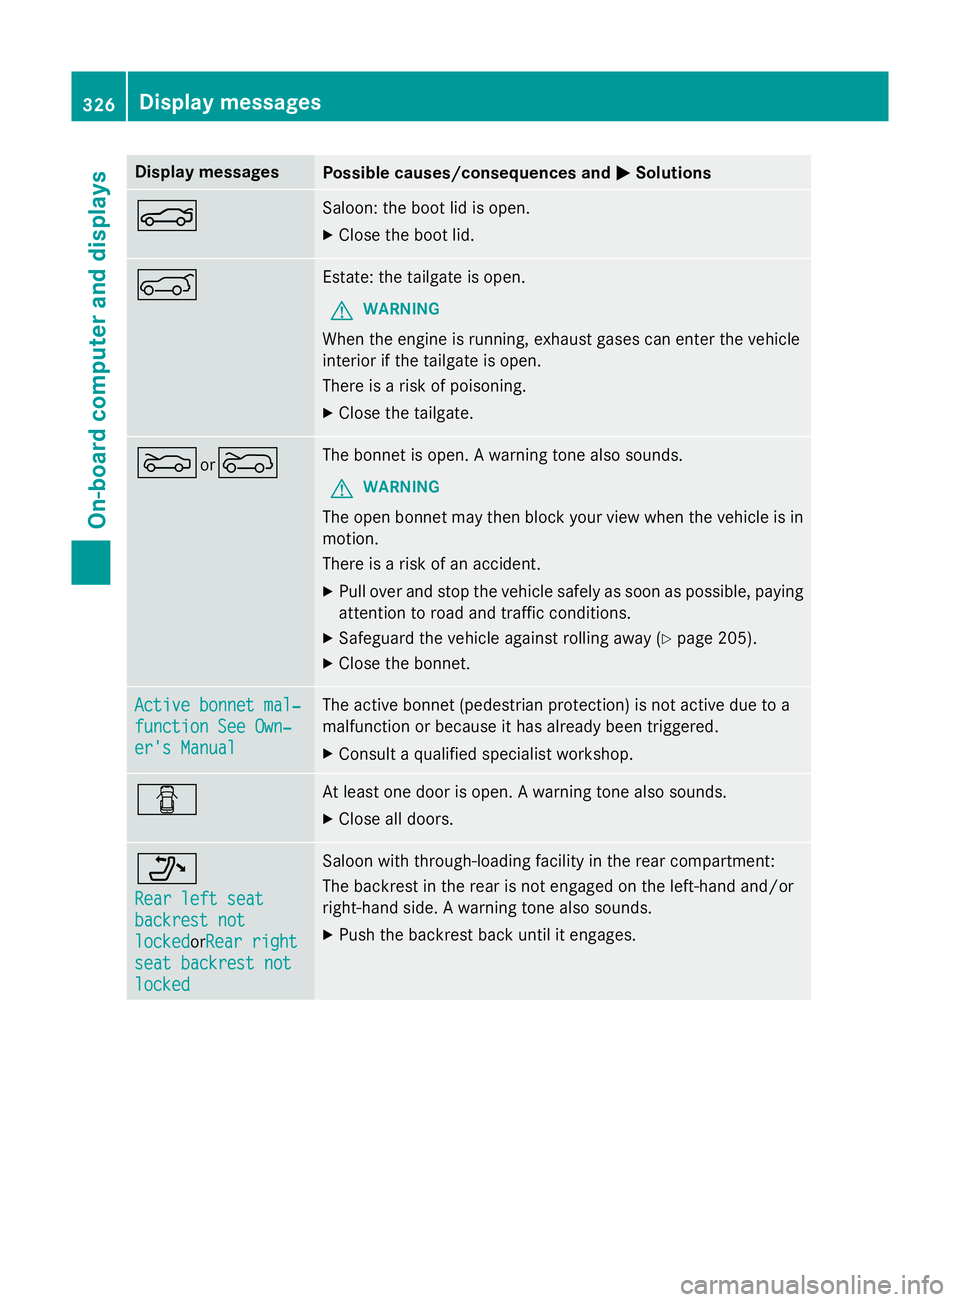
MSolutions N Saloon
:the boo tlid is open.
X Clos ethe boo tlid. A Estate: th
etailgat eisopen.
G WARNING
Whe nthe engin eisrunning ,exhaus tgase scan ente rthe vehicle
interio rifthetailgat eisopen.
There is ariskofp oisoning.
X Clos ethe tailgate. Mor
? The bonne
tisopen.Aw arnin gtonea lso sounds.
G WARNING
The open bonne tmay then bloc kyour vie wwhen th evehicl eisin
motion.
There is ariskofana ccident.
X Pull ove rand stop th evehicl esafely as soo naspossible, paying
attention to roa dand traffic conditions.
X Safeguar dthe vehicl eagainst rollin gaway (Y page 205).
X Clos ethe bonnet. Active bonnet mal‐ Active bonnet mal‐
function See Own‐ function See Own‐
er'
sM anual
er' sM anual The active bonne
t(pedestrian protection )isnotactive due to a
malfunction or because it has already been triggered.
X Consult aqualified specialist workshop. C At leas
tone doo riso pen.Aw arnin gtonea lso sounds.
X Clos eall doors. _
Rea
rl efts eat
Rea rl efts eat
backrest not backrest not
locked locked orRear right
Rea rr ight
sea tb ackrest not
sea tb ackrest not
locked
locked Saloon wit
hthrough-loading facilit yint he rear compartment:
The backrest in th erear is no tengage dont heleft-han dand/or
right-hand side .Awarnin gtonea lso sounds.
X Push th ebackrest bac kuntil it engages. 326
Display
messagesOn-boardcomputer an ddisplays
Page 345 of 497
Useful information
i This Owner's Manual describes all mod-
els, series and optional equipment for your
vehicle that were available at the time of
going to press. National variation sare pos-
sible. Not ethat your vehicle may not be
equipped with all of the function sdescri-
bed. This is also the case for system sand
function srelevan ttosafety.
i Read the information on qualified special-
ist workshops: (Y page 27). Stowage areas
Loading guidelines
G
WARNING
If objects, luggage or loads are not secured or not secured sufficiently, they could slip, tip
over or be flung around and thereby hit vehicle
occupants .There is arisk of injury, especially
when brakin gorabruptly changing directions.
Always stor eobjects so that they cannot be
flung around. Secure objects, luggage or
loads against slipping or tippin gbefore the
journey. G
WARNING
Combustion engines emit poisonous exhaust
gases such as carbon monoxide. Exhaust
gases can enter the vehicle interior if the boot
lid/tailgat eisopen when the engin eisrun-
ning, especially if the vehicle is in motion.
There is arisk of poisoning.
Always switc hoff the engin ebefore opening
the boot lid/tailgate. Never drive with the
boot lid/tailgat eopen. G
WARNING
The exhaust tail pipe and tail pipe trim can
becom every hot. If you come int ocontact
with thes eparts of the vehicle, you could burn
yourself. There is arisk of injury. Always be particularly careful around the
exhaust tail pipe and the tail pipe trim .Allow
thes ecomponents to cool down before touch-
ing them.
The handling characteristic sofaladen vehi-
cle are dependen tonthe distribution of the
load within the vehicle. For this reason ,you
should observ ethe following notes when
transporting aload:
R neve rexceed the maximum permissible
gross vehicle weight or the permissible axle loads for the vehicle (includin goccupants).
R the boot/luggage compartment is the pre-
ferred place to stor eobjects.
R position heavy loads as far forwards as pos-
sible and as low down in the boot/luggagecompartment as possible.
R the load must not protrude above the upper
edge of the seat backrests.
R always place the load against the rear or
fron tseat backrests .Make sure that the
seat backrests are securely locked into
place.
R always place the load behind unoccupied
seats if possible.
R use the lashing eyelets and the luggage
net stot ransport loads and luggage.
R only use lashing eyelets and fastenin gcom-
ponents that are suitable for the weight and size of the load.
R when transporting objects in the luggage
compartment,t he combined luggage cover
and net must always be installed (luggage
compartment cove rand safet ynet).
R secure the load with sufficiently strong and
wear-resistan tlashing material. Pad sharp
edges for protection.
i Load restraint
sare available at any quali-
fied specialist workshop, e.g. aMercedes-
Ben zService Centre. 342
Stowage areasStowing and features
Page 350 of 497
X
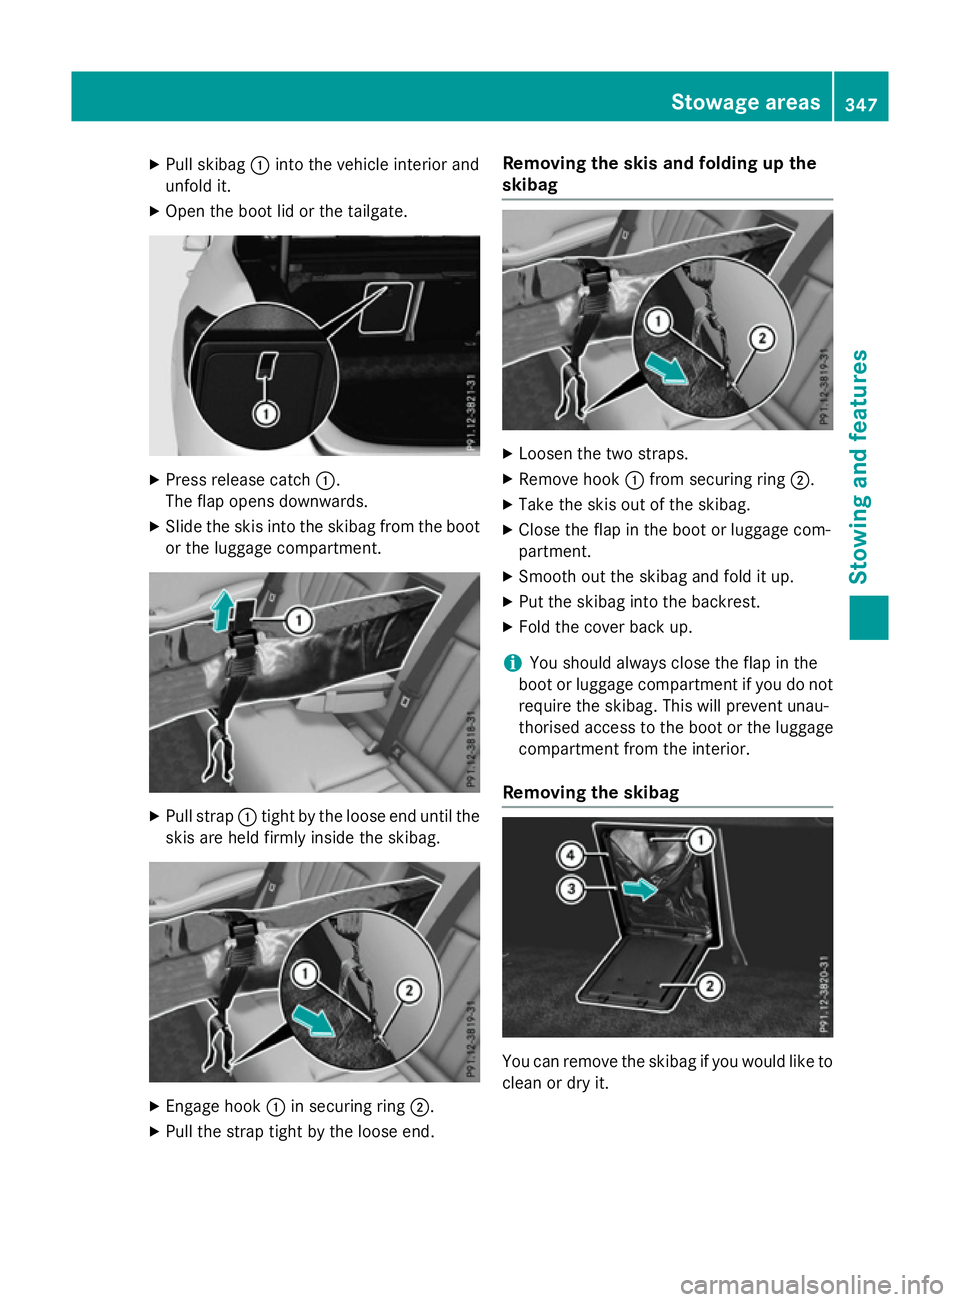
Pull skibag :into the vehicle interior and
unfold it.
X Open the boot lid or the tailgate. X
Press release catch :.
The flap opens downwards.
X Slide the skis into the skibag from the boot
or the luggage compartment. X
Pull strap :tight by the loose end until the
skis are held firmly inside the skibag. X
Engage hook :in securing ring ;.
X Pull the strap tight by the loose end. Removing the skis and folding up the
skibag
X
Loosen the two straps.
X Remove hook :from securing ring ;.
X Take the skis out of the skibag.
X Close the flap in the boot or luggage com-
partment.
X Smoot hout the skibag and fold it up.
X Put the skibag into the backrest.
X Fold the cover back up.
i You should alway
sclose the flap in the
boot or luggage compartment if you do not require the skibag. This will prevent unau-
thorised access to the boot or the luggage
compartment from the interior.
Removing the skibag You can remove the skibag if you would like to
clean or dry it. Stowage areas
347Stowing and features Z
Page 351 of 497
X
Open the boot lid or the tailgate.
X Press release catch :.
Flap ;folds down.
X Press catch =inwards and pull out
frame ?containing the skibag. Through-loading facility in the rear
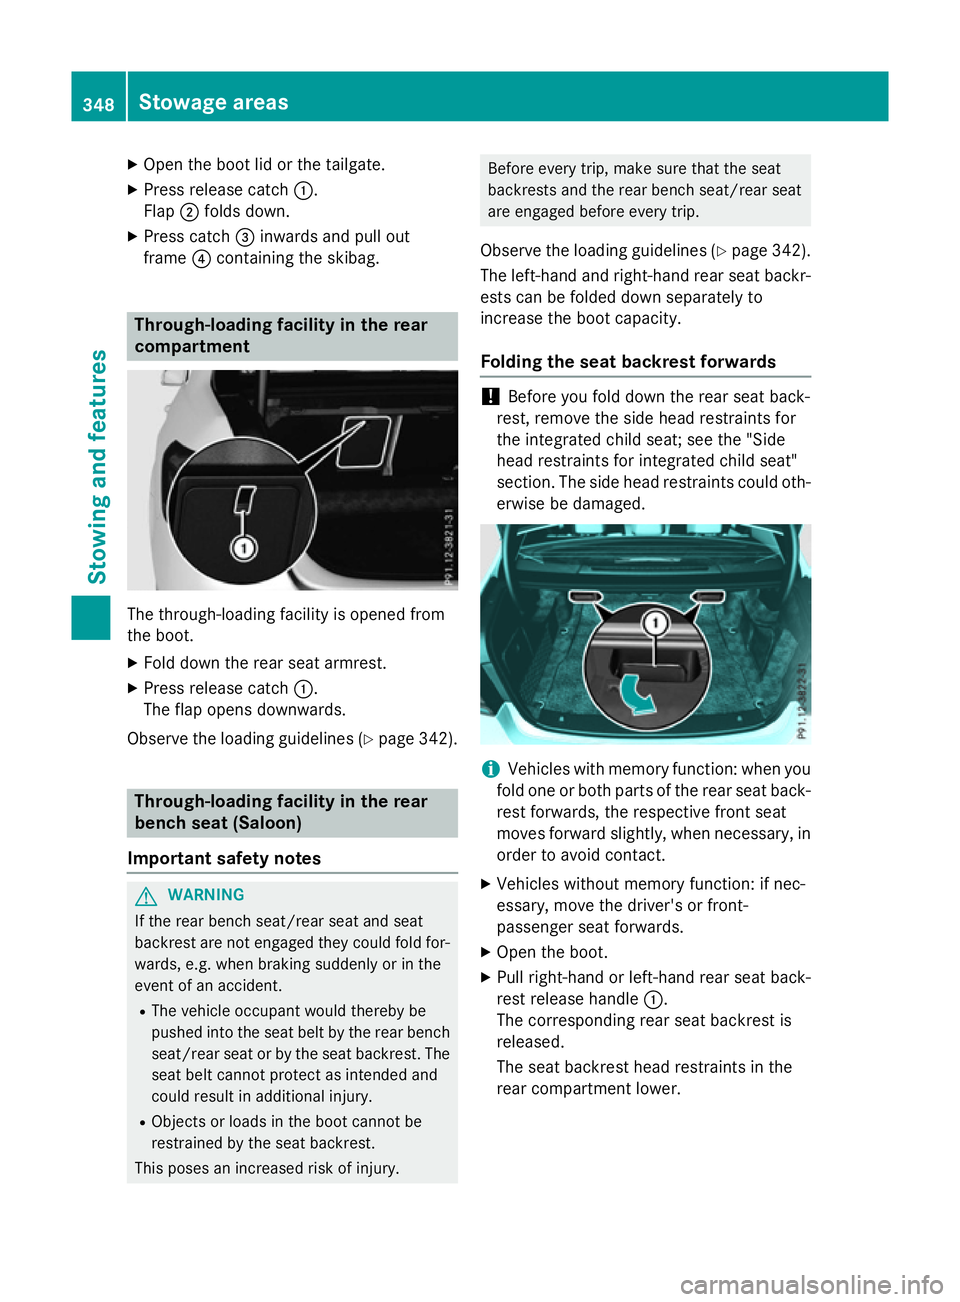
compartment The through-loading facility is opened from
the boot.
X Fold down the rear seat armrest.
X Press release catch :.
The flap opens downwards.
Observe the loading guidelines (Y page 342).Through-loading facility in the rear
benchs eat (Saloon)
Important safety notes G
WARNING
If the rear bench seat/rear seat and seat
backrest are not engaged they could fold for- wards, e.g. when braking suddenly or in the
event of an accident.
R The vehicle occupant wouldt hereby be
pushed into the seat belt by the rear bench
seat/rear seat or by the seat backrest. The
seat belt cannot protect as intended and
could result in additional injury.
R Objects or loads in the boot cannot be
restrained by the seat backrest.
This poses an increased risk of injury. Before every trip, make sure that the seat
backrests and the rear bench seat/rear seat
are engaged before every trip.
Observe the loading guidelines (Y page 342).
The left-hand and right-hand rear seat backr- ests can be folded down separately to
increase the boot capacity.
Folding the seat backrest forwards !
Before you fold down the rear seat back-
rest, remove the side head restraints for
the integrated child seat; see the "Side
head restraints for integrated child seat"
section. The side head restraints could oth-
erwise be damaged. i
Vehicles with memory function: when you
fold one or both parts of the rear seat back- rest forwards, the respective front seat
moves forward slightly, when necessary, inorder to avoid contact.
X Vehicles without memory function: if nec-
essary, move the driver's or front-
passenger seat forwards.
X Open the boot.
X Pull right-hand or left-hand rear seat back-
rest release handle :.
The corresponding rear seat backrest is
released.
The seat backrest head restraints in the
rear compartment lower. 348
Stowage areasStowinga
nd features
Page 357 of 497
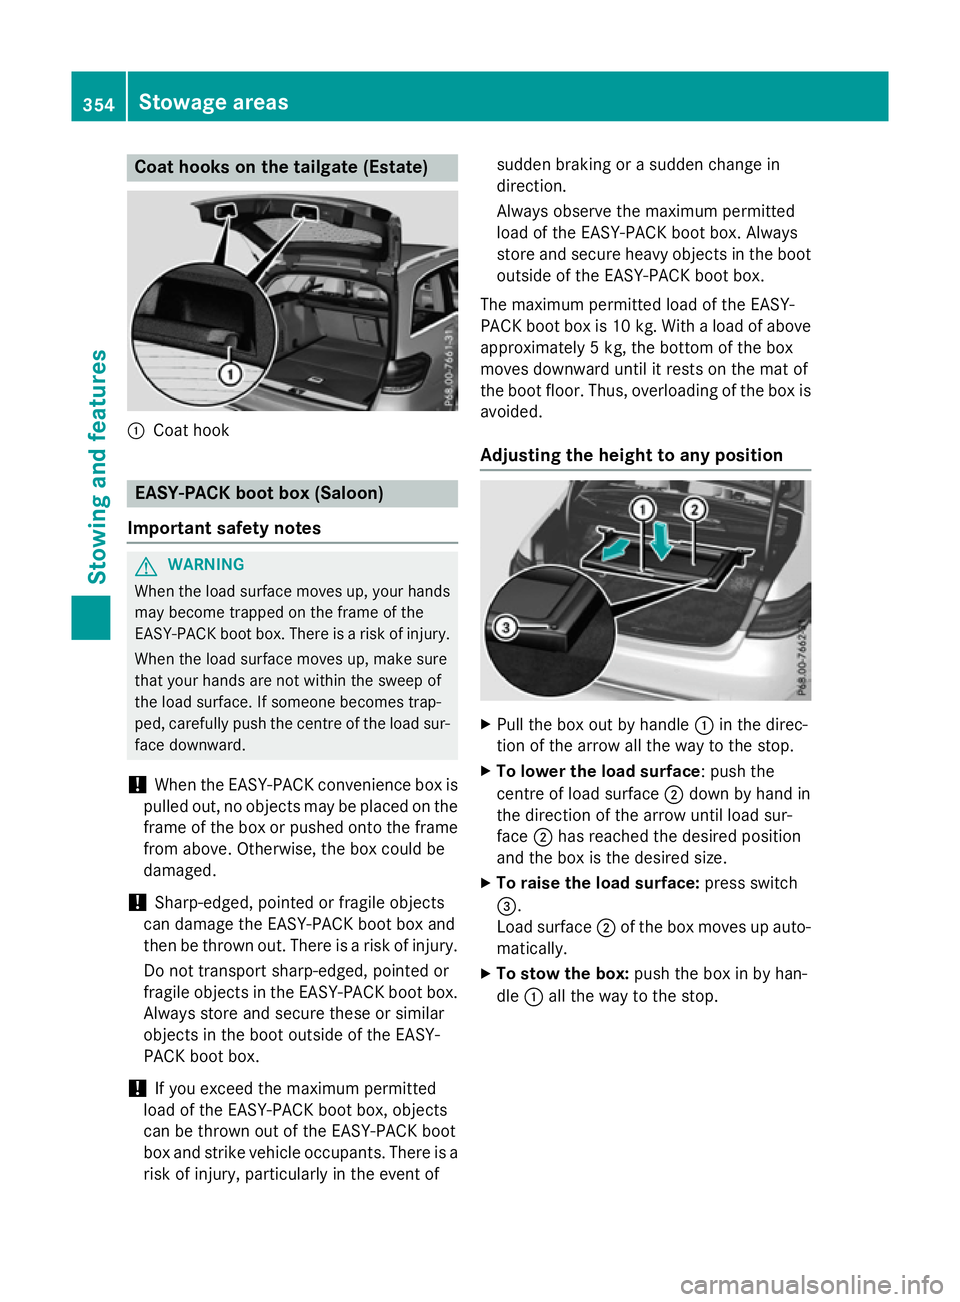
Coat hook
sonthetailgate (Estate) :
Coat hook EASY-PACK boot box (Saloon)
Important safety notes G
WARNING
When th eload surface moves up, your hands
may become trapped on th eframe of the
EASY-PACK boot box .Ther eisar iskofi njury.
When th eload surface moves up, mak esure
that your hands are no twithin th esweep of
th el oad surface. If someon ebecome strap-
ped, carefull ypush th ecentr eoft heload sur-
fac ed ownward.
! When th
eEASY-PACK convenience box is
pulled out ,noobjectsmay be placed on the
frame of th ebox or pushe dontot he frame
from above. Otherwise, th ebox could be
damaged.
! Sharp-edged
,pointe dorf ragile objects
can damag ethe EASY-PACK boot box and
then be thrown out .Ther eisar iskofi njury.
Do no ttranspor tsharp-edged, pointe dor
fragile object sintheEASY-PACK boot box.
Always store and secure these or similar
object sintheboot outside of th eEASY-
PACK boot box.
! If you excee
dthe maximum permitted
load of th eEASY-PACK boot box ,objects
can be thrown out of th eEASY-PACK boot
box and strik evehicle occupants .Ther eisa
ris kofi njury, particularly in th eevent of sudde
nbraking or asudde nchang ein
direction.
Always observ ethe maximum permitted
load of th eEASY-PACK boot box .Always
store and secure heav yobject sintheboot
outside of th eEASY-PACK boot box.
The maximum permitted load of th eEASY-
PACK boot box is 10 kg .Withal oad of above
approximately 5kg,theb otto moft hebox
moves downward until it rests on th emat of
th eb oot floor. Thus, overloading of th ebox is
avoided.
Adjusting th eheigh ttoa ny position X
Pull th ebox out by handle :in th edirec-
tio noft hearrow all th eway to th estop.
X To lower th eload surface:p ush the
centr eofload surface ;down by han din
th ed irection of th earrow until load sur-
face ;has reached th edesired position
and th ebox is th edesired size.
X To raise th eload surface: pressswitch
=.
Load surface ;of th ebox moves up auto-
matically.
X To stow th ebox: push th ebox in by han-
dle :all th eway to th estop. 354
Stowage areasStowing and features
Page 360 of 497
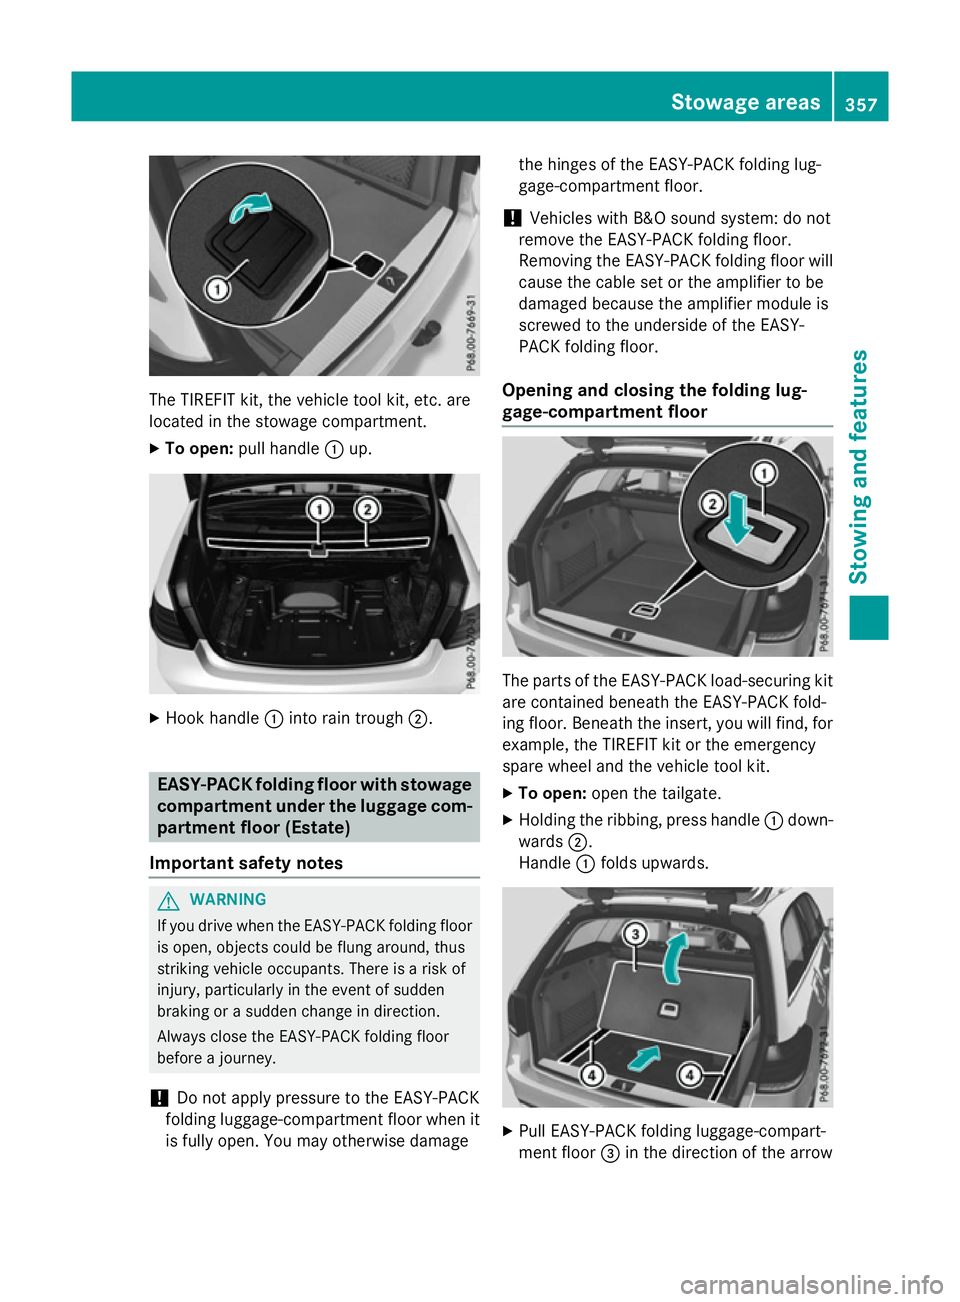
The TIREFIT kit, the vehicle tool kit, etc. are
located in the stowage compartment.
X To open: pull handle :up. X
Hook handle :into rain trough ;. EASY-PAC
Kfolding floor with stowage
compartment under the luggage com- partment floor (Estate)
Important safety notes G
WARNING
If you drive when the EASY-PACK folding floor is open, object scould be flung around, thus
striking vehicle occupants. There is arisk of
injury, particularly in the event of sudden
braking or asudden change in direction.
Always close the EASY-PACK folding floor
before ajourney.
! Do not apply pressure to the EASY-PACK
folding luggage-compartment floor when it is fully open. You may otherwise damage the hinges of the EASY-PACK folding lug-
gage-compartment floor.
! Vehicles with B&O sound system: do not
remove the EASY-PACK folding floor.
Removing the EASY-PACK folding floor will cause the cable set or the amplifier to be
damaged because the amplifier module is
screwed to the underside of the EASY-
PACK folding floor.
Opening and closing the folding lug-
gage-compartment floor The parts of the EASY-PACK load-securing kit
are contained beneath the EASY-PACK fold-
ing floor. Beneat hthe insert ,you will find, for
example, the TIREFIT kit or the emergency
spare wheel and the vehicle tool kit.
X To open: open the tailgate.
X Holding the ribbing, press handle :down-
wards ;.
Handle :folds upwards. X
Pull EASY-PACK folding luggage-compart-
ment floor =in the direction of the arrow Stowage areas
357Stowing and features Z
Page 361 of 497
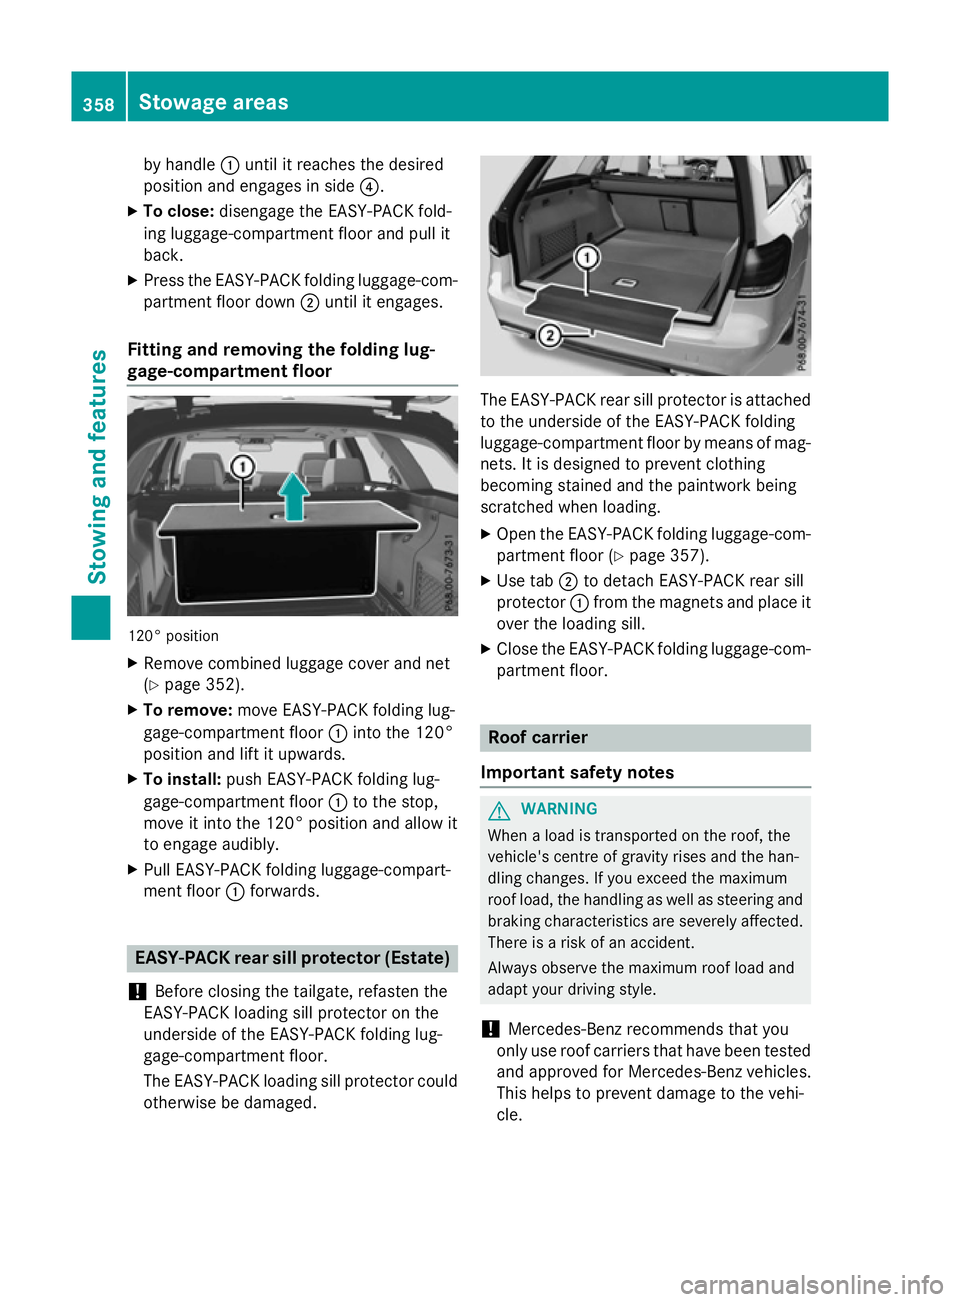
by handle
:until it reaches the desired
position and engages in side ?.
X To close: disengage the EASY-PACK fold-
ing luggage-compartment floor and pull it
back.
X Press the EASY-PACK folding luggage-com-
partment floor down ;until it engages.
Fitting and removing the folding lug-
gage-compartment floor 120
°position
X Remove combined luggage cover and net
(Y page 352).
X To remove: move EASY-PACK folding lug-
gage-compartment floor :intot he 120°
position and lift it upwards.
X To install: push EASY-PACK folding lug-
gage-compartment floor :to the stop,
move it int othe 120 °position and allow it
to engage audibly.
X Pull EASY-PACK folding luggage-compart-
ment floor :forwards. EASY-PACK rear sill protector (Estate)
! Befor
eclosin gthe tailgate, refasten the
EASY-PACK loading sill protector on the
underside of the EASY-PACK folding lug-
gage-compartment floor.
The EASY-PACK loading sill protector could
otherwise be damaged. The EASY-PACK rear sill protector is attached
to the underside of the EASY-PACK folding
luggage-compartment floor by means of mag-
nets. It is designed to preven tclothing
becomin gstained and the paintwor kbeing
scratched when loading.
X Open the EASY-PACK folding luggage-com-
partment floor (Y page 357).
X Use tab ;to detach EASY-PACK rear sill
protector :from the magnet sand place it
over the loading sill.
X Close the EASY-PACK folding luggage-com-
partment floor. Roof carrier
Importan tsafet ynotes G
WARNING
When aload is transported on the roof, the
vehicle's centre of gravit yrises and the han-
dling changes. If you exceed the maximum
roof load, the handling as well as steering and brakin gcharacteristics are severely affected.
There is arisk of an accident.
Always observe the maximum roof load and
adapt your drivin gstyle.
! Mercedes-Benz recommends that you
only use roof carrier sthat have been tested
and approved for Mercedes-Benz vehicles.
This helps to preven tdamage to the vehi-
cle. 358
Stowage areasStowing and features